
Popular categories
Looking for a yarn?


Comments / Questions (29)
![]() Michelle wrote:
Michelle wrote:
Hi. I would love to make this pattern,but in worsted weight yarn ,bernat premium yarn, Is there a pattern written for this yarn please? Thankyou.
10.01.2023 - 18:32
![]() Macarena wrote:
Macarena wrote:
Hola. ¿Cómo se teje el pliegue del cuello? Muchas gracias
10.06.2022 - 19:34DROPS Design answered:
Hola Macarena, puedes consultar el siguiente vídeo sobre cómo trabajar el pliegue del cuello: https://www.garnstudio.com/video.php?id=438&lang=es
16.06.2022 - 20:05
![]() Lynn wrote:
Lynn wrote:
Can I please have this pattern in English
18.05.2022 - 20:02DROPS Design answered:
Dear Lynn, sure, click on the scroll down menu below the photo and choose either English (UK/cm) or English (US/IN) as you like. Happy knitting!
19.05.2022 - 08:54
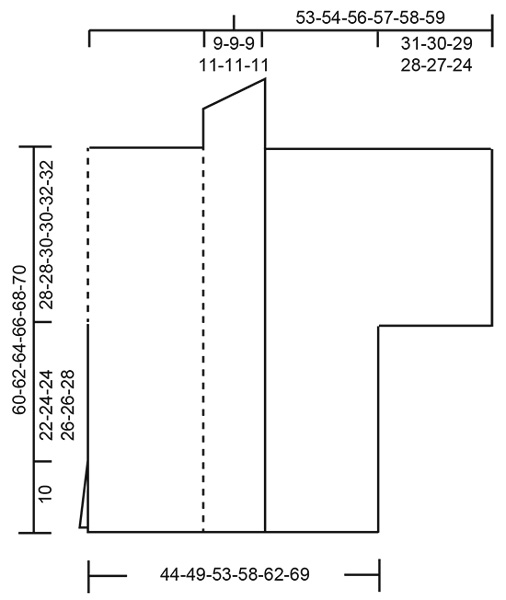
![]() Rose S wrote:
Rose S wrote:
Für mich ist die Frage, was stellt das Diagramm dar? Welche Seiten bzw. worauf beziehen sich die Größenangaben in cm , auf die gesamte Seite oder eine halbe Seite der Jacke.
20.01.2022 - 12:29DROPS Design answered:
Liebe Rose S, die untere Angaben sind für die gesamte Breite, die oberre (53... 59 cm für die Hälfte: von der Mitte Halsauschnnitt am Rückenteil bis zur Ende der Ärmel); die Angaben an der linken Seiten sind die Höhen. Hier lesen Sie noch mehr. Viel Spaß beim stricken!
20.01.2022 - 17:07
![]() Rose S wrote:
Rose S wrote:
Für mich ist das Diagramm unverständlich. Welchen Teil zeigt es? Nur die Hälfte d. Vorderseite? Die Maße darunter sind für 1/2 Seite (sprich jeweils re. u. li. Seite) oder insgesamt?
20.01.2022 - 12:27
![]() Helene wrote:
Helene wrote:
Jag förstår inte storleken . Tittar jag på ritningen ska koftan bara totalt 58 cm i min storlek men lägger jag upp 33 maskor med stickfasthet 9/10 cm blir ena framstycket 36 cm vilket skulle innebära att koftan blir 72 cm fram i nederkant??
13.10.2021 - 09:09DROPS Design answered:
Hej Helene, jo det stemmer, stykket mellem den stiplede linie og den hele linie midt på er dobbelt og ligger omlott :)
13.10.2021 - 09:42
![]() Silvia C wrote:
Silvia C wrote:
Bonjour. Pour le dos quand vous dites "En commençant sur l'endroit, tricoter les 44-45-46-46-47-48 mailles du devant gauche" vous entendez de relever les mailles du devant ? ou de travailler directement sur les mailles du devant? MERCI beaucoup :)
04.01.2021 - 03:13DROPS Design answered:
Bonjour Silvia, le dos se tricote de haut en bas, en continuant les mailles du devant gauche glissées en attente: reprenez simplement ces mailles et tricotez-les puis montez les mailles de l'encolure dos et tricotez ensuite les mailles du devant droit. Vos mailles n'avaient pas été rabattues mais mises en attente, reprenez-les simplement et tricotez-les pour former le premier rang du dos. Bon tricot!
05.01.2021 - 10:11
![]() Chantal Dicks wrote:
Chantal Dicks wrote:
Hi, I am confused. The instructions mention knitting a collar for the right & left front piece. There is no collar on the photo of the kimono cardigan.
14.07.2020 - 23:52DROPS Design answered:
Dear Mrs Dicks, this jacket has a collar shawl worked with short rows (to make it wider outwards than innwards) - see COLLAR RIGHT FRONT PIECE and COLLAR LEFT FRONT PIECE . Happy knitting!
15.07.2020 - 07:40
![]() Hajnal Szakal wrote:
Hajnal Szakal wrote:
Hej! Jag skulle sticka koftan till en 12 årig flicka, skulle ni kunna hjälpa mig med måttändringen? Hur skall jag tänka? Hon har 146/152 i storlek. Med vänlig hälsning Hajnal från Helsingborg
15.05.2020 - 07:15DROPS Design answered:
Hej, Den mindste størrelse er ikke så meget større end en stor børnestørrelse. Du finder målene nederst i mønsteret, så du let kan justere længde og ærmet om du synes det bliver for stort. God fornøjelse!
22.05.2020 - 12:18
![]() Aleksandra wrote:
Aleksandra wrote:
Dzień dobry! Nie rozumiem jak mam wykonać kołnierz. Wzięłam oczka z powrotem na druty, przerobiłam 1 ściągacz francuski ponad wszystkimi oczkami i następnie mam przerabiać ściągacz fr. ponad 9 pierwszymi oczkami - ale co wtedy z pozostałymi 3ma? Czy mają zostać na drucie? I czy nie powinno być tak, że co jakąś odległość zamykam oczka brzegowe, żeby ten kołnierz miał taką formę jak na schemacie? Bo z opisu wynika, że mam cały czas przerabiać tylko ponad 9 oczkami...
17.04.2020 - 11:17DROPS Design answered:
Witaj Aleksandro! Po przerobieniu 1 rzędui na lewej stronie robótki, teraz zaczynamy przerabiać rzędy skrócone: tj. *przerobić 1 ściągacz francuski (2 rzędy na prawo) ponad wszystkimi oczkami, 1 ściągacz francuski ponad 7-7-7-9-9-9 pierwszymi oczkami (2 rzędy na prawo tylko ponad 9 pierwszymi oczkami)*. W tej sposób długość brzegu kołnierza od środka przodu będzie większa, niż długość brzegu kołnierza od strony ramienia. Jak wykonać rzędy skrócone znajdziesz TUTAJ. Pozdrawiamy
20.04.2020 - 12:16
|
|
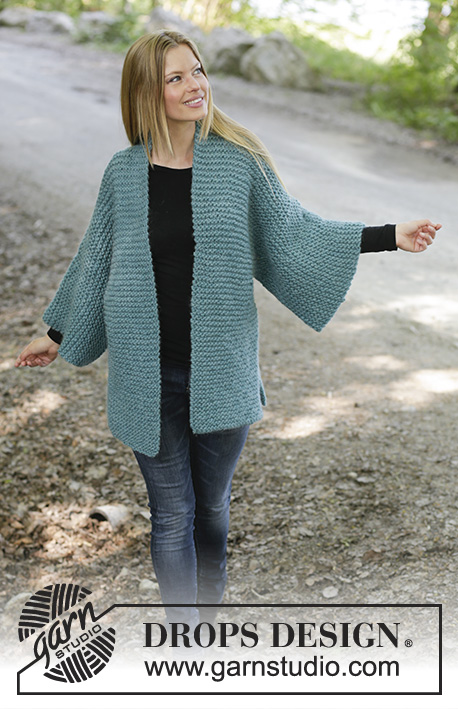
Emerald Isle#emeraldislejacket |
|
 |
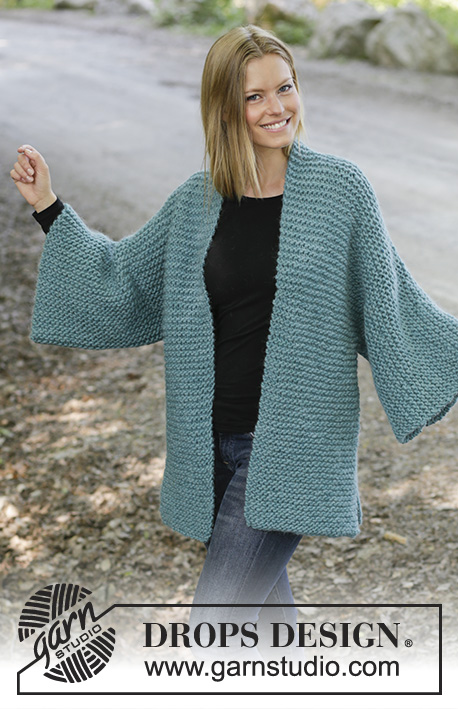 |
Knitted jacket in DROPS Snow. The piece is worked in garter stitch with shawl collar, split in sides and kimono sleeves. Sizes S - XXXL.
DROPS 196-41 |
|
|
EXPLANATIONS FOR THE PATTERN: ------------------------------------------------------- RIDGE/GARTER STITCH (worked back and forth): 1 ridge = Knit 2 rows. MEASURING TIP: Due to the weight of the yarn and the fact that you are working in garter stitch, always measure the piece when holding it up or the garment will be too long when worn. ------------------------------------------------------- START THE PIECE HERE: ------------------------------------------------------- JACKET - SHORT OVERVIEW OF THE PIECE: The front pieces are worked first, back and forth with circular needle. They are worked bottom up and new stitches are cast on for the sleeves in the sides. Then the front pieces are put together and you continue over the back piece from the top down. Using this method, there are no shoulder or sleeve seams. The piece is sewn together to finish, under the sleeves and down the sides. RIGHT FRONT PIECE: Cast on 26-28-30-33-35-38 stitches with circular needle size 10 mm and Snow. Work GARTER STITCH – read description above. REMEMBER THE KNITTING TENSION! When the piece measures 32-34-34-36-36-38 cm - read MEASURING TIP, cast on 28-27-26-25-24-22 new stitches at the end of the next row from the right side = 54-55-56-58-59-60 stitches. Continue with garter stitch until the piece measures 60-62-64-66-68-70 cm – adjust so that the next row is worked from the wrong side. Insert 1 marker on this row – this will be used to measure the length of the back piece. On the next row (from the right side) place the outermost 10-10-10-12-12-12 stitches towards mid front on a thread for collar, but to avoid cutting the strand you are using, work the stitches before placing them on the thread = 44-45-46-46-47-48 stitches left on needle for shoulder, work to end of row. Knit 3 rows back and forth over these stitches (the last row is worked from the wrong side) and then place these 44-45-46-46-47-48 stitches on 1 thread. Work collar and then left front piece as described below. COLLAR RIGHT FRONT PIECE: Place the 10-10-10-12-12-12 stitches from the thread mid front back on the needle. Start from the wrong side and knit 1 row. Then work garter stitch back and forth as follows: * Work 1 ridge back and forth over all stitches, work 1 ridge back and forth over the first 7-7-7-9-9-9 stitches *, work from *-* until the collar measures 6-6-6-7-7-7 cm at the narrowest part, but finish after 1 knitted row from the wrong side over all stitches. Cast off with knit from the right side or place the stitches on 1 thread. LEFT FRONT PIECE: Cast on 26-28-30-33-35-38 stitches with circular needle size 10 mm and work garter stitch. When the piece measures 32-34-34-36-36-38 cm cast on 28-27-26-25-24-22 new stitches at the end of the next row from the wrong side = 54-55-56-58-59-60 stitches. Continue with garter stitch until the piece measures 60-62-64-66-68-70 cm – adjust so that the next row is from the wrong side. Insert 1 marker on this row – this will be used to measure the length of the back piece. Knit 44-45-46-46-47-48 stitches from the right side and place the remaining 10-10-10-12-12-12 stitches towards mid front on 1 thread for collar. Knit 3 rows over these 44-45-46-46-47-48 stitches (the last row is worked from the wrong side) and then place the stitches on a thread. Work collar and then back piece as described below. COLLAR LEFT FRONT PIECE: Place the 10-10-10-12-12-12 stitches from the thread mid front back on the needle. Start from the right side and knit 1 row. Then work garter stitch back and forth as follows from the wrong side: * Work 1 ridge back and forth over all stitches, work 1 ridge back and forth over the first 7-7-7-9-9-9 stitches *, work from *-* until the collar measures 6-6-6-7-7-7 cm at the narrowest, but finish after 1 knitted row from the wrong side over all stitches. Cast off with knit from the right side or place the stitches on 1 thread. BACK PIECE: Start from the right side and knit over the 44-45-46-46-47-48 stitches from the left front piece, cast on 8-8-8-10-10-10 new stitches on the needle (= neck at back) and knit over the 44-45-46-46-47-48 stitches from the right front piece = 96-98-100-102-104-106 stitches on needle. Work garter stitch back and forth until the piece measures 28-28-30-30-32-32 cm from the markers inserted on the shoulders – remember MEASURING TIP. Cast off 28-27-26-25-24-22 stitches at the beginning of the next 2 rows = 40-44-48-52-56-62 stitches left on needle for the back piece. Continue with garter stitch until the piece measures 60-62-64-66-68-70 cm from the markers on the shoulders – adjust so that the front and back pieces are of equal length. Then loosely cast off from the right side. ASSEMBLY: Fold the piece double at the markers on the shoulders with the wrong side on the inside. Sew under arm and side seams in one go – the side seams are sewn in the outermost loop of the outermost stitch so that the seam is flat, but stop when you have 10 cm left (= split). Sew the collar together mid back inside the cast off edge - make sure the seam is towards the wrong side when the collar is folded down. If the stitches are on threads, sew the stitches together with grafting stitches. Sew the collar to the neck at the back. |
|
 |
|
Have you finished this pattern?Tag your pictures with #dropspattern #emeraldislejacket or submit them to the #dropsfan gallery. Do you need help with this pattern?You'll find 15 tutorial videos, a Comments/Questions area and more by visiting the pattern on garnstudio.com. © 1982-2026 DROPS Design A/S. We reserve all rights. This document, including all its sub-sections, has copyrights. Read more about what you can do with our patterns at the bottom of each pattern on our site. |
|


With over 40 years in knitting and crochet design, DROPS Design offers one of the most extensive collections of free patterns on the internet - translated to 17 languages. As of today we count 324 catalogues and 12290 patterns translated into English (UK/cm). 12290
We work hard to bring you the best knitting and crochet have to offer, inspiration and advice as well as great quality yarns at incredible prices! Would you like to use our patterns for other than personal use? You can read what you are allowed to do in the Copyright text at the bottom of all our patterns. Happy crafting!
Post a comment to pattern DROPS 196-41
We would love to hear what you have to say about this pattern!
If you want to leave a question, please make sure you select the correct category in the form below, to speed up the answering process. Required fields are marked *.