
Popular categories
Looking for a yarn?


Comments / Questions (5)
![]() Barb - Minnesota, The North Star State wrote:
Barb - Minnesota, The North Star State wrote:
I am ecstatic that I found your site! I can't find the type of slipper I want in any store & cannot find a pattern for felted slippers. In searching, I found your site & several patterns I want to try. And I'm going to make some of your felted mittens. I was also happy to see Amazon carries your yarn. I do have one question - when you felt in the washing machine, is the 40 degree temperature in Celsius or Fahrenheit? Thanks in advance & thank you for all your patterns. Barb S.
10.01.2025 - 20:29
![]() Catarina Nordström wrote:
Catarina Nordström wrote:
Kan jag byta ut Lima till Sky istället och göra dessa vantar? Det är samma garngrupp (B) och enligt er samma krympning på respektive garn.
12.11.2021 - 13:10DROPS Design answered:
Hei Catharina. Du kan bytte med DROPS Sky, mulig det vil få et litt ulikt resulatat enn DROPS Lima ettersom DROPS Sky ikke er et 100%ullgarn, men har noe polyamid i seg. mvh DROPS Design
15.11.2021 - 09:15
![]() Judy wrote:
Judy wrote:
Just a little confused on thumb increases....do you always do increases stitch before marker and stitch after or before the last increases and after....so far (and on 4th increases I have always done like how u explained the initial increase I.e. up to stitc marker inc. Then inc.after stitch marker....would this b right?
09.06.2019 - 13:36DROPS Design answered:
Dear Judy, when repeating the increases for thum, you should increase first before previous increase and after previous increase (= there are always 2 more stitches between the increases). Happy knitting!
11.06.2019 - 13:23
![]() Nancy wrote:
Nancy wrote:
Great explanation! Now I understand. Thanks
27.12.2018 - 21:34
![]() Nancy wrote:
Nancy wrote:
I do not understand the thumb increases. I have done mittens before but have never put a marker on the 22, 24, 26 stitch. Can you explain this differently so that I understand. Thanks, Nancy
25.12.2018 - 07:19DROPS Design answered:
Hi Nancy! You put the marker on the 22nd stitch (size S/M), on 24th stitch if you work size M/L or on the 26th stitch in the size L/XL. How to knit a thumb on a mitten you will find in the video HERE. Happy knitting!
27.12.2018 - 19:45
|
|
Polar Paws#polarpawsmittens |
|
 |
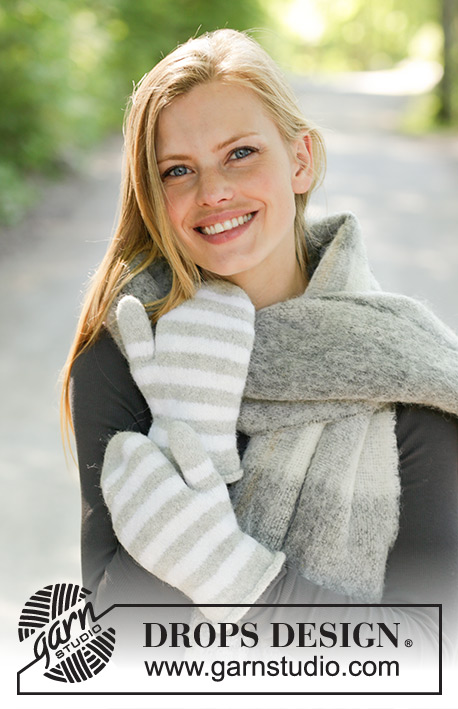 |
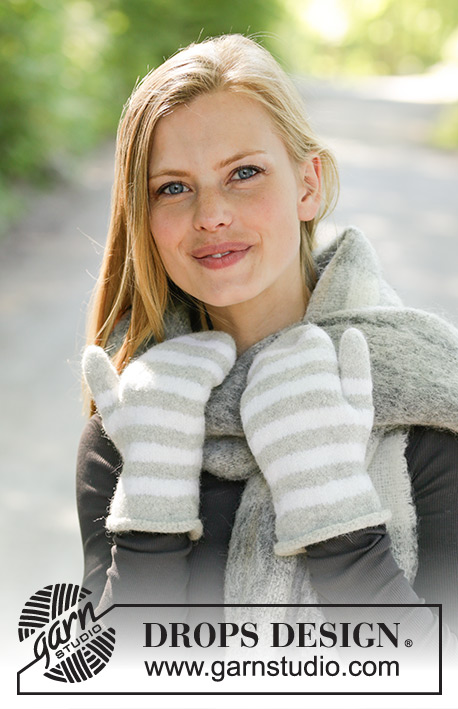
Knitted and felted mittens with stripes. The piece is worked in DROPS Lima.
DROPS 192-43 |
|
|
EXPLANATIONS FOR THE PATTERN: ------------------------------------------------------- STRIPES: * 6 rounds of pearl grey, 6 rounds of white*, work from *-*. INCREASE TIP: Increase 1 stitch by working 2 stitches in the same stitch. DECREASE TIP: Decrease before the marker as follows: Work until there are 2 stitches left before the marker, knit 2 together. Decrease after the marker as follows: Work as far as the marker, slip 1 stitch as if to knit, knit 1 and pass the slipped stitch over. ------------------------------------------------------- START THE PIECE HERE: ------------------------------------------------------- MITTEN - SHORT OVERVIEW OF THE PIECE: The piece is worked in the round with double pointed needles. You work from the wrist and up the hand. MITTEN: Cast on 56-60-60 stitches with double pointed needles size 4.5 mm and pearl grey. Work stocking stitch until the piece measures 3 cm, then work stocking stitch and STRIPES – see description above. AT THE SAME TIME on the next row decrease 4 stitches evenly on round (decrease by knitting 2 stitches together). Repeat the decrease every 1½ cm 2-2-1 more times = 44-48-52 stitches. REMEMBER THE KNITTING TENSION! When the piece measures approx. 8-8-7 cm insert 1 marker in the 22nd-24th-26th stitch on the round (= marks the thumb). Then increase 1 stitch on each side of the stitch with the marker, repeat this increase on the outside of the increased stitches every 4th round 5-6-7 more times - READ INCREASE TIP = 56-62-68 stitches. After the last increase, place the increased stitches + stitch with marker + 1 stitch on each side of these stitches on 1 thread for thumb = 15-17-19 thumb-stitches. Cast on 3 stitches behind the thumb-stitches = 44-48-52 stitches. The piece measures approx. 16-17-18 cm. Continue with stocking stitch in the round over these stitches. When the piece measures 12 cm from where you cast on stitches behind the thumb, insert 2 markers as follows: Insert 1 marker in the first stitch and the other marker in the 23rd-25th-27th stitch. On the next round, decrease 1 stitch before and after each marker - READ DECREASE TIP (= 4 stitches decreased). Repeat the decrease every 2nd round 3-4-5 more time, then continue with pearl grey and repeat the decrease every round 4 times = 12 stitches. Cut the strand and pull it through the remaining stitches, pull tight and fasten well. THUMB: The thumb is worked in the round with stocking stitch. Make sure the stripes match the rest of the piece. Place the 15-17-19 thumb-stitches on double pointed needles size 4.5 mm and knit up 3 stitches in the 3 increased stitches on the hand = 18-20-22 stitches. Continue until you have worked 1 stripe in each colour and then continue with pearl grey. When the thumb measures approx. 6-6½-7 cm decrease 3 stitches evenly on round (decrease by knitting 2 stitches together) = 15-17-19 stitches. Work 3 rounds. On the next round decrease 5-7-7 stitches evenly on round = 10-10-12 stitches. When the thumb measures 7½-8-8½ cm knit all stitches together 2 and 2 = 5-5-6 stitches. Cut the strand and pull it through the remaining stitches, pull tight and fasten well. Work the other mitten in the same way. FELTING: To avoid the thumb being felted to the mitten, turn it inside out and fasten a small plastic bag/silk ribbon over the top of the thumb with a safety pin. The opening of the safety pin should point towards the tip of the thumb so it is easy to remove after felting. Turn the mitten back to the right side, with the bag/ribbon inside the thumb. The piece can be felted either in the washing machine or the tumble dryer – read description below. Remember: Subsequent washes are as for a normal wool garment. IN WASHING MACHINE: Washing machines will vary when felting. If the piece is not felted enough, it can be felted again. If it is felted too much, it can be stretched to the correct size while still wet. DO THE FOLLOWING: Lay the piece in the washing machine and use a programme of approx. 40 minutes (not a wool programme). Wash at 40 degrees without pre-wash, detergent is optional. After washing, shape the piece while it is still wet. IN TUMBLE DRYER: Felting in a tumble dryer gives good control over the degree of felting. The tumble dryer can be opened during drying to check the size of the piece. If it is not felted enough it can be thoroughly wetted and felted again. If it is felted too much it can be stretched to the correct size while still wet. DO THE FOLLOWING: Lay the piece in water so it becomes completely wet, then place it in the tumble dryer and begin the drying process. Dry to the desired size, checking regularly. |
|
Have you finished this pattern?Tag your pictures with #dropspattern #polarpawsmittens or submit them to the #dropsfan gallery. Do you need help with this pattern?You'll find 13 tutorial videos, a Comments/Questions area and more by visiting the pattern on garnstudio.com. © 1982-2026 DROPS Design A/S. We reserve all rights. This document, including all its sub-sections, has copyrights. Read more about what you can do with our patterns at the bottom of each pattern on our site. |
|


With over 40 years in knitting and crochet design, DROPS Design offers one of the most extensive collections of free patterns on the internet - translated to 17 languages. As of today we count 324 catalogues and 12290 patterns translated into English (UK/cm). 12290
We work hard to bring you the best knitting and crochet have to offer, inspiration and advice as well as great quality yarns at incredible prices! Would you like to use our patterns for other than personal use? You can read what you are allowed to do in the Copyright text at the bottom of all our patterns. Happy crafting!
Post a comment to pattern DROPS 192-43
We would love to hear what you have to say about this pattern!
If you want to leave a question, please make sure you select the correct category in the form below, to speed up the answering process. Required fields are marked *.