
Popular categories
Looking for a yarn?


Comments / Questions (99)
![]() Ella wrote:
Ella wrote:
I really don't understand what is meant by "Continue A.1 over the 20-20-20-20-22-22 stitches in the pattern which remain on the front and back piece". There are 27 stitches in A.1. And what is meant by "Which remain on the front and back piece"?
19.02.2021 - 22:56DROPS Design answered:
Dear Ella, when dividing piece for sleeves there are some stitches for the raglan that still belong to the body, these stitches are worked following A.1 as before - this means you have either 20 or 22 (see size) in the pattern from yoke. Hope this helps. Happy knitting!
22.02.2021 - 07:31
![]() Lara wrote:
Lara wrote:
Buongiorno, un’altra domanda: nel davanti e dietro le 2 maglie insieme a diritto da ciascun lato del segno ai lati, si fa al centro delle nuove maglie per la manica? Grazie mille!
13.02.2021 - 13:27DROPS Design answered:
Buonasera Lara, le 2 maglie insieme a diritto vanno lavorate a livello dei segnapunti ai lati. Buon lavoro!
13.02.2021 - 18:59
![]() Jacquie wrote:
Jacquie wrote:
How can a complimentary comment be refused as too long if it is within the word limit.
05.02.2021 - 11:35
![]() Lara wrote:
Lara wrote:
Buonasera, per gli aumenti del raglan ho capito bene: si fa un gettato subito prima del diagramma e un gettato subito dopo? Quindi due gettati per ogni volta che eseguo il diagramma? Grazie infinite per l’aiuto.
01.02.2021 - 21:45DROPS Design answered:
Buonasera Lara, si esatto, 1 gettato prima e uno dopo il segnapunti. Buon lavoro!
01.02.2021 - 22:57
![]() Bianca wrote:
Bianca wrote:
Buonasera, quando si lavora il davanti e il dietro, non mi è chiara la diminuzione ,si mette il marcapunto anche prima e dopo le nuove maglie avviate per le maniche e si diminuisce (con 2 insieme a diritto) ai lati , fino a terminare il diagramma A1? Grazie
10.09.2020 - 21:55DROPS Design answered:
Buongiorno Bianca. Inserisce il marcapunto al centro delle maglie avviate e poi diminuisce prima e dopo questo segnapunti come spiegato nel paragrafo SUGGERIMENTO PER LE DIMINUZIONI (per le maniche). Buon lavoro!
11.09.2020 - 13:36
![]() Christelle wrote:
Christelle wrote:
Bonjour, comment je peux mettre des mailles en attente (manche) et en même temps "monter" des mailles ? merci pour vos explications
23.05.2020 - 18:12DROPS Design answered:
Bonjour Christelle, cette vidéo montre au time code 6:50 comment mettre les mailles des manches en attente sur un fil et comment monter les mailles sous la manche (time code 7:45 pour la 1ère manche) - vous retrouvez cette technique en photos dans cette leçon aux photos 10 à 14. Bon tricot!
25.05.2020 - 08:51
![]() Babs wrote:
Babs wrote:
I need to know whether or not to continue in the cable pattern when I divide the work into the sleeves section...In the directions, it's just before the BODY Section. I will put the sweater aside until I hear from you and work on another project. Thanks
22.05.2020 - 17:28DROPS Design answered:
Dear Babs, you continue working A.1 as before under body, but will now increase /decrease on each side as follows: increase before 1st A.1, work A.1, decrease mid under sleeve, A.1, increase. That way A.1 will by and by disappear on the sides. Happy knitting!
25.05.2020 - 07:42
![]() MONIKA wrote:
MONIKA wrote:
Bonjour, pour la partie dos/devant (taille L 232 mailles) pouvez vous me préciser le nombre de mailles à tricoter en jersey avant de commencer les 4 A1 ? ce n'est pas très clair pour moi, merci !!!!
22.05.2020 - 11:12DROPS Design answered:
Bonjour Monika, vous tricotez A.1 comme avant (les A.1 de l'empiècement continuent et vont se terminer sur les côtés avec des diminutions), vous avez donc exactement le même nombre de mailles dans chaque A1 sur les 232 mailles= au début du bas du pull après les emmanchures. Vous diminuez ensuite les mailles de A.1 via des diminutions au milieu sous les manches en même temps que vous augmentez le jersey avant/après les A.1 pour conserver le bon nombre de mailles. Bon tricot!
22.05.2020 - 12:30
![]() MARTINA wrote:
MARTINA wrote:
Désolée, je n'arrive pas à avancer, je suis perdue. Pour le dos/devant, taille L : il y a 53m (demi dos) + 74m (manche) + 10m augmentations + 106m (devant) + 74m (manche) + 10m augmentations + 53m (demis dos), ca fait 380m et non 360 ??
21.05.2020 - 19:28DROPS Design answered:
Bonjour Martina, les 10 mailles montées sous la manche vont remplacer les 74 mailles que l'on glisse en attente et que l'on reprendra après, vous avez ainsi: 53 m (dos), 74 m (manche), 106 m (devant), 74 m (manche), 53 m (dos) = 360 m puis 53 m (dos), 10 m (sous la manche), 106 m (devant), 10 m (sous la manche), 53 m (dos) = 232 m. Bon tricot!
22.05.2020 - 09:57
![]() Martina wrote:
Martina wrote:
Bonjour, j'en suis au dos/devant, format L, soit 232 mailles. vous dites qu'on va arriver à diminuer 3m des 8 torsades de 6m, donc ça veut dire qu'on a 4 fois le schéma A1, or moi, je n'ai que 3 fois A1?? Comment est ce possible ?
15.05.2020 - 17:10DROPS Design answered:
Bonjour Martina, vous devez effectivement avoir 4 fois A.1, 2 fois sous chaque manche: chaque A.1 tricoté sur l'empiècement: 2 pour le devant et 2 pour le dos. Bon tricot!
18.05.2020 - 06:51
|
|||||||||||||||||||
Arendal#arendalsweater |
|||||||||||||||||||
 |
 |
||||||||||||||||||
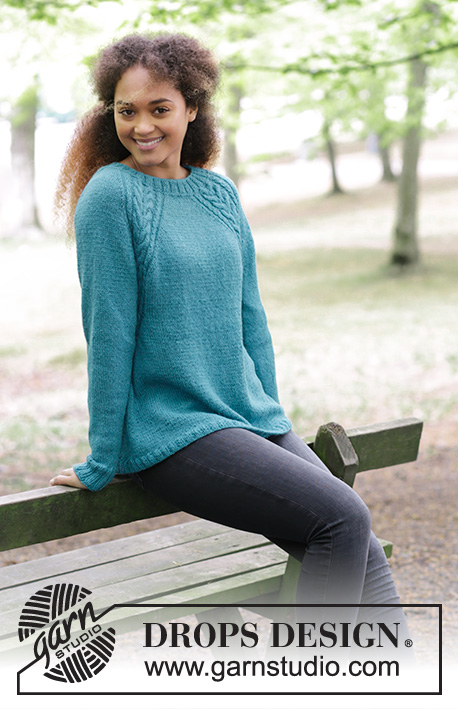
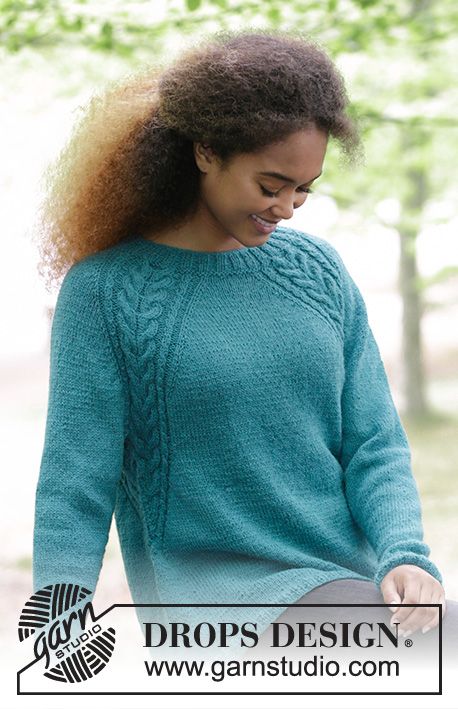
Knitted jumper with cables and raglan, worked top down. Sizes S - XXXL. The piece is worked in DROPS Puna.
DROPS 181-7 |
|||||||||||||||||||
|
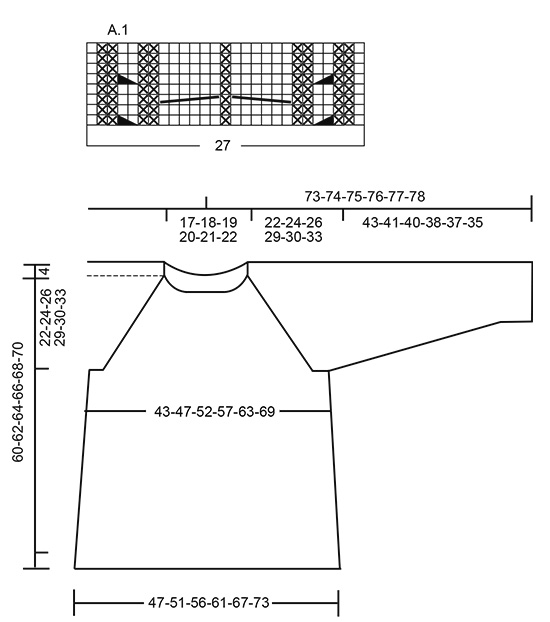
INFORMATION FOR THE PATTERN: RIDGE/GARTER STITCH (worked in the round): 1 ridge = 2 rounds. Knit 1 round and purl 1 round. PATTERN: See diagram A.1. The diagram shows all the rows in the pattern seen from the right side. RAGLAN: Increase to raglan on each side of A.1. Increase 1 stitch on each side of A.1 as follows (= 8 new stitches each time you increase). Work to A.1, 1 yarn over, work A.1, 1 yarn over. On the next round knit the yarn overs twisted to prevent holes. INCREASE TIP (for the sides): Work until there are 2 stitches left before the marker thread in the side. Make 1 yarn over, knit 2 stitches (the marker thread sits between these) and make 1 yarn over. On the next round, knit the yarn overs twisted to prevent holes. DECREASE TIP (for the sleeves): Decrease 1 stitch on each side of the marker thread as follows: Work until there are 3 stitches left before the marker thread, slip 1 stitch as if to knit, knit 1, pass the slipped stitch over, knit 2 stitches (the marker thread sits between these stitches), knit the next 2 stitches together. ---------------------------------------------------------- The jumper is worked in the round with circular needle, from mid back and top down. JUMPER: Cast on 112-120-124-128-136-136 stitches with circular needle size 4 mm and Puna. Knit 1 round, then work rib, knit 2/ purl 2. Continue with rib in this way for 4 cm. Change to circular needle size 4.5 mm. Work 1 RIDGE – see description above, on the first round, decrease 4 stitches evenly on round = 108-116-120-124-132-132 stitches. Continue working as follows: Knit 11-12-13-15-16-18, *1 yarn over, knit 1 *, repeat from *-* a total of 3 times, knit 1, * 1 yarn over, knit 1 *, repeat from *-* a total of 3 times (= these 7 stitches become 13 stitches), knit 18-20-20-18-20-16, *1 yarn over, knit 1 *, repeat from *-* a total of 3 times, knit 1, * 1 yarn over, knit 1 *, repeat from *-* a total of 3 times, knit 22-24-26-30-32-36, * 1 yarn over, knit 1 *, repeat from *-* a total of 3 times, knit 1, * 1 yarn over, knit 1 *, repeat from *-* a total of 3 times, knit 18-20-20-18-20-16, *1 yarn over, knit 1 *, repeat from *-* a total of 3 times, knit 1, * 1 yarn over, knit 1 *, repeat from *-* a total of 3 times and knit 11-12-13-15-16-18 = 132-140-144-148-156-156 stitches. Knit 1 round, the yarn overs are knitted twisted to prevent holes. Continue working as follows: Knit 4-5-6-8-9-11 (= half back piece), A.1 (= 27 stitches), knit 4-6-6-4-6-2 (=sleeve), A.1, knit 8-10-12-16-18-22 (= front piece), A1, knit 4-6-6-4-6-2 (= sleeve), A.1, knit 4-5-6-8-9-11 (= half back piece). READ THE WHOLE OF THE NEXT SECTION BEFORE CONTINUING! Continue this pattern, at the same time increase on each side of A.1 to RAGLAN – see description above. Increase every 2nd round 21-24-27-30-32-35 times. REMEMBER THE KNITTING TENSION! After all the increases, there are 300-332-360-388-412-436 stitches on the needle. Continue the pattern as before (without increases) until the piece measures 22-24-26-29-30-33 cm from the cast-on edge mid front. The next round is worked as follows: Work 45-49-53-58-63-68 stitches (= half back piece), place the next 60-68-74-78-80-82 stitches on 1 thread (= sleeve), cast on 8-8-10-10-12-14 new stitches on the needle (= under the sleeve), work 90-98-106-116-126-136 stitches (= front piece), place the next 60-68-74-78-80-82 stitches on 1 thread (= sleeve), cast on 8-8-10-10-12-14 new stitches on the needle (= under the sleeve) and work the remaining 45-49-53-58-63-68 stitches (= half back piece). BODY: = 196-212-232-252-276-300 stitches. THE PIECE IS NOW MEASURED FROM HERE! Insert a marker thread in each side, in the middle of the new stitches that where cast on. Continue A.1 over the 20-20-20-20-22-22 stitches in the pattern which remain on the front and back piece, but on every 2nd round, make 1 yarn over on the outside of each A.1 (= towards mid front and mid back) and knit 2 stitches together on each side of marker thread in the side. The yarn overs are knitted twisted on the next round. The number of stitches is the same, but the stitches in A.1 will gradually be decreased towards the sides of the jumper and there will be more and more stitches in stocking stitch. When there are not enough stitches in A.1 to work 6-stitch cables, work these stitches in stocking stitch, AT THE SAME TIME as you decrease 3 stitches evenly over the cable, do not decrease over the cables with 2 stitches (remember to increase on the outsides of A.1 and decrease on each side of the marker threads). When all of A.1 has been decreased there are 172-188-208-228-252-276 stitches on the round. Continue with stocking stitch. When the piece measures 15-15-15-15-15-15 cm increase 1 stitch on each side of the marker threads (= 4 stitches increased) – READ INCREASE TIP! Increase every 5 cm a total of 4 times = 188-204-224-244-268-292 stitches. When the piece measures 34-34-34-34-34-34 cm increase 40-44-48-52-56-60 stitches evenly on round = 228-248-272-296-324-352 stitches. Change to circular needle size 4 mm. Work rib, knit 2/ purl 2. Work rib for 2 cm, cast off with knit over knit and purl over purl. The jumper measures approx. 60-62-64-66-68-70 cm from the shoulder. SLEEVE: The piece is worked in the round with circular needle/double pointed needles. Place the 60-68-74-78-80-82 stitches from the thread in the one side of the piece on a short circular needle size 4.5 mm. In addition, cast on 8-8-10-10-12-14 new stitches mid under the sleeve = 68-76-84-88-92-96 stitches on the needle. Insert a marker thread in the middle of these new stitches – The piece is now measured from here! Work stocking stitch in the round. When the piece measures 2-2-2-2-2-4 cm decrease 2 stitches mid under the sleeve – READ DECREASE TIP. Decrease every 3-2-1½-1½-1½-1 cm a total of 12-15-18-19-20-21 times = 44-46-48-50-52-54 stitches. When the sleeve measures 38-36-35-33-32-30 cm increase 4-6-8-6-8-10 stitches evenly on round = 48-52-56-56-60-64 stitches. Change to double pointed needles size 4 mm and work rib, knit 2/ purl 2 over all stitches. Cast off when the sleeve measures 43-41-40-38-37-35 cm. Work the other sleeve in the same way. ASSEMBLY: Sew the openings under the sleeves. |
|||||||||||||||||||
Diagram explanations |
|||||||||||||||||||
|
|||||||||||||||||||
 |
|||||||||||||||||||
Have you finished this pattern?Tag your pictures with #dropspattern #arendalsweater or submit them to the #dropsfan gallery. Do you need help with this pattern?You'll find 31 tutorial videos, a Comments/Questions area and more by visiting the pattern on garnstudio.com. © 1982-2026 DROPS Design A/S. We reserve all rights. This document, including all its sub-sections, has copyrights. Read more about what you can do with our patterns at the bottom of each pattern on our site. |
|||||||||||||||||||


With over 40 years in knitting and crochet design, DROPS Design offers one of the most extensive collections of free patterns on the internet - translated to 17 languages. As of today we count 324 catalogues and 12290 patterns translated into English (UK/cm). 12290
We work hard to bring you the best knitting and crochet have to offer, inspiration and advice as well as great quality yarns at incredible prices! Would you like to use our patterns for other than personal use? You can read what you are allowed to do in the Copyright text at the bottom of all our patterns. Happy crafting!
Post a comment to pattern DROPS 181-7
We would love to hear what you have to say about this pattern!
If you want to leave a question, please make sure you select the correct category in the form below, to speed up the answering process. Required fields are marked *.