
Popular categories
Looking for a yarn?


Comments / Questions (13)
![]() Jette Etly wrote:
Jette Etly wrote:
Findes opskriften ikke som beskrevet i stedet for diagram?
10.01.2026 - 21:54DROPS Design answered:
Hei Jette. Oppskriften er skrevet slik du ser den på hjemmesiden, både tekst og diagram (men ikke egen tekst om hvordan man strikker diagrammene). mvh DROPS Design
26.01.2026 - 12:00
![]() Gerie Vreeswijk wrote:
Gerie Vreeswijk wrote:
Vraag over hoe haak je dit vest wat is verschil tussen tekening A 2d en Ab2 en A 2c b.v.b.dank gr. Gerie
14.01.2025 - 19:14DROPS Design answered:
Dag Gerie,
A.2c herhaal je steeds en A.2b en A.2d haak je alleen aan het begin einde van de toer (zie uitleg in patroon) In teltekening A.2c zie je bijvoorbeeld in de tweede toer een stokje staan aan het begin en in A.2b niet. In telpatroon A.2c zie je in de eerste toer een losse extra staan. (p.s.: De toer met het sterretje ervoor is niet de eerste toer maar is er alleen in getekend zodat je kunt zien hoe de steken in de toer ervoor gehaakt moeten worden.
14.01.2025 - 20:33
![]() Yrsa Saranpää wrote:
Yrsa Saranpää wrote:
Det lyckas att virka utan att ta av garnet om man virkar 2 varv från avan, 2 varv från rätan...
07.07.2023 - 11:08
![]() Yrsa Saranpää wrote:
Yrsa Saranpää wrote:
Hej, jag har nu kommit till framstyckena. Vad jag förstår när man virkar ett varv i taget så måste man ju efter varje varv ta av garnet och börja på nytt i motsatta hörnet eftersom man virkar fram och tillbaks med 2 garn. Eller har jag missat nåt knep? Blir en massa ändor att fästa..
06.07.2023 - 15:35DROPS Design answered:
Hej Yrsa, ... går det at virka fra den side hvor du har garnet?
07.07.2023 - 10:47
![]() Yrsa Saranpää wrote:
Yrsa Saranpää wrote:
... jo nu ser jag.. stjärnan betyder ju att det varvet är virkat.. tack nu kan jag fortsätta :)
21.06.2023 - 21:39
![]() Yrsa Saranpää wrote:
Yrsa Saranpää wrote:
Undrar om det skall vara en luftmaska mellan alla stolpar som man virkar på det första varvet runt de 9 rygglapparna? Eftersom sedan först randningsvarvet skall vara stolpar med märkning " runt luftmaskan/bågen/ringen och inte " stolpe i stolpe? .... eller nu ser jag ett annat alternativ.. är först randningsvarvet den andra raden på mönstret?
21.06.2023 - 21:30
![]() Kristin wrote:
Kristin wrote:
Ik heb de vierkantjes aan elkaar gehaakt zoals beschrijving, zo heb ik boordje van ons 1cm tussen de vierkanten. Als ik dan rondom haak zou ik volgens de beschrijving 23 stokjes haken in de vierkanten en 1 stokje tussen de vierkanten? dit is te weinig 1 stokje tussen de vierkanten, het werk gaat trekken dan?
23.03.2023 - 17:13DROPS Design answered:
Dag Kristin,
Toch is het de bedoeling om 1 stokje te haken tussen de vierkanten, zodat je daarna uitkomt met het aantal steken om het werk te kunnen vervolgen. Vaak trekt het werk wel bij na verloop van tijd, maar als het echt te strak zit zou je kunnen kijken of je met een dikkere naald kunt werken.
24.03.2023 - 19:30
![]() Kristin wrote:
Kristin wrote:
Na het haken van de vierkanten heb ik rondom een rij stokjes gehaakt. Dan telpatroon A.2a in de hoek om de vossenlus maar dan loop ik vast: telpatroon A.2b kan ik niet lezen. Volgens mijn 2 stokjes om de lossenlus?? maar ik heb geen vossenlus, enkel stokjes. Na de 3 stokjes staat er niets?? moeten hier lossen gehaakt worden? zo ja hoeveel? idem telpatroon A.2c
23.03.2023 - 11:44DROPS Design answered:
Dag Kristin,
De eerste toer van A.2 is al gehaakt, dus je begint met het lezen van de tweede toer, dus de toer waar je de streepjes met zwartje vierkantje ziet. Je haakt dus steeds afwisselend 1 losse, 3 steken overslaan en 3 stokjes tussen 2 steken van de vorige toer.
08.05.2023 - 21:04
![]() Natasha Cole wrote:
Natasha Cole wrote:
Why do you have to write your patterns in such a way that it is impossible to understand beats me. I have finished joining my squares at the back but the rest of the instructions are meaningless to me.
31.03.2020 - 21:14DROPS Design answered:
Dear Mrs Cole, after square are joined, you will work around all squares and crochet now diagram A.2 shaping armholes - see your size. Armholes are simply worked by skipping stitches replace by chains, there is then a hole = armhole where sleeves will be then worked later from (and top down). You continue then working the large square and continue each front piece separately in rows - see also measurement chart. Hope this can help, but do not hesitate to contact your DROPS store for any further individual assistance, even per mail or telephone. Happy crocheting!
01.04.2020 - 08:45
![]() Whitehouse wrote:
Whitehouse wrote:
Bonjour, Pouvez vous m’expliquer comment vous obtenez le même nombre de mailles de chaque côté des emmanchure sachant que vous terminez la première emmanchure en bas avec A2d qui compte 6 brides et que vous commencez la deuxième emmanchure par le bas avec A2b qui compte 3 brides. Cela m’occasionne un décalage premièrement de trois brides entre l’emmanchure gauche et droite mais aussi un décalage de 25 motifs à gauche et 24 à droite au deuxième tour. Merci de m’aider
17.09.2019 - 15:25DROPS Design answered:
Bonjour Mme Whitehouse, vous sautez le même nombre de mailles pour chacune des emmanchures, vous aurez donc le même nombre de motifs le long de chaque côté du carré et au-dessus des chaînettes des emmanchures. Bon crochet!
17.09.2019 - 15:48
|
|||||||||||||||||||||||||||||||||||||
Escapade#escapadejacket |
|||||||||||||||||||||||||||||||||||||
 |
 |
||||||||||||||||||||||||||||||||||||
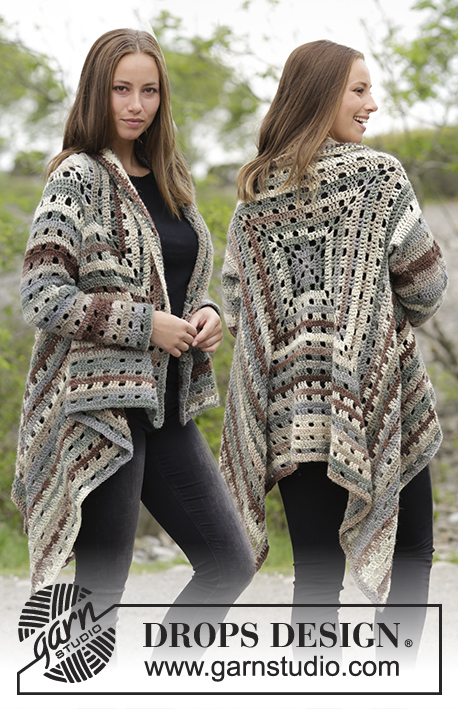
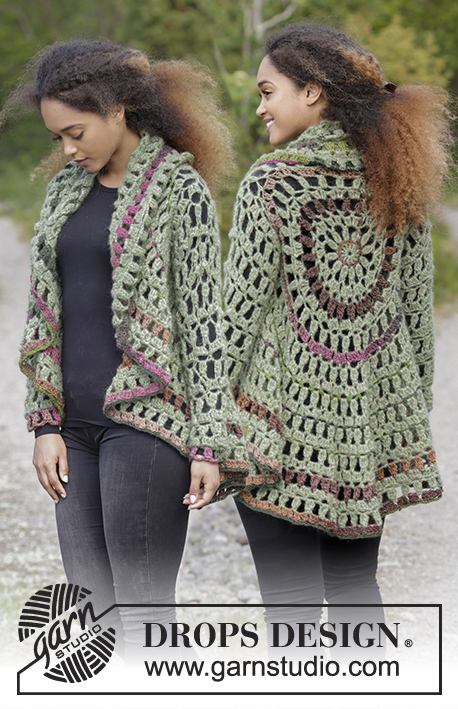
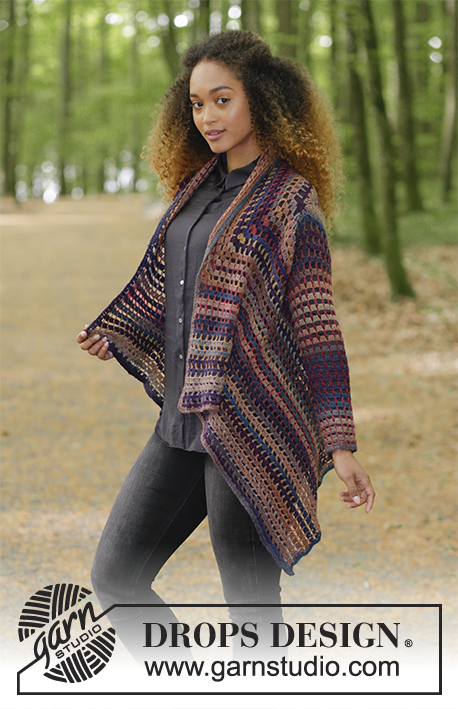
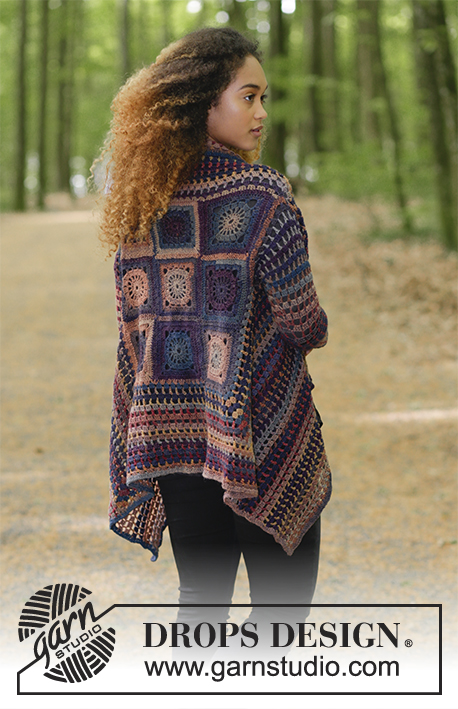
Jacket with crochet squares in the back, worked in the round from the back. Size: S - XXXL Piece is crocheted in DROPS Delight.
DROPS 180-31 |
|||||||||||||||||||||||||||||||||||||
|
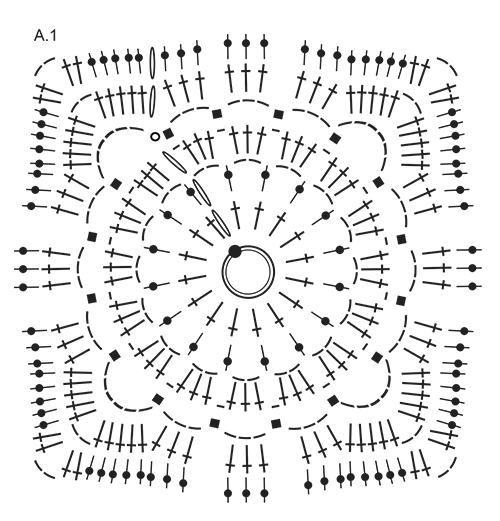
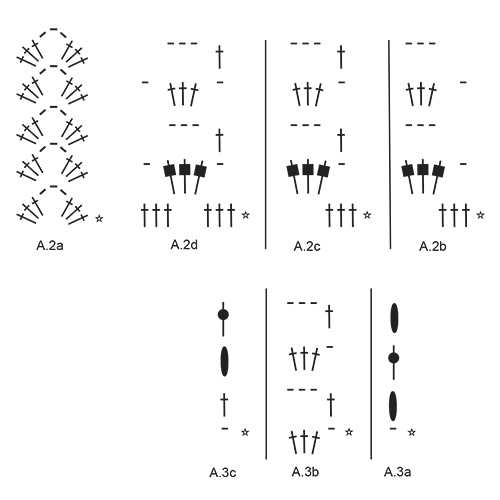
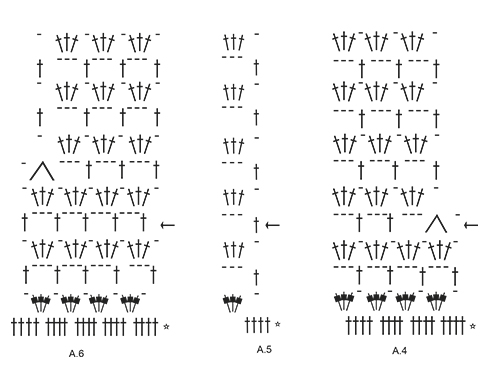
INFORMATION FOR PATTERN: PATTERN: See diagrams A.1 to A.6. CROCHET INFORMATION: Begin every round with treble crochets with 3 chain stitches and finish with 1 slip stitch in 3rd chain stitch at beginning of round (These 3 chain stitches do not replace first treble crochet on round.) STRIPES: Work 1 round/row with autumn forest (applies to rounds/rows with 3 treble crochets + 1 chain stitch in diagram A.2-A.6). Work 1 round/row with raspberry cake (applies to rounds/rows with 3 chain stitches + 1 treble crochet in diagram A.2-A.6). Repeat these 2 rounds/rows the rest of piece. TIP FOR CHANGING YARN: To make the colour transitions in Delight pretty when switching ball, it is important to find a ball that starts with the same colour last ball ended with. ---------------------------------------------------------- JACKET: Work 9 crochet squares before sewing them together into a square back piece. Then work around this square and skip stitches for armholes. Then work back and forth for front pieces. Finish by working the sleeves in the round. CROCHET SQUARE: Work 6 chain stitches on hook size 4 mm with autumn forest and form a ring with 1 slip stitch in first chain stitch. Then work PATTERN in the round according to diagram A.1. REMEMBER THE CROCHET TENSION! Read TIP FOR CHANGING YARN! 1 crochet square should measure 12 x 12 cm. Work 9 crochet squares in total. ASSEMBLY OF CROCHET SQUARES: Place the squares with 3 squares in width and 3 squares in height. Crochet squares together alongside and then across as follows: Place 2 squares together wrong side against wrong side and work together from right side: * 1 double crochet in corner of first square, 1 chain stitch, 1 double crochet in corner of next square, 1 chain stitch, 1 double crochet in next stitch on first square, 1 chain stitch, 1 double crochet in next stitch on second square, 1 chain stitch, 1 double crochet in next stitch on first square, 1 chain stitch, 1 double crochet in next stitch on second square *, work from *-* but in transitions between each set of squares work 1 chain stitch. Work the all the squares together in this way. NOTE! Make sure that the transitions between every square are pretty when the squares are worked together alongside. Fasten off. NOTE! Insert 1 marker thread in outer row in piece, NOW MEASURE PIECE FROM HERE. Then work 1 round with treble crochets around the entire square as follows - start at the top in the right corner (= 1st corner = see chart). Work 1 double crochet around chain space in corner, 3 chain stitches - read CROCHET INFORMATION, 2 treble crochets + 2 chain stitches + 2 treble crochets around same chain space, then work 1 treble crochet in each of the 23 treble crochets on every square + 1 treble crochet between each square at the top of back piece = 75 treble crochets along each side with 2 chain stitches in each corner. Continue around the square back piece in the different sizes as follows: Size S/M: Work STRIPES - see explanation above and work from 1st corner as follows: ROUND 1: Work A.2a around chain space in corner, A.2b over the next 3 treble crochets, A.2c until 6 treble crochets remain before next corner, A.2d over the next 6 treble crochets, A.2a around chain space in next corner. Work 42 loose chain stitches and skip 42 treble crochets (= armhole), work A.2c over the next 27 treble crochets, A.2d, A.2a around chain space in corner, A.2b, A.2c until 6 treble crochets remain before next corner, A.2d, A.2a around chain space in corner, A.2b, A.2c over the next 27 treble crochets, work 42 loose chain stitches (= armhole), skip 42 treble crochets, finish round with 1 slip stitch in 3rd chain stitch at beginning of round. ROUND 2: Work next round in diagrams the same way, but work 14 repetitions A.2c around chain stitch row for armhole in each side. There are now room for 24 repetitions A.2c + A.2b and A.2d, along each side of square, and A.2a in each corner. Continue until diagrams have been worked vertically, then repeat the last 2 rounds in diagram A.2a, A.2b, A.2c and A.2d until piece measures 20 cm – finish after a repetition with 3 treble crochets + 1 chain stitch! Cut the yarn. Then work FRONT PIECE - see explanation below. Size L, XL, XXL and XXXL: Work STRIPES - see explanation above and work from 1st corner as follows: * Work A.2a around chain space in corner, A.2b over the next 3 treble crochets, A.2c until 6 treble crochets remain before next corner, A.2d over the next 6 treble crochets *, work from *-* for the rest of the round. When 2 rounds have been worked, size L and XL are done. When 4 rounds have been worked, size XXL and XXXL are done. Then repeat the last 2 rounds in diagram A.2a, A.2b, A.2c and A.2d and work armhole as follows: ROUND 1: Work A.2a around chain space in 1st corner, A.2b, A.2c until 6 treble crochets before next corner, A.2d, A.2a around chain space in next corner. Work 45-45-48-51 loose chain stitches and skip 45-45-48-51 treble crochets (= armhole), work A.2c over the next 36-36-45-42 treble crochets, A.2d, A.2a around chain space in corner, A.2b, A.2c until 6 treble crochets remain before next corner, A.2d, A.2a around chain space in corner, A.2b, A.2c over the next 36-36-45-42 treble crochets, work 45-45-48-51 loose chain stitches, skip 45-45-48-51 treble crochets (= armhole), finish round with 1 slip stitch in 3rd chain stitch at beginning of round. ROUND 2: Work next round in diagrams the same way, but work 15-15-16-17 repetitions A.2c around chain stitch row for armhole in each side. Continue by repeating the last 2 rounds in diagram A.2a, A.2b, A.2c and A.2d until piece measures 20 cm – finish after a repetition with 3 treble crochets + 1 chain stitch! Cut the yarn. Then work FRONT PIECE - see explanation below. ALL SIZES: FRONT PIECES: Work front pieces back and forth seperatly. Continue stripes as before. Begin from wrong side and fasten strand with 1 double crochet around chain space in 1st corner - see star on chart! Work A.3a around chain space (show how row begins and ends), A.3b until 4th corner, work A.3c around chain space in corner (shows how row begins and ends). Continue like this back and forth. When diagrams have been worked vertically, repeat the 2 last rows in diagram until front piece measures 24-26-27-28-29 cm - finish after a row as last row in diagrams! Fasten off. Repeat on the other side the same way but now work back and forth from 3rd to 2nd corner - see chart! Finish with a round treble crochet around entire jacket: Work 1 treble crochet in every treble crochet / 1 treble crochet around every chain space (3 treble crochets, 1 chain stitch, 3 treble crochets), in the outermost treble crochet in each of the four corners. Fasten off. SLEEVES: Work sleeve in the round from armhole. Remember CROCHET INFORMATION! Insert a marker under armhole. NOW MEASURE PIECE FROM HERE! Beginning of round is here! Begin by working 84-92-92-96-104 treble crochets evenly around the opening for sleeve with raspberry cake. Continue in the round with stripes as before and pattern as follows: Work A.4 over the first 16 treble crochets, work A.5 over the next 48-56-56-60-68 treble crochets, work A.6 over the last 20 treble crochets. Continue like this in the round. When diagrams have been worked vertically, 1 decrease has been done on each side of marker thread. Then repeat pattern from row marked with arrow in diagram 3-4-4-3-4 more times vertically (= 4-5-5-4-5 decreases on each side of marker thread). Continue with pattern the same way without decreasing until sleeve measures 54 cm – finish after a round as last round in A.4-A.6. Fasten off. Work the other sleeve the same way. |
|||||||||||||||||||||||||||||||||||||
Diagram explanations |
|||||||||||||||||||||||||||||||||||||
|
|||||||||||||||||||||||||||||||||||||
 |
|||||||||||||||||||||||||||||||||||||
 |
|||||||||||||||||||||||||||||||||||||
 |
|||||||||||||||||||||||||||||||||||||
 |
|||||||||||||||||||||||||||||||||||||
Have you finished this pattern?Tag your pictures with #dropspattern #escapadejacket or submit them to the #dropsfan gallery. Do you need help with this pattern?You'll find 12 tutorial videos, a Comments/Questions area and more by visiting the pattern on garnstudio.com. © 1982-2026 DROPS Design A/S. We reserve all rights. This document, including all its sub-sections, has copyrights. Read more about what you can do with our patterns at the bottom of each pattern on our site. |
|||||||||||||||||||||||||||||||||||||


With over 40 years in knitting and crochet design, DROPS Design offers one of the most extensive collections of free patterns on the internet - translated to 17 languages. As of today we count 324 catalogues and 12290 patterns translated into English (UK/cm). 12290
We work hard to bring you the best knitting and crochet have to offer, inspiration and advice as well as great quality yarns at incredible prices! Would you like to use our patterns for other than personal use? You can read what you are allowed to do in the Copyright text at the bottom of all our patterns. Happy crafting!
Post a comment to pattern DROPS 180-31
We would love to hear what you have to say about this pattern!
If you want to leave a question, please make sure you select the correct category in the form below, to speed up the answering process. Required fields are marked *.