Comments / Questions (12)
![]() Donna wrote:
Donna wrote:
Please explain how to continue with the new loose chain for the shoulder. Do I turn and work the pattern in the loose chain or cut thread to begin from the other end to start the pattern there and continue the row in the loose chain?
01.07.2025 - 15:18DROPS Design answered:
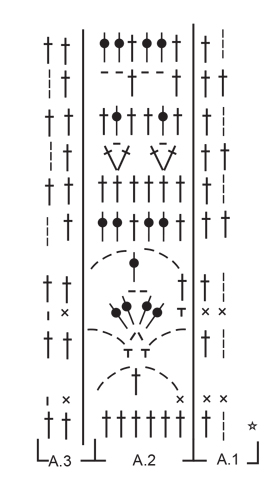
Dear Donna, in this video we show how to increase on the side crocheting several chains, then you just turn and work the next row in pattern as described for your size: starting with A.3, then repeating A.2 as before and end with A.1, and from RS: start with A.1, repeat A.2 and end with A.3. Happy crocheting!
04.07.2025 - 11:32
![]() Kate Reed wrote:
Kate Reed wrote:
Where's the sizing information, I can't find it at the bottom
05.10.2020 - 13:41DROPS Design answered:
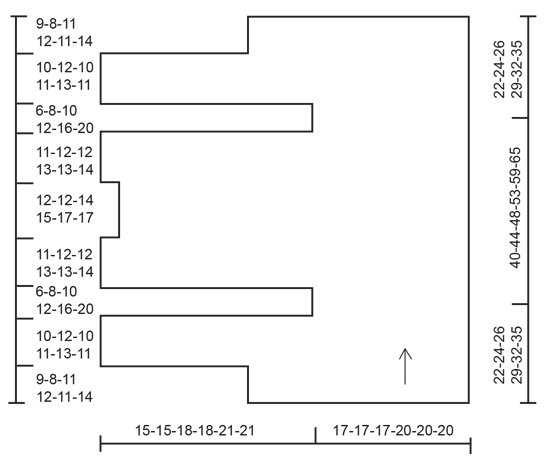
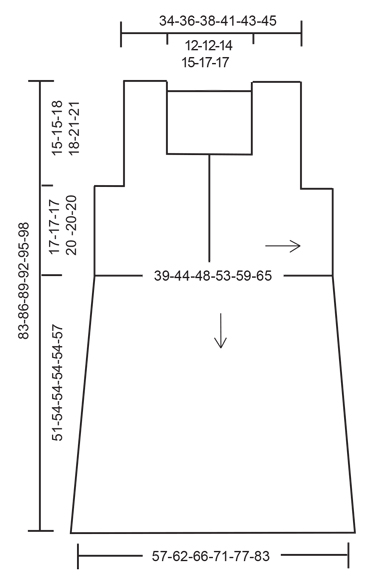
Dear Mrs Reed, you will find all measurement in the bottom chart - the first chart describes the top piece worked in rows, the bottom chat shows all measurements for piece measured flat. Read more about measurements here. Happy crocheting!
05.10.2020 - 15:54
![]() Jeannine Meeus wrote:
Jeannine Meeus wrote:
Hallo ik heb een vraag over de haak steken van patroon DROPS EXTRA 0-1284 ik weet niet hoe ik een vaste steek om de lossen moet doen een stokje om een lossen moet doen ik heb dat nog nooit zo steken gezien of gedaan dat zou ik graag weten anders kan ik niet voort aan mijn jurk doen ik hoop dat je mij kan helpen Dank u groetjes Jeannine,
25.09.2020 - 11:46DROPS Design answered:
Dag Jeannine,
Bij de relevante video's die bij het patroon staan, staat ook een video over wat het verschil is tussen OM de steek of IN de steek haken. Hopelijk heb je hier wat aan. Succes!
10.10.2020 - 11:19
![]() Victoria Amundsen wrote:
Victoria Amundsen wrote:
Beg. av arb, etter 2 rader med 1 st i hver st: Skal man følge diag. opp omg for omg, og etter hver omg snu arb. og begynne på raden over, snu arb, ny omg osv? Men da passer ikke omg. i hverandre. F eks etter å ha avsluttet omgang 2 (ikke medregnet stavene nederst, som ikke tilhører selve diagrammet), snur jeg arb. Da er lm jeg avsluttet omgang 2 helt til høyre, like ved nåla. Men da passer ikke siste stav i omgang 3 i siste lm i omgang 2, slik det ser ut som i diagrammet. Hvordan løse?
26.04.2020 - 16:05
![]() Line U. wrote:
Line U. wrote:
Hei Jeg går ut ifra at jeg skal fortsette på diagram 1-2-3 ved å starte På nytt nederst i diagrammet når jeg har heklet alt en gang. Det jeg har problemer med er at både siste runde øverst og første runde nederst skal hekles fra retten, hvordan løser jeg det? Mvh Line U.
03.07.2018 - 03:22DROPS Design answered:
Hei Line. Det stemmer at du begynner på nytt igjen. Det er 10 omganger i A.1, A.2 og A.3, så siste omgang er fra vrangen. Den nederste omgangen med staver (markert med stjerne) er ikke med i diagrammet, men indikerer omgangen før – som forklart ved tegnforklaringen til stjernen. God fornøyelse.
04.07.2018 - 09:14
![]() Eva Hammarberg wrote:
Eva Hammarberg wrote:
Finns det ett helt utskrivet mönster? Jag har väldigt svårt att virka efter sådana diagram och därför blir det fel hela tiden för mig. Betalar gärna för ett mönster som allt står skrivet för varje varv istället för att försöka tyda diagram. Vänliga hälsningar Eva
01.07.2018 - 23:03DROPS Design answered:
Hej, tyvärr har vi inte möjlighet att skriva ut detta mönster i text. Pröva gärna något av våra enklare diagram över virkmönster först och se om detta hjälper. Ifall du besöker närmaste DROPS-återförsäljare hjälper de dig tyda diagrammen.
02.07.2018 - 14:19Anca Giurgiu wrote:
The first row it is worked on RW, the next two rows from the band are worked on WS and RS, so the first row from the diagram must be worked on the WS. In the pattern description A1, A2, A3 are worked from the RS. Please explain how. Thank you!
21.08.2016 - 08:54DROPS Design answered:
Dear Mrs Giurgiu, very first row on top part will be worked from WS, then work 1 row with tr from RS, 1 row with tr from WS so that 1st row with diagrams A.1, A.2 and A.3 is worked from RS. Happy crocheting!
22.08.2016 - 09:34
![]() Berit Rönning wrote:
Berit Rönning wrote:
Man ska lägga upp nya maskor på avigsidan I slutet av varvet och sedan virka från avigsidan på överdelen - hur går detta till? Dessutom vilket är rätsidan? 1:a varvet på mönstret a1-a3 är det bara stolpar? Tacksam för svar Berit R.
16.07.2016 - 11:59Susan Weinberg wrote:
Love the pattern. Looking forward to the diagrams being in place.
29.06.2016 - 03:21
![]() Lauren McRoberts wrote:
Lauren McRoberts wrote:
You misunderstood me before. The diagrams are not visible on the pattern so the pattern cannot be worked. I know how to work diagrams, but they are not there. This is a technical issue. Please fix so the design can be worked.
28.06.2016 - 18:35DROPS Design answered:
Dear Mrs McRoberts, see answer below, the diagrams should be visible soon, thanks in advance for your patience! Happy crocheting!
28.06.2016 - 23:15
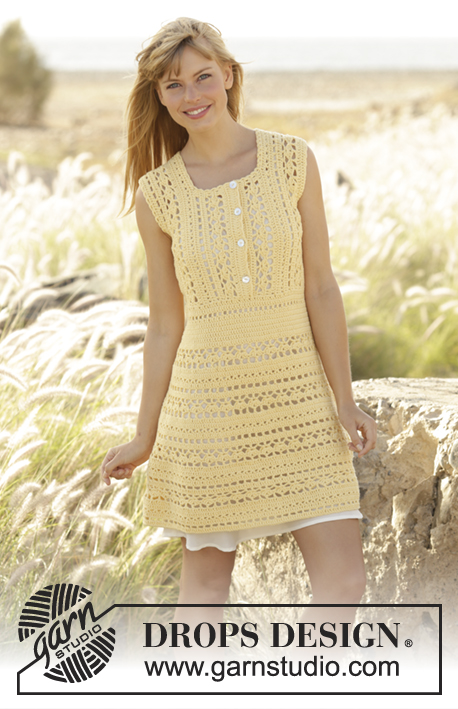
Goldfinch |
|||||||||||||||||||||||||||||||
|
|
|||||||||||||||||||||||||||||||
Crochet DROPS dress in "Cotton Merino". Size: S - XXXL.
DROPS Extra 0-1284 |
|||||||||||||||||||||||||||||||
|
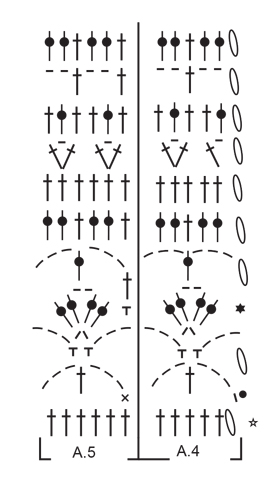
CROCHET INFO: Replace first tr at on every tr round with 3 ch, finish the round with 1 sl st in 3rd ch from beg of round. PATTERN: See diagrams A.1 to A.5. ---------------------------------------------------------- DRESS: Worked in two parts. Top part is worked back and forth in one piece, from mid front to mid front, then work bottom part in the round and down from bottom edge of top part. TOP PART: Work 48-48-55-62-69-69 ch on hook size 3.5 mm with Cotton Merino. Turn and work 1 tr in fourth ch from hook (= 2 tr), work 1 tr in each of the next 2 ch, * skip 1 ch, work 1 tr in each of the next 6 tr *, repeat from *-* = 40-40-46-52-58-58 tr. Work 2 rows with 1 tr in every tr (= band), then work as follows - from RS: A.1 (= 2 tr), A.2 over the next 36-36-42-48-54-54 tr, finish with A.3 (= 2 tr). REMEMBER THE CROCHET TENSION! When piece measures 9-8-11-12-11-14 cm – adjust so that next row is a row with tr that is worked from WS – cast on 24 new, loose ch at the end of row for shoulder = 64-64-70-76-82-82 tr/ch. Work next row as follows - from WS: A.3, A.2 over the next 60-60-66-72-78-78 tr, finish with A.1. Continue like this until piece measures 19-20-21-23-24-25 cm, adjust so that next row is a row with tr worked from RS. Now work as follows: Work A.1, work A.2 over the next 30-30-30-36-36-36 tr, work A.3, turn and work back (do not work over the last 30-30-36-36-42-42 tr on row = armhole). When piece measures 25-28-31-35-40-45 cm – adjust so that next row is a row with tr that is worked from WS – cast on 30-30-36-36-42-42 new, loose ch at the end of row for shoulder = 64-64-70-76-82-82 tr/ch. Work next row as follows - from WS: A.3, A.2 over the next 60-60-66-72-78-78 tr, finish with A.1. Continue like this until piece measures 36-40-43-48-53-59 cm, adjust so that next row is a row with tr worked from RS. Now work as follows: Work A.1, work A.2 over the next 56-56-60-66-72-72 tr, work A.3, turn and work back (do not work over the last 6 tr on row = neck). When piece measures 48-52-57-63-70-76 cm – adjust so that next row is a row with tr that is worked from WS – cast on 6 new, loose ch at the end of row for shoulder = 64-64-70-76-82-82 tr/ch. Work next row as follows - from WS: A.3, A.2 over the next 60-60-66-72-78-78 tr, finish with A.1. Continue like this until piece measures 59-64-69-76-83-90 cm, adjust so that next row is a row with tr worked from RS. Now work as follows: Work A.1, work A.2 over the next 30-30-30-36-36-36 tr, work A.3, turn and work back (do not work over the last 30-30-36-36-42-42 tr on row = armhole). When piece measures 65-72-79-88-99-110 cm – adjust so that next row is a row with tr that is worked from WS – cast on 30-30-36-36-42-42 new, loose ch at the end of row for shoulder = 64-64-70-76-82-82 tr. Work next row as follows - from WS: A.3, A.2 over the next 60-60-66-72-78-78 tr, finish with A.1. Continue like this until piece measures 75-84-89-99-112-121 cm, adjust so that next row is a row with tr worked from RS. Now work as follows: Work A.1, work A.2 over the next 36-36-42-48-54-54 tr, work A.3, turn and work back (do not work over the last 24 tr on row = neck). Continue like this until piece measures 82-90-98-109-121-133 cm, now work 3 rows with 1 tr in every tr (= band), piece measures 84-92-100-111-123-135 cm. Fasten off. ASSEMBLY: Sew the shoulder seams. BOTTOM PART: NOW MEASURE PIECE FROM HERE! Beg mid back along bottom edge of top (button band is mid front) and work 156-174-192-210-234-258 tr – work approx. 2 tr around every tr, when working over band place right front band on top of left front band and work through both layers, piece is now worked in the round. Finish round with 1 sl st in first tr. ROUND 1: Work 1 tr in every tr. ROUND 2: * Work 1 tr, 1 ch, skip 1 tr *, repeat from *-* the entire round. ROUND 3: Work 1 tr in every tr and 1 tr in every ch. ROUNDS 4-8: Work 1 tr in every tr. Continue to work as follows: Work A.4, then repeat A.5 the entire round. Continue the pattern downwards. When piece measures approx. 10 cm – adjust so that this is a round with tr, inc 12 tr evenly on piece, repeat inc every 7 cm 5 more times = 228-246-264-282-306-330 tr. Continue with A.4 and A.5 until piece measures 51-54-54-54-54-57 cm, piece measures 83-86-89-92-95-98 cm in total. Fasten off. CROCHET EDGE around armhole: Work 1 dc, * 3 ch, skip approx. 1 cm, work 1 dc *, repeat from *-* and finish with 1 sl st at beg of round. CROCHET EDGE around neck: Beg mid front, at the bottom of the right band: Work 1 dc, * 3 ch, skip approx. 1 cm, work 1 dc *, repeat from *-* up the band, around the neck and down along left band. Fasten 4 button evenly on left band, the top approx. 2 cm from upper edge, the bottom approx. 4 cm from bottom edge. Button through holes between tr on right band. |
|||||||||||||||||||||||||||||||
Diagram explanations |
|||||||||||||||||||||||||||||||
|
|||||||||||||||||||||||||||||||
 |
|||||||||||||||||||||||||||||||
 |
|||||||||||||||||||||||||||||||
 |
|||||||||||||||||||||||||||||||
 |
|||||||||||||||||||||||||||||||
Have you finished this pattern?Tag your pictures with #dropspattern or submit them to the #dropsfan gallery. Do you need help with this pattern?You'll find 7 tutorial videos, a Comments/Questions area and more by visiting the pattern on garnstudio.com. © 1982-2026 DROPS Design A/S. We reserve all rights. This document, including all its sub-sections, has copyrights. Read more about what you can do with our patterns at the bottom of each pattern on our site. |
|||||||||||||||||||||||||||||||




Post a comment to pattern DROPS Extra 0-1284
We would love to hear what you have to say about this pattern!
If you want to leave a question, please make sure you select the correct category in the form below, to speed up the answering process. Required fields are marked *.