
Popular categories
Looking for a yarn?


Comments / Questions (54)
![]() Crocus wrote:
Crocus wrote:
Encore moi. Une photo en plan rapproché du fameux raglan aurait été une aide très précieuse. Je me suis rarement sentie aussi nulle devant des explications. Je me suis même demandé si ma tête fonctionnait correctement. c'est dire ! :-)
04.06.2018 - 09:26
![]() Crocus wrote:
Crocus wrote:
Les explications des premiers rangs du raglan/motif ajouré sont complexes et j'ai déjà détricoté plusieurs fois. Ce qui me rassure quant à mes capacités de tricoteuse et de compréhension, c'est que je ne suis apparemment pas la seule. Beaucoup de personnes ont séché devant le texte.
04.06.2018 - 09:22DROPS Design answered:
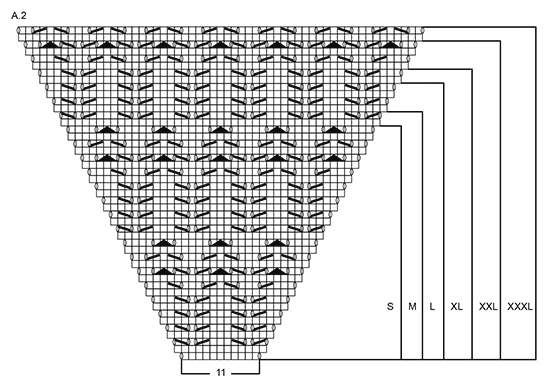
Bonjour Crocus, on augmente pour le raglan d'abord 12 mailles (4 m pour le dos et 2 m pour les devants soit 2 m avant/après A.2 et seulement 2 m pour les manches soit 1 m après A.2 au début de la manche et 1 m avant A.2 à la fin de la manche) 1-15 fois au total en fonction de la taille, puis on va augmenter seulement 8 m (= 1 m avant/après chaque A.2) 16-9 fois au total. Bon tricot!
04.06.2018 - 09:49
![]() MARCEAU wrote:
MARCEAU wrote:
Bonjour Je ne comprends pas comment faire le raglan au niveau des manches, pour faire les diagrammes ( et agrandir les dessins )
10.02.2018 - 14:05DROPS Design answered:
Bonjour Mme Marceau, les augmentations du raglan des manches figurent dans le diagramme A.2, tricotez A.2 le nombre de rangs indiqué pour votre taille et augmentez en même temps pour le dos et les devants comme indiqué dans les explications pour votre taille. Bon tricot!
12.02.2018 - 08:41
![]() Gisela wrote:
Gisela wrote:
Bei den Raglanzunahmen in den Rückreihen verstehe ich nicht, welche Umschläge links verschränkt gestrickt werden sollen. Alle Umschläge im Rücken- und Vorderteil?
05.02.2018 - 11:43DROPS Design answered:
Liebe Gisela, nur die Umschläge neben den Markierern (= Raglanlinien) werden "normal" gestrickt, die anderen (= 2. und 3. der 4 Umschläge), die 1. und 4. Umschläge werden verschränkt gestrickt. Viel Spaß beim stricken!
05.02.2018 - 13:20
![]() Henrietta Ho-Asjoe wrote:
Henrietta Ho-Asjoe wrote:
I am confused about the RAGLAN section -- P the closest to markers on the next round to make holes, P YO towards the back/ front piece twisted to avoid holes -- when do I do the P I am also confused about the increases and the number of times. I am making my sweater in small size. Thank you.
08.01.2018 - 18:07DROPS Design answered:
Dear Mrs Ho-Asjoe, you will P twisted the first of both YOs before A.2 and the last of both YOs after A.2 and you will P the 2nd YO before A.2 and the first YO after A.2. In size S you will increase 2 sts that way only 1 time. Then increase 1 st before + 1 st after A.2 (= 8 sts increased on row) a total of 16 times every RS row. Happy knitting!
09.01.2018 - 09:35
![]() Sergeant wrote:
Sergeant wrote:
Bildet paa denne modellen (r-690) viser en ganske stor utringning, som jeg ikke faar til aa stemme med maalene paa tegningen (str L har nakkevidde paa 21cm). Jeg har kommet 5 cm avgaarde paa arbeidet str L, men oppnaar ikke den vide luftige utringningen som paa bildet. Jeg oensker virkelig denne vide utringningen, men er redd for at ved aa velge en stoerre stoerrelse blir den altfor vid over brystet. Har dere noen raad? Er veldig motivert for den ser saa fin ut!!
16.11.2017 - 14:00DROPS Design answered:
Hej, jo men hvis du slår det antal masker løst op som står i opskriften, så vil du ifølge strikkefastheden, få den vide udringning som du ser på billedet. God fornøjelse!
05.12.2017 - 14:38
![]() Gloria Knight wrote:
Gloria Knight wrote:
Is there any way that the charts can be magnified as I am finding it difficult to see the markings clearly, especially the A! chart where I could not see the y/o symbol within the k2tog . I only know the y/o is needed because of drops design answer
09.06.2017 - 18:49DROPS Design answered:
Dear Mrs Knight, you can try to zoom on your screen (browser) or to enlarge diagrams when printing/phocopying them. Happy knitting!
12.06.2017 - 08:57
![]() Gloria Knight wrote:
Gloria Knight wrote:
Also c/0 instruction states (incl 5 band sts in each side towards mid front)????? does this mean the c/0 number includes 10 stitches for bands at either end of needle as the pattern is worked back and forth on circular needles.
09.06.2017 - 14:36DROPS Design answered:
Dear Mrs Knight, the front band sts are included in the number of sts to cast on. Happy knitting!
09.06.2017 - 17:22
![]() Gloria Knight wrote:
Gloria Knight wrote:
I am totally confused. Pattern says to c/0 101 stitches for jacket after 1st row knit to use chart A1. I read the pattern therefore = 5 rows knit, then w/s k2tog which i took to be for whole row, however after doing further 4 rows knit and increasing 15 stitches on last row I only have 67 stitches and not 116. A! chart only reps resents 10 stitches, should it just be 10 stitches I decreased on.
09.06.2017 - 14:35DROPS Design answered:
Dear Mrs Knight, when working row 5 in A.1 repeat (K2 tog, 1 YO) = number of sts will keep constant, the dec will be compensate by the YOs. You keep then 101 sts + 15 sts inc evenly = 116 sts. Happy knitting!
09.06.2017 - 17:21
![]() Gillian wrote:
Gillian wrote:
Hello. Between what stitches do I place the markers? Between the 2 stitches in stocking stitch before A2 (11stitches)?
30.05.2017 - 14:58DROPS Design answered:
Dear Gillian, markers are inserted between the 2 sts in stocking st before A.2, and then between the 2 sts after A.2. Happy knitting!
30.05.2017 - 15:37
|
|||||||||||||||||||
Sea Nymph Cardigan#seanymphcardigan |
|||||||||||||||||||
|
|
|||||||||||||||||||
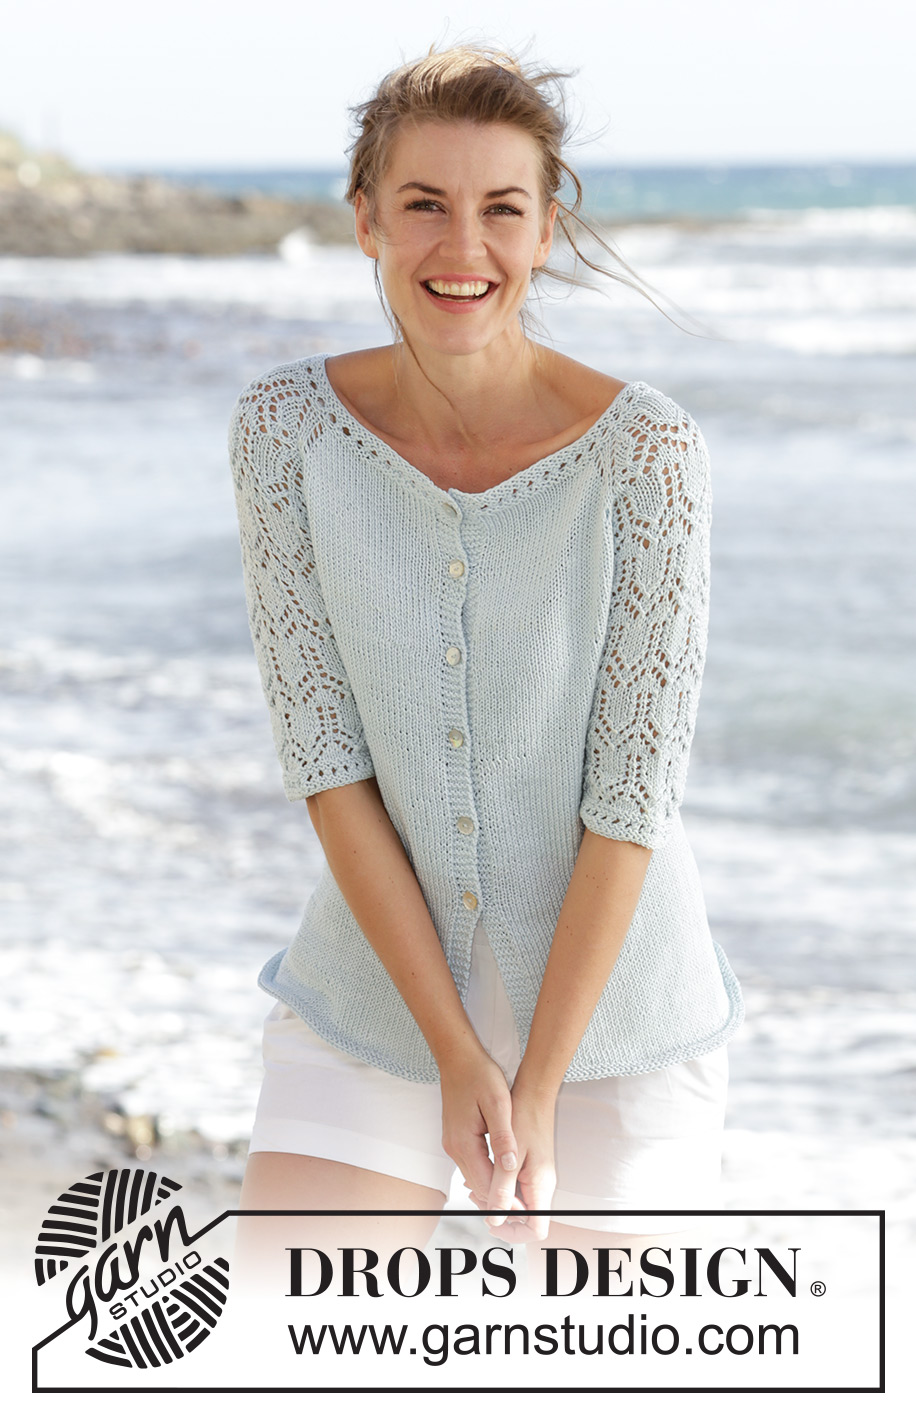
Knitted DROPS jacket with raglan, lace pattern and ¾ sleeves in "Muskat". Worked top down. Size: S - XXXL.
DROPS 169-5 |
|||||||||||||||||||
|
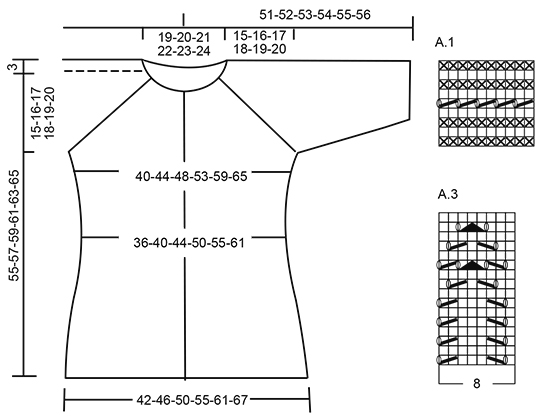
GARTER ST (back and forth): K all rows. 1 ridge = 2 rows K. PATTERN: See diagrams A.1 to A.3. The diagrams show all rows in pattern seen from RS. Choose diagram for your size. RAGLAN: Inc on every row from RS (= every other row) as follows: Inc 4 sts on back piece, 2 sts on each front piece and 2 sts on each sleeve (= 12 sts inc, inc on sleeve are drawn in pattern) – beg 3 sts before each A.2 and work as follows: 1 YO, K 1, 1 YO, K 2 (marker is in the middle of these sts), A.2, K 2 (marker is in the middle of these sts), 1 YO, K 1, 1 YO. P the YOs closest to markers on next round to make holes, P YOs towards back/front piece twisted to avoid holes. Inc 12 sts this way 0-2-3-7-10-14 times more (= 1-3-4-8-11-15 times in total, first inc is explained in the text). Then inc on every row from RS (= every other row) as follows: Inc 2 sts on back piece, 1 sts on each front piece and 2 sts on each sleeve (= 8 sts inc, inc on sleeve are drawn in pattern) – beg 2 sts before each A.2 and work as follows: 1 YO, K 2 (marker is in the middle of these sts), A.2, K 2 (marker is in the middle of these sts), 1 YO. P YOs on next row to make holes. Inc 8 sts this way 16-15-16-13-12-9 times in total. BUTTONHOLES: Dec for buttonholes on right band. 1 buttonhole = K tog second and third st from edge and make 1 YO. Dec for buttonholes when piece measures (measured from cast-on edge): SIZE S-M-L: 2, 9, 16, 23, 30 and 37 cm. SIZE XL-XXL-XXXL: 2, 9, 16, 23, 30, 37 and 44 cm ---------------------------------------------------------- JACKET: Work back and forth on circular needle from mid front, work top down. Cast on 97-101-105-109-113-117 sts (incl 5 band sts in each side towards mid front) on circular needle size 4 mm with Muskat. K 1 row from RS, then work A.1 (1st row = from WS) with 5 sts in garter st in each side, on last row in A.1 inc 15 sts evenly = 112-116-120-124-128-132 sts. Then work as follows from mid front and from RS: 5 sts in garter st, work 17-18-19-20-21-22 sts in stocking st, 1 YO, 1 st in stocking st, 1 YO, 2 sts in stocking st (insert a marker between these sts), A.2 (= 11 sts), 2 sts in stocking st (insert a marker between these sts), 1 YO, 1 st in stocking st, 1 YO, 34-36-38-40-42-44 sts in stocking st, 1 YO, 1 st in stocking st, 1 YO, 2 sts in stocking st (insert a marker between these sts), A.2, 2 sts in stocking st (insert a marker between these sts), 1 YO, 1 st in stocking st, 1 YO, 17-18-19-20-21-22 sts in stocking st, 5 sts in garter st. Continue this pattern, and inc for RAGLAN as explained above, first inc is now done. REMEMBER THE KNITTING TENSION. When A.2 has been worked vertically - see marking for your size, there are 252-272-296-324-356-384 sts on needle, inc are now done. Work next row as follows from WS: Work 43-47-51-57-63-69 sts (= right front piece), slip the next 45-47-51-53-57-59 sts on a stitch holder (= sleeve), cast on 8 sts under sleeve, work the next 76-84-92-104-116-128 sts (= back piece), slip the next 45-47-51-53-57-59 sts on a stitch holder (= sleeve), cast on 8 new sts under sleeve, work the last 43-47-51-57-63-69 sts (= left front piece). BODY: There are now 178-194-210-234-258-282 sts on body. Continue in stocking st and garter st as before. Insert a marker in each side, in the middle of the 8 new sts that were cast on. NOW MEASURE PIECE FROM HERE. When piece measures 4 cm, dec 1 st on each side of markers (= 4 sts dec), repeat dec every 4-4-4-5-5-5 cm 3 times in total = 162-178-194-218-242-266 sts. When piece measures 22-23-24-25-26-27 cm, inc 1 st on each side of each marker (= 4 sts inc), repeat inc every 2 cm 5 more times = 186-202-218-242-266-290 sts. When piece measures 36-37-38-39-40-41 cm, work 2 ridges over all sts. Cast off K 1/P 1 (to avoid a wavy cast-off edge), piece measures approx. 55-57-59-61-63-65 cm from cast-on edge. SLEEVE: Worked in the round. Slip sts from sleeve back on double pointed needles size 4 mm, pick up 1 st in each of the 8 sts under sleeve = 53-55-59-61-65-67 sts. Insert 1 marker mid under sleeve = beg of round. NOW MEASURE PIECE FROM HERE! Then work as follows: 6-7-1-2-4-6 sts in stocking st, A.3 over the next 40-40-56-56-56-56 sts (beg A.3 where A.2 ends for your size), 7-8-2-3-5-7 sts in stocking st. When piece measures 4 cm, dec 1 st on each side of marker. Work the sts that do not fit the pattern in stocking st, make sure that no of dec and inc in pattern is correct. Repeat dec every 7-7-5-5-3-3 cm 2-2-3-3-4-4 more times = 47-49-51-53-55-57 sts. When piece measures 24-23-23-22-22-21 cm, work A.1 over all sts, then cast off. Work the other sleeve the same way. Sew the buttons on to left front piece. |
|||||||||||||||||||
Diagram explanations |
|||||||||||||||||||
|
|||||||||||||||||||
 |
|||||||||||||||||||
 |
|||||||||||||||||||
Have you finished this pattern?Tag your pictures with #dropspattern #seanymphcardigan or submit them to the #dropsfan gallery. Do you need help with this pattern?You'll find 23 tutorial videos, a Comments/Questions area and more by visiting the pattern on garnstudio.com. © 1982-2026 DROPS Design A/S. We reserve all rights. This document, including all its sub-sections, has copyrights. Read more about what you can do with our patterns at the bottom of each pattern on our site. |
|||||||||||||||||||


With over 40 years in knitting and crochet design, DROPS Design offers one of the most extensive collections of free patterns on the internet - translated to 17 languages. As of today we count 324 catalogues and 12290 patterns translated into English (UK/cm). 12290
We work hard to bring you the best knitting and crochet have to offer, inspiration and advice as well as great quality yarns at incredible prices! Would you like to use our patterns for other than personal use? You can read what you are allowed to do in the Copyright text at the bottom of all our patterns. Happy crafting!
Post a comment to pattern DROPS 169-5
We would love to hear what you have to say about this pattern!
If you want to leave a question, please make sure you select the correct category in the form below, to speed up the answering process. Required fields are marked *.