
Popular categories
Looking for a yarn?


Comments / Questions (45)
Chris Wilkins wrote:
Hi Guys, I'm in Australia and received my beautiful Drops yarn today. I am making the Peach Dreams pattern 170-26 and have immediately run into trouble reading the pattern. Would you mind writing out just the first row after the initial row of double crochet, just so I can get the hang of how to read the pattern? Many thanks in advance. Chris
06.04.2016 - 13:26DROPS Design answered:
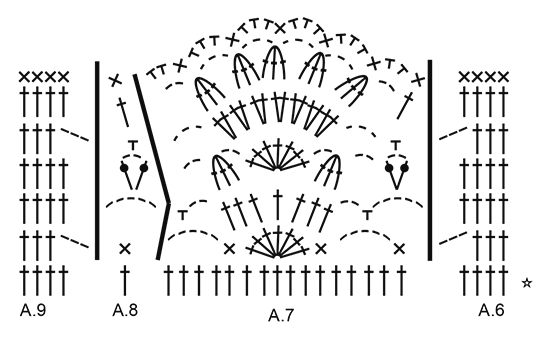
Dear Mrs Wilkins, start reading diagram at the bottom corner on the right side towards the left from RS, and from the left towards the right from WS - 1 symbol = 1 st (1 group of st), just repeat as explained: A.1 1 time (= over the first 4 tr), then work A.2 over the next 6 tr, and then repeat A.3 in width until 7 sts remain, and finish with A.4. Inserting a marker after each repetition can help. Happy crocheting!
06.04.2016 - 17:39
![]() Bibi wrote:
Bibi wrote:
Bonjour quand allez vous repondre a ma question plus bas au sujet des manche que je puisse finir mon tricot? Si votre patron serais ecrit clairement ont ne poserais pas des questions. Merci
04.04.2016 - 16:00DROPS Design answered:
Bonjour Bibi, vous trouverez la réponse ci-dessous. Bon crochet!
05.04.2016 - 08:39
![]() Bibi wrote:
Bibi wrote:
Bonjour j attend votre reponse pour les manches merci
01.04.2016 - 16:24DROPS Design answered:
Bonjour Bibi, votre question est bien prise en compte, merci d'avance pour votre patience.
02.04.2016 - 17:33
![]() Bibi wrote:
Bibi wrote:
Ok pour le debut sauf que sur le patron ses indiquer au dessus des ml 1ml au dessus des 3 premieres ml???? Il y a 13 m dans cette arceau ses dans laquel? Et pour le 2 eme rang si je fait 5ml et 1 ms autout de chaques arceau je fais la 1 ere ms dans le 1 er arceau? Ca va donner un petit arceau? Et le 15 eme arceau je fais la ms ou? Comme je vous ai mentionne les explications ne sont pas clair. Pourquoi ne pas avoir fait un video pour montrer clairment comment faire ses arceaux????
30.03.2016 - 17:13DROPS Design answered:
Bonjour Bibi, après la dernière ms dans la dernière ml de la chaînette, crochetez 1 ms dans le 1er arceau du rang (celui de 12 ml) et continuez en arceau de (5 ml, 1 ms) tout le tour. Bon crochet!
05.04.2016 - 08:38
![]() Bibi wrote:
Bibi wrote:
Je ne comprend pas les explications des manche ? ? Vous dite qu il se travaille en rond mais où on doit le rejoindre pour faire le rond? Vos explications ne sont pas clair. Si je rejoins en rond après avoir fait les 83m ses impossible de faire 1 ms dans la 13eme ml ? Pouvez vous expliquer le procéder de la manche clairement svp? Et comment faire les arceaux d'y 2 ème tour? Je trouve que ce patron manque d explication clair. Merci
27.03.2016 - 04:24DROPS Design answered:
Bonjour Bibi, les manches se crochètent en rond sur la base d'une chaînette de ml, on crochète ensuite 1 rang d'arceaux, et on termine par 1 ms autour du 1er arceau, on forme ainsi un rond et on continue en arceaux de 5 ml. Bon crochet!
29.03.2016 - 09:44
![]() Beaute wrote:
Beaute wrote:
Votre patron ne peu pas fonctionné calculer pour qui reste 165 B déjà sauter 1b et 1b dans chacune des 4 ml suivante 40 fois = 160 + les 2 bride du départ = 162b il manque 3b et il reste à faire 1B dans chacune des 3-5-3-1 ml suivante ? Alors il manque des m au depart dans le 207 m . Expliquer moi en détail . Voir mon autre message plus bas. Merci
18.03.2016 - 02:37DROPS Design answered:
Bonjour Beaute, vous commencez en taille S par une chaînette de 207 ml et crochetez ainsi: 1 B dans la 4ème ml à partir du crochet (2 B - 4 ml "utilisées"), puis 1 B dans chacune des 3 B suivantes (3B - 3 ml), puis *sautez 1 ml, 1 B dans les 4 ml suivante* (4 B - au-dessus de 5 ml), répétez de *-* 40 fois au total (= 160 B crochetées au-dessus de 200 ml) - vous avez un total de 2+3+160= 165 B au-dessus de 4+3+200= 207 ml. Bon crochet!
21.03.2016 - 08:45
![]() Beaute wrote:
Beaute wrote:
Bonjour Pouvez vous expliquer 1B dans chacune des 3-5-3-1ml suivante??? Est que vous voulez dire dans les 12 m suivante?? Merci
17.03.2016 - 23:56DROPS Design answered:
Bonjour Beaute, pour que la chaînette de base ne resserre pas l'ouvrage, on va crocheter moins de B que de ml et ainsi, au 1er rang, on saute régulièrement des ml ainsi: 1 B dans la 4ème ml à partir du crochet, puis 1 B dans chacune des 3 ml suiv en taille S et L-1B dans chacune des 5 ml suivantes en taille M et dans la ml suiv en taille XL, puis répétez jusqu'à la fin du rang: *sautez 1 ml, puis 1 B dans chacune des 4 ml suivantes*, vous devez avoir un total de 165-183-201-219B à la fin du 1er rang sur la chaînette de base. Bon crochet!
21.03.2016 - 08:36
![]() Vay Eniko wrote:
Vay Eniko wrote:
Elnézést de van nénéhány dolog amit nem értek.A kardigán bekezdésnél a végén 219 erp van, kozben pedig rp-ről van szó.ínem tudom hogyan kezdek. A következő bekezdésnél van egy köv-ut meggjegyés. Ez mit is jelent. Köszönettel
07.03.2016 - 20:44
![]() Linda Augustsson wrote:
Linda Augustsson wrote:
Fråga ang. diagrammet. rad 2 efter pilen. OM man läser rad två från höger. så undrar jag lite. ska det bara vara en stolpe direkt innan den andra långa linjen? Överallt annars är det 2 stolpar förutom i början och i slutet. Mvh Linda
04.03.2016 - 14:49DROPS Design answered:
Hej, Jeg kan ikke se hvor du er. Hvilket diagram og hvilken række talt fra nederste og op.
07.03.2016 - 16:13
![]() Lisette wrote:
Lisette wrote:
Ik heb een vraagje over het telpatroon. Klopt het dat in het begin als je A1 tot A5 doet de rechter en de linkerkant niet precies gelijk zijn? En wat betekenen de drie streepjes/ stipjes voor de stokjes in A1?
22.02.2016 - 20:45DROPS Design answered:
Hoi Lisette. Rechts en links zijn wel gelijk. A.1 en A.5 zijn de zijkanten, en haak je de overige telpatronen zoals beschreven, dan heb je ook symmetrie met de boogjes/stokjes. 1 streepje ("stip") is 1 losse.
23.02.2016 - 14:15
|
|||||||||||||||||||||||||||||||||||||
Peach Dream#peachdreamjacket |
|||||||||||||||||||||||||||||||||||||
 |
 |
||||||||||||||||||||||||||||||||||||
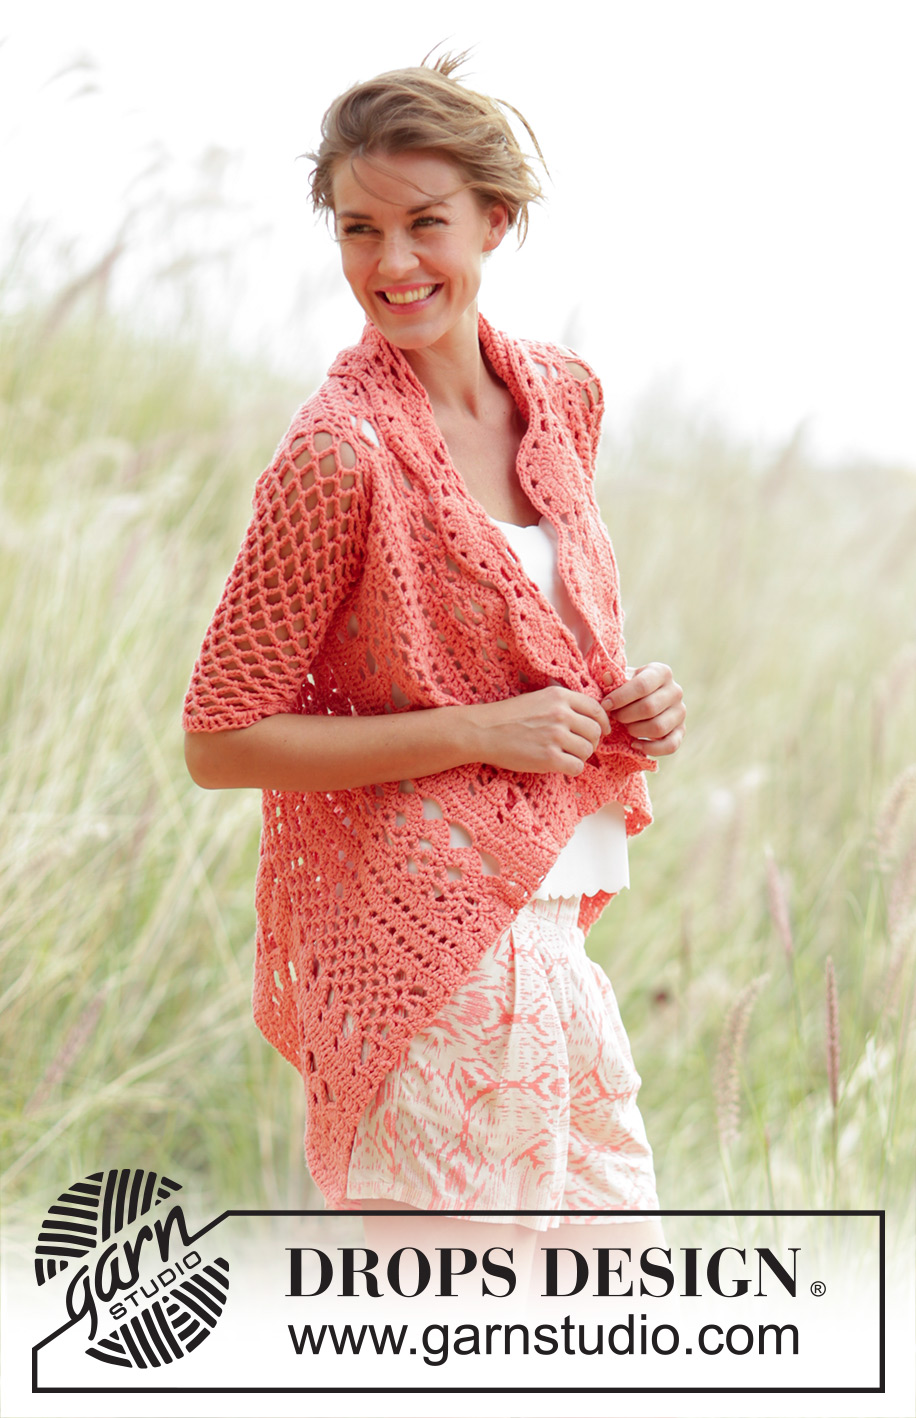
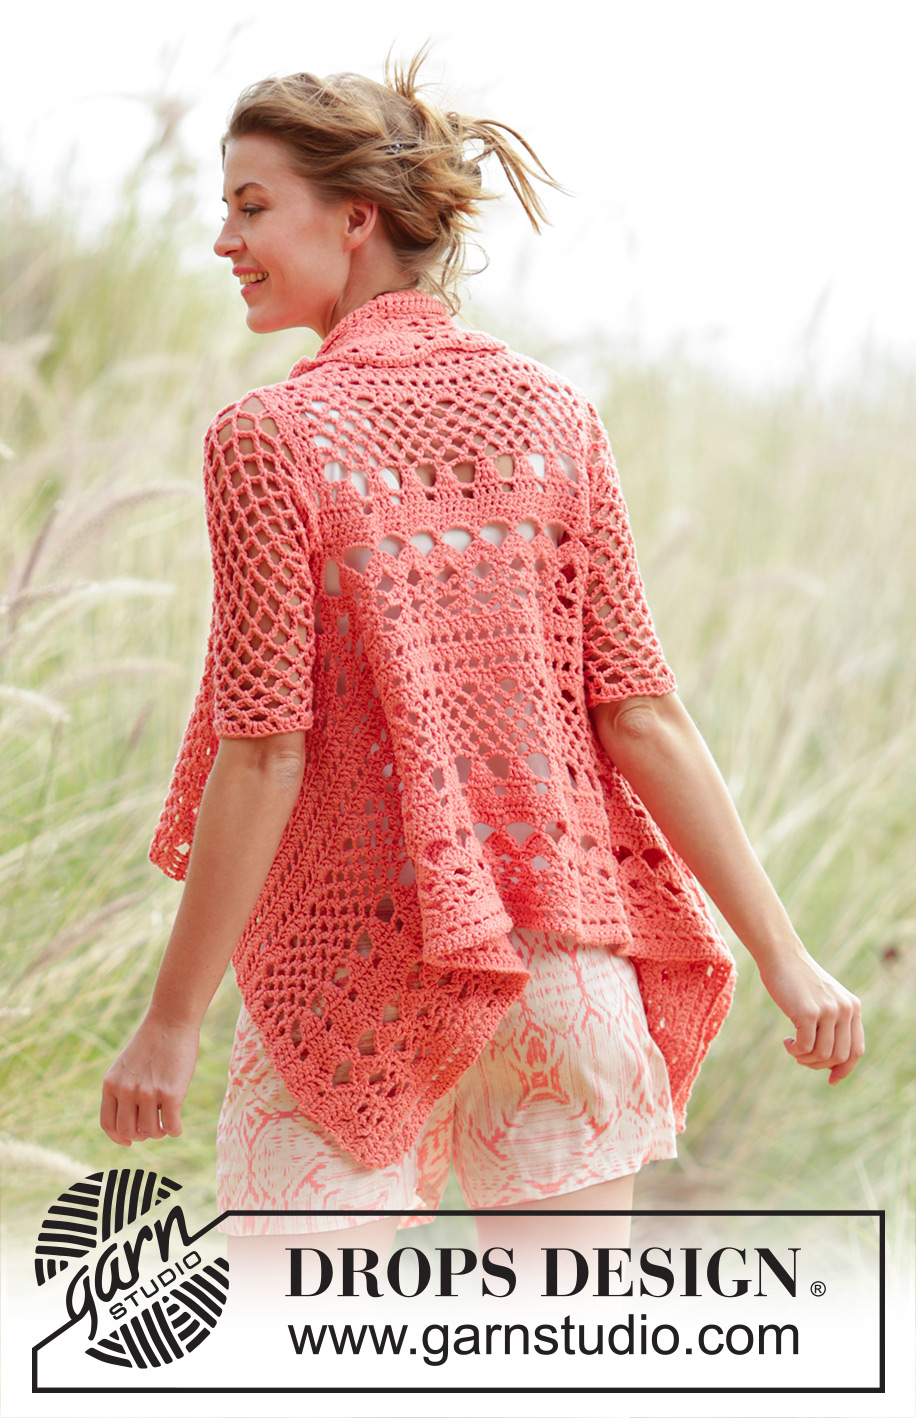
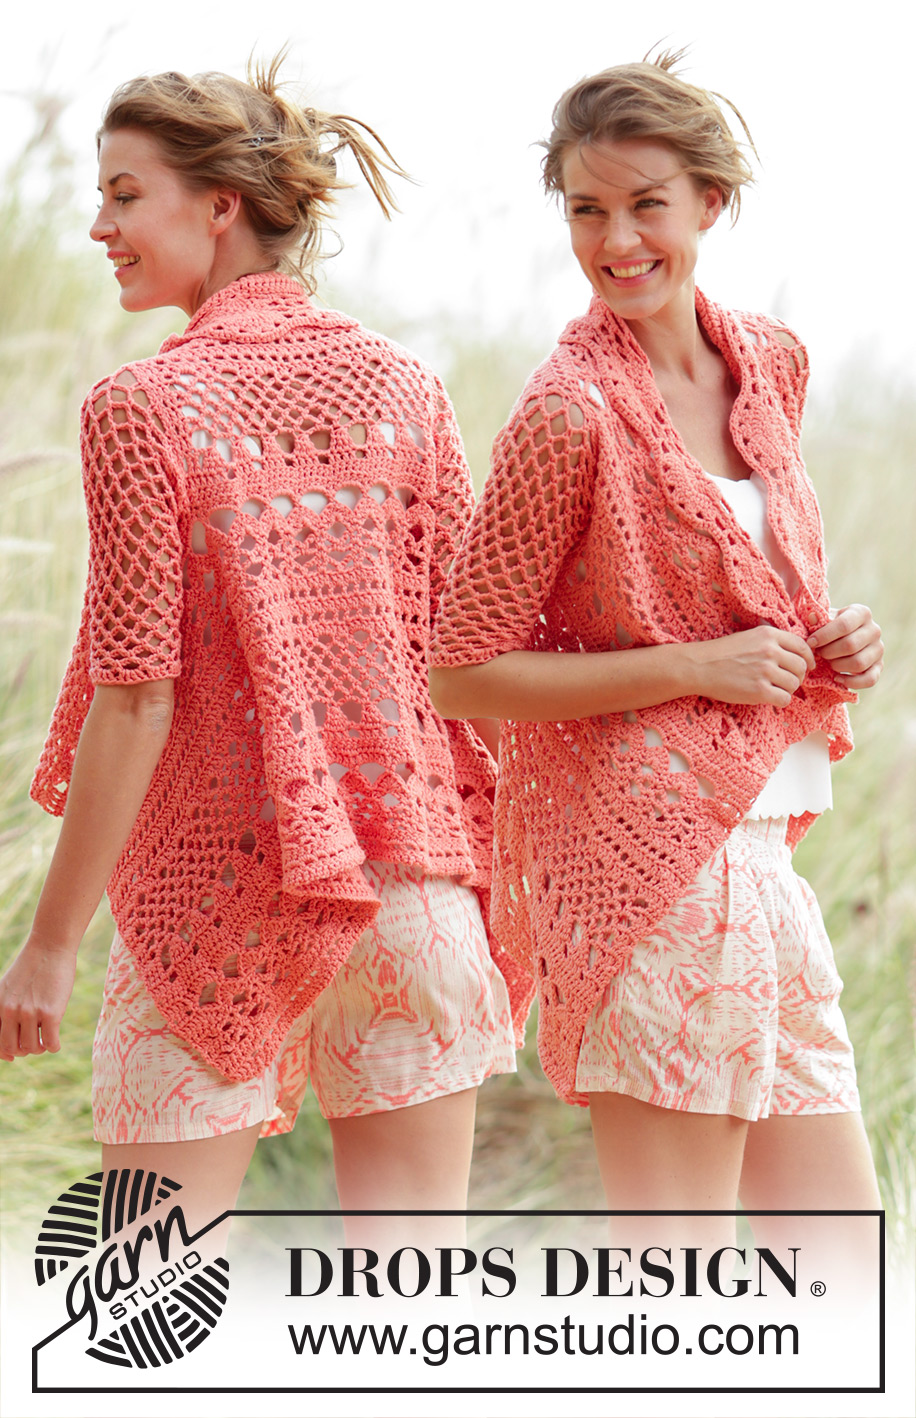
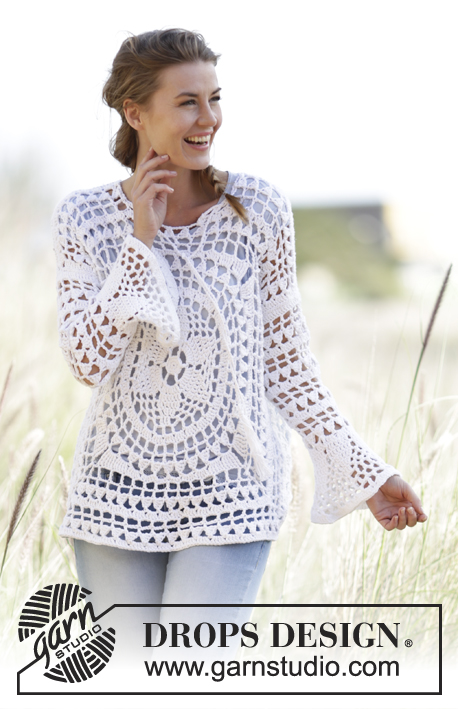
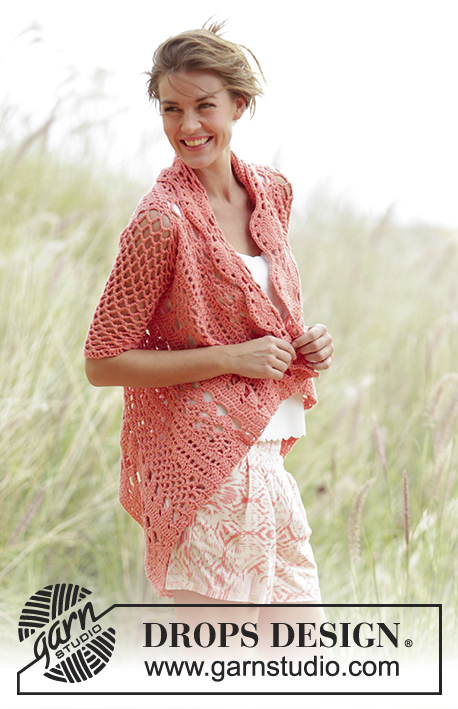
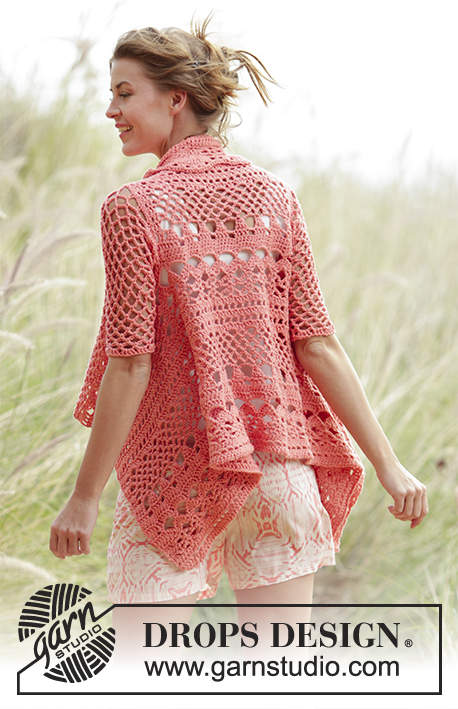
Crochet DROPS jacket worked in a square with lace pattern in ”Paris”. Size: S - XXXL.
DROPS 170-26 |
|||||||||||||||||||||||||||||||||||||
|
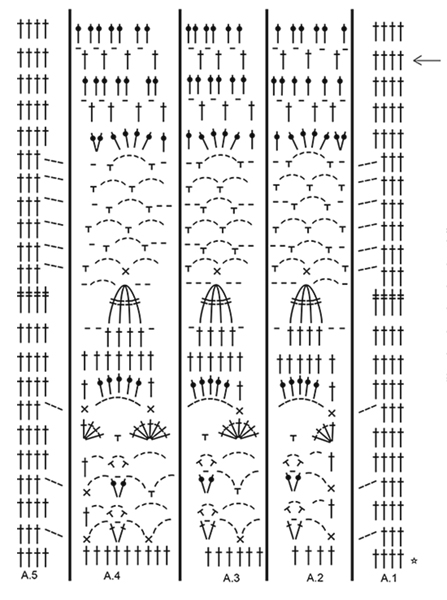
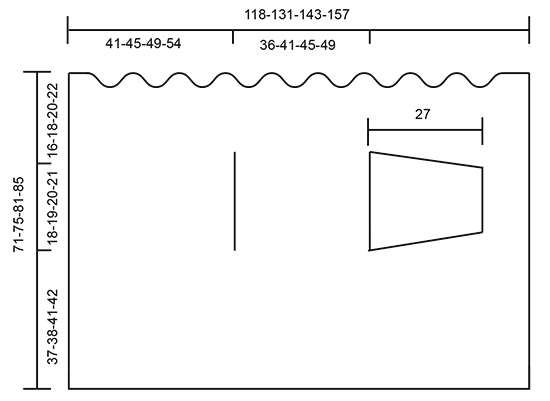
PATTERN: See diagrams A.1 to A.9. CROCHET INFO: Beg every dc row with 1 ch (replaces first dc). Beg every tr row with 3 ch (replaces first tr). Beg every dtr row with 4 ch (replaces first dtr). INCREASE TIP: Inc 1 tr by working 2 tr in/around same st. CROCHET TIP (applies to sleeves): After last dc on the round, continue to next round with 1 dc around next ch-space (= first ch-space on next round). NOTE: Insert a marker at the beg of round between last ch and first dc on the round, move the marker upwards. NOTE: BE CAREFUL NOT TO DISPLACE THE MARKER. DECREASE TIP: Work 1 dc around next ch-space but wait with last pull through, work next dc around next ch-space (do not work 5 ch between dc), on last pull through, pull yarn through all 3 loops on hook. ---------------------------------------------------------- JACKET: Work 207-229-252-275 ch on hook size 5 mm with Paris. Work 1 tr in 4th ch from hook (= 2 tr) - READ CROCHET INFO, 1 tr in each of the next 3-5-3-1 ch, * skip 1 ch, 1 tr in each of the next 4 ch *, repeat from *-* the entire row = 165-183-201-219 tr. Then work NEXT TO LAST row of diagram A.1 to A.5 - see arrow in chart - as follows: Work A.1 over the first 4 tr, work A.2 over the next 6 tr, repeat A.3 until 11 tr remain (= 24-27-30-33 times in total in width), work A.4 over the next 7 tr and finish with A.5. Work last row of A.1 to A.5. REMEMBER THE CROCHET TENSION! Then repeat A.1 to A.5 vertically. NOTE: Do not work first row in diagram, it shows how next row should be worked in sts from previous row. When piece measures 37-38-41-42 cm, adjust so that next row is with tr and from RS (cut the yarn if next row is from WS), divide the piece. RIGHT FRONT PIECE: Continue as follows from RS: Work A.1 and A.2 as before, repeat A.3 over the next 36-42-48-54 tr (= 6-7-8-9 times in total in width), work A.4 and then A.5, turn piece. Continue pattern like this over these sts until piece measures 18-19-20-21 cm from where it was divided, adjust so that next row is with tr and from WS (cut the yarn if next row is from RS). BACK PIECE: Work as follows from RS: Work A.1, A.2, repeat A.3 over the next 30-36-42-48 tr (= 5-6-7-8 times in total in width), A.4, finish with A.5. Continue pattern like this over these sts until piece measures 18-19-20-21 cm, adjust pattern according to right front piece. LEFT FRONT PIECE: Work as right front piece. FRONT AND BACK PIECE: Then work the parts tog from WS (i.e. work from left front piece, over back piece and to right front piece) with pattern as before, i.e. work as follows from WS: Work A.5 and A.4 as before, A.3 24-27-30-33 times in total in width, A.2, finish with A.1. Continue pattern like this. When piece measures 63-67-73-77 cm in total, adjust so that next row is with tr, inc 4-2-0-14 tr evenly – READ INCREASE TIP = 169-185-201-233 tr. Then work next row as follows: A.6 over the first 4 tr, repeat A.7 until 5 tr remain (= 10-11-12-14 times in width), A.8 over next tr, finish with A.9 over the last 4 tr. When A.6 to A.9 have been worked 1 time vertically, piece measures approx. 71-75-81-85 cm in total. Fasten off. SLEEVE: Sleeve is worked in the round, top down. Work 78-78-83-83 ch on hook size 5 mm with Paris. ROUND 1: Work 1 dc in 13th ch from hook, * 5 ch, skip 4 ch, 1 dc in next ch *, repeat from *-* over ch, work 1 dc around the first 3 ch = 14-14-15-15 ch-spaces - READ CROCHET TIP! Continue to work 5 ch and 1 dc around every ch-space. When piece measures 4 cm, dec 1 ch-space before marker - READ DECREASE TIP! Repeat dec alternately on each side of marker every 4 cm 4 more times = 9-9-10-10 ch-spaces. When piece measures 26 cm, finish round with 1 sl st in last ch mid under sleeve. Continue in the round as follows: ROUND 1: Work 3 ch, * 4 tr around first/next ch-space, 3 tr around next ch-space *, repeat from *-* the entire round, finish with 1 sl st in 3rd ch at beg of round = 32-32-35-35 tr. Fasten off. Work another sleeve the same way. ASSEMBLY: Fasten sleeve to jacket, sew in outer loops of edge sts, and make sure to avoid a tight seam. |
|||||||||||||||||||||||||||||||||||||
Diagram explanations |
|||||||||||||||||||||||||||||||||||||
|
|||||||||||||||||||||||||||||||||||||
 |
|||||||||||||||||||||||||||||||||||||
 |
|||||||||||||||||||||||||||||||||||||
 |
|||||||||||||||||||||||||||||||||||||
Have you finished this pattern?Tag your pictures with #dropspattern #peachdreamjacket or submit them to the #dropsfan gallery. Do you need help with this pattern?You'll find 8 tutorial videos, a Comments/Questions area and more by visiting the pattern on garnstudio.com. © 1982-2026 DROPS Design A/S. We reserve all rights. This document, including all its sub-sections, has copyrights. Read more about what you can do with our patterns at the bottom of each pattern on our site. |
|||||||||||||||||||||||||||||||||||||


With over 40 years in knitting and crochet design, DROPS Design offers one of the most extensive collections of free patterns on the internet - translated to 17 languages. As of today we count 324 catalogues and 12290 patterns translated into English (UK/cm). 12290
We work hard to bring you the best knitting and crochet have to offer, inspiration and advice as well as great quality yarns at incredible prices! Would you like to use our patterns for other than personal use? You can read what you are allowed to do in the Copyright text at the bottom of all our patterns. Happy crafting!
Post a comment to pattern DROPS 170-26
We would love to hear what you have to say about this pattern!
If you want to leave a question, please make sure you select the correct category in the form below, to speed up the answering process. Required fields are marked *.