
Popular categories
Looking for a yarn?




























Comments / Questions (46)
 Sonja wrote:
Vervolg op mijn vraag van deze morgen: 70 naalden = meer dan 30 cm hoogte - op de patroontekening staat dat ik 23 cm hoogte moet hebben voor de raglan. Ik ben nu aan naald 34 en heb al 15.5 cm hoogte.
02.10.2026 - 14:09DROPS Design answered:
Dag Sonja,
Met om de andere naald wordt bedoeld de ene naald wel en de andere naald niet. Als je 18 keer moet meerderen, dan zou je dus op 36 naalden komen en niet op het dubbele.
03.10.2026 - 12:08
Sonja wrote:
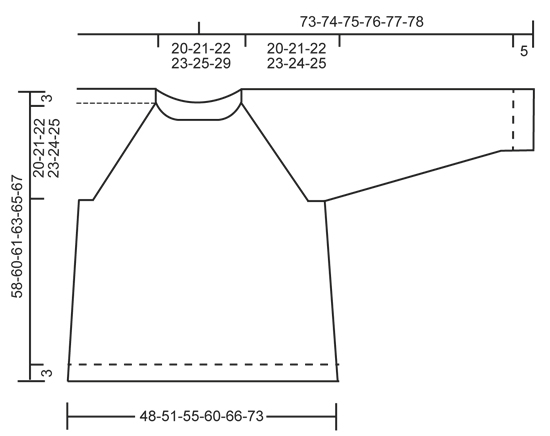
Hallo, ik brei deze trui in maat xl -- mijn vraag gaat over verderbreien in de rondte, na de pas, na rondte 2 -- 17 keer meerderen om de andere naald, dan 18 keer meerderen om de andere naald enz - 17+18 = 35 en dit twee maal wegens om de andere naald - dan heb ik 70 naalden gebreid. Dit zou volgens de proeflap meer dan 30 cm hoogte zijn, terwijl het volgens de patroontekening 23 cm hoogte zou moeten zijn. Ik begrijp dit niet..
02.10.2026 - 09:20DROPS Design answered:
Dag Sonja,
Met om de andere naald wordt bedoeld de ene naald wel en de andere naald niet.
02.10.2026 - 12:40
 Regina wrote:
UWAGA! Umieścić 1 marker na środku przodu (oznaczenie z przodu, gdzie reglan jest najkrótszy). Przer. kolejne okrążenie następująco: przer. 66-70-74-80-88-96 o. przodu, *zdjąć na drut pomocniczy 42-44-46-52-54-56 nast. itd nie rozumiem tego że mam przerabiać 70 oczek przodu bo do tego momentu start miałam w połowie tylu. Czy teraz zaczynam w innym miejscu?
29.10.2024 - 18:25DROPS Design answered:
Witaj Regino, mieliśmy 4 markery na reglany. Dodałaś kolejny marker wyznaczający początek okrążenia na środku tyłu. Marker na przód jest tylko po to by odróżnić przód od tyłu. Zacznij okrążenie tam gdzie wcześniej i podziel oczka następująco: przerób połowę tyłu, zdejmij oczka rękawa na nitkę, nabierz taką liczbę oczek jak w opisie, przerób oczka przodu, zdejmij oczka 2-giego rękawa na nitkę, nabierz taką liczbę oczek jak w opisie i przerób drugą połowę tyłu. Pozdrawiamy!
30.10.2024 - 08:48
Regina wrote:
Witam. Nie rozumiem fragmentu o tym żeby dodawać oczka z każdej strony markera. Jeśli marker mam między oczkami to musiałabym dodawać dwa oczka obok siebie a to niemożliwe
28.10.2024 - 08:16DROPS Design answered:
Witaj Regino, dodajesz 1 oczko w odl. 2 oczek przed markerem i za 2 oczkami za markerem (linia reglanu to 4 oczka prawe). Zobacz opis w części REGLAN (gdy przerabiamy już na okrągło). Pozdrawiamy!
28.10.2024 - 08:44
 Lubov wrote:
Hej, jeg skal til at strikke ryg- og forstykke - hvor ofte skal jeg lave de 4 udtagninger - i hver omgang eller i hver anden omgang? Skal omslaget strikkes drejet på næste omgang?..
29.12.2023 - 00:10DROPS Design answered:
Hej, ja du tager 8 masker ud på hver 2.omgang og ja omslaget skal strikkes drejet på næste omgang :)
03.01.2024 - 08:18
 Sue Corr wrote:
I would like to know the bust measurement of finished garment.....I don't know whether to knit a XL or XXL, many thanks Sue
28.02.2023 - 18:03DROPS Design answered:
Dear Sue, you will find all finished measurements taken flat from side to side in the chart at the end of the pattern; read more here about charts. Happy knitting!
01.03.2023 - 09:40
Charlotte Jørgensen wrote:
Man strikker til ryggen måler 59 cm i str. medium, så strikker man 3 cm rib - og hele trøjen ender med at blive 61 cm - hvordan hænger det sammen? Især når der vel også lægges lidt til for halsen?
28.01.2023 - 20:00DROPS Design answered:
Hei Charlotte. I str. M strikkes det til arbeidet måler 57 cm (ikke 59) målt på baksiden, så byttes det rundpinne og det strikkes en vrangbord på 3 cm = 60 cm, noe som målskissen også viser. mvh DROPS Design
30.01.2023 - 14:17
 Cristina wrote:
Salve, non riesco a capire nel primo ferro quanti segna punti mettere e dove per le maniche. Una volta avviate le maglie e lavorato il primo giro a rov. Vanno messi quattro segna punti per delimitare 16 maglie, 8 a inizio giro e 8 alla fine?
06.02.2022 - 16:50DROPS Design answered:
Buonasera Cristina, i segnapunti vanno messi prima/dopo le maglie laterali indicate per ogni taglia. Ad esempio, per la taglia S contare 8 maglie, inserire 1 segnapunti, contare 32 maglie e inserire l'altro segnapunti. Buon lavoro!
09.02.2022 - 21:59
 Cristina wrote:
Estoy cercana a terminar y me pregunto que sistema de bloqueo recomendáis: ¿agua o vapor?
03.09.2021 - 12:27DROPS Design answered:
Hola Cristina, vapor es suficiente. Cordiales saludos!
03.09.2021 - 15:30
Regina wrote:
Gentilissimi, chiedo: ho seguito il lavoro fino agli aumenti (8 sui segni) a giri alterni per 11 volte in totale ed ora dovrei cominciare gli aumenti (8 sui segni) per 3 volte ogni 4 giri, ossia 24 maglie in più . Solo che mi ritrovo già con 200 m in luogo di 192. E quindi andrò ad avere 224 m. La mia taglia è la S. Ho letto un’altra domanda relativa a questo fatto ma non ho capito bene la risposta. Ho sbagliato qualcosa. Ma non ne vengo a capo.
30.08.2021 - 21:10DROPS Design answered:
Buonasera Regina, per la taglia S prima degli aumenti ci sono 104 maglie. Si aumentano 8 maglie per giro di aumenti per 11 volte totali ogni 2 giri (8x11=88) e poi ogni 4 giri 3 volte (8x3=24), per cui 88 + 24 = 112 aumenti. 104 maglie + 112 maglie = 216 maglie alla fine degli aumenti. Buon lavoro!
30.08.2021 - 23:36
|
|
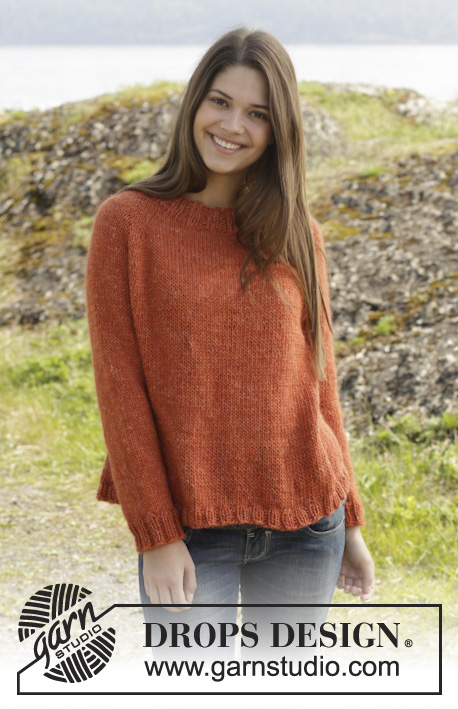
Orange Crush#orangecrushsweater |
|
|
|
|
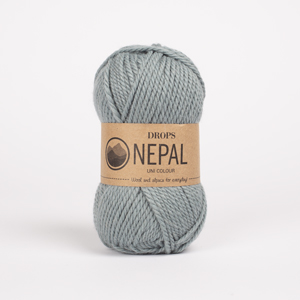
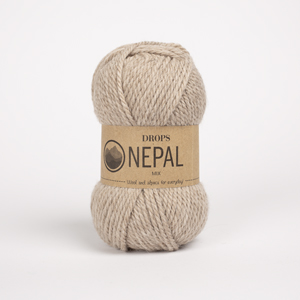
Knitted DROPS jumper with rib and raglan worked top down in ”Nepal”. Size: S - XXXL.
DROPS 158-18 |
|
|
INCREASE TIP: Back and forth on needle: Inc 1 st from RS by making 1 YO, on next row P YO twisted. In the round on needle: Inc 1 st by making 1 YO, on next round K YO twisted. DECREASE TIP: Dec 1 st before marker as follows: Work until 2 sts remain before marker, slip 1 st as if to K, K 1, psso. Dec 1 st after marker as follows: K 2 tog. ---------------------------------------------------------- JUMPER: Worked top down in the round on circular needle/double pointed needles. First work back and forth until sts have been cast on for front piece, then work in the round. Pick up a neck edge at the end. RAGLAN: Cast on 48-50-52-52-52-58 sts on circular needle size 5.5 mm with Nepal. ROW 1 (= WS): P all sts. Insert 1 marker 8-8-8-8-6-6 sts in from each side (= 8-8-8-8-6-6 sts on sleeve in each side, 32-34-36-36-40-46 sts on back piece between markers). Move the markers upwards when working. ROW 2 (= RS): K 2, * inc 1 st - READ INCREASE TIP, K until 2 sts remain before next marker, inc 1 st, K 4 (marker is in the middle of these sts), inc 1 st, K until 2 sts remain before next marker, inc 1 st, K 4 (marker is in the middle of these sts), inc 1 st *, K until 2 sts remain on needle, inc 1 st, K 2 = 6 inc sts. Now cast on 4 sts on needle for front piece = 58-60-62-62-62-68 sts. (NOTE: Repeat *-* in 4th and 6th row as explained below). ROW 3: P all sts, at the end of row cast on 4 sts = 62-64-66-66-66-72 sts. Insert 1 new marker 4 sts in from each side (= 4 sts on front piece in each side, 4 markers in total in piece). ROW 4: K 6, (1st marker is after the first 4 sts), repeat from *-* from 2nd row, K until 2 sts remain before last marker, inc 1 st, K 6 (last marker is before the last 4 sts) = 6 inc sts. Cast on 4 sts = 72-74-76-76-76-82 sts. ROW 5: P all sts, at the end of row cast on 4 sts = 76-78-80-80-80-86 sts (= 8 sts on front piece in each side). ROW 6: K 10, (1st marker is after the first 8 sts), repeat from *-* from 2nd row, K until 2 sts remain before last marker, inc 1 st, K 10 = 6 inc sts (last marker is before the last 8 sts). Cast on 11-12-13-13-15-18 sts = 93-96-99-99-101-110 sts. ROW 7: P, at the end of row, cast on 11-12-13-13-15-18 sts = 104-108-112-112-116-128 sts on needle (= 19-20-21-21-23-26 sts on front piece in each side, 38-40-42-42-46-52 sts on back piece and 14-14-14-14-12-12 sts on each sleeve). REMEMBER THE KNITTING TENSION! Then work piece in the round as follows: ROUND 1: * K until 2 sts remain before next marker, inc 1 st, K 4 (marker is between these sts), inc 1 st *, repeat from *-* 3 more times (= 4 times in total), K the remaining sts (= 8 inc sts) = 112-116-120-120-124-136 sts. ROUND 2: K all sts. Then inc 8 sts on round the same way - i.e. inc 1 st on each side of every marker - every other round 10-11-12-17-20-21 more times (11-12-13-18-21-22 inc in total on front piece), then every 4th round 3-3-3-1-0-0 time = 216-228-240-264-284-304 sts (= 66-70-74-80-88-96 sts on front piece and back piece, 42-44-46-52-54-56 sts on each sleeve). NOTE! Insert 1 marker in the middle on front piece (marks front piece which has shorter raglan). Work next round as follows: Work 66-70-74-80-88-96 sts on front piece, * slip the next 42-44-46-52-54-56 sts (= sleeve) on 1 stitch holder, cast on 6-8-10-12-14-16 sts for armhole, insert a marker in the middle of these new sts *, work the next 66-70-74-80-88-96 sts on back piece, repeat from *-* 1 more time = 144-156-168-184-204-224 sts for body. BODY: Then work in stocking st. When piece measures 10 cm from new sts under sleeve, inc 1 st on each side of markers in the side as follows: Work until 1 st before first marker, 1 YO, 2 sts in stocking st, 1 YO, repeat inc in the other side (= 4 sts inc) = 148-160-172-188-208-228 sts. Repeat inc when piece measures 20-22-24-26-28-30 cm = 152-164-176-192-212-232 sts. When piece measures 55-57-59-61-63-65 cm in total vertically (measured at the back), inc 8 sts evenly on round = 160-172-184-200-220-240 sts. On next round switch to circular needle size 5 mm. Continue to work rib as follows: * K 2, P 2 *, repeat from *-* the entire round until rib has been worked for 3 cm. Cast off with K over K and P over P. SLEEVE: Slip the 42-44-46-52-54-56 sts from stitch holder back on double pointed needles size 5.5 mm. Cast on 6-8-10-12-14-16 sts at the end of row = 48-52-56-64-68-72 sts. Insert a marker in the middle of the new sts under the sleeve. NOW MEASURE THE PIECE FROM HERE. Continue to work in stocking st in the round for 3 cm. On next round dec 1 st - READ DECREASE TIP - on each side of marker. Repeat dec every 5-4-3½-2½-2-2 cm 6-7-8-12-13-14 more times = 34-36-38-38-40-42 sts. Continue in stocking st until piece measures 38-37-37-36-35-33 cm. On next round switch to double pointed needles size 5 mm. Work in stocking st AT THE SAME TIME inc 6-4-6-6-8-6 sts evenly = 40-40-44-44-48-48 sts. Continue to work rib as follows: * K 2, P 2 *, repeat from *-* the entire round. When rib measures 5 cm, loosely cast off all sts with K over K and P over P, sleeve measures approx. 43-42-42-41-40-38 cm (shorter measurements in the larger sizes because of wider shoulders). ASSEMBLY: Sew tog hole under the sleeves. NECK EDGE: Beg mid back and pick up 88-92-96-96-100-112 sts on circular needle size 5 mm around the neck. Then work rib as follows: K 1, * P 2, K 2 *, repeat from *-* until 3 sts remain, P 2, K 1. Continue like this until rib has been worked for 5 cm. Cast off with K over K and P over P. |
|
 |
|
Have you finished this pattern?Tag your pictures with #dropspattern #orangecrushsweater or submit them to the #dropsfan gallery. Do you need help with this pattern?You'll find 16 tutorial videos, a Comments/Questions area and more by visiting the pattern on garnstudio.com. © 1982-2026 DROPS Design A/S. We reserve all rights. This document, including all its sub-sections, has copyrights. Read more about what you can do with our patterns at the bottom of each pattern on our site. |






With over 40 years in knitting and crochet design, DROPS Design offers one of the most extensive collections of free patterns on the internet - translated to 17 languages. As of today we count 333 catalogues and 12525 patterns translated into English (UK/cm). 12525
We work hard to bring you the best knitting and crochet have to offer, inspiration and advice as well as great quality yarns at incredible prices! Would you like to use our patterns for other than personal use? You can read what you are allowed to do in the Copyright text at the bottom of all our patterns. Happy crafting!
Post a comment to pattern DROPS 158-18
We would love to hear what you have to say about this pattern!
If you want to leave a question, please make sure you select the correct category in the form below, to speed up the answering process. Required fields are marked *.