
Popular categories
Looking for a yarn?


Comments / Questions (90)
![]() Solbjorg Olsen wrote:
Solbjorg Olsen wrote:
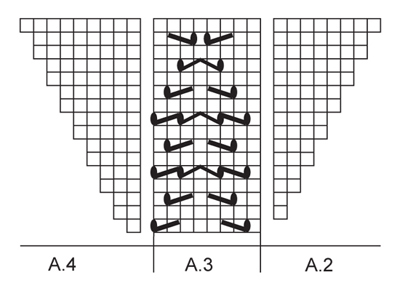
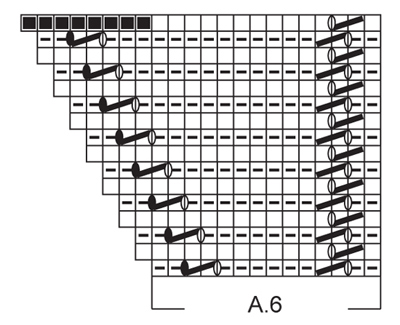
På bildet av sjalet ser jeg at det er strikket ett par omganger med hullmønster før kanten strikkes. Jeg kan ikke finne dette nevnt i mønsteret hvordan dette skal srikkes.
16.10.2018 - 17:34DROPS Design answered:
Hei Solbjorg. Den kanten med hullmønster før spissene langs kanten er en del av A.6 - hullmønsteret lengst til høyre i diagrammet. God fornøyelse.
17.10.2018 - 08:30
![]() Michele Rousse wrote:
Michele Rousse wrote:
Bonjour, Sur la photo du châle il y a un rang entièrement ajouré entre A5 et A6 comment le faire , rien ne l'indique dans les explications. Merci d'avance
04.06.2018 - 11:59DROPS Design answered:
Bonjour Mme Rousse, le diagramme A.6 est la bordure qui se tricote le long des 2 diagonales du châle (= le long du début et de la fin des rangs, où vous avez 1 trou (= 1 jeté, 2 m ens à l'end) tout du long de ces 2 diagonales. Bon tricot!
04.06.2018 - 13:24
![]() Anne wrote:
Anne wrote:
Je fais le châle et je rencontres un problème avec le diagramme A6 je n arrive pas à faire les jours côté raccordement au chale merci de me indiquer la marge de suivre Merci de avance Anne
09.06.2017 - 00:13DROPS Design answered:
Bonjour Anne, les 4 premières m de A.6 (vu sur l'envers) se tricotent ainsi: glisser la 1ère m à l'end, 1 m end, 1 jeté, 2 m ens à l'end - en fin de rang sur l'endroit, tricotez à l'endroit jusqu'à ce qu'il reste 4 m et tricotez ces 4 m ainsi: 1 m end, 1 jeté, 2 m ens à l'end, et tricotez ens à l'end la 4ème m de A.6 avec la m suivante du châle. Bon tricot!
09.06.2017 - 08:23
![]() Anne wrote:
Anne wrote:
Je ai fait une faute dans mon précédent message Christophe est le modèle Butterfly Dance by drops design et non D'ancêtres Mes excuses Merci de avance pour votre réponse
25.04.2017 - 00:20
![]() Anne wrote:
Anne wrote:
Merci pour votre réponse mais je ne trouve la légende du diagramme A1/ A3/ A6/côté gauche pour le A6 Du chale Butterfly D'ancêtres by drops 153-2 Modele ° z-674 n en alpaca Merci de me dépanner je suis bloqué
25.04.2017 - 00:04DROPS Design answered:
Bonjour Anne, les symboles utilisés dans A.1/A.3/A.6 sont les mêmes que précédemment, ainsi dans A.3 au 1er rang, vous tricotez: 1 m end, 1 double jeté, glisser 1 m à l'end, 1 m end, passer la m glissée par-dessus la m tricotée, 3 m end, 2 m ens à l'end, 1 double jeté. Bon tricot!
25.04.2017 - 09:04
![]() Anne Auguste wrote:
Anne Auguste wrote:
Bonsoir Je ne comprends pas les diagramme A1/A3/A6 ne ayant pas la Legendre des formes crochet merci de me donner le expliquation Cordialement
23.04.2017 - 22:08DROPS Design answered:
Bonjour Mme Auguste, vous trouverez la légende des diagrammes au-dessus des diagrammes, à la fin de explications, et la signification de chaque symbole. Bon tricot!
24.04.2017 - 10:38
![]() Antonia wrote:
Antonia wrote:
En diagrama A6 los puntos orillos se incluyen en el o van a parte?
24.02.2016 - 23:02DROPS Design answered:
Hola Antonia. Los pts orillo están incluidos en el diagrama A.6. No te olvides de que en cada fila por el LD tienes que trabajar el último pt del diagrama junto con el siguiente pt libre del chal, de este modo el borde del chal se une al chal.
25.02.2016 - 20:21
![]() Almudena wrote:
Almudena wrote:
Cuando se termina de repetir A5 en las indicaciones dice 2 pjd en el 1er pt, se refiere a hacer un aumento? Y cuando dice 2d en el pt central, también se refiere a realizar un aumento ?
24.02.2016 - 16:49DROPS Design answered:
Hola Almudena. Después de terminar A.5 se hacen los aum trabajando 2 d. en el 1er pt, el pt central y el último pt.
25.02.2016 - 20:31
![]() Rocio wrote:
Rocio wrote:
(no entiendo cuando dice que en cada fila por LD trabajar el último punto junto con elsiguiente libre del chal, a qué último punto se refiere? Al ultimo del diagrama A6? Entonces sería 2pjd?) (tampoco entiendo cómo trabajar la siguiente fila desl el 1er pt como de revés ) gracias
24.02.2016 - 16:03DROPS Design answered:
Hola Rocio. Para unir el borde del chal con el chal hay que trabajar por el LD el último pt del borde con el último punto del chal como 2 pjd, a la vta pasar este pt sin trabajar (deslizarlo) a la ag derecha pinchando el pt como si lo trabajaramos de revés.
26.02.2016 - 17:18
![]() Rocio wrote:
Rocio wrote:
Buenas. Perdona las molestias pero tengo varias dudas en la realización del borde. Se montan 14 puntos y se teje una fila de derecho sobre estos 14puntos y se gira la labor, ahora hay que trabajar A6 ( se trabaja solo sobre estos 14 puntos nuevos o sobre toda la fija?)
24.02.2016 - 16:02DROPS Design answered:
Hola Rocio. El borde (el diagrama A.6) se trabaja solamente en los 14 pts montados al terminar A.5.
25.02.2016 - 20:35
|
|||||||||||||||||||||||||
Butterfly Dance#butterflydanceshawl |
|||||||||||||||||||||||||
|
|
|||||||||||||||||||||||||
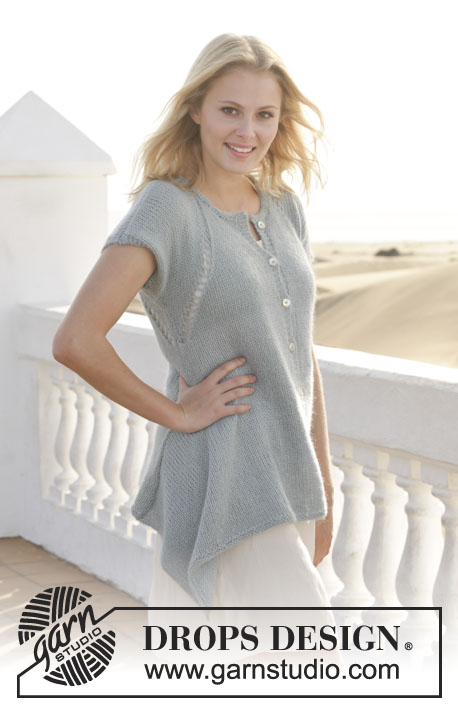
Knitted DROPS shawl in garter st with lace pattern in ”Alpaca”.
DROPS 153-2 |
|||||||||||||||||||||||||
|
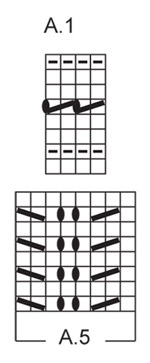
GARTER ST (back and forth on needle): K all rows. 1 ridge = 2 rows K. PATTERN: See diagrams A.1 to A.6. The diagrams show all rows in pattern seen from RS. INC REPETITION: Inc on every row from RS as follows with double YO: Row 1: Inc with double YO inside 1 edge st in each side of shawl and on each side of mid st. Row 2: K all sts, K first YO to make a hole, drop the second off the needle. Row 3: Inc with double YO inside 1 edge st in each side of shawl and on each side of mid st. Row 4: K all sts, K first YO to make a hole, drop the second off the needle. Every time inc repetition has been worked, piece inc 8 sts. ---------------------------------------------------------- SHAWL: Cast on 3 sts on circular needle size 3.5 mm with Alpaca. Insert a marker in the 2nd st = mid st. Work first row as follows: K 1, 1 YO, K 1, 1 YO, and K 1, turn and K = 5 sts on needle. Continue in GARTER ST - see explanation above AT THE SAME TIME work INC REPETITION (work this the entire shawl) – see explanation above, until inc repetition has been worked 22 times and there are 44 holes upwards on each side of mid st = 181 sts on needle. No of sts can now be divided by 8 + 5. Then work diagram A.1 (work inc as before and edge and mid st in garter st). On row in diagram with K 2 tog and YO work until 1 st remains before mid st, K 1, mid st and inc as before on each side of this, K 1 and continue with diagram A.1. When diagram has been worked 1 time vertically, there are 197 sts on needle. Then work according to diagram A.2, A.3 and A.4 as follows: Work edge st and YO as before, work A.2 (NOTE! No sts to work in A.2 on first row of diagram), repeat A.3 until 1 st remains before mid st, work A.4 over this st, YO and mid st as before. Repeat on the other side of shawl. Continue working according to A.2, A.3 and A.4 this way. When A.2-A.4 have been worked 1 time vertically, there are 229 sts on needle. Now replace diagram A.3 with diagram A.5, inc have been made to fit 2 extra repetitions of A.5 on each side of shawl. Work according to diagram A.2, A.5 and A.4 and work more repetitions of A.5 when they fit. Continue like this until A.5 has been worked 6 times in total vertically. There are now 325 sts on needle and no of sts is still divisible by 8 + 5. On next row from RS work without inc repetition as follows: K 2 in first st, then * K 4, 1 yo *, repeat *-* 8 times, K 97, repeat *-* 8 times. K 2 in middle st, repeat *-* 8 times, K 97, repeat *-* 8 times and end with K 2 in last st = 360 sts on needle, st no can be divided by 8. K 1 row from WS, K YOs from previous row twisted to avoid holes. Then work the edge on shawl. EDGE: Do not turn piece, but cast on 14 new sts for shawl edge from WS. Turn piece, K 1 row over the 14 new sts. Turn piece. Then work according to diagram A.6 over these sts from WS (1st row in diagram = WS). NOTE! On every row from RS work last st tog with next free st from shawl – this way the shawl edge is worked tog and fastened on shawl. On next row slip 1st st as if to P. Continue working A.6 along the entire edge of shawl = 43 tips along edge. Cut and fasten the yarn. |
|||||||||||||||||||||||||
Diagram explanations |
|||||||||||||||||||||||||
|
|||||||||||||||||||||||||
 |
|||||||||||||||||||||||||
 |
|||||||||||||||||||||||||
 |
|||||||||||||||||||||||||
Have you finished this pattern?Tag your pictures with #dropspattern #butterflydanceshawl or submit them to the #dropsfan gallery. Do you need help with this pattern?You'll find 18 tutorial videos, a Comments/Questions area and more by visiting the pattern on garnstudio.com. © 1982-2026 DROPS Design A/S. We reserve all rights. This document, including all its sub-sections, has copyrights. Read more about what you can do with our patterns at the bottom of each pattern on our site. |
|||||||||||||||||||||||||


With over 40 years in knitting and crochet design, DROPS Design offers one of the most extensive collections of free patterns on the internet - translated to 17 languages. As of today we count 324 catalogues and 12290 patterns translated into English (UK/cm). 12290
We work hard to bring you the best knitting and crochet have to offer, inspiration and advice as well as great quality yarns at incredible prices! Would you like to use our patterns for other than personal use? You can read what you are allowed to do in the Copyright text at the bottom of all our patterns. Happy crafting!
Post a comment to pattern DROPS 153-2
We would love to hear what you have to say about this pattern!
If you want to leave a question, please make sure you select the correct category in the form below, to speed up the answering process. Required fields are marked *.