
Popular categories
Looking for a yarn?


Comments / Questions (38)
![]() Gerda wrote:
Gerda wrote:
Habe ein ganz ähnliches Muster vor Jahren schon im Internet gefunden und nachgearbeitet; da von oben nach unten gearbeitet wird muss alles vorher gut ausgemessen und berechnet sein; Vorsicht bei stärkerem Busen als hier dargestellt, wird leicht zu eng!
31.01.2014 - 14:16
![]() Nelly wrote:
Nelly wrote:
Bellissimo, sono a metà del lavoro e sono molto soddisfatta del risultato! Non vedo l' ora di finirlo e indossarlo. Grazie è continuate così Nelly
30.11.2013 - 11:20
![]() Nelly wrote:
Nelly wrote:
Bellissimo, sono a metà del lavoro e sono molto soddisfatta del risultato! Non vedo l' ora di finirlo e indossarlo. Grazie è continuate così Nelly
30.11.2013 - 11:19
![]() Maistret wrote:
Maistret wrote:
J'ai quelques doutes concernant le démarrage, et le nombre de mailles : les 54 mailles représentent-elles le tour de cou, et faut-il les tricoter en circulaire? Ca me paraît peu!
13.10.2013 - 20:56DROPS Design answered:
Bonjour Mme Maistret, on monte 54 m et on tricote 2 côtes mousse en rond, puis on forme la ré-hausse dos en allers et retours jusqu'à ce que 48 m aient été tricotées (cf explications), et on tricote alors de nouveau en rond. Pensez à bien vérifier votre échantillon (17 m = 10 cm de large en jersey). Bon tricot!
14.10.2013 - 09:27
![]() Karolien wrote:
Karolien wrote:
Vanaf regel 16 van onder, van patroon a1 smallmedium komt er opeens uit het niets averechtse steken bij, moest mijn werk al 3 keer uithalen en die meerderingen daarna in de averechtse steken moeten die echt in de volgende nld. recht gebreid worden?
31.08.2013 - 11:15DROPS Design answered:
Hoi Karolien. In nld 15 heb je 23 st per herhaling met 2 omslagen erbij heb je 25 st in nld 16. Je breit nu: 3 av, 19 r en 3 av per herhaling. Er komt dus wel een av st bij aan beide kanten, maar het aantal r st in het midden blijft hetzelfde als in nld 15.
04.09.2013 - 11:07
![]() Sevgi wrote:
Sevgi wrote:
Sehr schön
28.06.2013 - 23:57
![]() Anita wrote:
Anita wrote:
Leuk jurkje maar dan zonder die rand aan de onderkant. Die valt uit de toon
20.06.2013 - 09:08Kerstin wrote:
Einfallsreiche Bordüre. Nicht so sicher mit den 3/4 Aermeln.
18.06.2013 - 17:03Teresa wrote:
Wunderschönes Kleid, würde ich gerne stricken!
17.06.2013 - 21:07
![]() Henny Gimnes wrote:
Henny Gimnes wrote:
Nydelig tunika,gleder meg til å strikke
14.06.2013 - 13:42
|
|||||||||||||||||||||||||||||||
Orchid Bloom#orchidbloomdress |
|||||||||||||||||||||||||||||||
|
|
|||||||||||||||||||||||||||||||
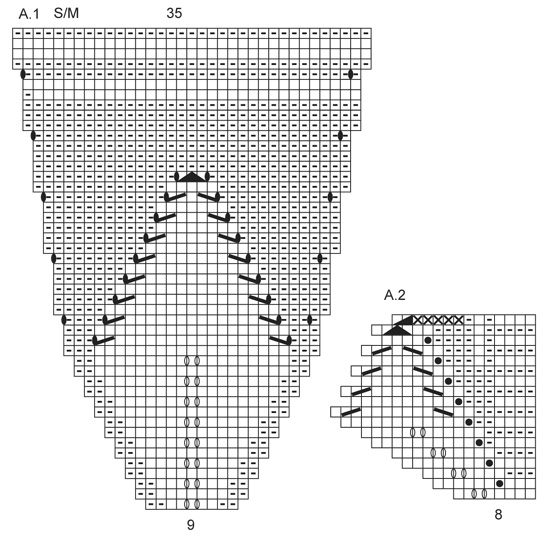
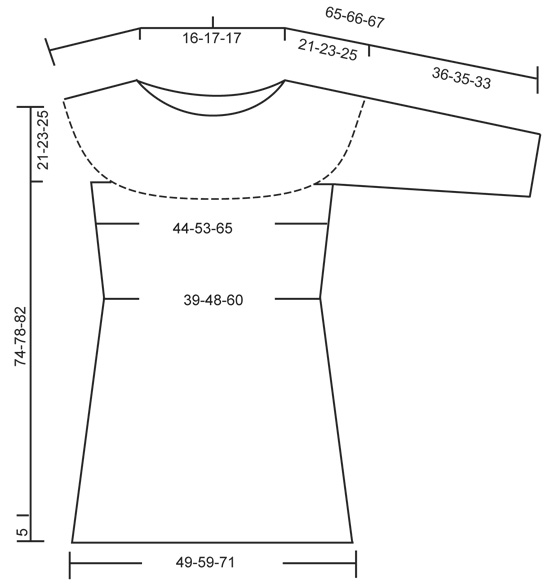
Knitted DROPS dress with round yoke and lace pattern in ”Big Merino”. Size: S - XXXL.
DROPS 151-6 |
|||||||||||||||||||||||||||||||
|
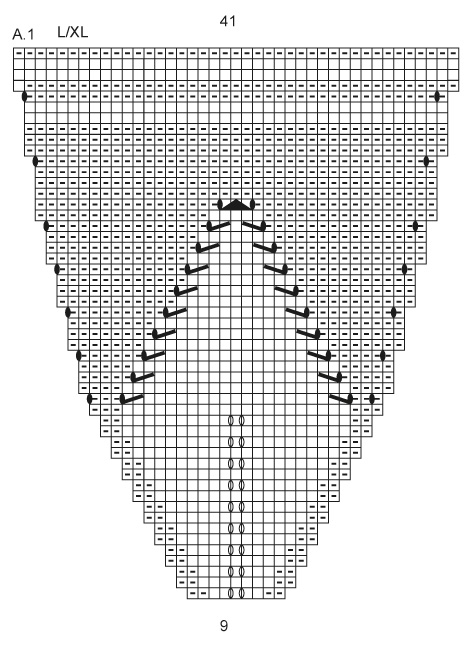
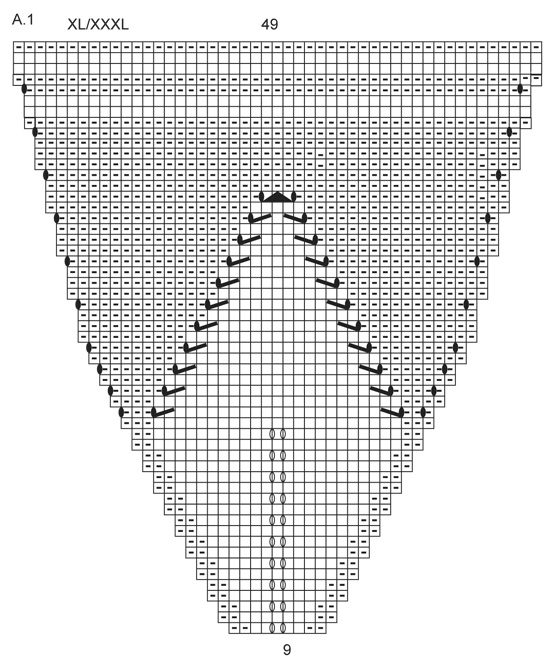
GARTER ST (in the round on circular needle): * K 1 round and P 1 round *, repeat from *-*. 1 ridge = 2 rounds. PATTERN: See diagrams A.1 and A.2. See diagram A.1 for size! ---------------------------------------------------------- DRESS: Worked in the round on circular needle, top down. YOKE: Cast on 54-58-58 sts on a short circular needle size 5 mm with Big Merino. Work 2 RIDGES in garter st - see explanation above, on last round inc 9-5-5 sts evenly = 63 sts in all sizes. Insert 1 marker at beg of round = mid back. Then work an elevation at the back in garter st as follows: K 8 sts past marker, turn, tighten yarn and K 16 sts back, turn, tighten yarn and K 24 sts, turn, continue by working 8 sts more on every turn until a total of 48 sts have been worked, turn and K 1 round until marker mid back again. Then work according to A.1 (work 7 repetitions of A.1 in width). Switch to a longer circular needle when needed. When A.1 has been worked, there are 245-287-343 sts on round. K 1 round while AT THE SAME TIME adjusting the no of sts to 240-288-340. Work next round as follows from mid back: Work 33-41-51 sts, slip the next 54-62-68 sts on 1 stitch holder for sleeve (without working them first), cast on 8 new sts, work 66-82-102 sts (= front piece), slip the next 54-62-68 sts on 1 stitch holder for sleeve (without working them first), cast on 8 new sts, work 33-41-51 sts. BODY: = 148-180-220 sts. NOW MEASURE PIECE FROM HERE! Insert 1 marker in each side, in the middle of the 8 new sts that were cast on. Work in stocking st. When piece measures 3 cm, dec 1 st on each side of markers, repeat dec every 4-4½-5 cm 3 more times (4 dec in total ) = 132-164-204 sts. When piece measures 21-23-25 cm, inc 1 st on each side of each marker, repeat inc every 3 cm 8 more times (9 inc in total) = 168-200-240 sts. Continue until piece measures 53-55-57 cm, cast off. SLEEVE: Slip sts from one stitch holder on double pointed needles size 5 mm, cast in addition on 8 sts mid under sleeve (insert 1 marker in the middle of these sts) = 62-70-76 sts. NOW MEASURE PIECE FROM HERE! Work in stocking st in the round. When sleeve measures 3 cm, dec 1 st on each side of marker. Repeat dec every 2½-2-1½ cm 10-13-14 more times (11-14-15 times in total) = 40-42-46 sts. When sleeve measures 35-34-32 cm (shorter measurements in the larger sizes because of wider shoulders), work 2 ridges in garter st. Cast off. Work the same way over the sts on the other stitch holder. ASSEMBLY: Sew the openings under the sleeves. EDGE WITH LEAF PATTERN: Work edge back and forth on circular needle and fasten at the bottom of dress when finished. Cast on 8 sts on circular needle size 5 mm with Big Merino. Work according to A.2 (1st row = from RS). Work A.2 until piece measures 98-118-142 cm vertically, cast off. Sew cast-on edge and cast-off edge tog, fasten the edge at the bottom of dress, make sure that the seam on edge is mid back on dress. |
|||||||||||||||||||||||||||||||
Diagram explanations |
|||||||||||||||||||||||||||||||
|
|||||||||||||||||||||||||||||||
 |
|||||||||||||||||||||||||||||||
 |
|||||||||||||||||||||||||||||||
 |
|||||||||||||||||||||||||||||||
 |
|||||||||||||||||||||||||||||||
Have you finished this pattern?Tag your pictures with #dropspattern #orchidbloomdress or submit them to the #dropsfan gallery. Do you need help with this pattern?You'll find 21 tutorial videos, a Comments/Questions area and more by visiting the pattern on garnstudio.com. © 1982-2026 DROPS Design A/S. We reserve all rights. This document, including all its sub-sections, has copyrights. Read more about what you can do with our patterns at the bottom of each pattern on our site. |
|||||||||||||||||||||||||||||||


With over 40 years in knitting and crochet design, DROPS Design offers one of the most extensive collections of free patterns on the internet - translated to 17 languages. As of today we count 324 catalogues and 12245 patterns translated into English (UK/cm). 12245
We work hard to bring you the best knitting and crochet have to offer, inspiration and advice as well as great quality yarns at incredible prices! Would you like to use our patterns for other than personal use? You can read what you are allowed to do in the Copyright text at the bottom of all our patterns. Happy crafting!
Post a comment to pattern DROPS 151-6
We would love to hear what you have to say about this pattern!
If you want to leave a question, please make sure you select the correct category in the form below, to speed up the answering process. Required fields are marked *.