
Popular categories
Looking for a yarn?


Comments / Questions (17)
![]() Myrna Laupland wrote:
Myrna Laupland wrote:
Rouge Neck Warmer - Re increase after 144 sts. Rib K3/P3. Do I make 1 YO between 2 P stitches or between a K and P stitch? Also Re Inc alternately on the right and left side of P sections - does this mean increasing a whole row on the right side and then the next time increasing whole row on left side or One increase on right/one on left side all around one row? Thank you
26.02.2023 - 06:09DROPS Design answered:
Dear Myrna, the yo is worked inside the p3 (between 2 purl stitches). You increase in one row at the beginning of each purl section and then on the next row increase at the end of each purl section. Happy knitting!
26.02.2023 - 23:58
![]() Cecilia S wrote:
Cecilia S wrote:
Det blev ordning på länkarna och mössan blev verkligen jättefin :) Tack för fint mönster!
03.10.2021 - 21:33
![]() Cecilia Smeby wrote:
Cecilia Smeby wrote:
Hej Tyvärr är denna sida trasig. Länkar till symbolerna långt ner på sidan är döda. Exempel: Symbols = 2m Räta tills
25.09.2021 - 22:49
![]() Natalie wrote:
Natalie wrote:
Thank you so much for this pattern!
07.12.2018 - 01:17
![]() Chantal wrote:
Chantal wrote:
Le modèle se tricote avec 2 fils. Dans le diagramme de la torsade à A2, il y a 3 m. end. puis 3 m. en sur une aig. à torsade. Puisque le fil est double et que le nombre de maille est impaire, dois-je prendre 1 fil pour la section impaire et faire suivre le second fil? merci
14.11.2015 - 03:59DROPS Design answered:
Bonjour Chantal, on tricote avec 2 fils comme un seul, chaque maille est composée de 2 fils et la torsade se fait bien sur 6 m, prenez bien chacune des 3 m pour les glisser sur l'aiguille auxiliaire (chaque maille = 2 fils). Bon tricot!
16.11.2015 - 09:09Chantal Lainé wrote:
Peut-on faire ce model avec 2 aiguilles? merci
23.10.2015 - 22:44DROPS Design answered:
Bonjour Mme Lainé, cliquez ici pour plus d'infos sur l'adaptation d'un modèle en allers et retours. Bon tricot!
24.10.2015 - 10:07
![]() Törcsvary G. wrote:
Törcsvary G. wrote:
Stricke die Mütze und bin gerade beim abnehmen. Wenn ich aber vor und nach jeder Markierung je 1 Masche abnehme, sind das 10 Maschen pro Runde. Also insgesamt 40 Maschen + die 8 Maschen im Muster. Wie können es dann nach den Abnahmen nur noch 25 Maschen sein? Was mache ich falsch?
08.12.2014 - 20:47DROPS Design answered:
Die Anleitung ist an dieser Stelle leider nicht ganz korrekt und wird gleich aktualisiert - Sie arbeiten die Abnahmen zunächst in jeder 2. Rd 3 x (= 30 M abgenommen), danach in jeder Rd noch 4 x (= 40 weitere M abgenommen, = 70 M). In denselben 4 Rd nehmen Sie noch 8 M in A.3 ab, d.h. es bleiben 27 M und nicht 25 M übrig, aber das macht nichts - die können Sie auch einfach paarweise zusammenstricken. Ich werde das letztere Problem an die Designerinnen weiterleiten.
10.12.2014 - 22:26
![]() Kat wrote:
Kat wrote:
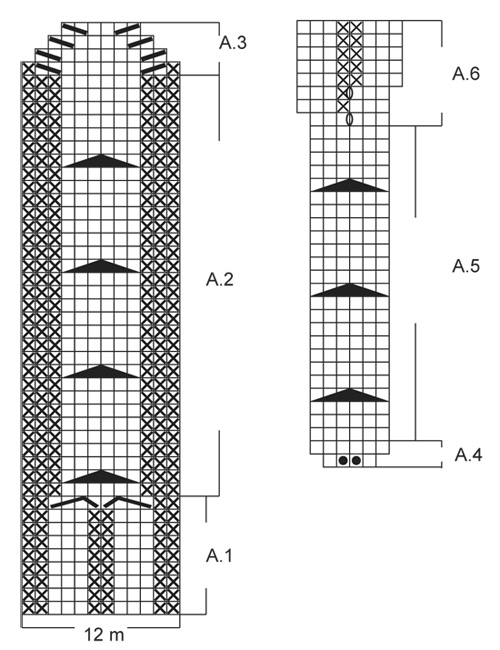
Er der en fejl i øverste line på A1? På billedet er 2x4 masker involveret snoningen, men i beskrivelsen til diagrammet tales der kun om 2x3 masker.
12.08.2013 - 18:55DROPS Design answered:
Ja, det har vært en feil i diagrammet A.1. Det er rettet opp nå.
16.08.2013 - 15:23
![]() Lucia wrote:
Lucia wrote:
Me gusta es muy lindo y practico.
26.06.2013 - 23:27
![]() Petra wrote:
Petra wrote:
Sieht sehr warm aus, gefällt mir und werde es bestimmt stricken
21.06.2013 - 19:48
|
||||||||||||||||||||||||||||
Rouge#rougeset |
||||||||||||||||||||||||||||
|
|
||||||||||||||||||||||||||||
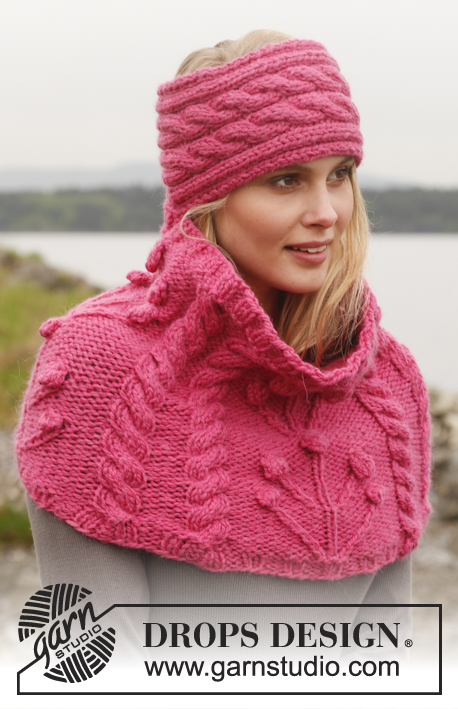
Knitted DROPS hat and neck warmer with cables in 2 strands ”Alpaca”.
DROPS 150-27 |
||||||||||||||||||||||||||||
|
HAT: PATTERN: See diagrams A.1, A.2 and A.3. DECREASE TIP HAT: Dec 1 st on each side of every marker as follows: Dec as follows 2 sts before marker: Slip 1 st as if to K, K 1, psso. Dec as follows after marker: K 2 tog. ---------------------------------------------------------- HAT: Cast on 100-105 sts on circular needle size 3 mm with 2 strands Alpaca. Work rib K 3/P 2 over 50 sts, K 3, A.1 over 12 sts, beg with K 3 and continue rib the rest of the round. Continue rib and A.1 until A.1 has been work 1 time vertically. Switch to double pointed needles and continue in stocking st but work the 12 sts in A.1 according to A.2. When piece measures 18-19 cm, insert 5 markers in the piece as follows: S/M: 20 sts between each marker. Make sure that A.2 is in the middle of a space with 20 sts. L/XL: 21 sts between each marker. Make sure that A.2 is in the approx. middle of a space with 21 sts. All sizes: Continue in stocking st and with A.2 while dec before and after markers, repeat every other round 3 more times. Then dec every round 4 times in total BUT between the markers where A.2 is, dec according to diagram A.3 = 20-25 sts in total remain on round after last row of A.3. On next round, K all sts tog 2 by 2 = 10-13 sts remain. Cut the yarn, use a needle and pull it through the remaining sts, tighten tog and fasten. The hat measures approx. 23-24 cm vertically. ---------------------------------------------------------- NECK WARMER: PATTERN: See pattern A.4, A.5 and A.6. INCREASE TIP: Inc as follows in P-sections: Make 1 YO between 2 sts, P YO twisted on next round to avoid holes. Inc alternately on the right and left side of P-sections. ---------------------------------------------------------- NECK WARMER: Worked in the round on circular needle, top down. Loosely cast on 88 sts on circular needle size 4 mm with 1 strand of each colour. K 1 round, on next roundwork * K 3, P 2, A.4 (= 4 sts, becomes 6 sts) and P 2 *, repeat from * - * the rest of round = 104 sts. Then work: * K 3, P 2, A.5, and P 2 *, repeat from * - * the rest of round. Continue like this until A.5 has been worked 1 time vertically, piece measures approx. 10 cm. Now work * K 3, P 2, A.6, and P 2 *, repeat from * - * the rest of round. Continue like this until diagram A.6 has been worked 1 time vertically = 120 sts. READ INCREASE TIP! On next round, inc all 2 P sts to 3 P sts = 144 sts. Switch to a longer circular needle and continue with rib K 3/P 3. Then inc the same way every 6th round 3 more times in total = 216 sts (K 3/P 6). Work 4 more rounds with K 3/P 6 and loosely cast off with K over K and P over P. |
||||||||||||||||||||||||||||
Diagram explanations |
||||||||||||||||||||||||||||
|
||||||||||||||||||||||||||||
 |
||||||||||||||||||||||||||||
Have you finished this pattern?Tag your pictures with #dropspattern #rougeset or submit them to the #dropsfan gallery. Do you need help with this pattern?You'll find 14 tutorial videos, a Comments/Questions area and more by visiting the pattern on garnstudio.com. © 1982-2026 DROPS Design A/S. We reserve all rights. This document, including all its sub-sections, has copyrights. Read more about what you can do with our patterns at the bottom of each pattern on our site. |
||||||||||||||||||||||||||||


With over 40 years in knitting and crochet design, DROPS Design offers one of the most extensive collections of free patterns on the internet - translated to 17 languages. As of today we count 324 catalogues and 12290 patterns translated into English (UK/cm). 12290
We work hard to bring you the best knitting and crochet have to offer, inspiration and advice as well as great quality yarns at incredible prices! Would you like to use our patterns for other than personal use? You can read what you are allowed to do in the Copyright text at the bottom of all our patterns. Happy crafting!
Post a comment to pattern DROPS 150-27
We would love to hear what you have to say about this pattern!
If you want to leave a question, please make sure you select the correct category in the form below, to speed up the answering process. Required fields are marked *.