
Popular categories
Looking for a yarn?


Comments / Questions (9)
![]() Egbertien Van Langeveld wrote:
Egbertien Van Langeveld wrote:
Goedendag, Ik heb een vraag over: gehaakte spencer MERLIN. Bij de schouder staat 2 aan 2 samen breien. Betekent dit 2 keer 1 steek minderen? – haak de eerste 4 st langs de hals 2 aan 2 samen –
17.11.2025 - 12:26DROPS Design answered:
Dag Egbertien,
Ja, klopt, je mindert dan 2 keer een steek door steken samen breien. Bovenaan de beschrijving staat hoe je steken samen kunt breien.
22.11.2025 - 09:42
![]() Linda wrote:
Linda wrote:
Some cute patterns here on this site but I cannot even find the basic information of Level to complete this pattern~ I can do all things but find all the information. Maybe it will take time but ugh I really like doing Amigurumi for the Holidays and can find none of them? Do you not have toys?
09.11.2022 - 02:00DROPS Design answered:
Dear Linda, there is no level stated since this is quite individually - read the pattern thoroughly and feel free to ask any question here if needed - you will find all our crocheted toys here. Happy crocheting!
09.11.2022 - 08:34
![]() Simkóné Nagy Judit wrote:
Simkóné Nagy Judit wrote:
Bocsánat, a korábbi kérdésem kiegészítéséhez szólok, közben rájöttem, hogy a kérdéses sornál az 5 számjegy az 5 különböző méretre vonatkozik. Így megoldódott a problémám. 😊
13.05.2022 - 11:38
![]() Simkóné Nagy Judit wrote:
Simkóné Nagy Judit wrote:
Az elsó sorban az első erp a 4.szembe, ez rendben, de utána 1rp a köv. 2-2-6-4-2 lsz-be, ez azt jelenti, hogy onnan a 2.majd 2.és hatodik stb.szembe megy rövidpálca? Azután pedig az 1 láncszem, 6 erp minta folytatódik. A sor elejét nem értem, vagy nem jól értelmezem, vagy nem jó a leírás?
12.05.2022 - 13:15
![]() Benedek-Kováts, Emese wrote:
Benedek-Kováts, Emese wrote:
A magyar fordításban rosszul van a próba. Nem 18 RPx 12 sor, hanem 18 szem x 12 sor minta (1 sor rp 1 sor erp váltakozva).
27.12.2020 - 21:07
![]() JUANA wrote:
JUANA wrote:
LA AYUDA ES EXCELENTE PARA TEJER PARA MIS NIETOS, GRACIAS
17.08.2020 - 20:07
![]() Eileen O'Keeffe wrote:
Eileen O'Keeffe wrote:
What stitch is used in swatch for Merlin vest.
05.02.2020 - 16:18DROPS Design answered:
Dear Mrs O'Keeffe, the tension is measured with the pattern used in the vest - see PATTERN (= 1 row with trebles/1 row with double crochets (UK-English)). Happy crocheting!
06.02.2020 - 09:26
![]() Anne wrote:
Anne wrote:
Hej er der en fejl i staten med l lm kan ikke få det til at passe og til at det i næste rakke skal blive 54
23.12.2016 - 11:33DROPS Design answered:
Hej Anne. Du starter med 62 lm og haekler: Fortsæt med 1 fm i 2.lm fra nålen = 2 fm, derefter 1 fm i hver af de næste 4 lm, * spring over 1 lm, 1 fm i hver at de næste 6 lm *, gentag fra *-* rækken ud = 54 fm = inden *-* har du haeklet 6 fm over 6 lm (förste fm er en lm som du vendte med) og har 56 lm tilbage, du haekler 6 fm over 7 lm, dvs 8 gentagelser = 8x6 = 48 + 6 fm fra starten = 54 fm
30.12.2016 - 13:03
![]() Nathalie Dillen wrote:
Nathalie Dillen wrote:
Ik begrijp het patroon niet meer vanaf hals en schouder. Er staat starten met hals en eindigen met schouder maar bij de uitleg starten ze toch niet aan kant waar hals komt?
18.03.2014 - 17:22DROPS Design answered:
Hoi Nathalie. Je haakt de schouders apart. Dus eerst haak je over de eerste 16-17-18-20-21 st van het pand = schouder 1. Als je hiermee klaar bent, dan ga je aan de andere kant van het pand en haakt over de 16-17-18-20-21 st hier - dus dat betekent dat je een opening hebt ertussen voor de hals van bijv 12 st (kleinste maat).
19.03.2014 - 11:31
|
|
Merlin#merlinvest |
|
 |
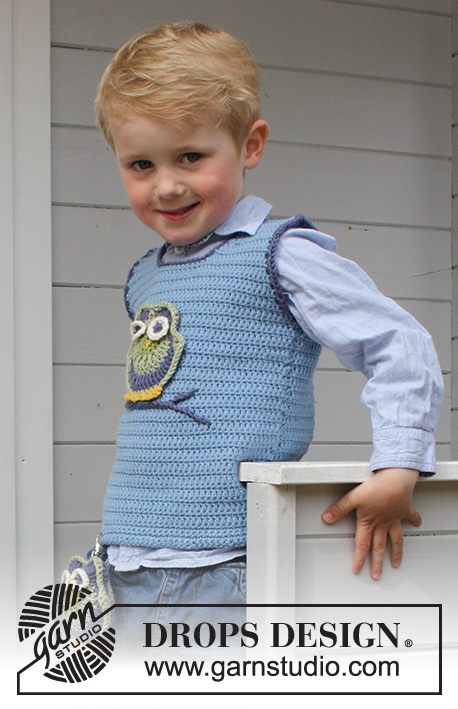 |
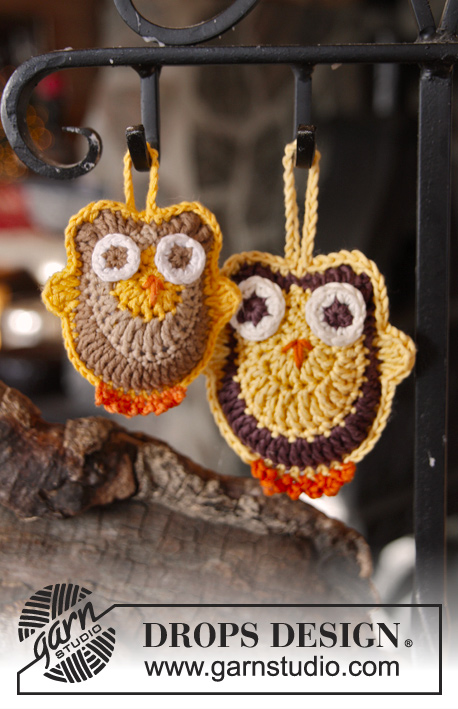
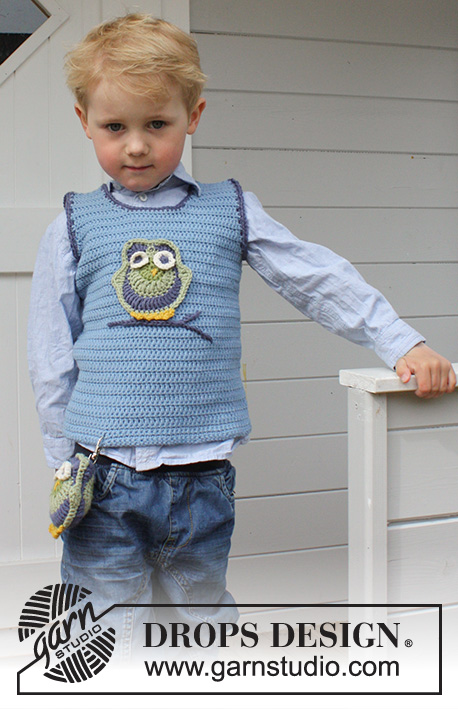
Crochet vest / slipover with owl in DROPS Merino Extra Fine. Size children 3 - 12 years.
DROPS Children 24-11 |
|
|
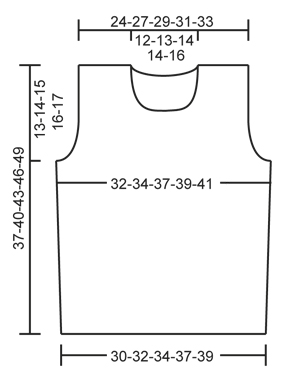
CROCHET INFO: On every dc row replace first dc with 1 ch. On every tr row replace first tr with 3 ch. PATTERN: ROW 1: 1 tr in every dc. ROW 2: 1 dc in every tr. Repeat rows 1 and 2. DECREASE TIP: Dec 1 st by working 2 sts tog. Work 2 dc tog as follows: Insert hook in first st and pull thread through, insert hook in next st and pull thread through, make 1 YO and pull thread through all 3 loops on hook. Work 2 tr tog as follows: Work 1 tr in first st but wait with last pull through, work 1 tr in next st but on last pull through, pull thread through all 3 loops on hook. MAGIC CIRCLE: When piece is worked in the round, start with this technique to avoid holes in the middle (instead of ch-ring): Hold the yarn end and wind the yarn one time around the index finger to make a loop. Hold the loop with left thumb and middle finger, place the yarn over left index finger. Insert hook through the loop, make a YO and pull yarn through loop, work 1 ch, then work dc around the loop. When the desired no of dc have been reached, pull the yarn end to tighten the loop. Fasten the yarn end at the back. COLOUR CHANGE: To get a nice transition between the colour changes, work last sl st on round with the new colour as follows: Insert hook in last ch from beg of round, make a YO with the new colour and pull it through st on hook. -------------------------------------------------------- VEST: To make the texture the same on the piece work it back and forth in 2 parts, and sew tog when finished. FRONT PIECE: Work 62-67-71-76-81 ch with Merino Extra Fine on hook size 4 mm. Continue with 1 dc in 2nd ch from hook, then 1 dc in each of the next 4-2-6-4-2 ch, * skip 1 ch, 1 dc in each of the next 6 ch *, repeat from *-* the entire row = 54-58-62-66-70 dc (first ch = 1 dc). READ CROCHET INFO! Turn and work 4 rows with 1 dc in every dc. Then work PATTERN until finished measurements - see explanation above. REMEMBER THE CROCHET TENSION! When piece measures 10-11-12-13-14 cm, inc 1 st in each side by working 2 sts in the second and next to last st. Repeat inc when piece measures 20-21-22-23-24 cm = 58-62-66-70-74 sts. When piece measures approx. 24-26-28-30-32 cm (adjust so that next row is a row with dc), dec for armholes as follows: Work sl sts over the first 3 tr, continue with dc until 3 tr remain, turn. * Work 3 ch in first dc, then work the next 2 tr tog – SEE DECREASE TIP, then work tr until 3 dc remain, work the next 2 tr tog, then 1 tr in last dc. Turn and work 1 row with dc over all tr, turn *. Repeat from *-* 3 more times = 44-48-52-56-60 sts on row. When piece measures 29-31-34-36-39 cm, beg neck line and finish each shoulder separately. 1ST SHOULDER: Work only over the first 16-17-18-20-21 sts. Turn and work back - at the same time work the first 4 sts towards neck tog 2 by 2 – SEE DECREASE TIP! On next row work the 2 outermost sts towards neck tog, repeat this dec on every row 2 more times = 11-12-13-15-16 sts remain on shoulder. Continue to work until piece measures 37-40-43-46-49 cm, fasten off. 2ND SHOULDER: Work as first shoulder – make sure to beg in the correct side of piece so that the texture is the same the entire way. BACK PIECE: Work as front piece to and with armhole dec = 44-48-52-56-60 sts on row. Continue to work until piece measures approx. 36-39-42-45-48 cm. Now work 2 rows with pattern as before only over the 11-12-13-15-16 sts in each side (the middle 22-24-26-26-28 sts = neck). Fasten off. ASSEMBLY: Sew shoulder seams and side seams, edge to edge to avoid a chunky seam. CROCHET EDGE: Work an edge around the neck and around the armhole with denim blue on hook size 4 mm. Work 1 dc in every dc and 2 dc in every row with tr. Fasten off. TWO-SIDED STUFFED OWL: Worked in the round in Merino Extra Fine. Start by making a MAGIC CIRCLE - read explanation above - with green on hook size 3 mm. ROUND 1: Read CROCHET INFO and COLOUR CHANGE! Work 8 dc in the magic circle. ROUND 2: 2 dc in first dc, 2 htr in next dc, 1 htr and 1 tr in next dc, 2 tr in each of the next 2 dc, 1 tr and 1 htr in next dc, 2 htr in next dc, 2 dc in last dc on round = 16 sts. ROUND 3: Switch to pistachio and work 1 dc in first st, 2 dc in next st, 1 dc in next st, 2 htr in each of the next 2 sts, 2 tr in next st, 1 dtr in front loop and 1 dtr in back loop of each of the next 4 sts, 2 tr in next st, 2 htr in each of the next 2 sts, 1 dc in next st, 2 dc in next st, 1 dc in last st on round = 28 sts. ROUND 4: Work 1 dc in every st the entire round. ROUND 5: Switch to denim blue and work 1 dc in first st, 1 htr in next st, 1 tr in same st, 2 dtr in next st, 1 ch (= top of ear), 2 dtr in next st, 1 tr in next st, 1 htr in same st, 1 dc in next st, 2 dc in next st, 1 dc in next st, 1 htr in next st and 1 tr in same st, 2 tr in next st, 2 dtr in each of the next 8 sts, 2 tr in next st, 1 tr in next st, 1 htr in same st, 1 dc in next st, 2 dc in next st, 1 dc in next st, 1 htr in next st, 1 tr in same st, 2 dtr in next st, 1 ch (= top of ear), 2 dtr in next st, 1 tr in next st, 1 htr in same st, 1 dc in last st on round = 50 sts (+ 2 ch). Work another owl the same way. Fasten off. EYES: Worked in the round. Start by making a MAGIC CIRCLE - read explanation above - with denim blue. ROUND 1: READ CROCHET INFO - Work 6 dc in the magic circle. ROUND 2: Switch to off white and work 2 dc in every dc the entire round = 12 dc. Work another eye the same way. Fasten off. ASSEMBLY: Fasten the eyes on the owl. Embroider on the beak with mustard as follows: Beg in the mid of the magic circle and sew a stitch down to 2nd round 2 times, and sew from the mid of circle and diagonally down to 1st round on each side of the first stitches; only 1 time on each side. Then work the owl tog with pistachio. Place the two owls on top of each other, WS against WS, with the beak towards you. Work through both layers as follows: Work 2 dc in ch at the top of ear on the left side. Then work as follows: 1 dc in the next 6 sts, 1 htr in next st and 1 tr in same st, 2 dtr in next st, 1 tr in next st and 1 htr in same st, 1 dc in each of the next 8 sts, insert 1 marker in the last st and work 1 dc in each of the next 14 sts, 1 htr in next st and 1 tr in same st, 2 dtr in next st, 1 tr in next st and 1 htr in same st, 1 dc in each of the next 6 sts and work 2 dc in ch (= top of right ear). Fill the owl with some cotton wool and continue as follows: 1 dc in each of the next 10 sts and finish round with 1 sl st in first dc from beg of round = 60 sts. Fasten off. Work claws in mustard. Beg in the st with marker as follows: * 1 dc, 3 ch, 1 dc in next st, 4 ch, 1 dc in next st, 3 ch, 1 dc in next st *, repeat from *-* 1 more time. Fasten off. Fasten a key chain with hook to the back of owl. SIMPLE OWL PATCH: Work as two-sided owl but work only one owl. Work around the owl with pistachio the same way as around the two-sided owl. Work claws the same way. Fasten the owl on to vest – see picture. Below the owl work a branch as follows: Work dc with denim blue on hook size 3 mm. Work approx. 25 dc, slant a bit at the end. Then work a small branch upwards, beg approx. 8 dc before the end of the long branch, and work 5 dc upwards - see picture. |
|
 |
|
Have you finished this pattern?Tag your pictures with #dropspattern #merlinvest or submit them to the #dropsfan gallery. Do you need help with this pattern?You'll find 11 tutorial videos, a Comments/Questions area and more by visiting the pattern on garnstudio.com. © 1982-2026 DROPS Design A/S. We reserve all rights. This document, including all its sub-sections, has copyrights. Read more about what you can do with our patterns at the bottom of each pattern on our site. |
|


With over 40 years in knitting and crochet design, DROPS Design offers one of the most extensive collections of free patterns on the internet - translated to 17 languages. As of today we count 324 catalogues and 12290 patterns translated into English (UK/cm). 12290
We work hard to bring you the best knitting and crochet have to offer, inspiration and advice as well as great quality yarns at incredible prices! Would you like to use our patterns for other than personal use? You can read what you are allowed to do in the Copyright text at the bottom of all our patterns. Happy crafting!
Post a comment to pattern DROPS Children 24-11
We would love to hear what you have to say about this pattern!
If you want to leave a question, please make sure you select the correct category in the form below, to speed up the answering process. Required fields are marked *.