
Popular categories
Looking for a yarn?


Comments / Questions (91)
![]() Janine wrote:
Janine wrote:
Hallo, ich versuche gerade diese Mütze zu stricken und bin mir nciht ganz sicher, ab wann ich rund stricken muss?
15.11.2012 - 14:42DROPS Design answered:
Liebe Janine, nach 8 cm ketten Sie die ersten 6 M ab und stricken rund weiter. Viel Spass beim Stricken!
16.11.2012 - 10:47
![]() Birgitta wrote:
Birgitta wrote:
The structure of the two pieces in the picture are different. It seems like the neck warmer has the wrong side out.
01.11.2012 - 13:20
![]() Brenda wrote:
Brenda wrote:
I spent 3 days trying different ways to get this pattern right and after looking at the blog knitted it all from the wrong side and it really looks good now. I think the diagram is misleading but then I am not an experienced knitter.
25.10.2012 - 22:58
![]() Claudia wrote:
Claudia wrote:
Danke für Ihre schnelle Antwort. Das Problem ist nicht das Muster an sich, sondern, dass es bei mir nicht so ausschaut, das Muster aber stimmt. Ich meine die starke Struktur ist bei mir nicht so ersichtlich. Erst bei Dehnung der Mütze.
22.10.2012 - 11:08
![]() Claudia wrote:
Claudia wrote:
Hallo Drops, ich stricke gerade die Mütze. Aber leider wird das Muster bei mir nicht so strukturiert, wie auf dem Bild. Wieso?
22.10.2012 - 09:14DROPS Design answered:
Hallo Claudia, Sie müssen die 4 Rd von immer wiederholen, dann ergibt sich das Muster. Achten Sie bei der Mütze darauf, dass Sie bei Runden immer die Hin-R stricken.
22.10.2012 - 10:34
![]() Brigitte wrote:
Brigitte wrote:
Hallo Drops! Ein schönes Set ist das. Nur leider kann ich nicht umsetzen wie ich das Tuch stricken muss. Mir fehlt eine Skizze, wie es nachher aussieht. Ist es richtig, dass 2 Teile gestrickt werden, die krausen Maschen werden an beiden Teilen abgenommen, dann werden die Teile zusammengefügt und am Anfang und am Ende je 6 Maschen zugenommen? Wie wird dann verbunden? Mir fehlt die Vorstellungkraft.. Ich bitte um Hilfe! Dankeschön
26.09.2012 - 13:13DROPS Design answered:
Guten Tag Brigitte, ja es ist genau wie Sie schreiben. Und der obere Teil wird ebenfalls offen gestricktt, also nicht zur Runde verbunden.
27.09.2012 - 09:25
![]() Patricia wrote:
Patricia wrote:
Vielen Dank, ja ich hätte einfach bis zum Ende schauen müssen!
20.09.2012 - 08:57
![]() Patricia wrote:
Patricia wrote:
Für mich ist das Muster nicht ganz klar, obwohl es eigentlich nur linke und rechte Maschen sind :-). Muss ich jetzt (wenn ich in die Runde geschlossen habe) 1 Runde links, 1 Runde rechts und 2 Runden rechts links stricken? Oder 2 Runden Links und dann 2 Runden rechts links?. Vielen Dank
19.09.2012 - 20:13DROPS Design answered:
Hallo Patricia, haben Sie das Schema neben der Schnittübersicht gesehen? Das Muster ist: 1 re, 1 li über 2 Rd, dann 1 Rd re und 1 Rd li und wieder von vorne (der Rapport umfass 4 Rd in der Höhe). Viel Erfolg!
20.09.2012 - 08:08
![]() Anna Kühn wrote:
Anna Kühn wrote:
Es ist kein wirklicher Fehler eher die Bitte mehr Größen aufzunehmen. Ich kann mir die Mütze nicht stricken (bin nicht so gut im Abwandeln von Anleitungen) da ich sie in 60/62 cm bräuchte! Würde mich sehr über eine Anleitung in meiner Mützen-/Kopf-Größe freuen. Drops Design: Model ne-104
06.09.2012 - 13:04
![]() Freinaht wrote:
Freinaht wrote:
Super tolle und einfach zu strickende Mütze. hab sie ein gaaaaanz klein wenig abgeändert freinaht.blogspot.co.at/2012/08/graue-maus.html
30.08.2012 - 18:17
|
|||||||
Bliss#blissset |
|||||||
|
|
|||||||
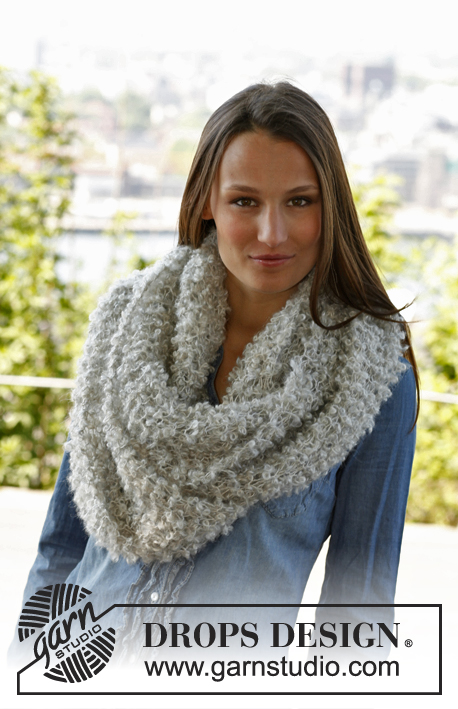
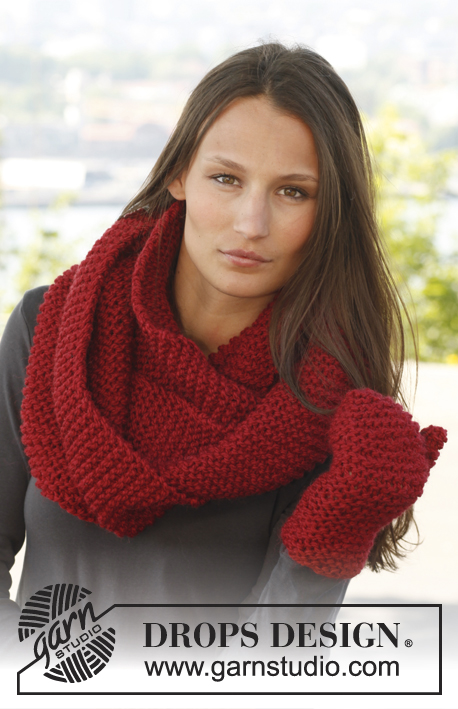
Knitted DROPS neck warmer and hat with pattern in ”Nepal”.
DROPS 140-40 |
|||||||
|
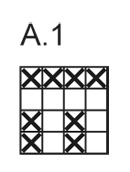
GARTER ST (back and forth on needle): K all rows. 1 ridge = 2 rows K. GARTER ST (in the round on circular needle): 1 ridge = 2 rounds * K 1 round and P 1 round *, repeat from *-*. PATTERN: See diagram A.1. Diagram shows all rows in pattern from RS. ---------------------------------------------------------- HAT: Piece is first worked back and forth on circular needle and then in the round. Cast on 86-94 sts with Nepal on circular needle size 4 mm. K 1 row from WS, then work as follows: 6 sts in GARTER ST - see explanation above, * K 2, P 2 *, repeat from *-*, finish with K 2 and 6 sts in garter st. Continue rib and in garter st in each side until piece measures 4 cm. Switch to circular needle size 5 mm. Now work as follows: 6 sts in garter st, A.1 over the next 74-82 sts and finish with 6 sts in garter st. When piece measures 8 cm, cast off the first 6 sts on needle, then work in the round with A.1 over all sts = 80-88 sts. When piece measures 20-21 cm, work in GARTER ST - see explanation above - until finished measurements. Work in garter st, AT THE SAME TIME dec 12 sts evenly every 3rd round a total of 5 times = 20-28 sts remain on round. Work the remaining sts tog 2 by 2, cut the thread and pull it through the remaining sts. Tighten tog and fasten. The hat measures approx. 25-26 cm vertically. Sew 2 buttons on to flap at the bottom of hat, sew through both layers. ---------------------------------------------------------- NECK WARMER: Worked back and forth on needle. Cast on 62 sts on circular needle size 4 mm with Nepal. K 1 row from WS, then work as follows - from RS: 6 sts in garter st, K 2, * P 2, K 2 *, repeat from *-* and finish with 6 sts in garter st. Continue like this. When piece measures 4 cm, switch to circular needle size 5 mm and continue as follows: 6 sts in garter st, A.1 over the next 50 sts and finish with 6 sts in garter st. When piece measures 20 cm, cast off 6 sts in each side = 50 sts. Cut the thread. Put piece aside. Knit another part the same way. Cast on 6 sts on circular needle size 5 mm, work sts from one part back on needle, work sts from the other part back on needle and cast on 6 sts at end of row = 112 sts. Worked back and forth on needle as follows: 6 sts in garter st (band), A.1 over the next 100 sts, 6 sts in garter st (band). Continue like this until piece measures 34 cm. Switch to circular needle size 4 mm, then work as follows – AT THE SAME TIME on first row inc 2 sts evenly. 6 sts in garter st, K 2, * P 2, K 2 *, repeat from *-* and finish with 6 sts in garter st = 114 sts. Work rib for 4 cm, then cast off with K over K and P over P. Place bands on top of each other and sew on 4 buttons through both layers. |
|||||||
Diagram explanations |
|||||||
|
|||||||
 |
|||||||
Have you finished this pattern?Tag your pictures with #dropspattern #blissset or submit them to the #dropsfan gallery. Do you need help with this pattern?You'll find 7 tutorial videos, a Comments/Questions area and more by visiting the pattern on garnstudio.com. © 1982-2026 DROPS Design A/S. We reserve all rights. This document, including all its sub-sections, has copyrights. Read more about what you can do with our patterns at the bottom of each pattern on our site. |
|||||||


With over 40 years in knitting and crochet design, DROPS Design offers one of the most extensive collections of free patterns on the internet - translated to 17 languages. As of today we count 324 catalogues and 12290 patterns translated into English (UK/cm). 12290
We work hard to bring you the best knitting and crochet have to offer, inspiration and advice as well as great quality yarns at incredible prices! Would you like to use our patterns for other than personal use? You can read what you are allowed to do in the Copyright text at the bottom of all our patterns. Happy crafting!
Post a comment to pattern DROPS 140-40
We would love to hear what you have to say about this pattern!
If you want to leave a question, please make sure you select the correct category in the form below, to speed up the answering process. Required fields are marked *.