
Popular categories
Looking for a yarn?


Comments / Questions (98)
![]() Marias wrote:
Marias wrote:
Grazie mille ci sono riuscita! Dopo chiedo una cosa:per l'asola chiedo domani spiegazioni!!! Ci tenevo tantissimo a riuscirci perchè ho comprato la vostra lana e questa giacca è bellissima! La faccio color menta!!
15.07.2014 - 10:27
![]() Marias wrote:
Marias wrote:
Quindi devo lavorare 5 ferri a diritto e poi? Devo partire da dove c'è la freccia? Se si devo lavorare ancora a legaccio senza fare i gettati? Comunque adesso provo a rifarlo! é tre volte che scucio tutto !!! Grazie mille!
14.07.2014 - 22:13DROPS Design answered:
Buongiorno Marias, deve iniziare lavorando 4 ferri a dir, il 1° f è il rovescio del lavoro e poi 1 ferro a rov sul rovescio del lavoro. Quindi dal diritto del lavoro inizi a lavorare come indicato, lavorando i motivi dal basso verso l'alto, da destra verso sinistra, partendo dalla prima riga in basso. Ci riscriva se non è chiaro. Buon lavoro!!
15.07.2014 - 14:29
![]() Marias wrote:
Marias wrote:
Grazie per la risposta! Quindi se ho capito bene:lavoro 1 2 3 4 ferri a diritto o tutti a rovescio,poi lavoro un ferro a diritto o a rovescio, e dopo da dove parto? dalla riga indicata dalla freccia?
14.07.2014 - 22:04DROPS Design answered:
Buongiorno Marias, deve iniziare lavorando 4 ferri a dir, il 1° f è il rovescio del lavoro e poi 1 ferro a rov sul rovescio del lavoro. Quindi dal diritto del lavoro inizi a lavorare come indicato, lavorando i motivi dal basso verso l'alto, da destra verso sinistra, partendo dalla prima riga in basso. Ci riscriva se non è chiaro. Buon lavoro!!
15.07.2014 - 14:28
![]() Marias wrote:
Marias wrote:
Perché non mi è chiaro! cioè se fosse lo schema solo dalla parte diritta mi verrebbero delle righe a legaccio ,ma senza il motivo a zig zag! grazie!
13.07.2014 - 21:44DROPS Design answered:
Buongiorno Marias, per quanto riguarda lo schema, il diagramma mostra tutti i f dal diritto del lavoro, quindi anche i ferri di ritorno, e si legge dal basso verso l'alto, da destra verso sinistra. Ci riscriva se ha altri dubbi. Buon lavoro!!
14.07.2014 - 18:06
![]() Marias wrote:
Marias wrote:
Salve! Volevo fare 2 domande - all'inizio dice di fare 4 ferri a diritto(legaccio) quindi dopo un ferro a diritto. quindi sarebbero 5 ferri a legaccio giusto?? - non capisco lo schema!si parte dal basso? e non ho capito se rappresenta solo il diritto del lavoro o anche il rovescio? e se si, quando finisco le righe con i gettati cosa devo lavorare?
13.07.2014 - 21:43DROPS Design answered:
Buongiorno Marias, all'inizio deve avviare le m e lavorare 4 f a m legaccio, considerando il 1° f come il rovescio del lavoro. Per quanto riguarda lo schema, il diagramma mostra tutti i f dal diritto del lavoro, quindi anche i ferri di ritorno, e si legge dal basso verso l'alto, da destra verso sinistra. Ci riscriva se ha altri dubbi. Buon lavoro!!
14.07.2014 - 18:05
![]() Marias wrote:
Marias wrote:
Perché non mi è chiaro! cioè se fosse lo schema solo dalla parte diritta mi verrebbero delle righe a legaccio ,ma senza il motivo a zig zag! grazie!
13.07.2014 - 21:40DROPS Design answered:
Buongiorno Marias, per quanto riguarda lo schema, il diagramma mostra tutti i f dal diritto del lavoro, quindi anche i ferri di ritorno, e si legge dal basso verso l'alto, da destra verso sinistra. Ci riscriva se ha altri dubbi. Buon lavoro!!
14.07.2014 - 18:06
![]() Marias wrote:
Marias wrote:
Salve! Volevo fare 2 domande - all'inizio dice di fare 4 ferri a diritto(legaccio) quindi dopo un ferro a diritto. quindi sarebbero 5 ferri a legaccio giusto?? - non capisco lo schema!si parte dal basso? e non ho capito se rappresenta solo il diritto del lavoro o anche il rovescio? e se si, quando finisco le righe con i gettati cosa devo lavorare?
13.07.2014 - 21:40DROPS Design answered:
Buongiorno Marias, all'inizio deve avviare le m e lavorare 4 f a m legaccio, considerando il 1° f come il rovescio del lavoro. Per quanto riguarda lo schema, il diagramma mostra tutti i f dal diritto del lavoro, quindi anche i ferri di ritorno, e si legge dal basso verso l'alto, da destra verso sinistra. Ci riscriva se ha altri dubbi. Buon lavoro!!
14.07.2014 - 18:05
![]() NYCKEES wrote:
NYCKEES wrote:
Bonjour à vous, Souhaiterais avoir s/cat. 136 explications sur le modèle CL-010. Ayant pour la taille 3 pr le devant fait 3X le diagramme N°1 je termine les devants hauts avec le diagramme N°2, et non les 2xM1, pourriez m'expliquer comment dois-je faire?
04.06.2014 - 09:19DROPS Design answered:
Bonjour Mme Nyckees, en taille XL/XXL, tricotez les devants ainsi (de bas en haut) :3 fois M.1, 1 fois M.2, 1 fois M.1, 1 fois M.2 et 2 fois M.1. Et tricotez le dos ainsi (de haut en bas) : 2 fois M.1, 1 fois M.2, 1 fois M.1, 1 fois M.2 e 3 fois M.1. Bon tricot!
04.06.2014 - 09:54
![]() Caterina wrote:
Caterina wrote:
Salve! Ho finito di lavorare questo modello; è proprio bello! all'inizio ho avuto qualche problema di comprensione delle spiegazioni, poi si è risolto; grazie per l'assistenza!
16.04.2014 - 16:14
|
||||||||||||||||
Mystic River#mysticrivercardigan |
||||||||||||||||
 |
 |
|||||||||||||||
Knitted DROPS jacket with short sleeves and lace pattern in ”Cotton Light” or "Belle". Size: S - XXXL
DROPS 136-6 |
||||||||||||||||
|
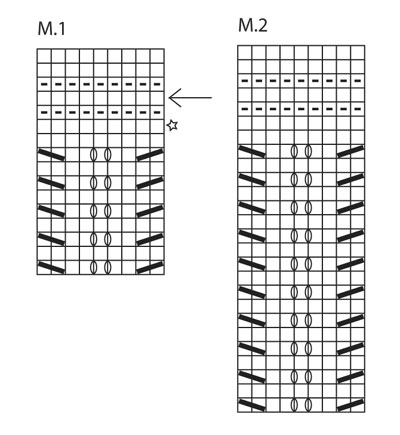
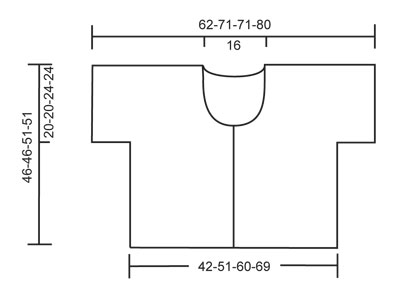
PATTERN: See diagrams M.1 and M.2 – diagrams show pattern from RS. 1 diagram = 1 repetition = 9 sts in width. Work front piece as follows (from bottom up): Diagram M.1: 2-2-3-3 times, diagram M.2: 1 time, diagram M.1: 1 time, diagram M.2: 1 time and diagram M.1: 2 times. Work back piece as follows (top down): Diagram M.1: 2 times, diagram M.2: 1 time, diagram M.1: 1 time, diagram M.2: 1 time and diagram M.1: 2-2-3-3 times. GARTER ST (back and forth on needle): K all rows. -------------------------------------------------------- JACKET: First work right front piece and inc for sleeve, then work left front piece and sleeve, then slip these tog and work down back piece. Worked back and forth on a circular needle to make room for all the sts. RIGHT FRONT PIECE: Cast on 49-58-67-76 sts (incl 1 edge st in the side and 3 band sts towards mid front) on needle size 4 mm with Cotton Light or Belle. K 4 rows (1st row = WS), then P 1 row from WS. Work next row as follows: 3 band sts in GARTER ST - see explanation above, PATTERN - see explanation above - until 1 edge st remains, work this in garter st. Continue like this. REMEMBER THE KNITTING TENSION! At the same time when piece measures 26-26-27-27 cm, cast on 20-20-11-11 new sts for sleeve at the end of next row towards the side (fewer sts in the larger sizes because of broader shoulder width) = 69-78-78-87 sts. READ ALL OF THE FOLLOWING SECTION BEFORE CONTINUING! Work sleeve sts in pattern but work the outermost 3 sts in garter st. AT THE SAME TIME when piece measures 27-27-29-29 cm, cast off for 1 button hole by K tog 2nd and 3rd st from edge and then making 1 YO. Repeat cast off for button hole when piece measures 30-30-32-32 cm. When piece measures 31-31-33-33 cm, slip the outermost 12 sts towards mid front on a stitch holder for neck. Then cast off at beg of every row from mid front: 2 sts 2 times and 1 st 4 times = 49-58-58-67 sts remain on shoulder. Continue to work as before with 1 st towards mid front in garter st until piece measures approx. 46-46-51-51 cm - adjust so that last row is worked from RS and is the row marked with an arrow in diagram M.1. Now insert a marker (= mid on top shoulder). NOW MEASURE PIECE FROM HERE! Work the 2 next to last rows in diagram M.1, put piece aside. LEFT FRONT PIECE: Cast on and work as right piece but reversed. NOTE: Do not cast off for button hole. BACK PIECE: 1st row = WS (= last row in diagram M.1). Work sts from right front piece on to circular needle size 4 mm, cast on 34 new sts (= back of neck) and work sts from left front piece on to circular needle = 132-150-150-168 sts in total. Continue with PATTERN as explained above, but work 4 rows in garter st over the 34 new sts before they are also included into pattern! When piece measures 20-20-24-24 cm from marker on shoulder, cast off the 20-20-11-11 sleeve sts in each side (cast off at beg of the next 2 rows) = 92-110-128-146 sts remain on needle. Continue the pattern with 1 edge st in garter st in each side. When working diagram M.1 for the last time, finish with the row marked with a star. Piece now measures approx. 45-45-50-50 cm from marker on shoulder. Now K 3 rows (1st row = WS). Then LOOSELY cast off with K from RS – NOTE: It is important to avoid a tight cast off edge. NECK EDGE: Knit up approx. 38-41 sts (from RS, incl sts on stitch holders) on circular needle size 4 mm along neckline of RIGHT FRONT PIECE until begin of BACK PIECE (= the 34 new stitches in garter st) . K 3 rows back and forth, then cast off. Repeat along LEFT FRONT PIECE. ASSEMBLY: Sew sleeve and side seams in one inside 1 edge st. Sew on buttons. |
||||||||||||||||
Diagram explanations |
||||||||||||||||
|
||||||||||||||||
 |
||||||||||||||||
 |
||||||||||||||||
Have you finished this pattern?Tag your pictures with #dropspattern #mysticrivercardigan or submit them to the #dropsfan gallery. Do you need help with this pattern?You'll find 12 tutorial videos, a Comments/Questions area and more by visiting the pattern on garnstudio.com. © 1982-2026 DROPS Design A/S. We reserve all rights. This document, including all its sub-sections, has copyrights. Read more about what you can do with our patterns at the bottom of each pattern on our site. |
||||||||||||||||


With over 40 years in knitting and crochet design, DROPS Design offers one of the most extensive collections of free patterns on the internet - translated to 17 languages. As of today we count 324 catalogues and 12290 patterns translated into English (UK/cm). 12290
We work hard to bring you the best knitting and crochet have to offer, inspiration and advice as well as great quality yarns at incredible prices! Would you like to use our patterns for other than personal use? You can read what you are allowed to do in the Copyright text at the bottom of all our patterns. Happy crafting!
Post a comment to pattern DROPS 136-6
We would love to hear what you have to say about this pattern!
If you want to leave a question, please make sure you select the correct category in the form below, to speed up the answering process. Required fields are marked *.