
Popular categories
Looking for a yarn?


Comments / Questions (98)
![]() Marias wrote:
Marias wrote:
Scusate ma per la taglia l c'è scritto 350 gr di cotone mentre a me ne serve un altro e lavoro con tensione normale!
25.08.2014 - 13:50DROPS Design answered:
Lo segnaliamo. Grazie
11.09.2014 - 16:33
![]() Marias wrote:
Marias wrote:
Scusate ma per la taglia l c'è scritto 350 gr di cotone mentre a me ne serve un altro e lavoro con tensione normale!
25.08.2014 - 13:50
![]() Janneke wrote:
Janneke wrote:
Hallo, De 100 op te nemen st. voor de afwerking van de halkskant worden die opgenomen van het linker- en rechterpand: dus 88 st. + 12 st. hulpdraad linkerpand en 88 st. + 12 st. hulpdraad rechterpand. Of 100 st. - 24 st. (2x12st. hulpdraad) = 76 st. verdeeld over linkerpand, rugpand en rechterpand? En hoe verdeel ik de resterende 76 st. dan?
23.08.2014 - 18:21DROPS Design answered:
Hoi Janneke. Je neemt de st op incl. de st van de hulpdraad (2 keer 12 st = 24). Ga je 100 st opnemen dan heb je dus nu 76 st over. Je verdeeld deze overige st met een gelijkmatige afstand over de voorpanden + achterpand = bijvoorbeeld 1 st van elk st van de halslijn op het achterpand en de rest over de voorpanden.
27.08.2014 - 15:40
![]() Sinikka Nurminen wrote:
Sinikka Nurminen wrote:
Löysäkierteinen lanka.Onko jotain keinoa,kuinka saa kaikki säikeet puikolle helpommin mukaan neuloessa?
23.08.2014 - 11:52DROPS Design answered:
Lankaa kannattaa neuloa hieman tavallista hitaammin ja varovaisemmin, jotta se ei purkautuisi. Välillä mahdolliset kierteet kannattaa suorentaa.
25.08.2014 - 15:50
![]() Marias wrote:
Marias wrote:
Scusate,ma la messa in forma oome è preferibile farla con questo filato? Con il vapore o con il lavaggio e l'asciugatura con gli spilli?
15.08.2014 - 18:58DROPS Design answered:
Buongiorno Marias, la messa in forma è sempre meglio farla con il lavaggio e non con il ferro da stiro, in ogni caso si comporti come ha fatto con il campione, in modo che le misure del capo risultino corrette. Buon lavoro!1
18.08.2014 - 18:25
![]() Marias wrote:
Marias wrote:
Però se in tutto le m sono 150 come seguo il motivo? i sue vivagni e sono 148,le m del collo e sono 34,rimangono 114. come le divido per il motivo,che è 9?
30.07.2014 - 09:02DROPS Design answered:
Buongiorno Marias. Lavori 3 m a legaccio (bordo della manica), M1 6 volte, 1 m legaccio (è la m vicino al collo, che sul davanti lavorava a legaccio), 34 m legaccio (le nuove m), 1 m legaccio, M1 6 volte, 3 m legaccio: in tutto 150 m. Così per 4 ferri. Dopo: 3 m legaccio, M1 16 volte, 3 m legaccio. Buon lavoro!
30.07.2014 - 09:41
![]() Marias wrote:
Marias wrote:
Penso di aver capito,vi farò sapere al più presto,grazie!
30.07.2014 - 08:57
![]() Marias wrote:
Marias wrote:
Si,però se io lavoro l ultimo ferro del motivo m1 sul davanti dx e poi avvio le 34 maglie,come faccio a usare il primo metodo? non bisogna usare il secondo?
30.07.2014 - 00:17DROPS Design answered:
Buonasera Marias, può tranquillamente usare il primo metodo per avviare le nuove maglie per il dietro. Buon lavoro!!
30.07.2014 - 19:24
![]() Marias wrote:
Marias wrote:
Non capisco nel video una cosa. Quando lavora le maglie al rovescio dopo averle montate perchè prende due fili? E poi quando le lavora le lavora a rovescio? perchè non riesco a capire io le lavoro diversamente.Oppure a rovescio ritorto?
29.07.2014 - 17:17DROPS Design answered:
Buonasera Marias. Nel video vengono presi due fili solo quando si avviano le m con il secondo metodo. Nel suo modello, dopo aver avviato le 34 m, si ricordi di lavorare i primi 4 ferri su queste nuove m a punto legaccio. Buon lavoro!
29.07.2014 - 22:10
![]() Marias wrote:
Marias wrote:
Scusate un'ultima domanda: la taglia l a cosa si riferisce? Perchè io di seno ho un 100 però sotto non sono grossa. può andare bene la l? perchè la xl mi sa che verrebbe troppo larga!
15.07.2014 - 10:32DROPS Design answered:
Buongiorno Marias, per quanto riguarda le taglie, scorrendo la pagina può trovare lo schema delle misure sotto i diagrammi, così può scegliere la taglia più corretta. Buon lavoro!!
15.07.2014 - 14:31
|
||||||||||||||||
Mystic River#mysticrivercardigan |
||||||||||||||||
 |
 |
|||||||||||||||
Knitted DROPS jacket with short sleeves and lace pattern in ”Cotton Light” or "Belle". Size: S - XXXL
DROPS 136-6 |
||||||||||||||||
|
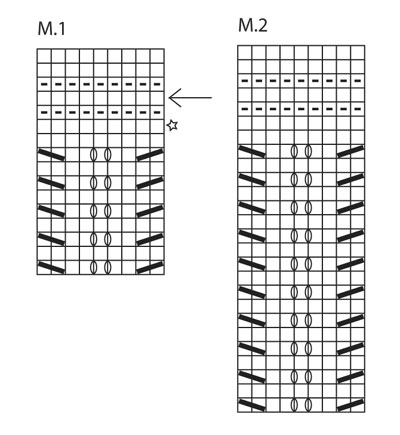
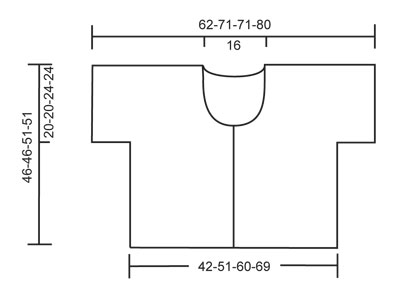
PATTERN: See diagrams M.1 and M.2 – diagrams show pattern from RS. 1 diagram = 1 repetition = 9 sts in width. Work front piece as follows (from bottom up): Diagram M.1: 2-2-3-3 times, diagram M.2: 1 time, diagram M.1: 1 time, diagram M.2: 1 time and diagram M.1: 2 times. Work back piece as follows (top down): Diagram M.1: 2 times, diagram M.2: 1 time, diagram M.1: 1 time, diagram M.2: 1 time and diagram M.1: 2-2-3-3 times. GARTER ST (back and forth on needle): K all rows. -------------------------------------------------------- JACKET: First work right front piece and inc for sleeve, then work left front piece and sleeve, then slip these tog and work down back piece. Worked back and forth on a circular needle to make room for all the sts. RIGHT FRONT PIECE: Cast on 49-58-67-76 sts (incl 1 edge st in the side and 3 band sts towards mid front) on needle size 4 mm with Cotton Light or Belle. K 4 rows (1st row = WS), then P 1 row from WS. Work next row as follows: 3 band sts in GARTER ST - see explanation above, PATTERN - see explanation above - until 1 edge st remains, work this in garter st. Continue like this. REMEMBER THE KNITTING TENSION! At the same time when piece measures 26-26-27-27 cm, cast on 20-20-11-11 new sts for sleeve at the end of next row towards the side (fewer sts in the larger sizes because of broader shoulder width) = 69-78-78-87 sts. READ ALL OF THE FOLLOWING SECTION BEFORE CONTINUING! Work sleeve sts in pattern but work the outermost 3 sts in garter st. AT THE SAME TIME when piece measures 27-27-29-29 cm, cast off for 1 button hole by K tog 2nd and 3rd st from edge and then making 1 YO. Repeat cast off for button hole when piece measures 30-30-32-32 cm. When piece measures 31-31-33-33 cm, slip the outermost 12 sts towards mid front on a stitch holder for neck. Then cast off at beg of every row from mid front: 2 sts 2 times and 1 st 4 times = 49-58-58-67 sts remain on shoulder. Continue to work as before with 1 st towards mid front in garter st until piece measures approx. 46-46-51-51 cm - adjust so that last row is worked from RS and is the row marked with an arrow in diagram M.1. Now insert a marker (= mid on top shoulder). NOW MEASURE PIECE FROM HERE! Work the 2 next to last rows in diagram M.1, put piece aside. LEFT FRONT PIECE: Cast on and work as right piece but reversed. NOTE: Do not cast off for button hole. BACK PIECE: 1st row = WS (= last row in diagram M.1). Work sts from right front piece on to circular needle size 4 mm, cast on 34 new sts (= back of neck) and work sts from left front piece on to circular needle = 132-150-150-168 sts in total. Continue with PATTERN as explained above, but work 4 rows in garter st over the 34 new sts before they are also included into pattern! When piece measures 20-20-24-24 cm from marker on shoulder, cast off the 20-20-11-11 sleeve sts in each side (cast off at beg of the next 2 rows) = 92-110-128-146 sts remain on needle. Continue the pattern with 1 edge st in garter st in each side. When working diagram M.1 for the last time, finish with the row marked with a star. Piece now measures approx. 45-45-50-50 cm from marker on shoulder. Now K 3 rows (1st row = WS). Then LOOSELY cast off with K from RS – NOTE: It is important to avoid a tight cast off edge. NECK EDGE: Knit up approx. 38-41 sts (from RS, incl sts on stitch holders) on circular needle size 4 mm along neckline of RIGHT FRONT PIECE until begin of BACK PIECE (= the 34 new stitches in garter st) . K 3 rows back and forth, then cast off. Repeat along LEFT FRONT PIECE. ASSEMBLY: Sew sleeve and side seams in one inside 1 edge st. Sew on buttons. |
||||||||||||||||
Diagram explanations |
||||||||||||||||
|
||||||||||||||||
 |
||||||||||||||||
 |
||||||||||||||||
Have you finished this pattern?Tag your pictures with #dropspattern #mysticrivercardigan or submit them to the #dropsfan gallery. Do you need help with this pattern?You'll find 12 tutorial videos, a Comments/Questions area and more by visiting the pattern on garnstudio.com. © 1982-2026 DROPS Design A/S. We reserve all rights. This document, including all its sub-sections, has copyrights. Read more about what you can do with our patterns at the bottom of each pattern on our site. |
||||||||||||||||


With over 40 years in knitting and crochet design, DROPS Design offers one of the most extensive collections of free patterns on the internet - translated to 17 languages. As of today we count 324 catalogues and 12290 patterns translated into English (UK/cm). 12290
We work hard to bring you the best knitting and crochet have to offer, inspiration and advice as well as great quality yarns at incredible prices! Would you like to use our patterns for other than personal use? You can read what you are allowed to do in the Copyright text at the bottom of all our patterns. Happy crafting!
Post a comment to pattern DROPS 136-6
We would love to hear what you have to say about this pattern!
If you want to leave a question, please make sure you select the correct category in the form below, to speed up the answering process. Required fields are marked *.