
Popular categories
Looking for a yarn?


Comments / Questions (11)
![]() Katia Laflamme wrote:
Katia Laflamme wrote:
Bonjour Les explications pour la façon de gérer les rangs raccourcis ne sont pas claires, de même que les inversions à faire pour le côté droit. De plus la quantité de laine alpaga recommandée pour la taille M n'est clairement pas suffisante. J'ai dû acheter des pelotes supplémentaires
18.12.2024 - 13:46
![]() Katia Laflamme wrote:
Katia Laflamme wrote:
Qu'est-ce que vous voulez dire par cette note NOTE : tous les 8 rangs sur l'envers, tricoter 2 rangs en plus en allers et retours sur les 18-18-18-21-22-22 m au point mousse (pour que la bordure ne resserre pas). Répéter ceci jusqu'à la fin Voulez-vous dire que je dois tricoter sur ces les mailles au point mousse seulement ? Comment faire ? est-ce comme des rands raccourcis ? Avez-vous une vidéo explicative à ce sujet ? Merci
09.09.2024 - 13:48DROPS Design answered:
Bonjour Mme Laflamme, tous les 16 rangs (= tous les 8 rangs tricotés sur l'envers), vous tricotez des rangs raccourcis, autrement dit, vous tricotez 2 rangs sur les 18 à 22 premières mailles (cf taille) en commençant sur l'envers. Bon tricot!
10.09.2024 - 08:52
![]() Vicki wrote:
Vicki wrote:
I love your patterns but always struggle. I cannot understand your decreases... On next row work the first 8 sts in every K/P rib-section tog 2 by 2 Do I k 2 tog twice then 8 stitches? I so want to complete this. The rest of the pattern looks ok just this reducing bit.
19.01.2022 - 21:02DROPS Design answered:
Hi Vicki, You reduce the first 8 stitches to 4 stitches by knitting/purling 2 together x 4. Happy knitting!
20.01.2022 - 07:44
![]() Antonietta Sdino wrote:
Antonietta Sdino wrote:
Modello bellissimo.!È la prima volta che lavoro con i ferri accorciati e i video tutorial sono stati utilissimi. Grazie di cuore.
27.11.2019 - 07:11
![]() Marie Jose wrote:
Marie Jose wrote:
Je souhaite realiser ce modèle, comment se procurer les explications ? merci
19.10.2018 - 18:31DROPS Design answered:
Bonjour Marie Jose, cliquez simplement sur le bouton "imprimer" pour lancer l'impression. Bon tricot!
22.10.2018 - 10:29Bibiana Benvenuto wrote:
I am knitting this pattern. I need you to clarify the section where the sleeves star. It is very confusing and wordy. I tried many different ways but no luck. Could you re-write it for me? I love the pattern but I am not going anywhwrwe!!! Please help. Best regards, Bibiana
09.03.2016 - 01:33DROPS Design answered:
Dear Mrs Benvenuto, sleeve is worked with short rows starting from WS, (first work all sts from RS, turn and start short rows): work 2 rows over 2 sts, 2 rows over 4 sts, 2 rows over 6 sts, etc. work always 2 more sts until you have worked 34-44 sts, work then all sts and work some other short rows: working 2 rows with 2 sts less every other row from 34-44 sts until 2 sts. then work 34-44 sts. And then slip all sts again on same needle. Happy knitting!
09.03.2016 - 09:13
![]() Anis wrote:
Anis wrote:
Wieder ein wunderschönes Modell für einen Lagenlook, aber auch ohne. Gefällt mir sehr gut.
14.01.2011 - 00:12
![]() Heike Trimborn wrote:
Heike Trimborn wrote:
Endlich ein Schulterschal der an Ort und Stelle bleibt - sehr schön!
10.01.2011 - 21:37
![]() Agnes wrote:
Agnes wrote:
Denna kan jag tänk mig i flera färger.
14.12.2010 - 20:14
![]() Davesne wrote:
Davesne wrote:
Aussi agréable qu'un pancho mais plus pratique grace aux emmanchures bonne idée
13.12.2010 - 10:53
|
||||||||||
Shimmer#shimmercardigan |
||||||||||
 |
 |
|||||||||
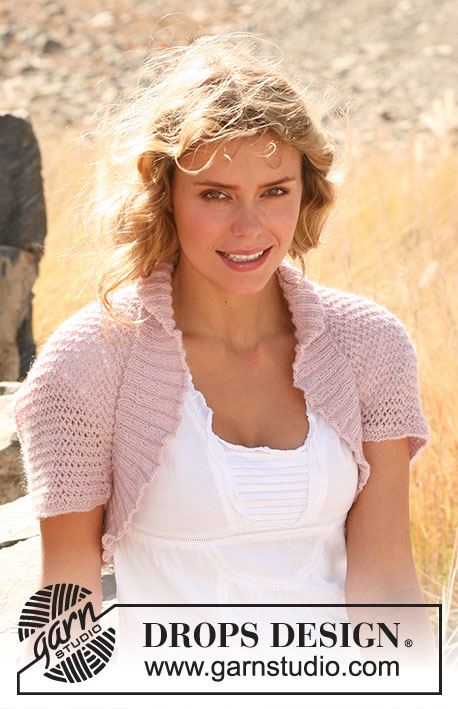
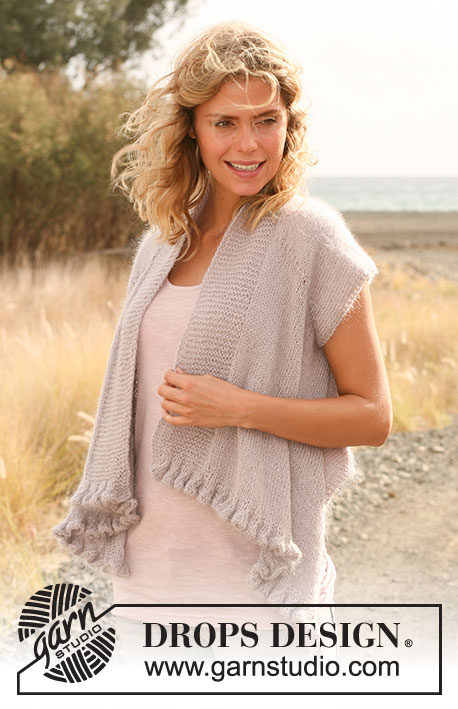
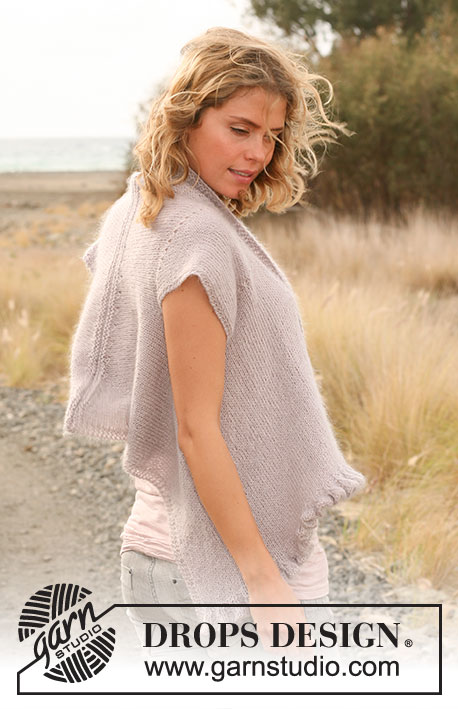
DROPS jacket with flounce knitted sideways in "Alpaca" and "Kid-Silk". Size: S - XXXL
DROPS 128-22 |
||||||||||
|
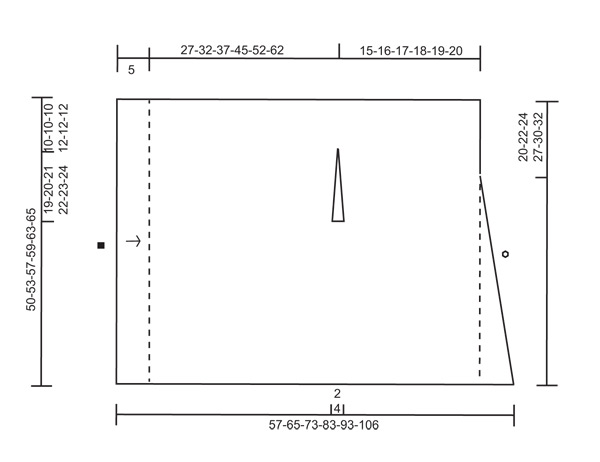
GARTER ST (back and forth on needle): K all rows. --------------------------------------------------------- JACKET: The garment is knitted back and forth on circular needle because of no of sts. Work the jacket from mid front on left front piece and out towards the side, dec for sleeve and continue until mid back before casting off. Then work right front piece the same way but reversed from mid front before the garment is sewn tog mid back. LEFT FRONT PIECE: Cast on 377-395-431-449-485-503 sts on circular needle 4.5 mm with 1 thread Alpaca and 1 thread Kid-silk. K 1 row from WS. Then work as follows (row 1 = from RS): 4 sts in garter st- see explanation above, K9, *P9, K9 *, repeat from *-* and finish with 4 sts in garter st. Work a total of 2 rows this way. On next row (from RS) K or P the first 8 sts in every K/P rib-section tog 2 by 2 = 213-223-243-253-273-283 sts. Work 1 row rib K5/P5 and 4 sts in garter st in each side. On next row work the first 4 sts in every K/P rib-section tog 2 by 2 =131-137-149-155-167-173 sts. Work 1 row rib K3/P3 and 4 sts in garter in each side. On next row from RS dec 1 st in each K section = 110-115-125-130-140-145 sts. Work 1 row from WS in rib P2/K3 with 4 sts in garter st in each side. On next row (from RS) dec 1 st in each P section = 90-94-102-106-114-118 sts. Work 1 row rib K2/P2 with 4 sts in garter in each side. The piece measures approx. 5 cm. Insert a marker and measure the piece from here. Continue in stocking st with 4 sts in garter at beg of row and 18-18-18-21-22-22 sts in garter at end of row (seen from RS), AT THE SAME TIME on first row adjust no of sts to 90-95-101-106-112-117 sts (do not adjust the garter sts in each side). REMEMBER THE KNITTING TENSION! NOTE: on every eighth row from WS work 2 rows extra back and forth over the 18-18-18-21-22-22 sts in garter (so that the edge does not contract). Do this until piece is finished. When piece measures approx. 27-32-37-45-52-62 cm from marker (measure on the stocking sts) - adjust so that next row is knitted from RS - slip the last 52-54-56-61-64-66 sts in the left side of piece (end of row seen from RS) on a stitch holder. Work 6-6-6-10-10-10 rows in stocking st with 4 sts in garter at beg of row as before and 2 sts in garter in the side towards the sts on the stitch holder (= approx. 2-2-2-4-4-4 cm) over the remaining 38-41-45-45-48-51 sts on needle. Cut the thread. Then slip these sts on a stitch holder. Slip the 52-54-56-61-64-66 sts from the first stitch holder back on circular needle 4.5 mm and continue with 18-18-18-21-22-22 sts in garter in the left side as before and 2 sts in garter in the right side (= bottom of sleeve) and knit the sleeve with shorter rows as follows (first row = RS): Work 34-36-38-40-42-44 sts, turn piece, tighten thread and return. Work 2 sts, turn piece, tighten thread and return. Work 4 sts, turn piece, tighten thread and return. Continue by working 2 sts more each time until working 34-36-38-40-42-44 sts, turn piece, tighten thread and return. Work 52-54-56-61-64-66 sts (= all sts on needle), turn piece and return. Work 34-36-38-40-42-44 sts, turn piece, tighten thread and return. Work 32-34-36-38-40-42 sts, turn piece, tighten thread and return. Continue by working 2 sts less each time until working 2 sts, turn piece, tighten thread and return. Work 34-36-38-40-42-44 sts, turn piece, tighten thread and return. Cut the thread. Now slip the 38-41-45-45-48-51 sts from the stitch holder back on needle. Then work over all the 90-95-101-106-112-117 sts as follows (first row = from RS): 4 sts in garter, stocking st until there are 18-18-18-21-22-22 sts left which are worked in garter. When piece measures 42-48-54-63-71-82 cm from marker (measured in the left side of piece seen from RS) work 1 row from RS as before. Then continue in stocking st with garter st in each side as before while AT THE SAME TIME working short rows to add extra width mid back as follows (beg at beg of row from WS = from neck edge): Work the first 36-40-44-48-54-58 sts on needle and then slip these sts on a stitch holder, work the remaining sts on the needle, turn piece and return over all sts, turn piece, * work the first 6-4-4-4-3-3 sts on the needle, then slip sts on the same stitch holder and work the remaining sts on the needle, turn piece and return over all sts *, repeat from *-* a total of 8-11-13-13-14-16 times. Turn piece, work the remaining 6-11-5-6-16-11 sts. Now slip all the sts from the stitch holder back on the needle (= 90-95-101-106-112-117 sts) and K 4 rows over all sts before LOOSELY casting off = mid back of jacket. The piece now measures approx. 47-53-59-67-76-87 cm in the left side (seen from RS) and 57-65-73-83-93-106 cm in the right side from cast on edge - measured in knitting direction! RIGHT FRONT PIECE: Cast on and work as left front piece but reversed, i.e all measurements that were done in the left side of piece is now done in the right side of piece (seen from RS). When working the 6-6-6-10-10-10 rows under the sleeve adjust so that the first row is worked from WS (instead of RS) and the last 52-54-56-61-64-66 sts in the left side of piece (seen from WS, not RS) is slipped on a stitch holder. Continue to follow explanation for sleeve from WS (instead of RS). Finish by working with short rows mid back by starting at beg of row from RS (instead of beg of row from WS). ASSEMBLY: Sew the jacket tog mid back within the cast off edge so that there are 4 garters mid back. |
||||||||||
Diagram explanations |
||||||||||
|
||||||||||
 |
||||||||||
Have you finished this pattern?Tag your pictures with #dropspattern #shimmercardigan or submit them to the #dropsfan gallery. Do you need help with this pattern?You'll find 13 tutorial videos, a Comments/Questions area and more by visiting the pattern on garnstudio.com. © 1982-2026 DROPS Design A/S. We reserve all rights. This document, including all its sub-sections, has copyrights. Read more about what you can do with our patterns at the bottom of each pattern on our site. |
||||||||||


With over 40 years in knitting and crochet design, DROPS Design offers one of the most extensive collections of free patterns on the internet - translated to 17 languages. As of today we count 324 catalogues and 12290 patterns translated into English (UK/cm). 12290
We work hard to bring you the best knitting and crochet have to offer, inspiration and advice as well as great quality yarns at incredible prices! Would you like to use our patterns for other than personal use? You can read what you are allowed to do in the Copyright text at the bottom of all our patterns. Happy crafting!
Post a comment to pattern DROPS 128-22
We would love to hear what you have to say about this pattern!
If you want to leave a question, please make sure you select the correct category in the form below, to speed up the answering process. Required fields are marked *.