
Popular categories
Looking for a yarn?


Comments / Questions (40)
![]() Cindy wrote:
Cindy wrote:
I have started the left side of the sweater. I knit my first row, then started to purl the second row, adding in the cable and the garter stitch border. After several rows of this, my cable seems to be on the backside not the front front so I’m quite confused. Please help thank you.
10.12.2025 - 04:00DROPS Design answered:
Hi Cindy, Cabling is worked from the right side. The first knitted row is from the wrong side and the pattern begins on the next row from the right side, so you then work the cables on rows from the right side too. Regards, Drops Team.
10.12.2025 - 06:39
![]() Cindy wrote:
Cindy wrote:
I am making Lakeside Sunset cardigan. Now starting on the front piece. Trying to figure out how to do the little cable part but what does the short row mean hello
03.12.2025 - 22:10DROPS Design answered:
Hi Cindy, The 1 short row is to shape the band before beginning the decreases for the neckline (work across the band, turn and work back to beginning of row = 1 short row). The decreases for the neckline are after/before M.1 + band stitches (depending on which front piece you are working, and so the cable pattern isn't affected by the decreases). Hope this helps. Regards, Drops Team.
04.12.2025 - 06:48
![]() Janick wrote:
Janick wrote:
Bonjour ,pouvez vous m'aider pour faire les rangs raccourcis au niveau encolure car si je suis les explications on commence à l'nvers puis on tourne et on refait donc on est sur l'endroit et pour le 3 ème rang , on reprend à priori on est aussi sur l'endroit je ne comprends pas... je vous remercie
21.04.2025 - 17:17DROPS Design answered:
Bonjour Janick, les rangs raccourcis du devant gauche se commencent effectivement sur l'envers: tricotez les 12 premières mailles en début de rang sur l'envers (= les mailles de la bordure devant), tournez, tricotez ces 12 mailles (sur l'endroit), tournez et tricotez de nouveau toutes les mailles (sur l'envers) comme avant. Pour le devant droit, vous commencerez ces rangs raccourcis sur l'endroit. Bon tricot!
22.04.2025 - 16:27
![]() Rita Goldenstein wrote:
Rita Goldenstein wrote:
Die letzte Reihe der Zeichenerklärung ist falsch: 1 M auf eine Zopfnadel __vor__ die Arbeit legen,........ nur so läuft die rechte Masche korrekt. Ich bitte um Überprüfung!
26.01.2021 - 18:28DROPS Design answered:
Liebe Frau Goldenstein, stimmt ja, danke für den Hinweis, Zeichenerklärung wird korrigiert. Viel Spaß beim stricken!
27.01.2021 - 07:50
![]() Gail McHugh wrote:
Gail McHugh wrote:
Excellent thank you very much, l can now continue with confidence and thank you for your speedy replies.
11.02.2020 - 16:01
![]() Gail McHugh wrote:
Gail McHugh wrote:
Thanks for your quick reply l now understand that the Dec 3/12/20sts relates to different pieces of the garment but am still unsure where to apply them. On the back shoulder left side do l knit the 12 garter stitches and then Dec, or do I Dec anywhere within the 12 garter stitches?
11.02.2020 - 14:53DROPS Design answered:
Dear Mrs Hugh, on left shoulder back piece, you work from RS: 12 sts garter stitch, decrease and work row to the end. On right shoulder you will work from RS until 14 stitches remain, decrease 1 stitch and finish row with 12 sts in garter stitch. Happy knitting!
11.02.2020 - 15:20
![]() Gail McHugh wrote:
Gail McHugh wrote:
Hi I seem to have got stuck on the back at the shoulders. The instructions say Dec l st for neckline on every right side row inside the 12 sts in garter st twice. But I don’t understand the Dec tip 2 which says Dec as follows after 3/12/20 sts. How do these numbers relate to the sts on the shoulders.
09.02.2020 - 18:09DROPS Design answered:
Dear Mrs McHugh, on back piece you work in stocking stitch with 12 sts in garter stitch towards neck and decrease inside these 12 stitches in garter stitch. When decreasing on armholes you decreased inside 3 sts in stcoking stitch and on front piece you will decrease inside 32 sts (= the 12 sts in garter st (front band) + M.1 (= 20 sts)). Happy knitting!
10.02.2020 - 09:42
![]() Heleen wrote:
Heleen wrote:
Onderstaande vraag mag verwijderd worden.
24.12.2014 - 08:13
![]() Heleen wrote:
Heleen wrote:
Moet je bij de voorpanden bij het minderen dit doen meteen voor/na de markeerdraad of moet je minderen aan de zijkanten van de panden? Dat laatste lijkt mij logischer om een mooie vorm te krijgen, maar in de beschrijving staat het anders.
23.12.2014 - 15:02DROPS Design answered:
Hoi Heleen. Je doet het meteen voor en na de markeerdraad en niet aan de zijkanten (lees ook TIP VOOR HET MINDEREN 1). Op deze manier krijg je ook een mooie taillevorm. Veel breiplezier verder.
23.12.2014 - 16:02
![]() Kim wrote:
Kim wrote:
Made this and am very pleased, one of my friends is going to make it for herself, it really is a nice pattern.
23.08.2014 - 21:34
|
||||||||||||||||
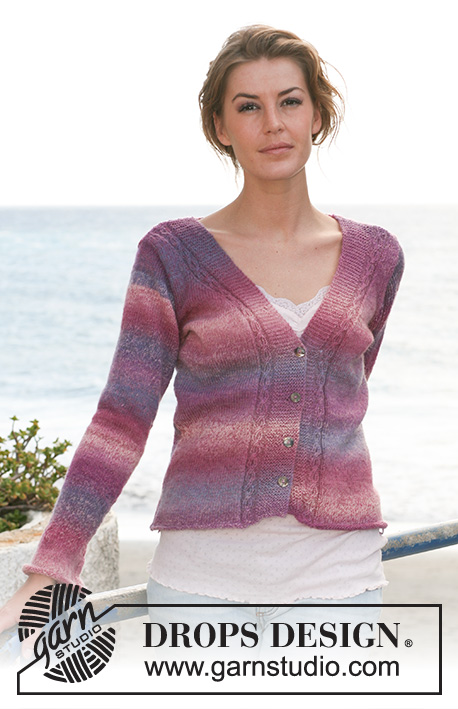
Lakeside Sunset#lakesidesunsetcardigan |
||||||||||||||||
 |
 |
|||||||||||||||
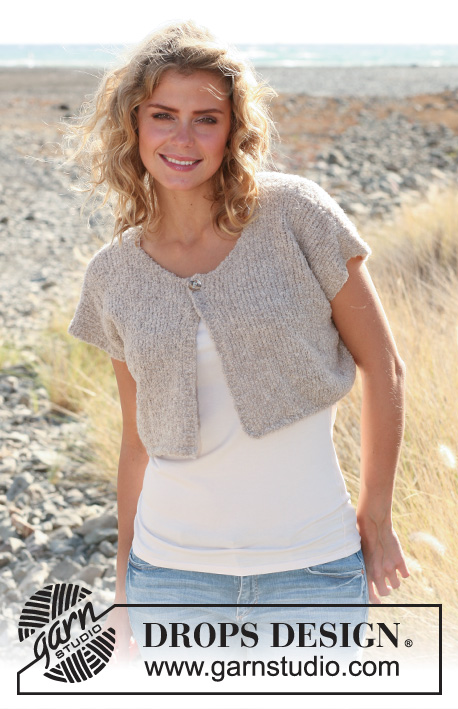
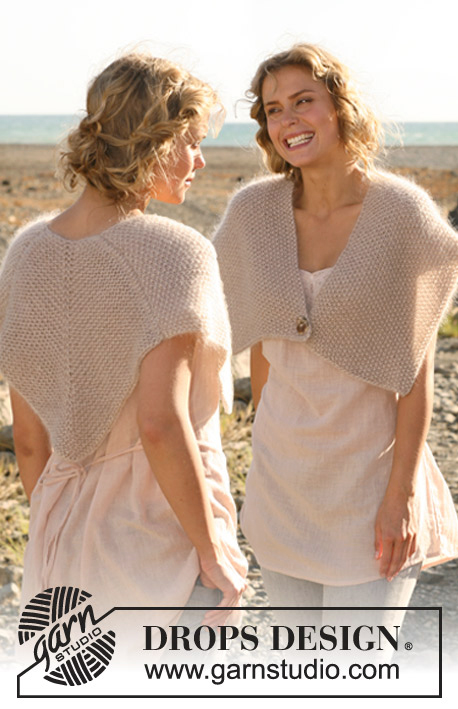
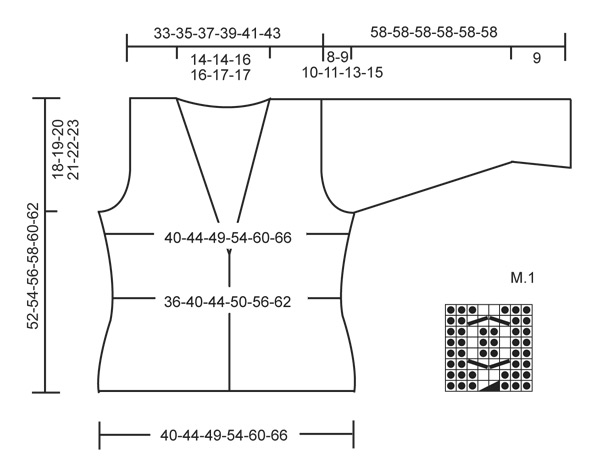
Knitted DROPS jacket with cables in "Delight". Size S-XXXL.
DROPS 130-21 |
||||||||||||||||
|
GARTER ST (back and forth on needle): K all rows. DECREASE TIP 1 (applies to waist): All dec are done from RS. Dec as follows after marker: K2 tog. Dec as follows before marker: Slip 1 st as if to K, K1, psso. DECREASE TIP 2: (applies to armholes and neckline): All dec are done from RS. Dec inside 3 sts in stocking st at armhole, inside 12 sts in garter st at neckline on back piece and inside 12 sts in garter st + M.1 (= 20 sts) at the neckline on the front piece. Dec as follows after 3/12/20 sts: Slip 1 st as if to K, K1, psso. Dec as follows before 3/12/20 sts: K2 tog. INCREASE TIP: Inc by knitting up 1 st between 2 sts from previous row and K this st twisted, i.e. work in the back loop of st instead of front to avoid holes. PATTERN: See diagram M.1 = 8 sts. The diagram shows the pattern from RS. BUTTON HOLES: Cast off for 4 button holes on right front band. 1 button hole = cast off 5th and 6th st from edge and cast on 2 new sts on next row over these sts. Cast off for button holes when piece measures: SIZE S: 9, 15, 21 and 27 cm. SIZE M: 10, 16, 22 and 28 cm. SIZE L: 11, 17, 23 and 29 cm. SIZE XL: 12, 18, 24 and 30 cm. SIZE XXL: 13, 19, 25 and 31 cm. SIZE XXXL: 14, 20, 26 and 32 cm. -------------------------------------------------------- BACK PIECE: Worked back and forth on needle. Cast on 94-104-114-126-140-154 sts (incl 1 edge st each side) on needle size 3.5 mm. K 1 row from WS, then continue working in stocking st. Insert 2 markers in the piece, after 24-26-29-32-35-39 sts each side (= 46-52-56-62-70-76 sts between markers). When piece measures 6-7-8-9-10-11 cm, dec at each marker for waist. Dec after 1st marker and before 2nd marker - READ DECREASE TIP 1! Repeat the dec on every 6th row a total of 5 times = 84-94-104-116-130-144 sts. REMEMBER THE KNITTING TENSION! When piece measures 17-18-19-20-21-22 cm, inc at markers - inc after 1st marker and before 2nd marker - READ INCREASE TIP! Repeat the inc on every 6th row a total of 5 times = 94-104-114-126-140-154 sts. When piece measures 34-35-36-37-38-39 cm, cast off 4-5-6-8-10-12 sts at beg of the next 2 rows for armholes. Continue to dec on every row from RS - READ DECREASE TIP 2 - 1 st 5-7-8-10-13-15 times = 76-80-86-90-94-100 sts. When piece measures 48-50-52-54-56-58 cm, work 4 rows in garter st over the middle 52-52-56-56-60-60 sts (work rest of sts as before) then cast off the middle 28-28-32-32-36-36 sts for neckline and finish each part separately. Continue in stocking st and 12 sts in garter st towards the neckline while AT THE SAME TIME dec for neckline on every row from RS inside the 12 sts in garter st - READ DECREASE TIP 2 - as follows: 1 st a total of 2 times = 22-24-25-27-27-30 sts remain on shoulder. Cast off when piece measures 52-54-56-58-60-62 cm. LEFT FRONT PIECE: Cast on 53-58-63-69-76-83 sts (incl 1 edge st in the side and 12 band sts towards mid front) on needle size 3.5 mm. K 1 row from WS. Work next row from RS as follows: 1 edge st, work in stocking st until 20 sts remain, PATTERN (= 8 sts) - see explanation above - and 12 sts in garter st. Continue in stocking st and M.1 + 12 band sts in garter st towards mid front until finished measurements. Insert a marker after 24-26-29-32-35-39 sts from side. When piece measures 6-7-8-9-10-11 cm, dec before marker for waist - SEE DECREASE TIP 1! Repeat the dec on every 6th row a total of 5 times = 48-53-58-64-71-78 sts. When piece measures 17-18-19-20-21-22 cm, inc before marker - SEE INCREASE TIP! Repeat the inc on every 6th row a total of 5 times = 53-58-63-69-76-83 sts. Read all of the following section before continuing! When piece measures 29-30-31-32-33-34 cm, work with short rows 1 time over the 12 band sts only, beg from WS as follows: Work 12 sts in garter st, turn and work back over the 12 sts in garter st. On next row from RS, dec for neckline inside 12 band sts + M.1 (= 20 sts) - READ DECREASE TIP 2: Dec on every other row: 1 st a total of 18 times and then on every 4th row: 1 st a total of 4-4-6-6-8-8 times. AT THE SAME TIME when piece measures 34-35-36-37-38-39 cm, cast off and dec for armhole in the side as on back piece. After all dec for neckline and armhole are done, 22-24-25-27-27-30 sts remain on shoulder. Continue as before until piece measures 52-54-56-58-60-62 cm - adjust after 1 whole repetition of M.1. Cast off. RIGHT FRONT PIECE: Cast on and work as left front piece but opposite. NOTE: Dec and inc for waist are done after marker and the short rows over band sts beg from RS. When piece measures 9-10-11-12-13-14 cm, cast off for first BUTTON HOLE - see explanation above! SLEEVE: Worked back and forth on needle. Cast on 56-58-62-64-68-70 sts (incl 1 edge st each side) on needle size 3.5 mm. K 1 row from WS. Continue in stocking st. When piece measures 9 cm, dec 10 sts evenly = 46-48-52-54-58-60 sts. When piece measures 15-15-15-15-12-11 cm, inc 1 st each side. Repeat inc every 2-2-2-1½-1½-1½ cm a total of 15-16-16-18-19-20 times = 76-80-84-90-96-100 sts. When piece measures 50-49-48-47-45-43 cm (NOTE! Shorter measurements in the larger sizes because of longer sleeve cap and broader shoulder width), cast off for sleeve cap at beg of row each side as follows: 4 sts 1 time, 3 sts 1 time, 2 sts 2 times, 1 st 5-6-8-9-12-15 times, then continue to cast off 2 sts each side until piece measures 57 cm, then cast off 3 sts 1 time each side. Cast off the remaining sts, the piece measures approx. 58 cm. ASSEMBLY: Sew shoulder seams, set in sleeves and sew under arm and side seams in one, inside 1 edge st. Sew the buttons on to left front piece. |
||||||||||||||||
Diagram explanations |
||||||||||||||||
|
||||||||||||||||
 |
||||||||||||||||
Have you finished this pattern?Tag your pictures with #dropspattern #lakesidesunsetcardigan or submit them to the #dropsfan gallery. Do you need help with this pattern?You'll find 19 tutorial videos, a Comments/Questions area and more by visiting the pattern on garnstudio.com. © 1982-2026 DROPS Design A/S. We reserve all rights. This document, including all its sub-sections, has copyrights. Read more about what you can do with our patterns at the bottom of each pattern on our site. |
||||||||||||||||


With over 40 years in knitting and crochet design, DROPS Design offers one of the most extensive collections of free patterns on the internet - translated to 17 languages. As of today we count 324 catalogues and 12290 patterns translated into English (UK/cm). 12290
We work hard to bring you the best knitting and crochet have to offer, inspiration and advice as well as great quality yarns at incredible prices! Would you like to use our patterns for other than personal use? You can read what you are allowed to do in the Copyright text at the bottom of all our patterns. Happy crafting!
Post a comment to pattern DROPS 130-21
We would love to hear what you have to say about this pattern!
If you want to leave a question, please make sure you select the correct category in the form below, to speed up the answering process. Required fields are marked *.