
Popular categories
Looking for a yarn?


Comments / Questions (28)
![]() BALLEVRE wrote:
BALLEVRE wrote:
Bonjour. Je ne comprends pas les indications pour le bonnet. Il faut rabattre les mailles à 13cm depuis la pointe et ensuite coudre et vous dites que c’est le dos. Les 13 cm tricotés ne permettent pas de faire un bonnet entier. Je me retrouve avec 2 grandes pointes et une pointe plus large au milieu mais plus courte. N est loin du bonnet Ne manque t-il pas des indications pour un devant ? Je ne comprends pas non plus vos indications de couture. Merci pour votre aide.
16.03.2025 - 21:35DROPS Design answered:
Bonjour Mme Ballevre, cette vidéo devrait pouvoir vous aider, nous y montrons comment assembler ce type de bonnet (pas le même nombre de mailles, mais la même technique). Bon tricot!
17.03.2025 - 09:45
![]() Teesa wrote:
Teesa wrote:
Ho confezionato il cardigan Matheo con vostra merino extra fine ed è venuto splendido. Ho acquistato 2 gomitoli in più ed ora vorrei confezionare questo cappellino. Ovviamente la lana è piu grossa. Posso farlo ugualmente, magari di una taglia inferiore?
01.11.2020 - 09:10DROPS Design answered:
Buongiorno Teresa, provi a lavorare un campione e vedere se corrisponde a quello indicato. Buon lavoro!
02.11.2020 - 10:39
![]() Hanna wrote:
Hanna wrote:
Minusta olisi hyvä että selkeämmin kirjoitettaisiin tuo myssyn päättely. Neulotaan 1 s o, ja 2 seuraavaa silmukkaa oikein yhteen SAMALLA kun päätät s:t... miten samalla?! Jatkamalla kavennuksia samalla tavalla ja siten päättyy työ vai pitääkö loput silmukat mitä ensimmäisestä kavennuksesta jää jäljelle päätellä; 1. s neulomatta, 2. silmukka neulotaan ja neulomatta jätetty silmukka vedetään neulotun yli. Selkeyttä!
07.11.2016 - 19:18
![]() Peter Hoffmann wrote:
Peter Hoffmann wrote:
Kurze Frage.....verstehe ich das richtig das ich einen Rapport von 4 Reihen habe, also eigentlich 2x die 2te Reihe? Bin mir nicht sicher, ob ich die Zu-und Abnahme der 2ten Reihen auch in den 4ten Reihen machen muss....Danke für Hilfe.....stecke schon am Anfang fest 😢
27.07.2016 - 08:49DROPS Design answered:
Lieber Peter, ja die Aufnahmen, die jede 2. R gemacht werden, stricken Sie auch in der 4. R.
28.07.2016 - 15:34
![]() Bossard wrote:
Bossard wrote:
Bonjour les marqueurs se mettent que sur les rgs endroits
30.12.2015 - 15:45DROPS Design answered:
Bonjour Mme Bossard, les 7 marqueurs se placent sur un rang sur l'endroit - les augmentations/diminutions se font ensuite uniquement sur l'endroit - tous les 2 rangs = tous les rangs sur l'endroit ou tous les 4 rangs = tous les 2 rangs sur l'endroit. Bon tricot!
02.01.2016 - 15:39
![]() Schmidt wrote:
Schmidt wrote:
Hallo, ich komme irgendwie nicht mit der Anleitung klar. Es steht mit der 1.R mit den Zu-und Abnehmen beginnen und andererseits steht in jeder 2.Reihe.????? Wenn ich die M zunehme, stricke ich diese dann in der Rückreihe zusammen, dies wäre aber eigentlich die 2. Reihe. Hat jemand die Mütze von 20-2 schon gestrickt und könnte mir eine genauere Anleitung zur Verfügung stellen? Vielen Dank F. Schmidt
14.09.2015 - 16:35DROPS Design answered:
Sie stricken die ganze Mütze kraus rechts, also jede R rechts. Sie beginnen mit den Abnahmen/Zunahmen in der 1. R (das ist eine Hin-R), danach nehmen Sie dann in jeder 2. R zu, d.h. immer in Hin-R. In den Rück-R stricken Sie die zugenommenen M verschränkt ab, sie werden in der Rück-R nicht zusammengestrickt.
15.09.2015 - 21:17
![]() Dorit Hejslet wrote:
Dorit Hejslet wrote:
Hej jeg forstår ikke helt, hvordan man skal tage ud og ind. Der står, at det altid skal ske fra retsiden og på 2. og 4. pind. Vil det sige, at jeg strikker 1. pind uden at gøre noget, 2. pind tager jeg ind og ud som der står i opskriften ved de mærker hvor 2. Pind er angivet. 3. Pind gør jeg intet. 4. Pind tager jeg ind og ud som der står i opskriften under de mærker hvor 4. Pind er angivet?
30.08.2015 - 16:23
![]() Marianne wrote:
Marianne wrote:
Jullie hebben het over meerderen en minderen om de naald en iedere 4E naald. In de eerste naald beginnen. Dan wordt het toch de derde naald? Alles moet toch aan de goede kant van het werk gebeuren? Hoor graag van u, mvrgr Marianne
09.02.2014 - 17:19DROPS Design answered:
Hoi Marianne. In elke 4e nld is op de goede kant. Je moet het als volgt tellen: 1 nld met minderingen/meerderingen (= goede kant), dan brei je de 1e nld verkeerde kant, 2e nld goede kant, 3e nld op de verkeerde kant en dan de 4e nld op de goede kant = hier meerder/minder je nog een keer.
12.02.2014 - 13:41
![]() Cristina wrote:
Cristina wrote:
Salve, ho provato a fare il vostro cappellino, ma dopo il terzo tentativo ho mollato!!mi vengono troppo lunghe le orecchie, troppo largo e sopratutto troppo basso, inoltre se guardo il video di come si chiude, ho la conferma che non vada bene quello che faccio perchè mi rimangono troppe poche maglie sul ferro..insomma un disastro!! dove sbaglio?? grazie mille
31.07.2013 - 14:24DROPS Design answered:
Buongiorno Cristina, è sicura che il suo campione corrisponda perfettamente a quello indicato? Se corrisponde, le misure dovrebbero essere corrette! Riguardo alla chiusura, potrebbe dirci che taglia sta lavorando e qual è il passaggio che le crea problemi? Saremo felici di aiutarla! Buon lavoro!
02.08.2013 - 15:14
![]() Edith wrote:
Edith wrote:
Beste. Heb ik het juist als dit patroon met enkele draad moet gebreid worden? In de omschrijving van de muts staat: "om de naald".Moet ik dit zien als 1 naald rechts breien en rekening houden MET de aangeduide steken en de teruggaande rechtse naald gewoon breien zoals de steken zich voordoen?Om de naald komt dan overeen met "ELKE 2de naald? Alvast bedankt voor je feedback! Groetjes Edith
14.06.2013 - 12:15DROPS Design answered:
Hoi Edith. Ja, deze muts wordt met 1 draad gebreid. Je meerdert en mindert dan om de nld (= in elke 2e nld), elke 4e nld en elke 6e nld
19.06.2013 - 13:41
|
|
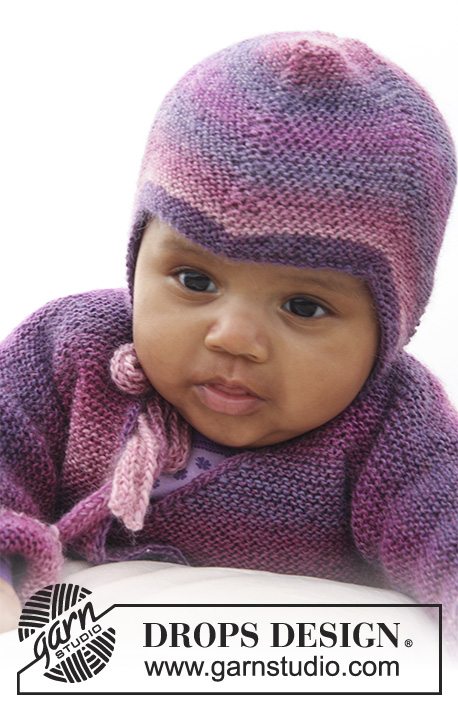
Sweet Evelina Hat#sweetevelinahat |
|
 |
 |
Knitted hat in garter st for baby and children in DROPS Delight
DROPS Baby 20-2 |
|
|
INCREASE TIP: All inc are done from RS. Inc 1 st before and after st with marker by making 1 YO. On next round knit YO twisted (i.e knit in the back loop of YO instead of front) to avoid holes. DECREASE TIP: All dec are done from RS. Dec 1 st on each side of st with marker. Beg 1 st before st with marker. Put 1 st on a cable needle behind the piece, slip 1 st (= st with marker), K next st and st on cable needle tog, psso. ---------------------------------------------------------- HAT: Worked back and forth on needle – K all rows (= garters). Cast on 119-127-135 (139-145) sts on needle size 2.5 mm with Delight. K 6 rows (1st row = RS). Insert 7 markers in the piece as follows (from RS): 1st marker in the 1st st on needle, 2nd marker in the 22nd-24th-26st (28th-31st) st, 3rd marker in the 43rd-47th-51st (55th-61st) st, 4th marker in the 60th-64th-68th (70th-73rd) st, 5th marker in the 77th-81st-85th (85th-85th) st, 6th marker in the 98th-104th-110th (112th-115th) st and 7th marker in the last st on the needle. Continue to K – AT THE SAME TIME on 1st row, beg to inc and dec – SEE INCREASE TIP AND DECREASE TIP! Inc 1 st after 1st marker on every other row. Dec 1 st on each side of the 2nd marker every other row. Inc 1 st before 3rd marker on every other row. Inc 1 st after 3rd marker on every 4th row. Dec 1 st on each side of the 4th marker every 4th row. Inc 1 st before 5th marker on every 4th row. Inc 1 st after 5th marker on every other row. Dec 1 st on each side of the 6th marker every other row. Inc 1 st before 7th marker on every other row. When piece measures 13-15-16 (18-19) cm (measured from bottom tip at 2nd and 6th marker) work next row from RS as follows: * K1, K2 tog *, repeat from *-* WHILE casting off. ASSEMBLY: Back of hat = cast off edge, i.e. 2 whole tips and 2 half tips. The 2nd of the 3 whole tips in the opposite side of the piece = cast on edge, goes down to the forehead at the front. Sew the hat tog edge to edge with 1 stitch in each st along the cast off edge as follows: Sew first half tip tog with first half of first whole tip. Continue to sew second half of first whole tip tog with first half of second whole tip. Then sew the other half of the second whole tip tog with the last half tip. Finish by sewing the hat tog mid back – make sure to sew edge to edge to avoid chunky seams. TIE STRING: Cast on 4 sts on needle size 2.5 mm with Delight. Knit as follows: * K1, place yarn in front of piece (towards you), slip 1 st as if to P, place yarn behind piece (from you) *, repeat from *-* the rest of row and on all rows. This becomes a string worked in the round. Cast off when the string measures approx. 20-22-24 (26-28) cm. Knit a similar tie string. Sew one tie string at the bottom of each tip on each side. |
|
Have you finished this pattern?Tag your pictures with #dropspattern #sweetevelinahat or submit them to the #dropsfan gallery. Do you need help with this pattern?You'll find 7 tutorial videos, a Comments/Questions area and more by visiting the pattern on garnstudio.com. © 1982-2026 DROPS Design A/S. We reserve all rights. This document, including all its sub-sections, has copyrights. Read more about what you can do with our patterns at the bottom of each pattern on our site. |
|


With over 40 years in knitting and crochet design, DROPS Design offers one of the most extensive collections of free patterns on the internet - translated to 17 languages. As of today we count 324 catalogues and 12290 patterns translated into English (UK/cm). 12290
We work hard to bring you the best knitting and crochet have to offer, inspiration and advice as well as great quality yarns at incredible prices! Would you like to use our patterns for other than personal use? You can read what you are allowed to do in the Copyright text at the bottom of all our patterns. Happy crafting!
Post a comment to pattern DROPS Baby 20-2
We would love to hear what you have to say about this pattern!
If you want to leave a question, please make sure you select the correct category in the form below, to speed up the answering process. Required fields are marked *.