
Popular categories
Looking for a yarn?


Comments / Questions (38)
![]() Nelly wrote:
Nelly wrote:
Bonjour , sur le devant en taille S j arrive à 36,5 cm env de hauteur après un motif complet de MB . Faut il que je fasse MC ou que je refasse encore un motif MB ?
09.02.2016 - 22:50DROPS Design answered:
Bonjour Nelly, à vous de voir en fonction de la hauteur d'1 motif M1B, si vous commencez avant, l'encolure sera un tout petit peu plus profonde (1.5 cm d'écart), si vous en tricotez 1 en plus, l'encolure sera moins profonde (déterminez la hauteur en fonction de votre nbe de rangs pour 1 motif). Bon tricot!
10.02.2016 - 10:17
![]() Bente Bisgaard wrote:
Bente Bisgaard wrote:
Jeg vil gerne strikke denne opskrift, men jeg får ikke diagramet med ud når jeg pr inter.hvad kan jeg gøre? ' hilsen Bente
12.01.2016 - 14:35
![]() DE PRINS Annie wrote:
DE PRINS Annie wrote:
J'ai un problème avec vos proportions : Si 17 mailles = 10 cm, 94 m (demandé pour la taille S qui a 42cm de large) = 55 cm. Si je veux avoir 42 cm de large il ne me faut que 72 mailles. Que faire ? Merci
12.11.2015 - 15:50DROPS Design answered:
Bonjour Mme De Prins, l'échantillon est tricoté en jersey, mais le pull comporte des torsades, ce qui va resserrer l'ouvrage, d'où un plus grand nombre de mailles nécessaire pour obtenir les dimensions. Si vous avez bien 17 m jersey = 10 cm, conservez bien la même tension, vous obtiendrez bien les 94 m = 42 cm en taille S. Bon tricot!
12.11.2015 - 16:49Rosalie Racine wrote:
Continue as before until piece measures approx 61-63-65-67-69-71 cm (adjust to a full repeat). Now worked M.C over M.B. After 1 vertical repeat of M.C there are 66-68-68-70-74-76 sts on needle. What does M.C over M.B. Mean?
15.04.2015 - 03:31DROPS Design answered:
Dear Mrs Racine, when piece measures 61-71, make sure to finish a repeat of diagram MB in height, work now following diagram MC (either M1C or M2C depending on your size) over MB, ie instead of MB. Happy knitting!
15.04.2015 - 09:03
![]() Sandra wrote:
Sandra wrote:
Hallo, sind bei den Charts nur die Hin-Reihen gezeichnet oder auch die Rück-Reihen? Danke im voraus für die schnelle Hilfe Sandra
29.10.2014 - 19:33DROPS Design answered:
Es sind immer alle R eingezeichnet, Hin- und Rück-R. Viel Spaß beim Stricken!
30.10.2014 - 21:17
![]() Teresa wrote:
Teresa wrote:
Beim Tipp zum Aufnehmen muss es heißen: ... und diesen Umschlag bei der nächsten R. verschränkt RECHTS stricken (d.h. man sticht in das hintere Glied der Masche ein).
30.08.2014 - 13:45DROPS Design answered:
Vielen Dank für den Hinweis, das wird gleich korrigiert! Weiterhin gutes Gelingen!
30.08.2014 - 15:41
![]() MARTIN wrote:
MARTIN wrote:
Bonjour, merci de bien vouloir expliquer comment l'on compte les "sections" pour réaliser les augmentations du col.
21.07.2014 - 22:36DROPS Design answered:
Bonjour Mme Martin, dans les côtes 2/2, les sections envers correspondent aux 2 m env des côtes, vous aurez ainsi après la 1ère augmentation des côtes 2 m end/3 m env dans les 23-33 rapports des côtes (cf taille) au milieu du col. Vous augmentez ensuite dans les sections 3 m env concernées pour passer à 4 m env et ainsi de suite. On a ensuite des côtes 2 m end/2 m env ou 3 m env ou 4 m env ... tout autour du col. Bon tricot!
22.07.2014 - 09:23
![]() Arancha wrote:
Arancha wrote:
Alguien tiene la foto de la espalda? No entiendo cómo se hace el cuello por la espalda. Agradezco foto o explicaciones.
03.03.2014 - 15:13DROPS Design answered:
Hola Arantza, a los 7 cm hay que pasar de *2d, 2r*. a *2 d., 3 r* en las 19-20-23-25-27-29 repeticiones de la espalda (es decir, no aum en las primeras y últimas 7 que quedarían *2d, 2 r.*) Cuando la pieza mida aprox 9 cm pasar de *2d, 3r* a *2d, 4r.* pt en cada una de las 15-16-19-21-23-25 repeticiones de la espalda (es decir, no aum en las primeras y últimas 9 repeticiones con lo que quedan 7 de *2d,2r*, 2 de *2d,3r* las del centro de *2d,4r*, 2 de *2d,3r* y 7 de *2d,2r*)
11.03.2014 - 11:23
![]() Arancha wrote:
Arancha wrote:
Alguien tiene la foto de la espalda? No entiendo cómo se hace el cuello por la espalda. Agradezco foto o explicaciones.
03.03.2014 - 15:13
![]() Rita wrote:
Rita wrote:
In patroon M.1A heb je dit wel nodig,het is zeer duidelijk aangeduid.goetjes Rita
22.05.2013 - 17:01
|
|||||||||||||||||||
Fishtail |
|||||||||||||||||||
 |
 |
||||||||||||||||||
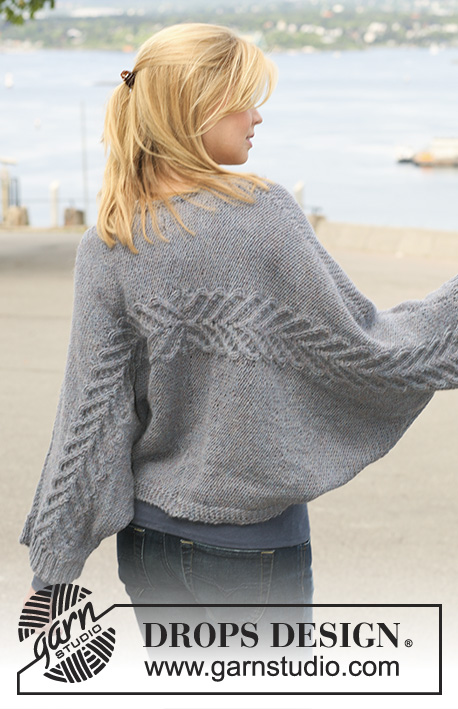
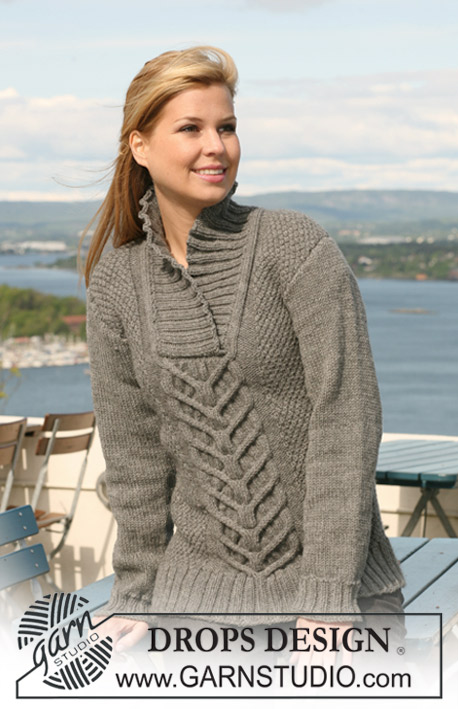
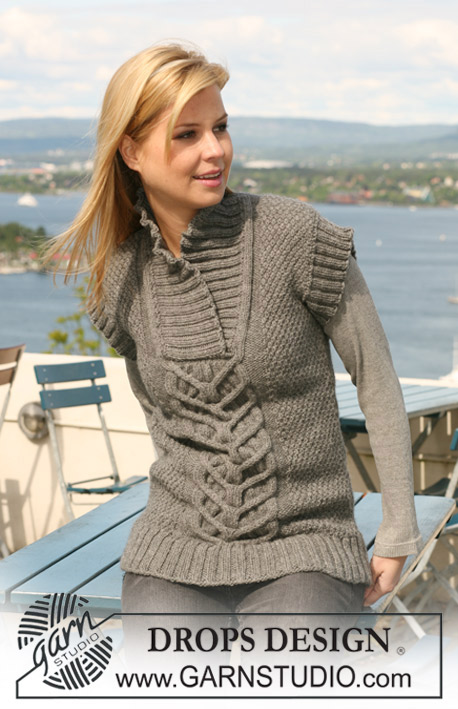
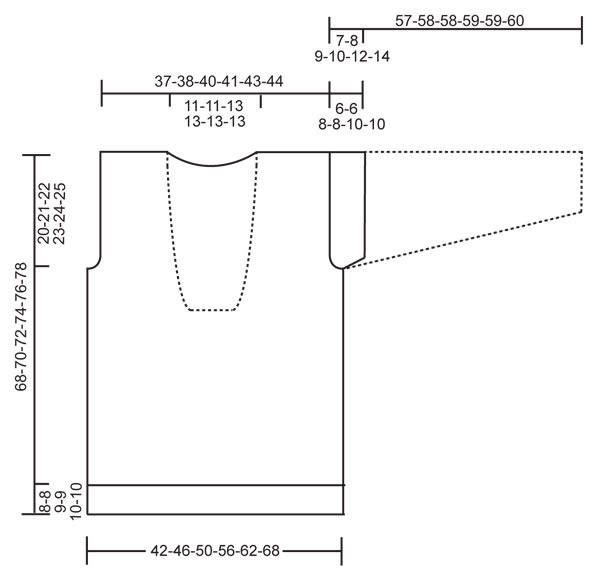
Knitted DROPS jumper with short or long sleeves with cables and moss st in ”Nepal”. Size S - XXXL.
DROPS 125-24 |
|||||||||||||||||||
|
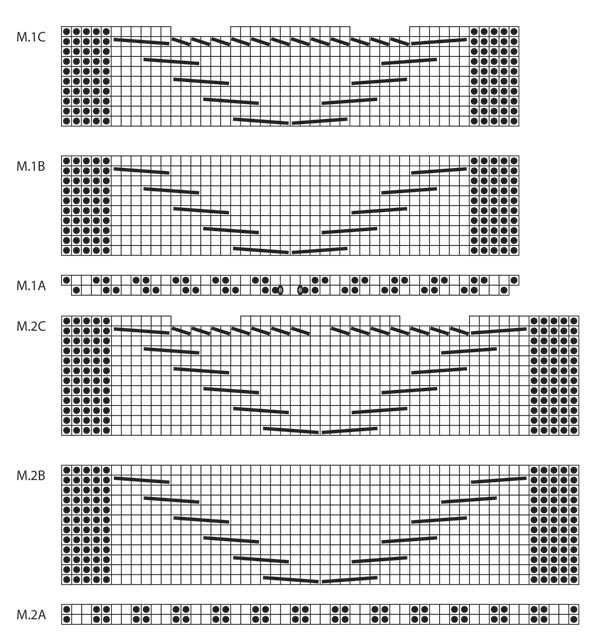
PATTERN: See diagram M.1 and M.2. See diagram for your size. Diagram shows the pattern from RS. Size S + M: M.1A, M.1B and M.1C. Size L + XL + XXL + XXXL: M.2A, M.2B and M.2C. GARTER ST (back and forth on needle): K all rows. INCREASING TIP: Inc 1 st by making 1 YO. Inc alternately before and after P-section. On next row K YO into back of loop to avoid a hole. MOSS ST (double): Row 1: * K1, P1 *, repeat from *-*. Row 2: K over K and P over P. Row 3: P over K and K over P. Repeat row 2 and 3. -------------------------------------------------------- BACK PIECE: Cast on 94-102-110-118-126-142 sts (includes 1 edge st each side) on needle size 4.5 mm with Nepal. P 1 row from WS and continue in rib as follows (from RS): 1 edge st, P1, * K2, P2 *, repeat from *-* and finish with K2, P1 and 1 edge st. When rib measures 8-8-9-9-10-10 cm work next row as follows (from RS): 1 edge st, 24-28-28-32-36-44 sts in rib as before, M.A (work diagram for your size - see above), 24-28-28-32-36-44 sts in rib as before and 1 edge st. After 1 vertical repeat of M.A there are 96-104-110-118-126-142 sts on needle. Change to needle size 5 mm and work next row as follows: 1 edge st, 24-28-28-32-36-44 MOSS STS - see above - AT THE SAME TIME dec 4-4-4-3-2-5 sts evenly, M.B (work diagram for your size), 24-28-28-32-36-44 moss sts AT THE SAME TIME dec 4-4-4-3-2-5 sts evenly and work 1 edge st. There are now 88-96-102-112-122-132 sts on needle. Continue in moss st and M.B. When piece measures 48-49-50-51-52-53 cm cast off 3 sts each side for armhole and cast off to shape the armhole at the beg of every row each side: 2 sts 1-2-3-5-6-8 times and 1 st 0-1-1-1-2-2 times = 78-80-82-84-88-90 sts. Continue as before until piece measures approx 61-63-65-67-69-71 cm (adjust to a full repeat). Now worked M.C over M.B. After 1 vertical repeat of M.C there are 66-68-68-70-74-76 sts on needle. On next row from RS cast off the middle 18-18-22-22-22-22 sts for neck= 24-25-23-24-26-27 sts left on each shoulder. Continue in moss st and P5 + K3 towards neck. AT THE SAME TIME on first row cast on 1 new st towards neck (= edge st) = 25-26-24-25-27-28 sts on shoulder. Continue until piece measures approx 68-70-72-74-76-78 cm, cast off. FRONT PIECE: Cast on and work like back piece until piece measures approx 38-39-40-41-42-43 cm (adjust to a full repeat). Now worked M.C over M.B. After 1 vertical repeat of M.C there are 76-84-88-98-108-118 sts on needle. On next row cast off the middle 18-18-22-22-22-22 sts for neck and complete each side separately. RIGHT FRONT PIECE: = 29-33-33-38-43-48 sts. Continue in moss st and P5 + K3 towards neck. AT THE SAME TIME on first row cast on 1 new st towards neck (= edge st). AT THE SAME TIME when piece measures 48-49-50-51-52-53 cm cast off for armhole at the side as described for back piece = 25-26-24-25-27-28 sts. Continue in moss st and P5 + K3 + 1 edge st towards neck until piece measures approx 68-70-72-74-76-78 cm (adjust to back piece). Cast off. LEFT FRONT PIECE: Like right front piece, but mirrored. ASSEMBLY: Sew shoulder seams. Sew side seams inside 1 edge st. SHORT SLEEVE: Pick up 80 to 120 sts on circular needle size 4.5 mm with Nepal round armhole. P 1 round, AT THE SAME TIME adjust no of sts to 88-92-100-108-112-116. K 1 round and continue in rib, K2/P2. When rib measures approx 6-6-8-8-10-10 cm cast off loosely with K over K and P over P. LONG SLEEVE: Worked back and forth on needle. Cast on 46-46-50-50-50-54 sts (includes 1 edge st each side) on needle size 4.5 mm with Nepal. P 1 row from WS and continue in rib K2/P2 with 1 edge st each side. When rib measures approx 6 cm K 1 row from RS, AT THE SAME TIME dec 5-3-5-4-4-6 sts evenly = 41-43-45-46-46-48 sts. P 1 row from WS. Change to needle size 5 mm and continue in stocking st with 1 edge st each side. When piece measures 7-8-8-8-8-8 cm inc 1 st each side and repeat the inc on every 4-3.5-3-2.5-2-2 cm a total of 11-12-13-15-16-18 times = 63-67-71-76-78-84 sts. Continue until piece measures 50-50-49-49-47-46 cm (NOTE! less for the larger sizes because of longer sleeve cap and wider shoulder). Now cast off 4 sts each side and cast off to shape the sleeve cap at the beg of every row each side: 2 sts 3-3-4-4-4-4 times and 1 st 0-0-0-1-3-5 times, then 2 sts at the beg of every row until piece measures approx 56-57-57-58-58-59 cm. Now cast off 4 sts 1 time each side and cast off remaining sts. Piece measures approx 57-58-58-59-59-60 cm. Sew sleeve seams inside 1 edge st and set in sleeves. NECK: Beg at bottom of neck on right front piece. Pick up 130 to 180 sts inside edge st on circular needle size 4.5 mm with Nepal up along neckline on right front piece, along back piece, and down along neckline on left front piece. NOTE! Do not pick up on the 18-18-22-22-22-22 sts cast off on front piece. K 1 row from WS, AT THE SAME TIME adjust no of sts to 138-142-154-162-170-178. K 1 row from RS and work next row from WS as follows: 2 GARTER STS - see above - P2, * K2, P2 *, repeat from *-* and finish with 2 garter sts. Continue in rib like this for approx 4 cm. On next row from RS inc 1 st in each of the 23-24-27-29-31-33- P-sections along back piece (i.e. do not inc in the first and last 5 P-sections) - See INCREASING TIP = 161-166-181-191-201-211 sts. Continue with K over K and P over P. When piece measures approx 7 cm inc 1 st in each of the 19-20-23-25-27-29 P-sections along back piece (i.e. do not inc in the first and last 7 P-sections) = 180-186-204-216-228-240 sts. Continue with K over K and P over P. When piece measures approx 9 cm inc 1 st in each of the 15-16-19-21-23-25 P-sections along back piece (i.e. do not inc in the first and last 9 P-sections) = 195-202-223-237-251-265 sts. Continue with K over K and P over P until piece measures approx 11-11-13-13-13-13 cm. Now cast off loosely with K over K and P over P. ASSEMBLY: Place the right rib over the left at bottom of front piece and fasten through both layers. |
|||||||||||||||||||
Diagram explanations |
|||||||||||||||||||
|
|||||||||||||||||||
 |
|||||||||||||||||||
 |
|||||||||||||||||||
Have you finished this pattern?Tag your pictures with #dropspattern or submit them to the #dropsfan gallery. Do you need help with this pattern?You'll find 20 tutorial videos, a Comments/Questions area and more by visiting the pattern on garnstudio.com. © 1982-2026 DROPS Design A/S. We reserve all rights. This document, including all its sub-sections, has copyrights. Read more about what you can do with our patterns at the bottom of each pattern on our site. |
|||||||||||||||||||


With over 40 years in knitting and crochet design, DROPS Design offers one of the most extensive collections of free patterns on the internet - translated to 17 languages. As of today we count 324 catalogues and 12290 patterns translated into English (UK/cm). 12290
We work hard to bring you the best knitting and crochet have to offer, inspiration and advice as well as great quality yarns at incredible prices! Would you like to use our patterns for other than personal use? You can read what you are allowed to do in the Copyright text at the bottom of all our patterns. Happy crafting!
Post a comment to pattern DROPS 125-24
We would love to hear what you have to say about this pattern!
If you want to leave a question, please make sure you select the correct category in the form below, to speed up the answering process. Required fields are marked *.