
Popular categories
Looking for a yarn?


Comments / Questions (38)
![]() Beate wrote:
Beate wrote:
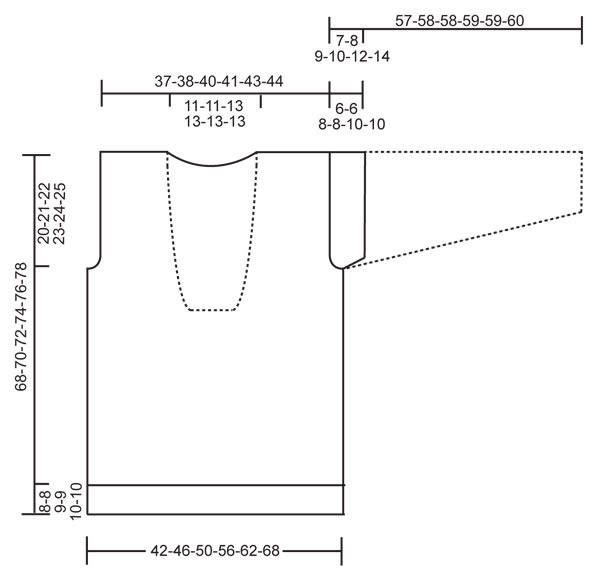
Am Halsausschnitt unten werden zum Beispiel 22 Maschen abgekettet und danach gerade hoch gestrickt? Auf dem Photo sieht es so aus, als ob am Halsausschnit noch abgenommen wird und diese schräg verläuft wie auf der Abbildung zu sehen ist.
17.02.2025 - 16:12DROPS Design answered:
Liebe Beate, es sind für Halsausschnitt keine Masche abgenommen, nur 1 Masche als Randmasche zugenommen - siehe auch Maßskizze. Viel Spaß beim Stricken!
18.02.2025 - 08:57
![]() Beate wrote:
Beate wrote:
Was bedeutet stricken Sie M.B (in Ihrer Grösse), 24-28-28-32-36-44 M. , Das Muster M2B hat doch 42 Maschen plus jeweils 10 linke Maschen
05.02.2025 - 12:55DROPS Design answered:
Liebe Beate, in S und M stricken Sie M.1 A, M.1B und M.1C aber in L bis XXXL stricken Sie M.2A, M.2B und M.2C, so wenn Sie M.B stricken sollen, stricken Sie entweder M.1B wenn Sie M.1A gestrickt haben oder M.2B wenn Sie M.2A gestrickt haben; und gleichzeitig stricken Sie 24-28-28-32-36-44 Maschen im Perlmuster und 1 Randmasche beidseitig. Viel Spaß beim Stricken!
05.02.2025 - 13:38
![]() Inge wrote:
Inge wrote:
Hallo, was bedeutet die Abkürzung MC und MB in M.C über M.B. Und kann man die Fragen und Kommentare auch in Deutsch bekommen?
08.01.2025 - 11:37DROPS Design answered:
Liebe Inge, das sind die Namen von den Diagrammen, siehe MUSTER am Anfang der Anleitung und unten: M.1A, M.1B, M.1C oder M.2A, M.2 und M.2C - siehe . Die Diagramme werden in diese Reihefolge strickt: zuerst -A Teil, dann -B Teil in der Höhe wiederholen dann -C Teil stricken. Viel Spaß beim Stricken!
08.01.2025 - 16:07
![]() Annemie Weyers wrote:
Annemie Weyers wrote:
Dankjewel dan is het duidelijk. In het patroon staat dat je een verticale herhaling van MC moet breien daarom kwam ik er niet uit. fijne jaarwisseling
31.12.2023 - 18:20
![]() Annemie Weyers wrote:
Annemie Weyers wrote:
Bedankt voor het snelle antwoord maar moet MC dan 2 keer gebreid worden, en komen de minderingen in de laatste naald van het 2de patroon?
30.12.2023 - 18:09DROPS Design answered:
Dag Annemie,
Nee, je breit MC 1 keer in de hoogte en op de één na laatste naald van dat patroon worden er minderingen gemaakt (2 steken samen breien, zie symboolverklaring).
31.12.2023 - 13:57
![]() Annemie Weyers wrote:
Annemie Weyers wrote:
Hallo. Als ik MC boven MB brei hoe moet dan het met de minderingen in het telpatroon van MC. Ik brei dit patroon in maat L. Bij voorbaat dank
29.12.2023 - 11:17DROPS Design answered:
Dag Annemie,
De minderingen zijn in het telpatroon aangegeven, dus als je gewoon het telpatroon volgt, maak je automatisch minderingen (door steken samen te breien) en heb je minder steken na het breien van de laatste naald van MC, zoals ook aangegeven in het patroon.
30.12.2023 - 17:50
![]() Morin wrote:
Morin wrote:
Je comprend pas les explications pour le col .peut être expliquer d une façon claire .merci
26.09.2022 - 21:29DROPS Design answered:
Bonjour Mme Morin, tricotez en côtes 2 m end, 2 m env avec 2 m point mousse + 2 m end (vu sur l'end) de chaque côté. Après 4 cm, vous augmenterez 1 m env dans chacune des sections envers indiquées (23-33 cf taille), autrement dit, vous tricoterez ensuite: 2 m point mousse, 5x(2 m end, 2 m env), puis 23 à 33 (2 m end, 3 m env), puis 5x (2 m end, 2 m env) et 2 m point mousse. Vous augmenterez ensuite mais dans les 19-29 m env centrales, les côtes seront donc 5 x (2 m end, 2 m env) de chaque côté, puis 2 x (2 m end, 3 m env), et (2 m end, 4 m env) au milieu du col . Augmentez encore de la même façon mais dans les 15 à 23 m envers du milieu du col. Bon tricot!
27.09.2022 - 09:01
![]() Annette wrote:
Annette wrote:
Now I understand! Your quick reply is much appreciated. Tusen takk!
23.02.2022 - 16:46
![]() Annette wrote:
Annette wrote:
I think I have the same query as M-Claire regarding the collar increase, but can’t fully understand the French terms! When you refer to back piece, you mean of the collar? But won’t this make it very lopsided? What is the purpose of these increases ? Nice pattern btw!
23.02.2022 - 15:15DROPS Design answered:
Dear Annette, you increase on collar over the middle stitches, ie excecpt in the first and in the last P-sections on the row. This will allow collar lie and fold nicely just as on the picture. Happy knitting!
23.02.2022 - 15:49
![]() Jeannette Valenzuela Nogales wrote:
Jeannette Valenzuela Nogales wrote:
Hola, no entiendo cómo se teje el patrón del punto central, ya que dice tejer tejer MC y luego MB, ninguna otra explicación, además en M1C y en M2C hay un dibujo \ \ \ \ \ que no sé que se hace , por que no se ve el punto tejido. Podrían explicarme de qué forma se sigue el patrón. por favor, gracias.
24.07.2021 - 22:51DROPS Design answered:
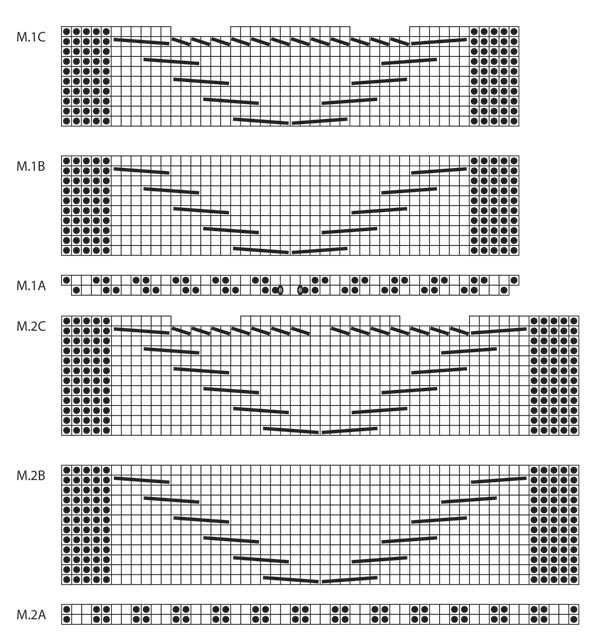
Hola Jeanette, mira PATRON: Ver diagrama M.1 y M.2. Consultar el diagrama para la talla correcta. El diagrama muestra el patrón por el LD. Talla S + M: M.1A, M.1B y M.1C. Talla L + XL + XXL + XXXL: M.2A, M.2B y M.2C. Buen trabajo!
27.07.2021 - 16:12
|
|||||||||||||||||||
Fishtail |
|||||||||||||||||||
 |
 |
||||||||||||||||||
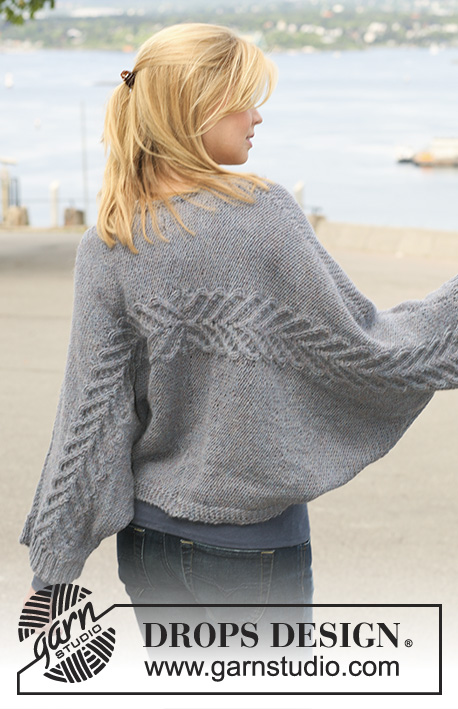
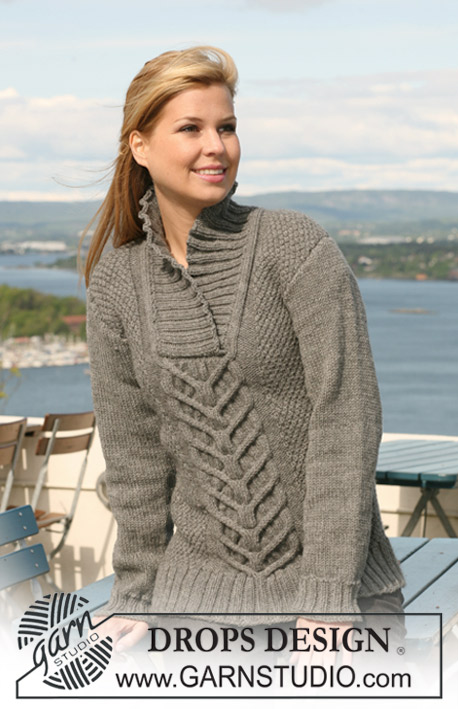
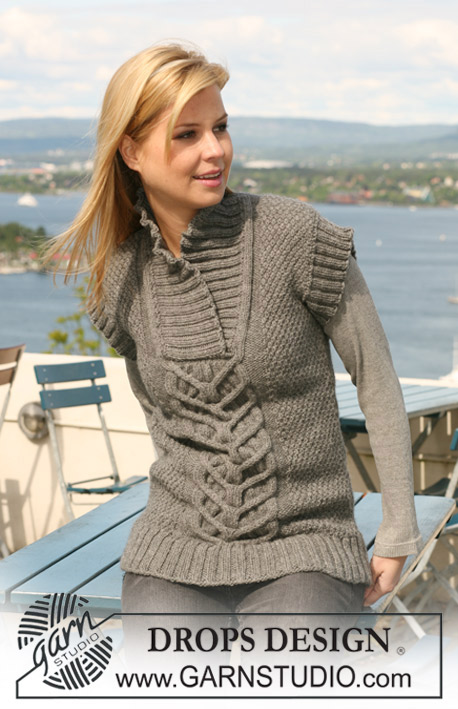
Knitted DROPS jumper with short or long sleeves with cables and moss st in ”Nepal”. Size S - XXXL.
DROPS 125-24 |
|||||||||||||||||||
|
PATTERN: See diagram M.1 and M.2. See diagram for your size. Diagram shows the pattern from RS. Size S + M: M.1A, M.1B and M.1C. Size L + XL + XXL + XXXL: M.2A, M.2B and M.2C. GARTER ST (back and forth on needle): K all rows. INCREASING TIP: Inc 1 st by making 1 YO. Inc alternately before and after P-section. On next row K YO into back of loop to avoid a hole. MOSS ST (double): Row 1: * K1, P1 *, repeat from *-*. Row 2: K over K and P over P. Row 3: P over K and K over P. Repeat row 2 and 3. -------------------------------------------------------- BACK PIECE: Cast on 94-102-110-118-126-142 sts (includes 1 edge st each side) on needle size 4.5 mm with Nepal. P 1 row from WS and continue in rib as follows (from RS): 1 edge st, P1, * K2, P2 *, repeat from *-* and finish with K2, P1 and 1 edge st. When rib measures 8-8-9-9-10-10 cm work next row as follows (from RS): 1 edge st, 24-28-28-32-36-44 sts in rib as before, M.A (work diagram for your size - see above), 24-28-28-32-36-44 sts in rib as before and 1 edge st. After 1 vertical repeat of M.A there are 96-104-110-118-126-142 sts on needle. Change to needle size 5 mm and work next row as follows: 1 edge st, 24-28-28-32-36-44 MOSS STS - see above - AT THE SAME TIME dec 4-4-4-3-2-5 sts evenly, M.B (work diagram for your size), 24-28-28-32-36-44 moss sts AT THE SAME TIME dec 4-4-4-3-2-5 sts evenly and work 1 edge st. There are now 88-96-102-112-122-132 sts on needle. Continue in moss st and M.B. When piece measures 48-49-50-51-52-53 cm cast off 3 sts each side for armhole and cast off to shape the armhole at the beg of every row each side: 2 sts 1-2-3-5-6-8 times and 1 st 0-1-1-1-2-2 times = 78-80-82-84-88-90 sts. Continue as before until piece measures approx 61-63-65-67-69-71 cm (adjust to a full repeat). Now worked M.C over M.B. After 1 vertical repeat of M.C there are 66-68-68-70-74-76 sts on needle. On next row from RS cast off the middle 18-18-22-22-22-22 sts for neck= 24-25-23-24-26-27 sts left on each shoulder. Continue in moss st and P5 + K3 towards neck. AT THE SAME TIME on first row cast on 1 new st towards neck (= edge st) = 25-26-24-25-27-28 sts on shoulder. Continue until piece measures approx 68-70-72-74-76-78 cm, cast off. FRONT PIECE: Cast on and work like back piece until piece measures approx 38-39-40-41-42-43 cm (adjust to a full repeat). Now worked M.C over M.B. After 1 vertical repeat of M.C there are 76-84-88-98-108-118 sts on needle. On next row cast off the middle 18-18-22-22-22-22 sts for neck and complete each side separately. RIGHT FRONT PIECE: = 29-33-33-38-43-48 sts. Continue in moss st and P5 + K3 towards neck. AT THE SAME TIME on first row cast on 1 new st towards neck (= edge st). AT THE SAME TIME when piece measures 48-49-50-51-52-53 cm cast off for armhole at the side as described for back piece = 25-26-24-25-27-28 sts. Continue in moss st and P5 + K3 + 1 edge st towards neck until piece measures approx 68-70-72-74-76-78 cm (adjust to back piece). Cast off. LEFT FRONT PIECE: Like right front piece, but mirrored. ASSEMBLY: Sew shoulder seams. Sew side seams inside 1 edge st. SHORT SLEEVE: Pick up 80 to 120 sts on circular needle size 4.5 mm with Nepal round armhole. P 1 round, AT THE SAME TIME adjust no of sts to 88-92-100-108-112-116. K 1 round and continue in rib, K2/P2. When rib measures approx 6-6-8-8-10-10 cm cast off loosely with K over K and P over P. LONG SLEEVE: Worked back and forth on needle. Cast on 46-46-50-50-50-54 sts (includes 1 edge st each side) on needle size 4.5 mm with Nepal. P 1 row from WS and continue in rib K2/P2 with 1 edge st each side. When rib measures approx 6 cm K 1 row from RS, AT THE SAME TIME dec 5-3-5-4-4-6 sts evenly = 41-43-45-46-46-48 sts. P 1 row from WS. Change to needle size 5 mm and continue in stocking st with 1 edge st each side. When piece measures 7-8-8-8-8-8 cm inc 1 st each side and repeat the inc on every 4-3.5-3-2.5-2-2 cm a total of 11-12-13-15-16-18 times = 63-67-71-76-78-84 sts. Continue until piece measures 50-50-49-49-47-46 cm (NOTE! less for the larger sizes because of longer sleeve cap and wider shoulder). Now cast off 4 sts each side and cast off to shape the sleeve cap at the beg of every row each side: 2 sts 3-3-4-4-4-4 times and 1 st 0-0-0-1-3-5 times, then 2 sts at the beg of every row until piece measures approx 56-57-57-58-58-59 cm. Now cast off 4 sts 1 time each side and cast off remaining sts. Piece measures approx 57-58-58-59-59-60 cm. Sew sleeve seams inside 1 edge st and set in sleeves. NECK: Beg at bottom of neck on right front piece. Pick up 130 to 180 sts inside edge st on circular needle size 4.5 mm with Nepal up along neckline on right front piece, along back piece, and down along neckline on left front piece. NOTE! Do not pick up on the 18-18-22-22-22-22 sts cast off on front piece. K 1 row from WS, AT THE SAME TIME adjust no of sts to 138-142-154-162-170-178. K 1 row from RS and work next row from WS as follows: 2 GARTER STS - see above - P2, * K2, P2 *, repeat from *-* and finish with 2 garter sts. Continue in rib like this for approx 4 cm. On next row from RS inc 1 st in each of the 23-24-27-29-31-33- P-sections along back piece (i.e. do not inc in the first and last 5 P-sections) - See INCREASING TIP = 161-166-181-191-201-211 sts. Continue with K over K and P over P. When piece measures approx 7 cm inc 1 st in each of the 19-20-23-25-27-29 P-sections along back piece (i.e. do not inc in the first and last 7 P-sections) = 180-186-204-216-228-240 sts. Continue with K over K and P over P. When piece measures approx 9 cm inc 1 st in each of the 15-16-19-21-23-25 P-sections along back piece (i.e. do not inc in the first and last 9 P-sections) = 195-202-223-237-251-265 sts. Continue with K over K and P over P until piece measures approx 11-11-13-13-13-13 cm. Now cast off loosely with K over K and P over P. ASSEMBLY: Place the right rib over the left at bottom of front piece and fasten through both layers. |
|||||||||||||||||||
Diagram explanations |
|||||||||||||||||||
|
|||||||||||||||||||
 |
|||||||||||||||||||
 |
|||||||||||||||||||
Have you finished this pattern?Tag your pictures with #dropspattern or submit them to the #dropsfan gallery. Do you need help with this pattern?You'll find 20 tutorial videos, a Comments/Questions area and more by visiting the pattern on garnstudio.com. © 1982-2026 DROPS Design A/S. We reserve all rights. This document, including all its sub-sections, has copyrights. Read more about what you can do with our patterns at the bottom of each pattern on our site. |
|||||||||||||||||||


With over 40 years in knitting and crochet design, DROPS Design offers one of the most extensive collections of free patterns on the internet - translated to 17 languages. As of today we count 324 catalogues and 12290 patterns translated into English (UK/cm). 12290
We work hard to bring you the best knitting and crochet have to offer, inspiration and advice as well as great quality yarns at incredible prices! Would you like to use our patterns for other than personal use? You can read what you are allowed to do in the Copyright text at the bottom of all our patterns. Happy crafting!
Post a comment to pattern DROPS 125-24
We would love to hear what you have to say about this pattern!
If you want to leave a question, please make sure you select the correct category in the form below, to speed up the answering process. Required fields are marked *.