
Popular categories
Looking for a yarn?


Comments / Questions (74)
![]() Christine Güttler wrote:
Christine Güttler wrote:
Hallo, wird die Jacke durchgehend mit 2 Fäden gestrickt?
25.01.2014 - 19:38DROPS Design answered:
Lieeb Christine, ja so ist es. Klingt die Anleitung an irgendeiner Stelle missverständlich? Dann lassen Sie uns das gerne wissen und wir ändern es.
27.01.2014 - 10:32
![]() Marie Bilde Rasmussen wrote:
Marie Bilde Rasmussen wrote:
Hej. Hvor kan man se hvilke mål der svarer til opskriftens størrelser S - M - L - XL og XXL? Jeg kan ikke finde det (jeg ser på opskriften DROPS 121-1).
11.01.2014 - 12:03DROPS Design answered:
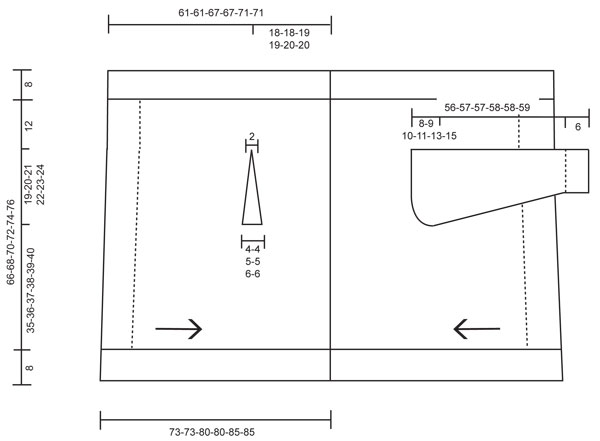
Hej Marie. Se nederst paa mönstret. Her er en maalskitse med alle maal i cm per störrelse. Sammenlign disse med dine egne maal for at vaelge str.
13.01.2014 - 12:41
![]() Marion wrote:
Marion wrote:
Hallo leuk dat filmpje heb ik gisteren gezien maar ze houd de naalden zo raar vast met de draad en ik doe het op een rondbreinaald ga de draad nu zoals je av breid of gaat de draad als je een rechte steek breid? het filmpje kan ik nog niet uitkomen. sorry gr marion
22.11.2013 - 14:03DROPS Design answered:
Hoi Marion. Ik brei net zoals op de video (Continentale manier), dus ik kan je helaas niet helpen. Neem contact op met je verkooppunt voor ondersteuning.
22.11.2013 - 15:53
![]() Karin wrote:
Karin wrote:
Hallo, bei 121-1 bin ich unsicher, ob beide Teile ganz im Patentmuster gestrickt werden oder glatt rechts. In der Anleitung steht nur "glatt". Auf dem Bild sehe ich nur, dass die Ränder im Patent sind. Was ist richtig?
09.09.2013 - 11:37DROPS Design answered:
Liebe Karin, es ist wie es in der Anleitung steht: die Ränder sind im Patentmuster und der Hauptteil glatt re. Ein Teil der Ränder wird gleich mitgestrickt, daher beginnt die Anleitung für die Hauptteile auch mit Patent.
10.09.2013 - 08:37
![]() Christine wrote:
Christine wrote:
Ist bei der Anleitung schon mit eingerechnet dass sich quergestrickte Jacken noch 20% aushängen/länger werden können?
12.08.2012 - 14:48DROPS Design answered:
Ja, wir rechnen das jeweils ein und haben daher auch den Messtipp entsprechend formuliert. Auf dem Foto sehen Sie aber, dass die Jacke (mit den Zipfeln) recht lang ist.
13.08.2012 - 20:22
![]() DROPS Design NL wrote:
DROPS Design NL wrote:
Je hebt gelijk, wij hebben het aangepast. Bedankt.
02.01.2012 - 13:00
![]() Els Rijkes wrote:
Els Rijkes wrote:
De prijsindicatie bij dit patroon klopt niet. Het moet het ongeveer het dubbele zijn van wat is aangegeven.
31.12.2011 - 08:32
![]() Drops Design wrote:
Drops Design wrote:
Jo, når du strikker højre halvdel (højre side som når du har tøjet på) fra midt foran, så begynder du pinden fre retsiden oppe ved halsen, og så bliver det de første 20 m oppe ved skulderen du sætter på en tråd. God fornøjelse!
13.10.2011 - 10:14
![]() Alice wrote:
Alice wrote:
Jeg forstår ikke at der i opskriften står at der skal strikkes 4 rækker over de første 20 masker når der lukkes af til ærme når jeg kigger på diagrammet er det brede stykke under armen så skulle det ikke være over de 59 masker der skulle strikkes 4 rækker?Nu bliver det oppe ved skulderen det er bredest jeg kan ikke trevle garnet op igen men det gør heller ikke noget Hilsen Alice T
12.10.2011 - 19:12
![]() Drops Design wrote:
Drops Design wrote:
Jo det stemmer for hver gang du strikker 2 m sammen så laver du et omslag, så du har samme maske antal igen. Undtagen sidste gang her strikker du 2 sammen uden at lave et omslag. Da får du 1 m mindre. God fornøjelse!
25.03.2011 - 08:58
|
|
Midnight Queen#midnightqueencardigan |
|
 |
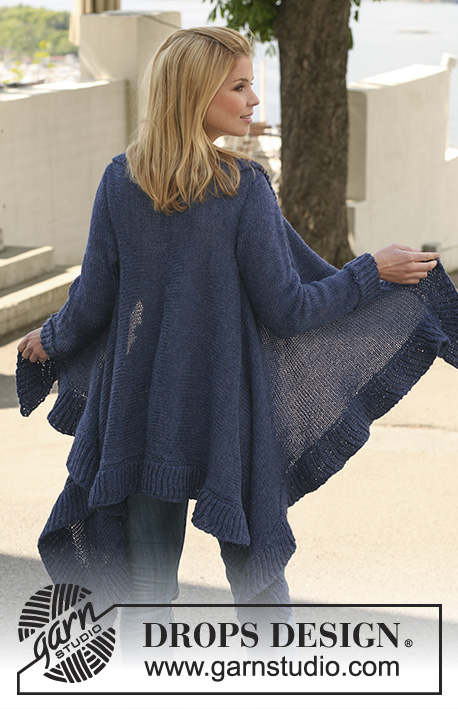 |
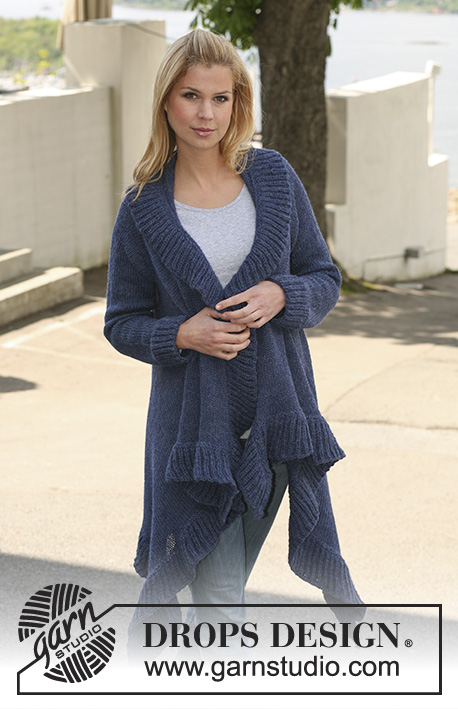
DROPS jacket knitted from side to side in 2 strands ”Alpaca”. Size S-XXXL.
DROPS 121-1 |
|
|
GARTER ST (back and forth on needle): K all rows. MEASUREMENT TIP: Because of the weight of the yarn make all measurements in the knitting direction while the garment is hanging, otherwise it will be too long when worn. ENGLISH RIB ON BODY PIECE (back and forth on needle): Row 1: 1 garter st, * K2 tog, 1 YO, slip 1 st as if to P *, repeat from *-* until 3 sts remain, finish with K2 tog and 1 garter st. Row 2: 1 garter st, * 1 YO, slip 1 st as if to P, K tog YO and slipped st *, repeat from *-* until 2 sts remain, finish with 1 YO, slip 1 st as if to P, 1 garter st. Row 3: 1 garter st, * K tog YO and slipped st, 1 YO, slip 1 st as if to P, repeat from *-* until 3 sts remain, K tog YO and slipped st, 1 garter st. Repeat row 2 and 3. ENGLISH RIB ON BORDERS AND SLEEVES (back and forth on needle): Row 1: 1 garter st, * K1, 1 YO, slip 1 st as if to P *, repeat from *-* until 2 sts remain, finish with K1, 1 garter st. Work row 2 and 3 as described for body piece - see above! Repeat row 2 and 3. -------------------------------------------------------- Body piece is worked in 2 parts and sewn tog mid back afterwards. RIGHT PART: Worked back and forth on circular needle. Cast on 142-148-154-154-160-166 sts on circular needle size 5.5 mm with 2 strands Alpaca. Work ENGLISH RIB - see above! (row 1 = WS). After first row in English rib there are 141-147-153-153-159-165 sts on needle. Continue with Row 2 and row 3 in English rib. When piece measures 5 cm change to circular needle size 4.5 mm. Continue in English rib until piece measures 8 cm (finish after row 3 = WS). Work 2 rows GARTER ST on all sts – see above. Change back to circular needle size 5.5 mm. On next row from RS continue in stocking st, AT THE SAME TIME dec 33-36-39-36-39-41 sts evenly = 108-111-114-117-120-124 sts (includes 1 edge st each side). Continue in stocking st with 1 garter st each side until piece measures 41-41-46-46-49-49 cm. REMEMBER THE KNITTING TENSION and See MEASUREMENT TIP! Now work 4 rows back and forth on only the first 20 sts for all sizes (as seen from RS), and slip these 20 sts on a stitch holder = 88-91-94-97-100-104 sts left on needle. Now cast off for armhole at beg of next row from RS as follows: 20-22-22-23-24-26 sts 1 time, work the remaining sts, turn and work return row. Turn and now cast off the next 10-10-12-12-12-12 sts = 58-59-60-62-64-66 sts. Work 0-0-2-2-4-4 rows on all sts. Insert a marker in first st on needle (as seen from RS), in the middle of these last 0-0-2-2-4-4 rows without dec (= mid under sleeve). Now cast on new sts at the end of every row from WS as follows: 10-10-12-12-12-12 sts 1 time and 20-22-22-23-24-26 sts 1 time = 88-91-94-97-100-104 sts. Slip the 20 sts from stitch holder back on needle = 108-111-114-117-120-124 sts. Continue in stocking st with 1 garter st each side until piece measures 18-18-19-19-20-20 cm from where the last sts were cast on after armhole. Piece now measures approx 61-61-67-67-71-71 cm from cast on row, measured at the top towards neckline. Continue with shortened rows to create extra width at bottom edge mid back as follows (beg from RS = from neckline): Work the first 52 sts on needle and then slip these sts on a stitch holder, work remaining sts on needle, turn piece and work all sts, * work the first 6-6-6-7-7-7 sts on needle, slip sts on the same stitch holder and work remaining sts on needle, turn piece and work all sts *, repeat from *-* a total of 7 times for all sizes. Turn piece and work the remaining 14-17-20-16-19-23 sts. Now slip all sts from stitch holder back on needle and K 2 rows on all sts (beg from RS), then cast off loosely = mid back. Piece now measures approx 61-61-67-67-71-71 cm on the right side of piece (as seen from RS) and approx 73-73-80-80-85-85 cm on the left side of piece – measured in the knitting direction. LEFT PART: Like right part, but mirrored, i.e. make all dec for armhole with start from WS and inc with start from RS. Beg shortened rows mid back from WS (= from neckline). SLEEVE: Worked back and forth on circular needle. Cast on 34-34-34-40-40-40 sts on circular needle size 4.5 mm with 2 strands Alpaca. Continue in English rib (row 1 = WS). After first row in English rib there are 33-33-33-39-39-39 sts on needle. Continue with row 2 and row 3 in English rib until piece measures 6 cm (finish after row 3 = WS). K 2 rows on all sts, change to circular needle size 5.5 mm and continue stocking st with 1 garter st each side, AT THE SAME TIME inc 5-7-9-5-7-7 sts on first row = 38-40-42-44-46-46 sts. Continue in stocking st with 1 garter st each side. When piece measures 10 cm inc 1 st each side and repeat the inc on every 3-2.5-2.5-2-2-1.5 cm a total of 12-13-14-15-17-19 times = 62-66-70-74-80-84 sts. When piece measures 48-48-47-47-45-44 cm (less for the larger sizes because of longer sleeve cap and wider shoulder) cast off for sleeve cap at the beg of every row each side as follows: 3-3-4-4-5-5 sts 1 time, 2 sts 6-7-3-4-4-4 times 1 st 0-0-1-1-3-5 times, then cast off 2 sts each side until piece measures 55-56-56-57-57-58 cm. Now cast off 3 sts 1 time each side and cast off remaining sts. Piece measures approx 56-57-57-58-58-59 cm. ASSEMBLY: Sew the 2 parts tog mid back, garter st towards garter st. Sew sleeve seams. Set in sleeves. BORDER: Bottom edge: Worked back and forth on circular needle. Pick up 233-233-257-257-272-272 sts inside the garter st on circular needle size 4.5 mm with 2 strands Alpaca (pick up approx 16 sts per 10 cm). K 1 row from WS and continue from RS as follows: 1 garter st, * K2, work 2 sts in next st *, repeat from *-* until 4 sts remain, finish with K3 and 1 garter st = 309-309-341-341-361-361 sts. Continue in ENGLISH RIB – see above! When piece measures 3 cm change to circular needle size 5.5 mm. Continue in English rib until border measures 8 cm. Cast off, but to make the edge elastic make a YO after every other st and cast off YO as a st. Upper edge: Worked back and forth on circular needle. Pick up 197-197-215-215-227-227 sts inside the garter st on circular needle size 4.5 mm with 2 strands Alpaca (pick up approx 16 sts per 10 cm). K 1 row from WS and continue from RS as follows: 1 garter st, * K2, work 2 sts in next st *, repeat from *-* until 4 sts remain, finish with K3 and 1 garter st = 261-261-285-285-301-301 sts. Now continue as described for bottom edge. |
|
 |
|
Have you finished this pattern?Tag your pictures with #dropspattern #midnightqueencardigan or submit them to the #dropsfan gallery. Do you need help with this pattern?You'll find 21 tutorial videos, a Comments/Questions area and more by visiting the pattern on garnstudio.com. © 1982-2026 DROPS Design A/S. We reserve all rights. This document, including all its sub-sections, has copyrights. Read more about what you can do with our patterns at the bottom of each pattern on our site. |
|


With over 40 years in knitting and crochet design, DROPS Design offers one of the most extensive collections of free patterns on the internet - translated to 17 languages. As of today we count 324 catalogues and 12290 patterns translated into English (UK/cm). 12290
We work hard to bring you the best knitting and crochet have to offer, inspiration and advice as well as great quality yarns at incredible prices! Would you like to use our patterns for other than personal use? You can read what you are allowed to do in the Copyright text at the bottom of all our patterns. Happy crafting!
Post a comment to pattern DROPS 121-1
We would love to hear what you have to say about this pattern!
If you want to leave a question, please make sure you select the correct category in the form below, to speed up the answering process. Required fields are marked *.