
Popular categories
Looking for a yarn?


Comments / Questions (57)
![]() Sylvie wrote:
Sylvie wrote:
Je tricote la taille M, je suis au devant, je viens de tricoter MC au dessus de MB et j'ai bien 84 mailles comme indiqué. Il est dit qu'au rang suivant on rabat les 18 mailles centrales pour l'encolure mais je n'en ai que 12 car sur le dernier rang de MC j'ai rabattu de chaque côté 6 mailles mais peut-être que je me suis trompée et qu'il faut rabattre 3 mailles ? au dessus des mailles ensembles...
17.03.2025 - 14:18DROPS Design answered:
Bonjour Sylvie, en taille M vous avez bien 84 m après M.C et avant l'encolure pour le devant, puis vous rabattez les 18 mailles centrales pour l'encolure = 33 m pour chaque épaule + vous montez 1 m lis côté encolure = 34 m pour l'épaule . Vous rabattez pour l'emmanchure sur un seul des côtés (= côté emmanchure) comme pour le dos (1 x 3 m + 2 x 2 m et 1 x 1 m= 8 m), il reste 34-8=26 mailles pour chaque épaule. Est-ce que ce détail vous aide davantage?
17.03.2025 - 15:43
![]() Schubnel wrote:
Schubnel wrote:
Bonjour, je reviens vers vous, j'arrive maintenant au dernier rang mc1 - j'ai rabattu 6 mailles de chaque côtés. J'avais 96 mailles et il m'en reste 84 comme indiqué. Puis il est dit de rabattre les 18 mailles centrales pour le col au tour suivant mais il m'en reste que 12? pouvez-vous m'éclairez? - par ailleurs est-ce qu'il est possible de faire tout le dos en point de blé?
15.03.2025 - 10:10DROPS Design answered:
Bonjour Mme Schubnel, quelle taille tricotez-vous? La taille M? Vous avez bien 96 m avant de tricoter M.B, vous rabattez ensuite pour les emmanchures: 1 x 3 m + 2 x 2 m + 1 x 1 m de chaque côté, il doit vous rester 80 mailles. Ensuite, à 63 cm, vous tricotez M.C, il vous reste 68 mailles; vous rabattez ensuite les 18 m centrales, il vous reste 25 m pour chaque épaule que vous terminez séparément; vous montez 1 maille côté épaule = 26 pour l'épaule. Si vous tricotez une autre taille, n'hésitez pas à nous l'indiquer, le nombre de mailles sera différent. Bon tricot!
17.03.2025 - 07:28
![]() Sylvie wrote:
Sylvie wrote:
Bonjour, j'ai fait 8 cm de côtes avec 102 mailles. Puis il faut continuer avec le diagramme M1A mais comment vous obtenez 104 mailles? je ne comprend pas?
12.03.2025 - 15:02DROPS Design answered:
Bonjour Sylvie, au milieu de M.1A vous allez faire 2 augmentations (cf 3ème symbole) de part et d'autre des 2 mailles endroit au milieu de M.1A = vous augmentez ainsi 2 mailles. Bon tricot!
13.03.2025 - 15:23
![]() Conti Andreas wrote:
Conti Andreas wrote:
Ich versuche mich am Zopfmuster. Werden beim Muster M 1B auf dem Piktogramm nur die ungeraden Reihen aufgeführt d.h. 1,3,5 usw. oder werden alle Reihen aufgezeichnet. Danke für die Hilfe Tricotage
30.11.2024 - 07:56DROPS Design answered:
Liebe Frau Conti, bei M.1B werden die Zöpfe über 6 Maschen gestrickt, beim 1. Teil = 4. Symbol under Zeichnungerklärung legen Sie die 3 ersten Maschen hinter die Arbeit, dann stricken Sie die 3 nächsten Maschen rechts und dann die 3 Maschen über Zopfnadel rechts; beim 2. Teil stricken Sie wie beim 5. Symbol: legen Sie die 3 nächsten Maschen vor die Arbeit, stricken Sie die 3 nächsten Maschen rechts dann die 3 Maschen vom Zopfnadel rechts. Alle Reihen sind im Diagram gezeichnet, die Hin sowie die Rückreihen. Viel Spaß beim Stricken!
02.12.2024 - 08:41Trish wrote:
Re Neck: after increasing in the P-sections, then "Continue with K over K and P over P" - how does this fit with the K2, P2 rib pattern? Does this change? To what? Apart from this ambiguity I love this pattern! Thank you
29.06.2016 - 09:52DROPS Design answered:
Dear Trish, you will work in rib K2/P2 as before in the first 5 and last 5 sections with P sts where you didn't inc, but you will now have P3 over the P2 you inc 1 st. When you inc 1 more P in P-sections, you will have then P2 on each side, then some P3 and P4 in the middle P sections, and so on. Happy knitting!
29.06.2016 - 11:11
![]() Manuela wrote:
Manuela wrote:
Ich habe mich da offensichtlich etwas unglücklich ausgedrückt - ich wollte gerne wissen, ob das Zopfmuster wirklich auch auf dem Rückenteil gestrickt wird. Für mich erscheint es ungewöhnlich, solch ein Muster auch auf dem Rücken zu stricken.
15.01.2016 - 19:04DROPS Design answered:
Ja, das Zopfmuster erscheint auch auf dem Rückenteil, Sie können ja auch den Rücken beliebig mustern, es spricht ja nichts dagegen. :-)
23.01.2016 - 18:03
![]() Manuela wrote:
Manuela wrote:
Hallo, ist das richtig so, dass das Zopfmuster sowohl auf der Rück- als auch der Vorderseite gestrickt wird? Ich stelle mir vor, dass es auf dem Rückenteil etwas komisch aussieht.
05.01.2016 - 06:37DROPS Design answered:
Das Zopfmuster ist am Rückenteil und am Vorderteil. Die Verzopfungen erfolgen immer nur in Hin-R.
10.01.2016 - 23:18
![]() Lisen Löfqvist wrote:
Lisen Löfqvist wrote:
Jag undrar varför jag inte får med diagram till denna modell ock likaså till modell nr.121-27.Hälsn.Lisen
16.12.2015 - 14:32DROPS Design answered:
Hej Lisen, Jo om du skriver ut från gröna knappen som ligger på mönstret (till höger under bilden): "SKRIV UT: MÖNSTER" så får du allt med ut. Lycka till!
17.12.2015 - 09:01
![]() Yvonne Van Os wrote:
Yvonne Van Os wrote:
Waar kan ik het telpatroon vinden? Ontbreekt op bij dit patroon?
03.10.2015 - 14:33DROPS Design answered:
Hoi Yvonne. Kijk onderaan het patroon. Hier staan de telpatronen.
05.10.2015 - 13:44
![]() Ann-Kathrin wrote:
Ann-Kathrin wrote:
Also, ich bin leider ein ziemliche Anfängerin beim Stricken und deshalb blicke ich hier leider nicht durch: Wofür gibt es ein rechtes und linkes Vorderteil, wenn es doch schon ein anderes Vorderteil gibt? Und wie nähe ich diese dann zusammen?
23.09.2015 - 22:20DROPS Design answered:
Sie sehen ja auf dem Foto, dass sich der Pulli oben am Ausschnitt teilt, das ist mit dem rechten und linken Vorderteil gemeint. Zuerst wird also das ganze Vorderteil in voller Breite von unten nach oben an einem Stück gestrickt, dann wird es am Halsausschnitt geteilt und die rechte und linke Seite werden jeweils einzeln weitergestrickt. Sie müssen da also nichts zusammennähen, am Ende werden nur Rücken- und Vorderteil miteinander verbunden (Schulternähte und Seitennähte).
28.09.2015 - 10:33
|
|||||||||||||||||||
Fishtail Vest |
|||||||||||||||||||
 |
 |
||||||||||||||||||
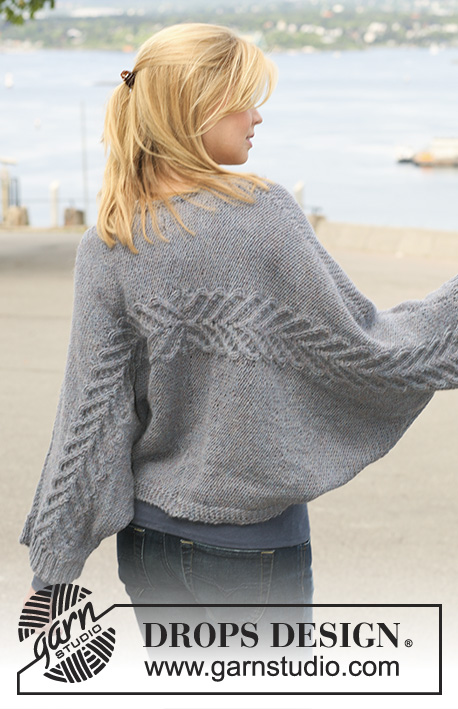
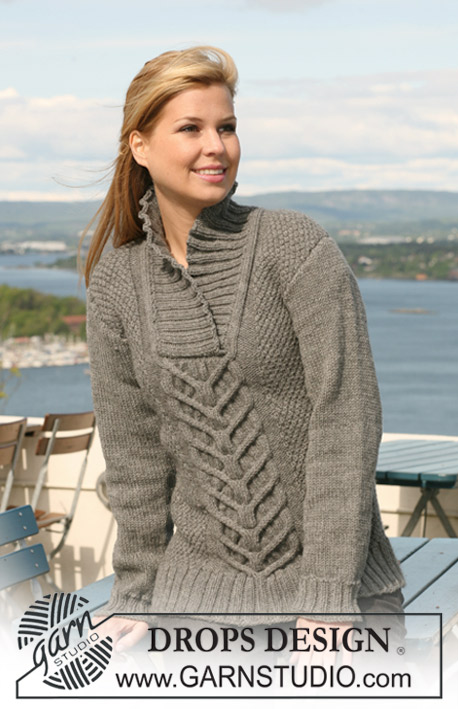
Knitted DROPS jumper with short or long sleeves with cables and moss st in ”Nepal”. Size S - XXXL.
DROPS 125-23 |
|||||||||||||||||||
|
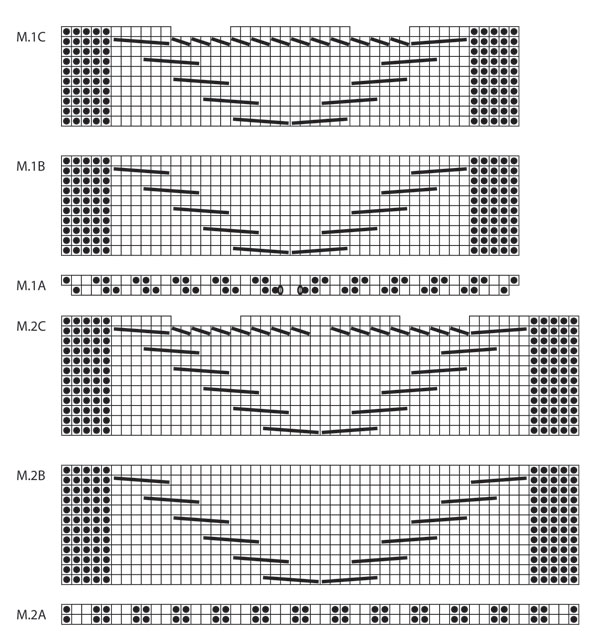
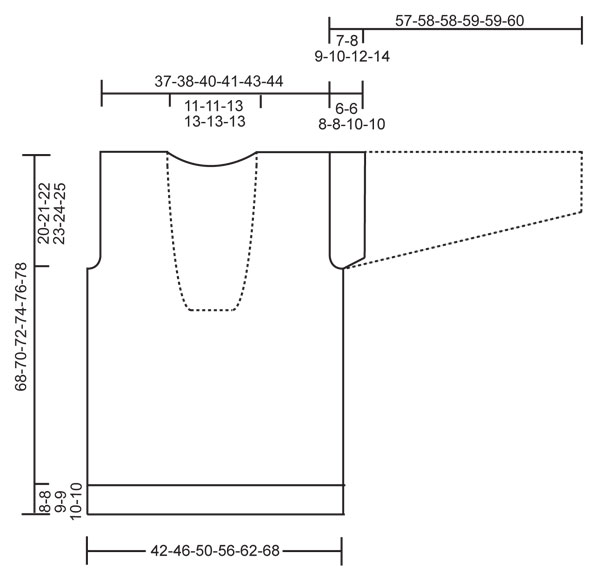
PATTERN: See diagram M.1 and M.2. See diagram for your size. Diagram shows the pattern from RS. Size S + M: M.1A, M.1B and M.1C. Size L + XL + XXL + XXXL: M.2A, M.2B and M.2C. GARTER ST (back and forth on needle): K all rows. INCREASING TIP: Inc 1 st by making 1 YO. Inc alternately before and after P-section. On next row K YO into back of loop to avoid a hole. MOSS ST (double): Row 1: * K1, P1 *, repeat from *-*. Row 2: K over K and P over P. Row 3: P over K and K over P. Repeat row 2 and 3. -------------------------------------------------------- BACK PIECE: Cast on 94-102-110-118-126-142 sts (includes 1 edge st each side) on needle size 4.5 mm with Nepal. P 1 row from WS and continue in rib as follows (from RS): 1 edge st, P1, * K2, P2 *, repeat from *-* and finish with K2, P1 and 1 edge st. When rib measures 8-8-9-9-10-10 cm work next row as follows (from RS): 1 edge st, 24-28-28-32-36-44 sts in rib as before, M.A (work diagram for your size - see above), 24-28-28-32-36-44 sts in rib as before and 1 edge st. After 1 vertical repeat of M.A there are 96-104-110-118-126-142 sts on needle. Change to needle size 5 mm and work next row as follows: 1 edge st, 24-28-28-32-36-44 MOSS STS - see above - AT THE SAME TIME dec 4-4-4-3-2-5 sts evenly, M.B (work diagram for your size), 24-28-28-32-36-44 moss sts AT THE SAME TIME dec 4-4-4-3-2-5 sts evenly and work 1 edge st. There are now 88-96-102-112-122-132 sts on needle. Continue in moss st and M.B. When piece measures 48-49-50-51-52-53 cm cast off 3 sts each side for armhole and cast off to shape the armhole at the beg of every row each side: 2 sts 1-2-3-5-6-8 times and 1 st 0-1-1-1-2-2 times = 78-80-82-84-88-90 sts. Continue as before until piece measures approx 61-63-65-67-69-71 cm (adjust to a full repeat). Now worked M.C over M.B. After 1 vertical repeat of M.C there are 66-68-68-70-74-76 sts on needle. On next row from RS cast off the middle 18-18-22-22-22-22 sts for neck= 24-25-23-24-26-27 sts left on each shoulder. Continue in moss st and P5 + K3 towards neck. AT THE SAME TIME on first row cast on 1 new st towards neck (= edge st) = 25-26-24-25-27-28 sts on shoulder. Continue until piece measures approx 68-70-72-74-76-78 cm, cast off. FRONT PIECE: Cast on and work like back piece until piece measures approx 38-39-40-41-42-43 cm (adjust to a full repeat). Now worked M.C over M.B. After 1 vertical repeat of M.C there are 76-84-88-98-108-118 sts on needle. On next row cast off the middle 18-18-22-22-22-22 sts for neck and complete each side separately. RIGHT FRONT PIECE: = 29-33-33-38-43-48 sts. Continue in moss st and P5 + K3 towards neck. AT THE SAME TIME on first row cast on 1 new st towards neck (= edge st). AT THE SAME TIME when piece measures 48-49-50-51-52-53 cm cast off for armhole at the side as described for back piece = 25-26-24-25-27-28 sts. Continue in moss st and P5 + K3 + 1 edge st towards neck until piece measures approx 68-70-72-74-76-78 cm (adjust to back piece). Cast off. LEFT FRONT PIECE: Like right front piece, but mirrored. ASSEMBLY: Sew shoulder seams. Sew side seams inside 1 edge st. SHORT SLEEVE: Pick up 80 to 120 sts on circular needle size 4.5 mm with Nepal round armhole. P 1 round, AT THE SAME TIME adjust no of sts to 88-92-100-108-112-116. K 1 round and continue in rib, K2/P2. When rib measures approx 6-6-8-8-10-10 cm cast off loosely with K over K and P over P. LONG SLEEVE: Worked back and forth on needle. Cast on 46-46-50-50-50-54 sts (includes 1 edge st each side) on needle size 4.5 mm with Nepal. P 1 row from WS and continue in rib K2/P2 with 1 edge st each side. When rib measures approx 6 cm K 1 row from RS, AT THE SAME TIME dec 5-3-5-4-4-6 sts evenly = 41-43-45-46-46-48 sts. P 1 row from WS. Change to needle size 5 mm and continue in stocking st with 1 edge st each side. When piece measures 7-8-8-8-8-8 cm inc 1 st each side and repeat the inc on every 4-3.5-3-2.5-2-2 cm a total of 11-12-13-15-16-18 times = 63-67-71-76-78-84 sts. Continue until piece measures 50-50-49-49-47-46 cm (NOTE! less for the larger sizes because of longer sleeve cap and wider shoulder). Now cast off 4 sts each side and cast off to shape the sleeve cap at the beg of every row each side: 2 sts 3-3-4-4-4-4 times and 1 st 0-0-0-1-3-5 times, then 2 sts at the beg of every row until piece measures approx 56-57-57-58-58-59 cm. Now cast off 4 sts 1 time each side and cast off remaining sts. Piece measures approx 57-58-58-59-59-60 cm. Sew sleeve seams inside 1 edge st and set in sleeves. NECK: Beg at bottom of neck on right front piece. Pick up 130 to 180 sts inside edge st on circular needle size 4.5 mm with Nepal up along neckline on right front piece, along back piece, and down along neckline on left front piece. NOTE! Do not pick up on the 18-18-22-22-22-22 sts cast off on front piece. K 1 row from WS, AT THE SAME TIME adjust no of sts to 138-142-154-162-170-178. K 1 row from RS and work next row from WS as follows: 2 GARTER STS - see above - P2, * K2, P2 *, repeat from *-* and finish with 2 garter sts. Continue in rib like this for approx 4 cm. On next row from RS inc 1 st in each of the 23-24-27-29-31-33- P-sections along back piece (i.e. do not inc in the first and last 5 P-sections) - See INCREASING TIP = 161-166-181-191-201-211 sts. Continue with K over K and P over P. When piece measures approx 7 cm inc 1 st in each of the 19-20-23-25-27-29 P-sections along back piece (i.e. do not inc in the first and last 7 P-sections) = 180-186-204-216-228-240 sts. Continue with K over K and P over P. When piece measures approx 9 cm inc 1 st in each of the 15-16-19-21-23-25 P-sections along back piece (i.e. do not inc in the first and last 9 P-sections) = 195-202-223-237-251-265 sts. Continue with K over K and P over P until piece measures approx 11-11-13-13-13-13 cm. Now cast off loosely with K over K and P over P. ASSEMBLY: Place the right rib over the left at bottom of front piece and fasten through both layers. |
|||||||||||||||||||
Diagram explanations |
|||||||||||||||||||
|
|||||||||||||||||||
 |
|||||||||||||||||||
 |
|||||||||||||||||||
Have you finished this pattern?Tag your pictures with #dropspattern or submit them to the #dropsfan gallery. Do you need help with this pattern?You'll find 20 tutorial videos, a Comments/Questions area and more by visiting the pattern on garnstudio.com. © 1982-2026 DROPS Design A/S. We reserve all rights. This document, including all its sub-sections, has copyrights. Read more about what you can do with our patterns at the bottom of each pattern on our site. |
|||||||||||||||||||


With over 40 years in knitting and crochet design, DROPS Design offers one of the most extensive collections of free patterns on the internet - translated to 17 languages. As of today we count 324 catalogues and 12290 patterns translated into English (UK/cm). 12290
We work hard to bring you the best knitting and crochet have to offer, inspiration and advice as well as great quality yarns at incredible prices! Would you like to use our patterns for other than personal use? You can read what you are allowed to do in the Copyright text at the bottom of all our patterns. Happy crafting!
Post a comment to pattern DROPS 125-23
We would love to hear what you have to say about this pattern!
If you want to leave a question, please make sure you select the correct category in the form below, to speed up the answering process. Required fields are marked *.