
Popular categories
Looking for a yarn?


Comments / Questions (39)
![]() DROPS Deutsch wrote:
DROPS Deutsch wrote:
M3: Beim ersten symbol werden nicht 3 Maschen zusammengestrickt sonder 1 M. abgehoben, 2 re. gestrickt und die abgehobene über die gestrickten gezogen ( - 1 M.).
04.10.2011 - 10:41
![]() Gabi wrote:
Gabi wrote:
Hallo liebes Designerteam! Ihr macht wunderschöne Modelle nur sind Eure Strickanleitungen manchmal schwer zu knacken. Diesmal komme ich aber nicht weiter. Bei M3 sind auf der Vorderseite 3 Maschen zusammen zu stricken aber auf der Rückseite nur 1 Umschlag, muß ich aus den Umschlag 2 Maschen rausstricken ??? wenn ja gilt das auch für die Muster M1 und M2. Vielen Dank im vorab.
04.10.2011 - 09:24
![]() Drops Design France wrote:
Drops Design France wrote:
Bonjour Claire, M.2 se tricote en fin de rang 1er rang = en bas, en commençant par la 1ère case à gauche, continuez ensuite en suivant le diagramme, 1er rang = sur l'end, donc vous tricotez d'abord les mailles du devant puis celles de la bordure.
15.08.2011 - 10:20
![]() Claire wrote:
Claire wrote:
Bonjour, j'ai un vrai souci avec le diagramme M2 ; pouvez-vous m'expliquer comment le lire ? Je n'ai eu aucun problème avec le M1 (que j'ai lu de bas en haut) et j'aimerais beaucoup terminer ce boléro que je trouve vraiment joli ! Par avance, merci beaucoup.
15.08.2011 - 00:26
![]() Drops Design wrote:
Drops Design wrote:
Bonjour Franco, diminuer après ou avant M1 signifie que les diminutions doivent se trouver juste après/avant M1. Après M1 : tricotez toutes les mailles de M1 comme indiqué dans le diag., dim.ainsi :glisser 1 m, 1 m end, passer la m glissée par dessus la m tricotée ; pour dim. avant M1 : quand il reste 2 m avant celles de M1 : 2 m ens à l'end, puis tric. toutes les mailles de M1.
20.04.2010 - 09:00Franco wrote:
Bonjour je voudrais s'avoir que sinifie dininuer apres ou avant m1 merci de m'éclairer une internaute acidue de vos modèles
19.04.2010 - 13:43Marwa wrote:
Why dont you offer a long sleeve pattern 'it will be wonderfull
08.03.2010 - 17:43Kalpana wrote:
Elegant and classic.
16.02.2010 - 05:50Esperanza wrote:
Es un modelo muy bonito, si lo pudieran traducir al español se los agradeceremos muchas. Muchas Felicidades por su pagina y sus productos.
28.01.2010 - 18:40
![]() Kirsten wrote:
Kirsten wrote:
Enkel og romantisk
24.01.2010 - 21:35
|
||||||||||||||||||||||||||||||||||
Pristina#pristinavest |
||||||||||||||||||||||||||||||||||
 |
 |
|||||||||||||||||||||||||||||||||
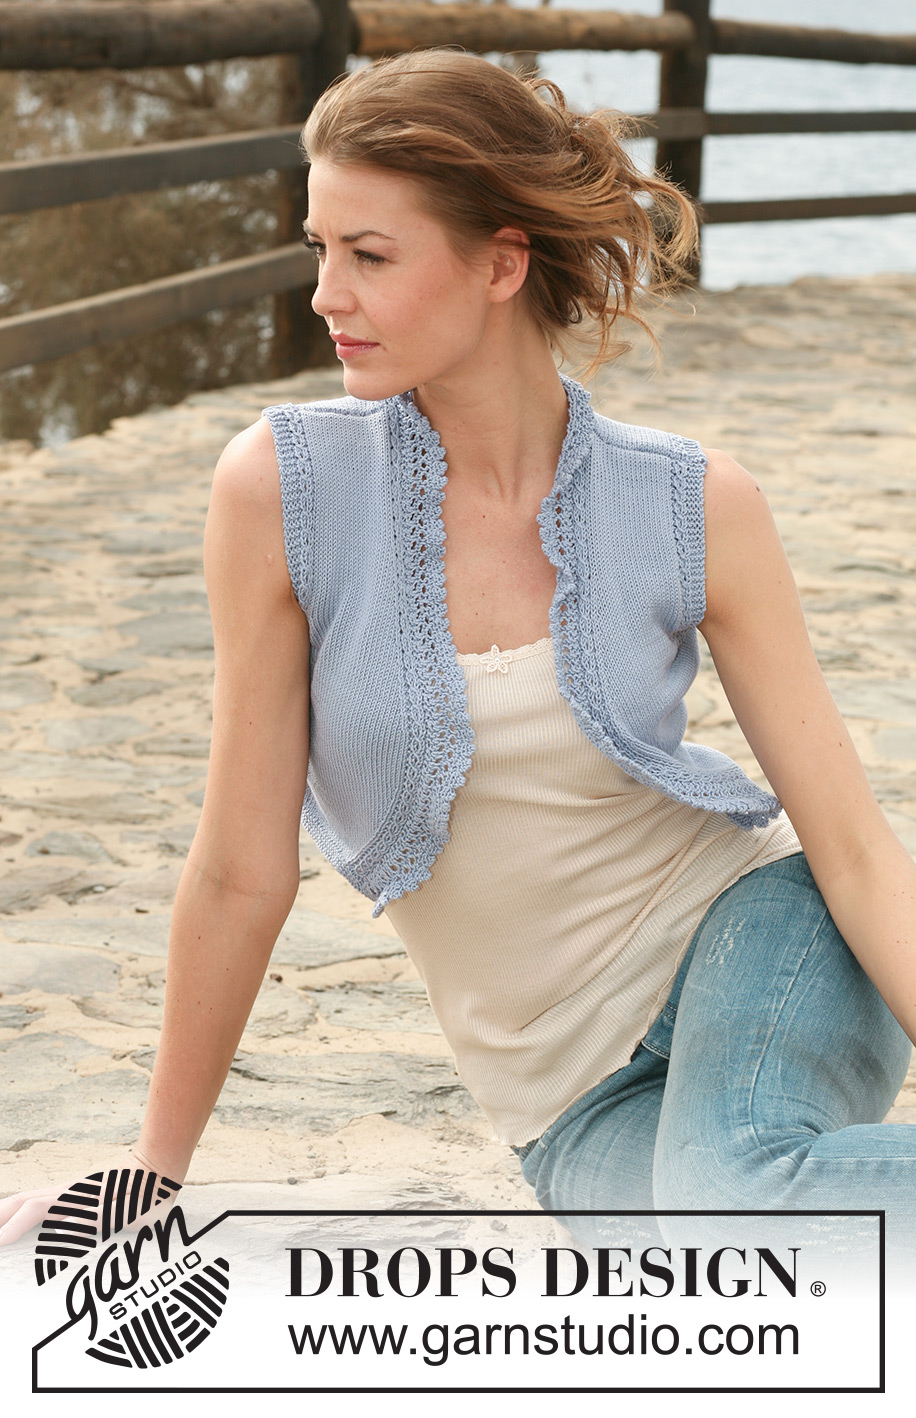
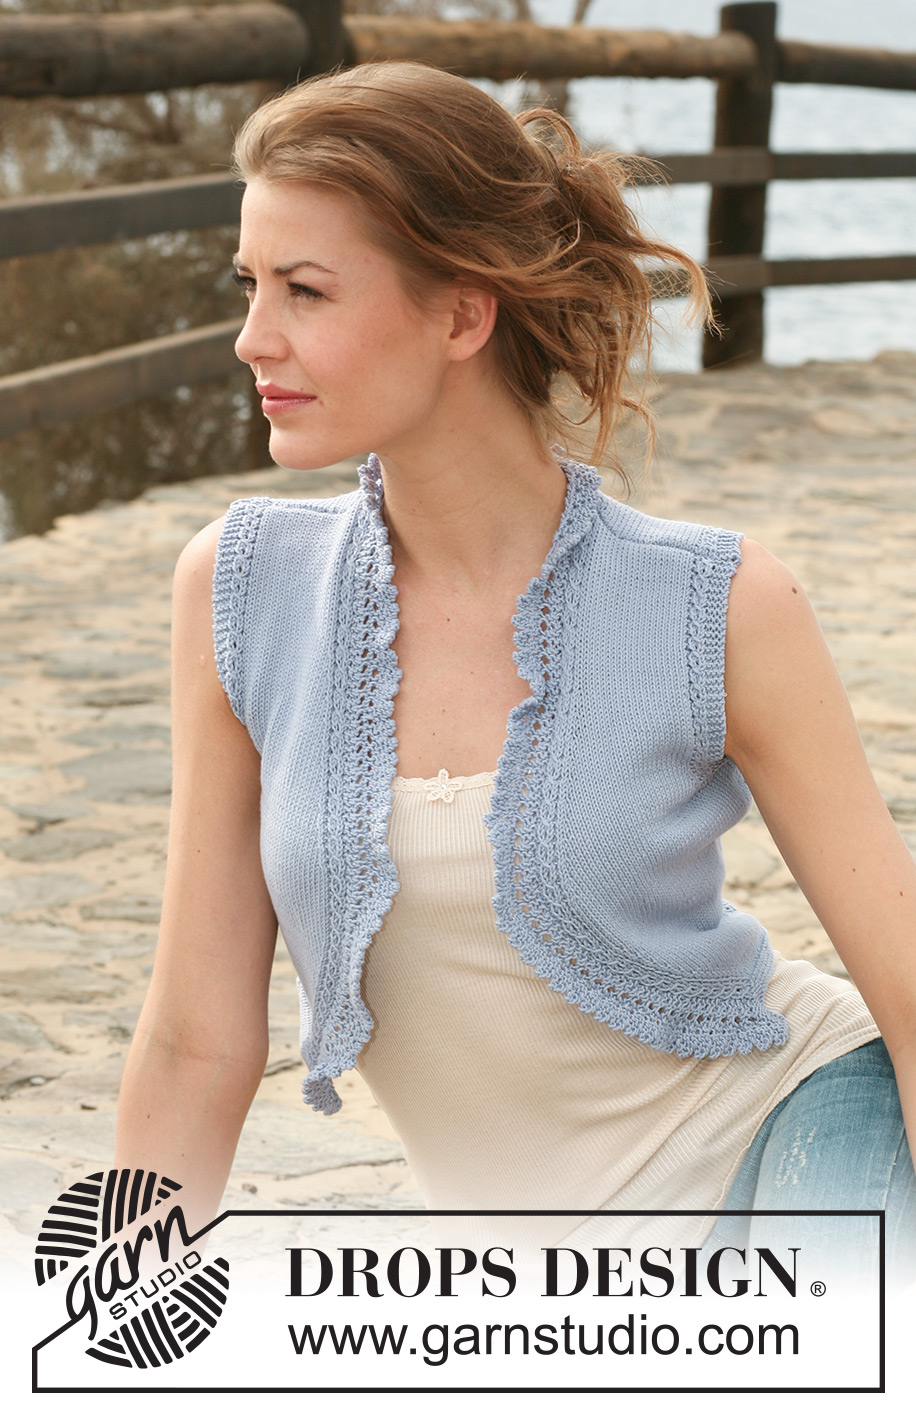
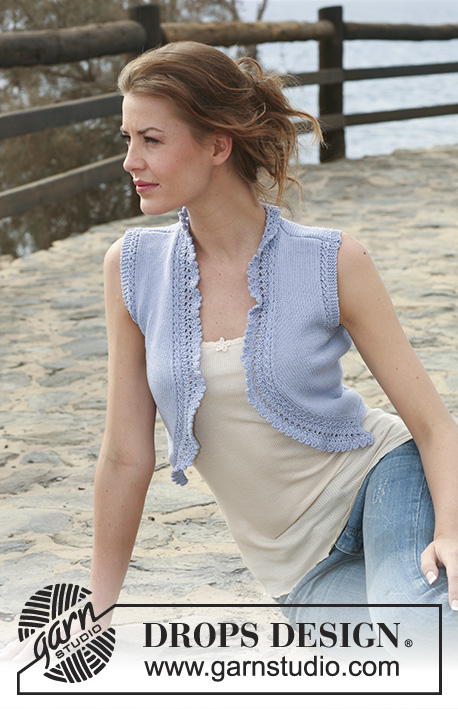
Short DROPS waistcoat in ”Safran” with lace pattern along front bands. Size XS to XXL.
DROPS 118-38 |
||||||||||||||||||||||||||||||||||
|
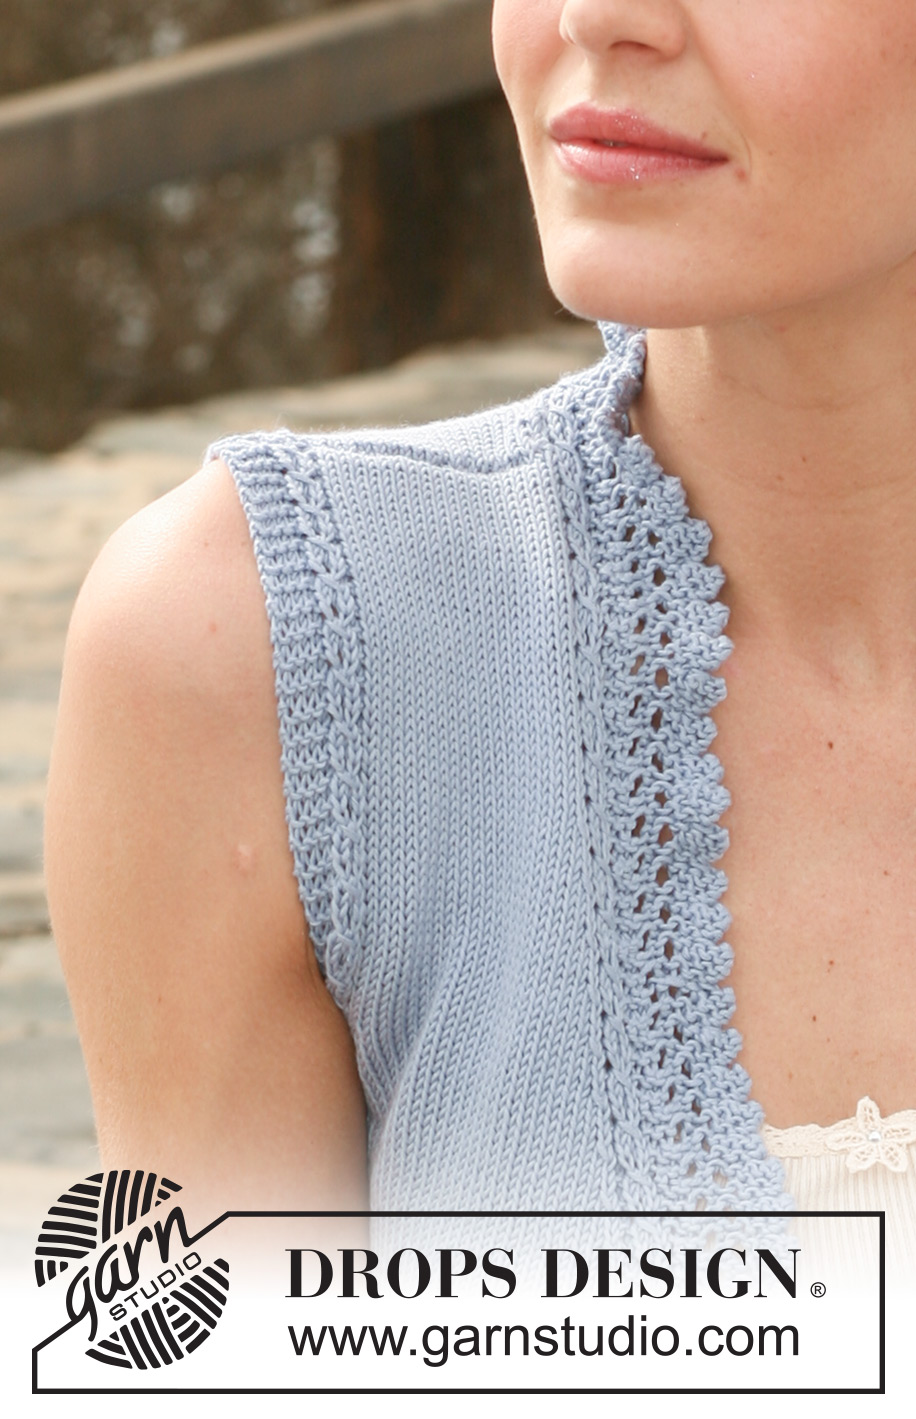
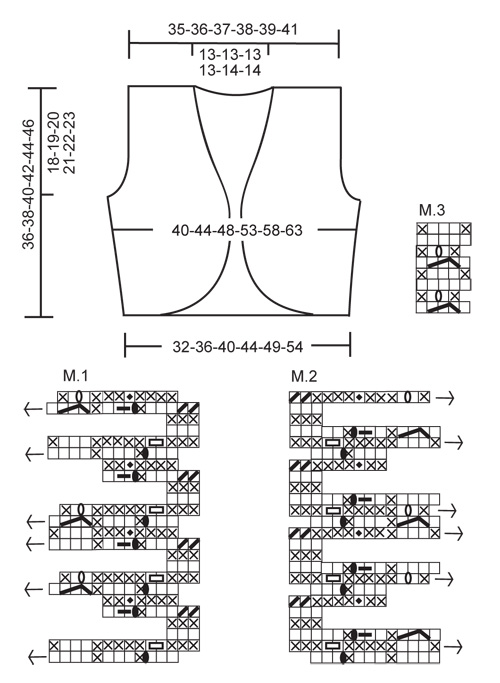
GARTER ST (back and forth on needle): K all rows. PATTERN: See diagram M.1, M.2 and M.3 - pattern in diagram is seen from RS and the first row in all diagrams = RS. To make M.1 and M.2 fall nicely you need to work more rows on these sts than the rest of front piece, do this as shown in diagram. INCREASING TIP: Make all inc from RS. Inc inside all sts in M.1/M.2 + 1 stocking st by making 1 YO, on next row P YO into back of loop to avoid a hole. DECREASING TIP-1 (applies to neck): Make all dec from RS inside M.1/M.2. Dec as follows AFTER M.1: slip 1 st as if to K, K1 and psso. Dec as follows BEFORE M.2: K2 tog. DECREASING TIP-2 (applies to armhole): Make all dec from RS inside 8 sts (i.e. 3 garter sts + M.3). Dec as follows AFTER 8 sts: slip 1 st as if to K, K1 and psso. Dec as follows BEFORE 8 sts: K2 tog. -------------------------------------------------------- -------------------------------------------------------- BACK PIECE: Worked back and forth on needle. Cast on 78-88-98-108-120-132 sts (includes 1 edge st each side) on needle size 2.5 mm. Work 6 rows GARTER ST – see above! Change to needle size 3 mm and continue in stocking st (first row = RS). REMEMBER THE KNITTING TENSION! When piece measures 5-5-6-6-7-7 cm inc 1 st each side, and repeat the inc on every 4th row a total of 10 times = 98-108-118-128-140-152 sts. When piece measures 17-18-19-20-21-22 cm continue as follows (from RS): 7-9-11-13-15-17 garter sts, M.3 (= 5 sts), stocking st until 12-14-16-18-20-22 sts remain, M.3 (= 5 sts) and 7-9-11-13-15-17 garter sts. Continue like this until there are 4 rows garter st each side. Now cast off 4-6-8-10-12-14 sts each side for armhole (i.e. at the beg of the next 2 rows) = 90-96-102-108-116-124 sts. Continue in stocking st with 3 garter sts + M.3 each side, AT THE SAME TIME on next row from RS dec 1 st each side to shape the armhole – SEE DECREASING TIP-2, and repeat the dec on every other row a total of 3-5-7-8-11-13 times = 84-86-88-92-94-98 sts. Continue with 3 garter sts and M.3 each side until finished measurements. When piece measures 33-35-37-39-41-43 cm cast off the middle 24-24-26-26-28-28 sts for neck and complete each shoulder separately. Cast off 1 st at the beg of every row from neck 3 times = 27-28-28-30-30-32 sts left on shoulder. Cast off when piece measures 36-38-40-42-44-46 cm. RIGHT FRONT PIECE: Worked back and forth on needle. Cast on 30-35-40-45-51-57 sts on needle size 2.5 mm (includes 1 edge st at the side). Work 6 rows garter st and change to needle size 3 mm. READ ALL OF THE FOLLOWING SECTION BEFORE CONTINUING! Continue as follows (first row = RS): M.1 (= 12 sts), and stocking st on remaining sts on row, AT THE SAME TIME on this row inc 1 st towards mid front – SEE INCREASING TIP, and repeat the inc on every other row a total of 10 times and then on every 4th row a total of 5 times. INC AT SIDE: When piece measures 5-5-6-6-7-7 cm inc at the side as described for back piece (i.e. 1 st 10 times). When all inc are complete there are 43-48-53-58-64-70 stocking sts (includes 1 edge st at the side) + M.1 (varies from 12 to 14 sts) on needle. NECKLINE: When piece measures 16-17-18-19-20-21 cm dec 1 st towards mid front for neck – SEE DECREASING TIP-1, and repeat the dec on every 4th row a total of 9-9-10-10-11-11 times. ARMHOLE: When piece measures 17-18-19-20-21-22 cm continue as follows (first row = RS). Work row until 12-14-16-18-20-22 sts remain, work M.3 (= 5 sts) and 7-9-11-13-15-17 garter sts. Continue like this until there are 4 rows garter st at the side on the first 7-9-11-13-15-17 sts - AT THE SAME TIME on last garter st row cast off the first 4-6-8-10-12-14 sts for armhole - i.e. cast off from WS. Continue with 3 garter sts + M.3 towards armhole, AT THE SAME TIME dec to shape the armhole as described for back piece. When all dec for armhole and neck are complete there are 27-28-28-30-30-32 sts + M.1 left on needle. When piece measures 36-38-40-42-44-46 cm cast off the 27-28-28-30-30-32 sts on shoulder (cast off from WS) and continue in M.1 on the remaining sts for collar until collar measures approx 7-7.5 cm on the shorter side. LEFT FRONT PIECE: Cast on and work like right front piece, but mirrored, i.e. work first row after the garter st as follows: stocking st until 12 sts remain, work these in M.2. NOTE: Cast off the 4-6-8-10-12-14 sts for armhole from RS – i.e. on first row AFTER the 4 rows garter st. Also cast off shoulder sts from RS. ASSEMBLY: Sew shoulder seams. Sew side seams inside 1 edge st. Sew collar tog, edge to edge, mid back and sew collar to neckline on back piece by placing garter sts on collar on neckline and sew with small, neat sts. |
||||||||||||||||||||||||||||||||||
Diagram explanations |
||||||||||||||||||||||||||||||||||
|
||||||||||||||||||||||||||||||||||
 |
||||||||||||||||||||||||||||||||||
Have you finished this pattern?Tag your pictures with #dropspattern #pristinavest or submit them to the #dropsfan gallery. Do you need help with this pattern?You'll find 21 tutorial videos, a Comments/Questions area and more by visiting the pattern on garnstudio.com. © 1982-2026 DROPS Design A/S. We reserve all rights. This document, including all its sub-sections, has copyrights. Read more about what you can do with our patterns at the bottom of each pattern on our site. |
||||||||||||||||||||||||||||||||||


With over 40 years in knitting and crochet design, DROPS Design offers one of the most extensive collections of free patterns on the internet - translated to 17 languages. As of today we count 324 catalogues and 12290 patterns translated into English (UK/cm). 12290
We work hard to bring you the best knitting and crochet have to offer, inspiration and advice as well as great quality yarns at incredible prices! Would you like to use our patterns for other than personal use? You can read what you are allowed to do in the Copyright text at the bottom of all our patterns. Happy crafting!
Post a comment to pattern DROPS 118-38
We would love to hear what you have to say about this pattern!
If you want to leave a question, please make sure you select the correct category in the form below, to speed up the answering process. Required fields are marked *.