
Popular categories
Looking for a yarn?


Comments / Questions (41)
![]() Katarzyna wrote:
Katarzyna wrote:
Czy ten wzór będzie kiedyś przetłumaczony na polski ?
27.02.2020 - 22:57DROPS Design answered:
Witaj Kasiu, będzie gotowy na początku przyszłego tygodnia. Pozdrawiamy
28.02.2020 - 08:35
![]() Zahide wrote:
Zahide wrote:
In de teltekening wordt recht samenbreien weergegeven als 2 hokjes met een naar links wijzend diagonaal streepje er over. Het tegengestelde, namelijk voor 1st r. afhalen, 1 breien en de afgehaalde staan overhalen. . Wordt in tel tekening weergegeven als 2 hokjes met een naar rechts wijzend diagonaal streepje erover. Dit moet toch andersom zijn? Naar links wijzend diagonaal streep is recht afhalen 1 breien en de afgehaalde st. overheen. En bij recht samenbreien .naar links wijzend streep toch?
21.01.2017 - 01:41DROPS Design answered:
Hoi Zahide. Ik ben het met je eens. Normaal is dit ook bij ons andersom. Ik zal het aanpassen. Bedankt voor het melden!
07.02.2017 - 14:55
![]() Heidi wrote:
Heidi wrote:
Hallo, das Muster ist von der rechten Seite abgebildet. Sind das die Reihen 1, 3 , 5 7 usw. oder sind alle Reihen 1, 2, 3 usw abgebildet? In der 1. Reihe habe ich einen Umschlag und 2 Maschen werden zusammen gestrickt, was ja auch Sinn macht. In der nächsten Reihe stricke ich nur 2 Maschen zusammen, stimmt das? Sind ja dann Abnahmen.
15.06.2016 - 08:11DROPS Design answered:
Liebe Heidi, die Arbeit wird ja zunächst in Runden gestrickt und im Diagramm ist jede Runde dargestellt. In Runde 1 machen Sie 2 Umschläge aber nur 1 Abnahme und nehmen damit 1 M zu, die in der nächsten Runde wieder abgenommen wird. Somit bleibt die Maschenzahl gleich.
16.06.2016 - 08:30
![]() Linda Campion wrote:
Linda Campion wrote:
Re the chart M1... Line 1 for example.... YO between 2 sts.... What do you mean...at the very beginning...between what two sts....? Is it knit 1, YO, Knit 1....is that what you mean at the very first stitch please because it does not seem at all clear to me and there is no video to show me. I would like you to put in words what the first line actually is please...stitch by stitch....thank you for your help.
17.05.2015 - 14:55DROPS Design answered:
Dear Mrs Campion, on 1st row in M.1 you work (YO, K1 into back of loop, YO, slip 1 st as if to K, K1, psso, K5) and repeat around. Pattern (= Round) starts with YO between last st of previous round and next st worked K into back of loop. Happy knitting!
18.05.2015 - 09:57Christine wrote:
I just finished the front piece section of directions. It said when piece measures 9 cm divide mid front and complete each side separately. The directions for the left front piece says to work back and forth in st st with 5 garter. And at the same time when the piece measures 9 cm to work 9 garter stitches at side with remaining stitches. Does that mean to add another 9 cm on to of the 9 cm I did already for the front piece? Also not 100 percent sure about how to decrease for v neck. thanks
15.02.2015 - 21:19DROPS Design answered:
Dear Christine, you divide front piece when piece measures 9 cm (2nd size) and will work from now on 5 sts in garter sts towards neckline - at the same time, you work 9 sts in garter st towards the side for armhole. Dec for armhole as stated under "Decreasing tip 1", ie from RS on left front piece: work until 7 sts remain (= 2 sts in st st + 5 sts in garter st), K2 tog and work the 5 remaining sts in garter st. Happy knitting!
16.02.2015 - 11:16
![]() Pamela wrote:
Pamela wrote:
I see you list your yarns in categories A, B, C, ect... How do the categories relate to Worsted weight 4, sport weight 3 ...??
21.03.2013 - 18:20
![]() Bertie Wirring wrote:
Bertie Wirring wrote:
Ik wil dit patroon graag met twee naalden ipv rondbreinaalden breien. Is dit dan (op het paatroon) de heengaande nald en alles averecht op de twruggaande ??
19.03.2013 - 20:17DROPS Design answered:
De telpatronen geeft het motief weer van de goede kant, maar alle naalden worden weergegeven. Dat zou betekenen dat elke 2e nld (2, 4, 6 enz) op de verkeerde kant moet komen. Dat betekent dan ook dat kies je om deze heen en weer te breien, dan moet je inderdaad de r st av breien, maar ook 2 st samen breien (op de verkeerde kant dan av samen breien ipv r). Vergeet niet om 1 kantst op te zetten aan beide zijkanten voor de naad. Het zal even puzzelen zijn, maar volgens mij goed mogelijk om te doen.
20.03.2013 - 15:54
![]() Rose-Marie Ejermo wrote:
Rose-Marie Ejermo wrote:
Har stickat den i jeansblått storlek M till mitt barnbarn. Köpte 550 g enligt beskrivningen gjorde den 5 cm längre och har ändå fått 200 g över !
12.05.2010 - 22:19
![]() Mariska wrote:
Mariska wrote:
Precies wat ik zocht.Ik ben zo blij met deze site, heb het al aan verschillende mensen doorgegeven! Bedankt
05.05.2009 - 15:17
![]() Strikkfant wrote:
Strikkfant wrote:
Denne var helt nydelig, den skal jeg strikke:)
05.04.2009 - 09:32
|
||||||||||||||||
Pink Lemonade#pinklemonadetunic |
||||||||||||||||
|
|
||||||||||||||||
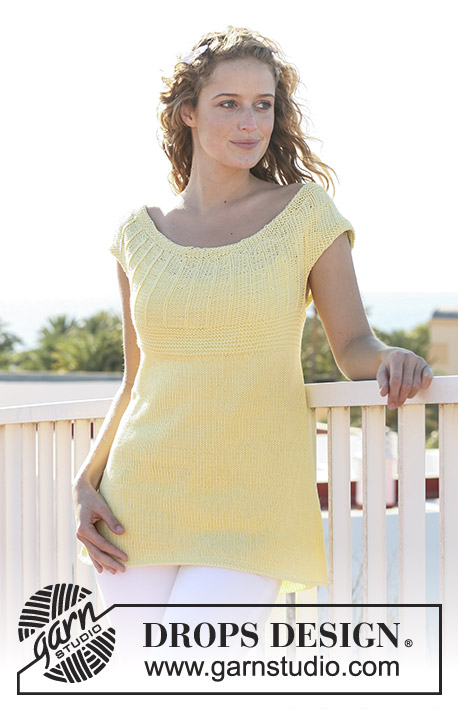
DROPS tunic in ”Safran” with skirt in lace pattern and yoke in stocking st with V-neck front and back. Size S - XXXL.
DROPS 113-24 |
||||||||||||||||
|
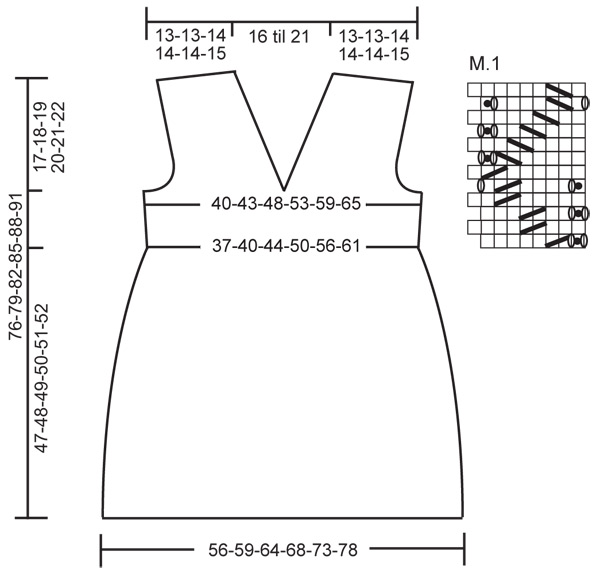
GARTER ST (back and forth on needle): K all rows. GARTER ST (in the round): K 1 round, P 1 round. PATTERN: See diagram M.1. The diagram shows the pattern from the RS. DECREASING TIP: Dec 1 st inside 5 garter sts. After 5 garter sts: slip 1 st as if to K, K1, psso. Before 5 garter sts: K2 tog. INCREASING TIP: Inc 1 st inside 5 garter sts by making 1 YO. K YO into back of loop on return row to avoid a hole. ---------------------------------------------------------- SKIRT: Worked in the round on circular needle. Cast on 268-288-308-326-350-374 sts on circular needle size 3 mm with Safran. Work 2 rounds garter st – see above. Change to circular needle size 3.5 mm, K 1 round, AT THE SAME TIME dec 12-16-12-14-14-14 sts evenly = 256-272-296-312-336-360 sts. Now continue in M.1 on all sts. When piece measures approx 47-48-49-50-51-52 cm change to circular needle size 3 mm. Work 10 rounds garter st, AT THE SAME TIME on row 1 dec 88-88-92-84-80-80 sts evenly = 168-184-204-228-256-280 sts. Change back to circular needle size 3.5 mm and K 1 round. Insert a marker at beg of round and a marker after 84-92-102-114-128-140 sts (marks the sides). Now divide the piece and complete front and back pieces separately, back and forth on needle. FRONT PIECE: = 84-92-102-114-128-140 sts. Continue in stocking st with 1 edge st each side. AT THE SAME TIME on row 1 inc 1 st each side, and repeat the inc on every 6 row a total of 4-4-4-4-4-5 times = 92-100-110-122-136-150 sts. When piece measures 7-8-9-10-11-12 cm from marker continue in garter st on the middle 10 sts with remaining sts as before. When piece measures 8-9-10-11-12-13 cm divide the piece mid front (= 5 garter sts on each side) and complete each side separately. LEFT FRONT PIECE: READ ALL OF THIS SECTION BEFORE CONTINUING! Continue back and forth on needle in stocking st with 5 garter sts towards mid front. AT THE SAME TIME when piece measures 8-9-10-11-12-13 cm work 9-9-9-13-17-21 garter sts at the side with remaining sts as before. AT THE SAME TIME dec for V-neck inside 5 garter sts towards mid front – see decreasing tip – on every other row: 1 st a total of 12-13-13-13-13-14 times. AT THE SAME TIME when piece measures 9-10-11-12-13-14 cm cast off 4-4-4-8-12-16 sts at the side for armhole. Insert a marker in piece and now measure piece from here. Cast off to shape the armhole inside 5 garter sts: 1 st on every other row a total of 1-2-6-8-10-10 times – see decreasing tip! When dec for armhole and neck are complete there are 29-31-32-32-33-35 sts on row. Now continue to dec 1 st for V-neck on every 4 row, but AT THE SAME TIME, for each dec also inc 1 st inside 5 garter sts at the side. Continue like this until piece measures 17-18-19-20-21-22 cm from marker. Now discontinue the dec/inc at neckline and the side, and cast off to shape the shoulder from the side towards the neckline on every other row: 5-6-6-6-7-7 sts 3 times and 14-13-14-14-12-14 sts 1 time. RIGHT FRONT PIECE: Like left front piece. BACK PIECE: = 84-92-102-114-128-140 sts. Like front piece. ASSEMBLY: Sew shoulder seams. Sew side seams inside 1 edge st from where cast off for armhole. |
||||||||||||||||
Diagram explanations |
||||||||||||||||
|
||||||||||||||||
 |
||||||||||||||||
Have you finished this pattern?Tag your pictures with #dropspattern #pinklemonadetunic or submit them to the #dropsfan gallery. Do you need help with this pattern?You'll find 16 tutorial videos, a Comments/Questions area and more by visiting the pattern on garnstudio.com. © 1982-2026 DROPS Design A/S. We reserve all rights. This document, including all its sub-sections, has copyrights. Read more about what you can do with our patterns at the bottom of each pattern on our site. |
||||||||||||||||


With over 40 years in knitting and crochet design, DROPS Design offers one of the most extensive collections of free patterns on the internet - translated to 17 languages. As of today we count 324 catalogues and 12290 patterns translated into English (UK/cm). 12290
We work hard to bring you the best knitting and crochet have to offer, inspiration and advice as well as great quality yarns at incredible prices! Would you like to use our patterns for other than personal use? You can read what you are allowed to do in the Copyright text at the bottom of all our patterns. Happy crafting!
Post a comment to pattern DROPS 113-24
We would love to hear what you have to say about this pattern!
If you want to leave a question, please make sure you select the correct category in the form below, to speed up the answering process. Required fields are marked *.