
Popular categories
Looking for a yarn?


Comments / Questions (120)
![]() Ellen wrote:
Ellen wrote:
Hei! Har tenkt å strikke denne Big Merino. Kva pinnestørrelde må eg bruke få? Og må egge ned ein størrelse?
18.01.2019 - 17:34Mariella wrote:
Hello, I have a question on the size of the shoulders. On the pattern I see cm 38 but when I compare it to the stitches (80) after binding off for the armhole and before binding off the neckline, I get 28 cm (80 stc at 28 stc per 10 cm) instead of 38. What is correct? Thank you!
04.11.2018 - 10:45DROPS Design answered:
Dear Mariella, These 38 cm are matching the 80 sts you have after binding off the sts for armhole in size M - with a tension of 21 sts = 10 cm in garter st, these 80 sts = 38 cm - the 28 sts = 10 cm are worked in rib. Happy knitting!
05.11.2018 - 09:28Mariella wrote:
Hello, I have a question on the size of the shoulders. On the pattern I see cm 38 but when I compare it to the stitches (80) after binding off for the armhole and before binding off the neckline, I get 28 cm (80 stc at 28 stc per 10 cm) instead of 38. What is correct? Thank you!
04.11.2018 - 10:43Stephanie Dukes wrote:
Right front piece says cast on 101 stitches for largest size but with one edge stitch each side that leaves an uneven number of stitches for the K1p1 ribbing. Is the stitch count correct?
20.05.2018 - 23:06DROPS Design answered:
Hi Stephanie, As you say you have 1 edge stitch at the side and 1 edge stitch towards mid front. When working rib you start and end with K1, so it doesn't matter that the number of stitches in uneven. Happy knitting!
22.05.2018 - 07:53Dianne wrote:
Should the sleeve pattern read 'cast off 3 sts for sleeve cap at the beg of next and following row, then 2 sts at the beg of next 8 rows...' OR ' cast off 3sts for sleeve cap each side for 1 row, then 2sts each side for the next 4 rows.'?
20.11.2017 - 08:25DROPS Design answered:
Dear Dianne, you cast off 3 sts 1 time at the beg of every row on each side, ie you will cast off 3 sts at the beg of next 2 rows, then 1 st at the beg of next 16 rows (= 1 st 8 times at the beg of each row on each side), etc. Happy knitting!
20.11.2017 - 10:08
![]() Vervaeck wrote:
Vervaeck wrote:
Bonjour, Un grand merci pour ce modele que je commence a l'instant. J'ai fait l'échantillon et les 21 mailles 42 rangs au point mousse qui correspondent au 10 x10 cm.Mais comme le patron est en partie des cotes dois je avoir une laine plus fine qui demande 28 mailles ? J'ai lu votre réponse précédente a propos de l'échantillon mais je ne l'ai pas bien comprise. D'avance merci pour votre réponse .
20.06.2017 - 05:40
![]() Sylvia MEIER wrote:
Sylvia MEIER wrote:
J'ai tricoté tout le gilet et j'en suis à l'encolure que j'ai recommencé deux fois déjà! je n'arrive jamais au nombre de mailles données dans l'explication, maintenant j'en suis à 100 de moins... mais le rendu pour l'instant n'a pas l'air trop mal même si pour l'instant les mailles sont sur aiguilles circulaires... alors dois-je recommencer ou n'est-ce pas trop grave? merci
17.01.2017 - 14:58DROPS Design answered:
Bonjour Mme Meier, vous parlez de la bordure des devants + col dont les mailles sont relevées le long de chaque devant + le long de l'encolure? 100 mailles peuvent facilement jouer sur la largeur, vérifiez bien votre tension pour éviter que la bordure des devants/le col ne resserrent l'ouvrage en hauteur. Vous pouvez ajuster votre nombre de mailles au 1er rang après les avoir relevées. Bon tricot!
17.01.2017 - 16:22
![]() FrauHeuer wrote:
FrauHeuer wrote:
Hallo, ich finde die Jacke toll und stricke sie gerade als Weihnachtsgeschenk für eine Freundin. Leider komme ich an einer Stelle in der Anleitung nicht weiter und benötige Ihre Hilfe. Ich habe das Rückenteil bis 42cm gestrickt und will jetzt mit den Abnahmen für das Armloch anfangen. Wie mache ich das? Leider verstehe ich die Anleitung "3 M. 1 Mal, 2 M. 3 Mal..." nicht. Mache ich die Abnahmen in einer Rehe oder verteilt über die nächsten 20cm? Vielen Dank für Ihre Antwort. E. Heuer
04.11.2016 - 11:08DROPS Design answered:
Liebe Frau Heuer, nach 42 sollen Sie auf beiden Seiten so abketten: 3 M 1 x (= am Anfang der nächsten 2 Reihe, 1 x bei der Hinreihe + 1 x bei der Rückreihe = 6 M. insg. werden abgekettet), dann 2 M x 3 (= am Anfang der nächsten 6 Reihe 2 Maschen abketten, dh bei der Hin- bzw Rückreihe = 12 M werden insg. abgekettet), usw.
04.11.2016 - 11:35
![]() Emanuela wrote:
Emanuela wrote:
Vorrei sapere dove si fa la diminuzione, ad inizio e fine ferro è corretto? In questo caso il punto di vivagno viene lavorato e poi si lavorano insieme i due punti che lo seguono, all'inizio del ferro e i due punti che lo precedono alla fine? Oppure la maglia di vivagno è lavorata insieme a quella che la segue e la precede? Grazie
21.09.2016 - 20:52DROPS Design answered:
Buonasera Emanuela, le diminuzioni non devono essere fatte sulle maglie di vivagno, per cui diminuirà all'inizio e alla fine del ferro prima/dopo le maglie di vivagno ogni 3 cm per 8 volte in totale. Buon lavoro!
21.09.2016 - 21:04
![]() Marsha wrote:
Marsha wrote:
A follow up to the question about button hole placement. I see that my question has an answer in the tips section online. Thank you for this edification.
23.07.2016 - 18:37
|
|
Jamie#jamiecardigan |
|
|
|
|
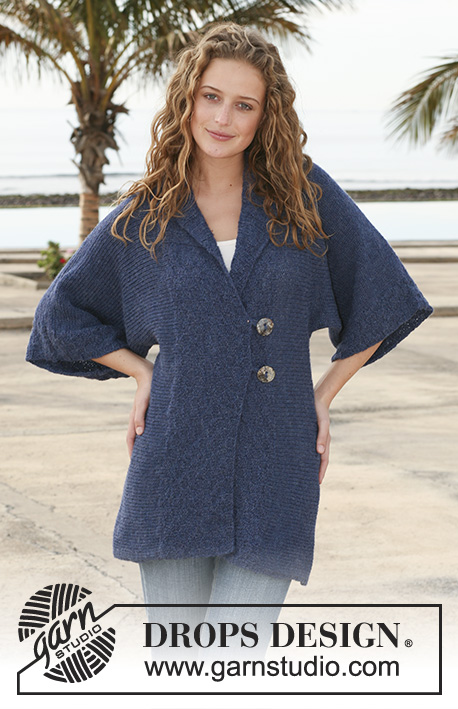
Knitted DROPS Jacket with rib in ”Merino Extra Fine”. Size S - XXXL.
DROPS 112-40 |
|
|
GARTER ST (back and forth on needle): K all rows. BUTTONHOLES: Make buttonholes on right front band. 1 buttonhole: K2 tog and cast on 1 new st on return row. Make buttonholes when piece measures 12, 20 and 28 cm, measured from bottom edge, for all sizes. --------------------------------------------------------- BACK PIECE: Worked back and forth on needle. Cast on 130-142-154-168-184-200 sts (includes 1 edge st each side) on needle size 4 mm with Merino. P 1 row from WS and continue in rib, K1-P1, with 1 edge st each side in garter st. REMEMBER THE KNITTING TENSION. When piece measures 5 cm dec 1 st each side on every 3 cm a total of 8 times = 114-126-138-152-168-184 sts. When piece measures 28 cm continue in garter st – see above. AT THE SAME TIME on first row dec 28-32-34-36-42-46 sts evenly = 86-94-104-116-126-138 sts. When piece measures 40-41-42-43-44-45 cm cast off for armhole each side at the beg of every row: 3 sts 1 time, 2 sts 0-1-3-4-6-8 times and 1 st 1-2-2-5-5-6 times = 78-80-82-84-86-88 sts. When piece measures 58-60-62-64-66-68 cm cast off the middle 16-18-20-22-24-26 sts for neck and complete each shoulder separately. Cast off 1 st on neckline on next row = 30-30-30-30-30-30 sts left on shoulder. Cast off when piece measures 60-62-64-66-68-70 cm. RIGHT FRONT PIECE: Cast on 66-72-78-85-93-101 sts (includes 1 edge st at the side and 1 edge st towards mid front) on needle size 4 mm with Merino. P 1 row from WS and continue in rib, K1/P1, with 1 edge st each side in garter st. When piece measures 5 cm dec at the side as described for back piece = 58-64-70-77-85-93 sts. When piece measures 28 cm continue in garter st, AT THE SAME TIME dec 14-16-17-18-21-23 sts evenly on first row = 44-48-53-59-64-70 sts. When piece measures 35-36-37-38-39-40 cm cast off to shape the neckline at the beg of row from mid front: 1 st on every 2 cm a total of 9-10-11-12-13-14 times. AT THE SAME TIME when piece measures 40-41-42-43-44-45 cm cast off for armhole at the side as described for back piece. When all dec are complete there are 31-31-31-31-31-31 sts left on shoulder (incl 1 edge st towards mid front). Cast off when piece measures 60-62-64-66-68-70 cm. LEFT FRONT PIECE: Like right front piece, but mirrored. SLEEVE: Worked back and forth on needle. Cast on 66-70-72-74-78-80 sts (includes 1 edge st each side) on needle size 4 mm with Merino. Work rib, K1/P1, with 1 edge st each side. When piece measures 8 cm continue in garter st, AT THE SAME TIME dec 16-18-18-18-20-20 sts evenly on first row = 50-52-54-56-58-60 sts. Now inc 1 st each side, and repeat the inc on every 3.5-2.5-2.5-2-2-1.5 cm a total of 12-14-16-18-19-21 times = 74-80-86-92-96-102 sts. When piece measures 49-48-48-47-46-44 cm – less for the larger sizes because of longer sleeve cap and wider shoulder – cast off for sleeve cap each side at the beg of every row: 3 sts 1 time, 2 sts 4-4-5-5-5-5 times, 1 st 0-1-1-2-5-8 times, then 2 sts each side until piece measures 55-55-56-56-57-57 cm, cast off 3 sts each side and cast off remaining sts. Piece measures approx 56-56-57-57-58-58 cm. ASSEMBLY: Sew shoulder seams. Set in sleeves. Sew side and sleeve seams inside 1 edge st. FRONT BANDS: Pick up 375-391-405-421-435-451 sts inside 1 edge st along right front piece, round neckline and down along left front piece. K 1 row from WS and continue as follows: 5 garter sts, rib K1/P1 and finish with K1 and 5 garter sts. When piece measures 3 cm make BUTTONHOLE on right front band – see above. When piece measures 5 cm slip 98-101-104-107-110-113 sts each side (= towards bottom edge) on a stitch holder and continue on remaining sts for collar. AT THE SAME TIME slip 6 sts on the stitch holder each side at the end of every row a total of 8-8-8-9-9-9 times = 146-149-152-161-164-167 sts on stitch holder each side. Rib now measures approx 10-10-10-11-11-11 cm where widest. Slip all sts from stitch holders back on needle and work 1 row rib as before on all sts. Cast off in rib. Sew buttons on left front piece to fit buttonholes. |
|
 |
|
Have you finished this pattern?Tag your pictures with #dropspattern #jamiecardigan or submit them to the #dropsfan gallery. Do you need help with this pattern?You'll find 17 tutorial videos, a Comments/Questions area and more by visiting the pattern on garnstudio.com. © 1982-2026 DROPS Design A/S. We reserve all rights. This document, including all its sub-sections, has copyrights. Read more about what you can do with our patterns at the bottom of each pattern on our site. |


With over 40 years in knitting and crochet design, DROPS Design offers one of the most extensive collections of free patterns on the internet - translated to 17 languages. As of today we count 324 catalogues and 12290 patterns translated into English (UK/cm). 12290
We work hard to bring you the best knitting and crochet have to offer, inspiration and advice as well as great quality yarns at incredible prices! Would you like to use our patterns for other than personal use? You can read what you are allowed to do in the Copyright text at the bottom of all our patterns. Happy crafting!
Post a comment to pattern DROPS 112-40
We would love to hear what you have to say about this pattern!
If you want to leave a question, please make sure you select the correct category in the form below, to speed up the answering process. Required fields are marked *.