
Popular categories
Looking for a yarn?


Comments / Questions (120)
![]() Anna-Karin wrote:
Anna-Karin wrote:
Hej! Jag får inte ihop det med ärmarna, man ska börja maska av vid 48 cm för att sen avsluta vid 56 cm. Då blir ärmkullen bara 8 cm. Men ärmhålan är ju större . 21 cm. Vad är detjag inte förstår här? Vänliga hälsningar Anna-Karin
07.03.2026 - 16:11DROPS Design answered:
Hei Anna-Karin. Det er bare ermtoppen som er ca 8 cm. Den som former toppen på ermet. Men alle maskene til ermet (74-80-86-92-96-102 masker inkl de som er felt til ermtoppen) skal sys til ermhullet. mvh DROPS Design
23.03.2026 - 11:54
![]() Jean Webber wrote:
Jean Webber wrote:
I do not understand how to decrease 1 stitch in 1x1 rib . I am using pattern 112-40 Jamie Cardigan and the instructions say to decrease 1 stitch each side.
06.03.2026 - 18:27DROPS Design answered:
Dear Mrs Webber, you can decrease inside 1 edge stitch by working 2 sts together at the beginning and at the end of the row. Happy knitting!
09.03.2026 - 07:35
![]() Anna wrote:
Anna wrote:
Hallo, ich bin mir nicht sicher, welche Größe ich bei dieser Jacke stricken soll. Normalerweise stricke ich eher L, aber nach den Maßen ist sie dann nicht so locker, wie auf dem Bild. Allerdings vermute ich, daß sie durch das Bündchen und kraus rechts Muster sowie vielleicht ein bisschen durch das Merino Garn nachgeben wird. Also müsste diese Größe dann vielleicht doch passen?
21.02.2026 - 11:39DROPS Design answered:
Liebe Anna, ja, die Jacke dürfte sich aufgrund des Musters noch ein wenig weiten bzw. Sie können sie auch dahingehend nach dem Stricken spannen (angefeuchtet). Wenn es nicht so viel ist, was bei Ihnen fehlt, sollte es mit L dann passen - aber vergleichen Sie unbedingt die Maße in der Maßskizze mit Ihren Maßen und achten Sie auf jeden Fall auch auf Ihre Maschenprobe. Viel Spaß beim Stricken!
23.02.2026 - 09:45
![]() Martine wrote:
Martine wrote:
Bonjour, J'aimerais tricoter cette veste également en Soft tweed ,mais au point de jersey. Puis-je la tricoter en suivant les mêmes instructions ou y a-t-il certaines modifications à apporter étant donné le changement du point ? Par avance, merci pour votre aide.
17.11.2025 - 17:07DROPS Design answered:
Bonjour Martine, il y aurait effectivement différents ajustements à faire car le bas se tricote en côtes (tension différente en largeur que pour du jersey), et le point mousse n'a pas la même tension que le jersey en hauteur; retrouvez ici tous les gilets et les vestes que vous pouvez réaliser en jersey avec un fil du groupe B, pensez à ajouter des filtres pour affiner la recherche si besoin. Bon tricot!
18.11.2025 - 09:10
![]() Lotta wrote:
Lotta wrote:
Har stickat helt enligt måtten för storlek L men garnet räckte inte. Det saknas ca 1/4 nystan. Någon mer som har haft det problemet?
02.11.2025 - 22:37
![]() Regina Friese wrote:
Regina Friese wrote:
Guten Tag, wird nach dem Bündchen weiter im Rippenmuster gestrickt und dann in die Krausrippe gewechselt ? Habe ich das so richtig verstanden ? Vielen Dank schonmal. Vielen Grüße Regina
23.10.2025 - 13:22DROPS Design answered:
Liebe Regina, ja, es wird im Rippenmuster weitergestrickt und bei 28 cm Gesamtlänge zu den Krausrippen gewechselt. Viel Spaß beim Weiterstricken!
24.10.2025 - 13:03
![]() Susan Tapper wrote:
Susan Tapper wrote:
Bij het achterpand ga je bij 43 cm hoogte afkanten voor de armsgaten. XL heeft dan 116 steken. 4x 2 =8 en 5x1 =5. Dan hou ik nog 103 over en niet zoals gemeld 84?
16.10.2025 - 20:37DROPS Design answered:
Hi Susan. in XL size you have to cast off for the armholes in each side: 3 sts 1 time, 2 sts 4 times and 1 st 5 times: 116-(3+3)-(8+8)-(5+5)=116-32=84 sts. Happy knitting!
17.10.2025 - 08:36
![]() Amanda wrote:
Amanda wrote:
Hi, re the decrease for the right front piece, pattern says 'as described for back piece', which decreases each side, but is the decrease for the fronts on one side of the piece only, if so which side (front or side)? Thanks.
01.10.2025 - 23:07DROPS Design answered:
Hi Amanda, You decrease in the same way as on the back piece but only on the side (not mid-front). Regards, Drops Team.
02.10.2025 - 05:56
![]() Kirsten wrote:
Kirsten wrote:
Kan jeg ikke få et billede der viser ryggen på denne bluse. Tak
12.01.2025 - 21:26DROPS Design answered:
Hej Kirsten, det har vi desværre ikke, men de øverste masker på rygstykket strikkes i retstrik som for forstykkerne :)
14.01.2025 - 12:06
![]() Gabriele Limp wrote:
Gabriele Limp wrote:
Liebes Drops Team, da ich nach langer Zeit wieder angefangen habe zu stricken, habe ich eine Frage bezüglich Modell 112-40,,, es steht dort nach 28 cm (Rückenteil) anfangen mit Krausrippe. Sind die vorherigen 5cm mit einberechnet oder heisst es nach 5cm anschließend nach 28cm? Würde mich über eine Antwort freuen. Dankeschön
13.10.2024 - 18:25DROPS Design answered:
Liebe Frau Limp, diese 28 cm messen Sie ab der Anschlagskante, dh mit den ersten 5 cm. Viel Spaß beim Stricken!
14.10.2024 - 09:08
|
|
Jamie#jamiecardigan |
|
|
|
|
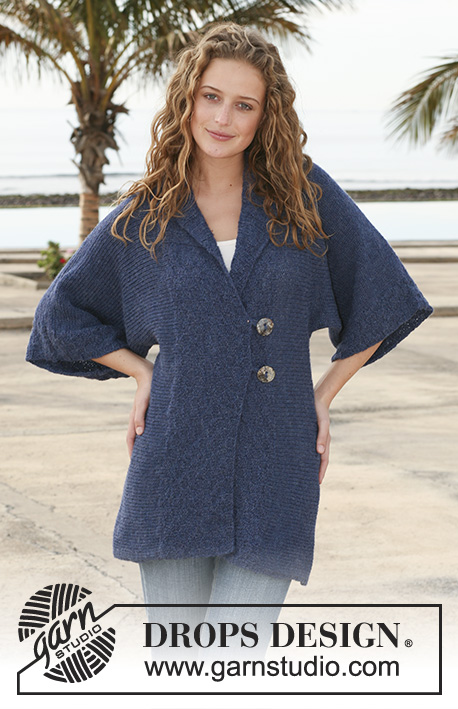
Knitted DROPS Jacket with rib in ”Merino Extra Fine”. Size S - XXXL.
DROPS 112-40 |
|
|
GARTER ST (back and forth on needle): K all rows. BUTTONHOLES: Make buttonholes on right front band. 1 buttonhole: K2 tog and cast on 1 new st on return row. Make buttonholes when piece measures 12, 20 and 28 cm, measured from bottom edge, for all sizes. --------------------------------------------------------- BACK PIECE: Worked back and forth on needle. Cast on 130-142-154-168-184-200 sts (includes 1 edge st each side) on needle size 4 mm with Merino. P 1 row from WS and continue in rib, K1-P1, with 1 edge st each side in garter st. REMEMBER THE KNITTING TENSION. When piece measures 5 cm dec 1 st each side on every 3 cm a total of 8 times = 114-126-138-152-168-184 sts. When piece measures 28 cm continue in garter st – see above. AT THE SAME TIME on first row dec 28-32-34-36-42-46 sts evenly = 86-94-104-116-126-138 sts. When piece measures 40-41-42-43-44-45 cm cast off for armhole each side at the beg of every row: 3 sts 1 time, 2 sts 0-1-3-4-6-8 times and 1 st 1-2-2-5-5-6 times = 78-80-82-84-86-88 sts. When piece measures 58-60-62-64-66-68 cm cast off the middle 16-18-20-22-24-26 sts for neck and complete each shoulder separately. Cast off 1 st on neckline on next row = 30-30-30-30-30-30 sts left on shoulder. Cast off when piece measures 60-62-64-66-68-70 cm. RIGHT FRONT PIECE: Cast on 66-72-78-85-93-101 sts (includes 1 edge st at the side and 1 edge st towards mid front) on needle size 4 mm with Merino. P 1 row from WS and continue in rib, K1/P1, with 1 edge st each side in garter st. When piece measures 5 cm dec at the side as described for back piece = 58-64-70-77-85-93 sts. When piece measures 28 cm continue in garter st, AT THE SAME TIME dec 14-16-17-18-21-23 sts evenly on first row = 44-48-53-59-64-70 sts. When piece measures 35-36-37-38-39-40 cm cast off to shape the neckline at the beg of row from mid front: 1 st on every 2 cm a total of 9-10-11-12-13-14 times. AT THE SAME TIME when piece measures 40-41-42-43-44-45 cm cast off for armhole at the side as described for back piece. When all dec are complete there are 31-31-31-31-31-31 sts left on shoulder (incl 1 edge st towards mid front). Cast off when piece measures 60-62-64-66-68-70 cm. LEFT FRONT PIECE: Like right front piece, but mirrored. SLEEVE: Worked back and forth on needle. Cast on 66-70-72-74-78-80 sts (includes 1 edge st each side) on needle size 4 mm with Merino. Work rib, K1/P1, with 1 edge st each side. When piece measures 8 cm continue in garter st, AT THE SAME TIME dec 16-18-18-18-20-20 sts evenly on first row = 50-52-54-56-58-60 sts. Now inc 1 st each side, and repeat the inc on every 3.5-2.5-2.5-2-2-1.5 cm a total of 12-14-16-18-19-21 times = 74-80-86-92-96-102 sts. When piece measures 49-48-48-47-46-44 cm – less for the larger sizes because of longer sleeve cap and wider shoulder – cast off for sleeve cap each side at the beg of every row: 3 sts 1 time, 2 sts 4-4-5-5-5-5 times, 1 st 0-1-1-2-5-8 times, then 2 sts each side until piece measures 55-55-56-56-57-57 cm, cast off 3 sts each side and cast off remaining sts. Piece measures approx 56-56-57-57-58-58 cm. ASSEMBLY: Sew shoulder seams. Set in sleeves. Sew side and sleeve seams inside 1 edge st. FRONT BANDS: Pick up 375-391-405-421-435-451 sts inside 1 edge st along right front piece, round neckline and down along left front piece. K 1 row from WS and continue as follows: 5 garter sts, rib K1/P1 and finish with K1 and 5 garter sts. When piece measures 3 cm make BUTTONHOLE on right front band – see above. When piece measures 5 cm slip 98-101-104-107-110-113 sts each side (= towards bottom edge) on a stitch holder and continue on remaining sts for collar. AT THE SAME TIME slip 6 sts on the stitch holder each side at the end of every row a total of 8-8-8-9-9-9 times = 146-149-152-161-164-167 sts on stitch holder each side. Rib now measures approx 10-10-10-11-11-11 cm where widest. Slip all sts from stitch holders back on needle and work 1 row rib as before on all sts. Cast off in rib. Sew buttons on left front piece to fit buttonholes. |
|
 |
|
Have you finished this pattern?Tag your pictures with #dropspattern #jamiecardigan or submit them to the #dropsfan gallery. Do you need help with this pattern?You'll find 17 tutorial videos, a Comments/Questions area and more by visiting the pattern on garnstudio.com. © 1982-2026 DROPS Design A/S. We reserve all rights. This document, including all its sub-sections, has copyrights. Read more about what you can do with our patterns at the bottom of each pattern on our site. |


With over 40 years in knitting and crochet design, DROPS Design offers one of the most extensive collections of free patterns on the internet - translated to 17 languages. As of today we count 324 catalogues and 12290 patterns translated into English (UK/cm). 12290
We work hard to bring you the best knitting and crochet have to offer, inspiration and advice as well as great quality yarns at incredible prices! Would you like to use our patterns for other than personal use? You can read what you are allowed to do in the Copyright text at the bottom of all our patterns. Happy crafting!
Post a comment to pattern DROPS 112-40
We would love to hear what you have to say about this pattern!
If you want to leave a question, please make sure you select the correct category in the form below, to speed up the answering process. Required fields are marked *.