
Popular categories
Looking for a yarn?


Comments / Questions (84)
![]() Isabelle wrote:
Isabelle wrote:
Cela fait longtemps que je souhaitais faire ce modèle, mais je n'arrive pas à comprendre où commence réellement les différentes parties du tricot. Vous dites milieu du dos(je commence toujours le dos) dans mes tricot, mais quand je monte les 43 mailles, le nombre ne suffit pas pour faire un milieu dos , il en faudrait au moins 180 c'est pour ça que je ne comprends pas. J'ai besoin d'aide. Merci pour votre réponse.
24.01.2026 - 13:14DROPS Design answered:
Bonjour Isabelle, parce que l'on tricote dans le sens de la longueur, ici le dos se tricote en 2 parties, à partir du milieu du dos, on va en même temps augmenter pour former la diagonale que l'on voit bien sur la 2ème photo, les 43 m ne correspondent donc pas au milieu du dos en largeur ni en hauteur mais au nombre de mailles dont on a besoin pour commencer le dos, on va progressivement augmenter pour former en même temps le bas du demi-dos et le côté (direction emmanchure). Suivez attentivement les explications comme indiqué, vous verrez l'ouvrage se former progressivement et ressembler à la photo. Bon tricot!
26.01.2026 - 08:12
![]() Deraeve Monique wrote:
Deraeve Monique wrote:
Bestaat er een filmpje om mitered trui te breien
24.01.2020 - 09:32DROPS Design answered:
Dag Monique,
Er zijn wel instructievideo's van diverse steken die gebruikt worden in dit patroon, maar er is niet een video over hoe je deze trui breit van begin tot einde. Laat even weten waar je niet uit komt, dan kunnen we je wellicht helpen.
26.01.2020 - 15:03
![]() Juana Ortiz wrote:
Juana Ortiz wrote:
Porque no hacen vídeos con el paso a paso de las prendas este modelo me encanta pero no creo que pueda hacerlo así solo con esas intrusiones. Muchas gracias
05.09.2019 - 21:24
![]() Diane Vanek wrote:
Diane Vanek wrote:
I am not a beginner knitter and I'm finding this pattern very confusing. The whole AT THE SAME TIME is boggling my mind. Is there any version of this pattern that lays it out row by row or at least with the rows listed where changes need to be made and what those changes per row are exactly?
20.08.2018 - 16:11DROPS Design answered:
Hi Diane, We are sorry, but there are no other versions available for this pattern.
21.08.2018 - 07:12
![]() Michaela Drozd wrote:
Michaela Drozd wrote:
Hallo, ich habe die 153 Maschen auf die Hilfsnadel gelegt, wieviel Maschen müssen auf der rechten Nadel übrigbleiben, mit denen man weiter stricken muss. Ich bin mir im Moment nicht sicher ob ich alle Zunahmen richtig gemacht habe. Gruß Michaela
20.11.2017 - 06:01DROPS Design answered:
Liebe Michaela, wenn Sie 153 M auf der linken Seite des Markierungsfadens + die M. mit dem Markierungsfaden haben, dann soll es alles klappen. Wenn alle Zunahmen fertig sind, sollen Sie 75 M haben. Viel Spaß beim stricken!
20.11.2017 - 10:05
![]() Sheila Richardson wrote:
Sheila Richardson wrote:
Question on the short row instructions for 113-8 The short row instructions: - if row 1 is the WS, then I would cast on the collar stitches, knit WS row in garter stitch, then knit RS row in garter, repeat for two rows, then knit a short row on the wrong side, then knit another short row on the right side, then repeat with the full rows x4 and short rows x2 until the piece reaches the next length measure?
18.07.2016 - 04:49DROPS Design answered:
Dear Mrs Richardson, sts for collar are inc/cast on at the end of a row from RS (right front piece), then start short rows from WS so that the 2 short rows are worked over the sts for collar (left side seen from RS) and not on the right side (from RS). Happy knitting!
18.07.2016 - 09:41
![]() Sheila Richardson wrote:
Sheila Richardson wrote:
Hi there - great design! Instructions say to repeat the YO-K-YO increase 62 times on every other row - by my calculations this takes me to row 124 - which is where I should cast on the new stitches for the collar and start the short rows. The line after the short row instructions says : REMEMBER INCREASES! And further instructions after short row instructions imply I continue the increases?
18.07.2016 - 04:47DROPS Design answered:
Dear Mrs Richardson, when you are working the short rows, remember to continue inc as before with a YO on each side of the st with marker. Happy knitting!
18.07.2016 - 09:38
![]() Joanne Sherek wrote:
Joanne Sherek wrote:
Drops 113-8. I do not understand the increase row on the return. On RS work inc on each side of marker. That is ok but, the return row, "inc by making 1 YO, K, YO." Is this on every row? Where do I make this increase? Over the inc from the row before? I am really confused.
02.07.2016 - 18:47DROPS Design answered:
Dear Mrs Sherek, from RS you inc 1 st on each side of the st with marker with YO, K the st with marker, YO - from WS work all sts. Then continue inc on each side of the st with the marker with a YO on every other row (= every row from RS) - then K YO on next row. Happy knitting!
04.07.2016 - 10:34
![]() Gerda Kristensen wrote:
Gerda Kristensen wrote:
Skal omslagende ved udtagene strikkes drejet ret ? Hvis ikke bliver der jo et hul, skal der være det? M.v.h. Gerda
05.05.2016 - 21:24DROPS Design answered:
Hej Gerda, Ja vi har strikket ret så der bliver et lille hul, men du vælger selv om du vil gøre hullet mindre ved at strikke drejet ret. God fornøjelse!
06.05.2016 - 10:08
![]() Nana Wood wrote:
Nana Wood wrote:
Jeg er i tvivl om udtagningerne på hø forstykke, venstre side. Der står 2 masker på hver 6. pind 1-2-2-2-2-3 gange, er det ialt 12 gange x 2 masker eller er det 2 masker x 1 eller 2(ialt 4) masker på samme pind, jeg er forvirret.
12.01.2015 - 15:33DROPS Design answered:
Hej Nana. Nej, hvis du f.eks. strikker str S, saa tager du 2 masker ud 1 gang i alt. Numrene er per störrelse
12.01.2015 - 16:09
|
|
City Explorer#cityexplorercardigan |
|
 |
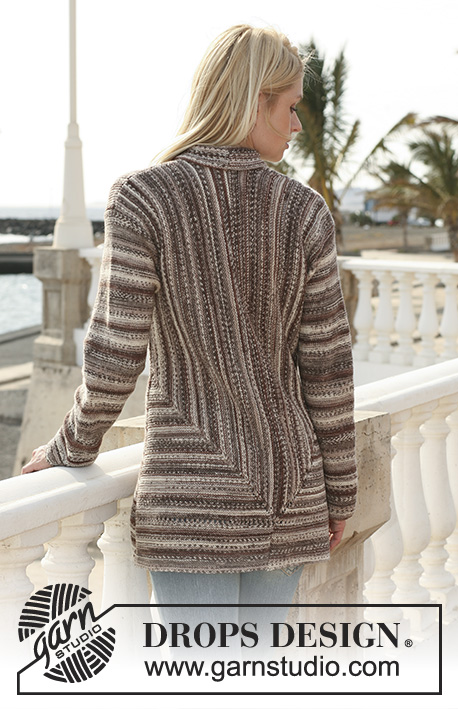 |
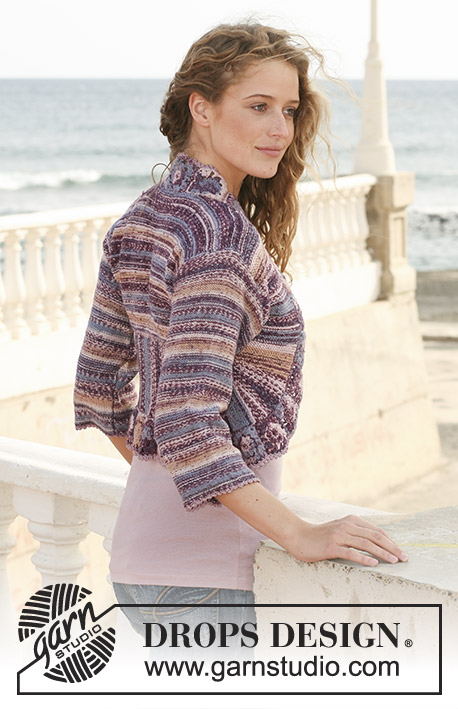
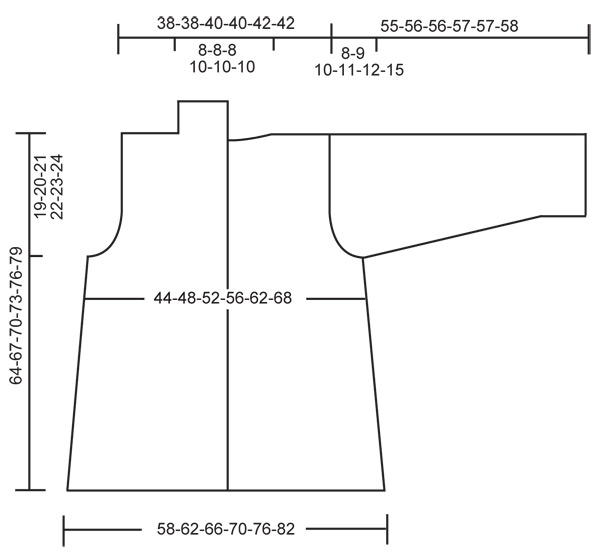
DROPS jacket knitted from side to side in garter st in ”Fabel”. Size S - XXXL.
DROPS 113-8 |
|
|
GARTER ST (back and forth on needle): K all rows. BUTTONHOLES: Make buttonholes on right front band. 1 buttonhole = K2 tog and cast on 1 new st on return row. Make buttonholes when piece measures – from bottom edge: SIZE S: 10, 17, 24, 31 and 39 cm. SIZE M: 10, 17, 24, 32 and 40 cm. SIZE L: 10, 17, 25, 33 and 41 cm. SIZE XL: 10, 18, 26, 34 and 42 cm. SIZE XXL: 9, 15, 22, 29, 36 and 43 cm. SIZE XXXL: 9, 16, 23, 30, 37 and 44 cm. -------------------------------------------------------- RIGHT FRONT PIECE: Worked from the side towards mid front, back and forth on circular needle. NOTE: make all measurements from cast on row. READ ALL OF THIS SECTION BEFORE KNITTING IT! Cast on 31-34-36-38-41-43 sts on needle size 3 mm with Fabel. K 1 row from WS. Insert a marker in 2nd st at the right side of piece (as seen from RS). Row 1 = WS. Work garter st on all sts, AT THE SAME TIME on row 2 (= RS) inc 1 st on each side of st with marker, and repeat the inc on every other row a total of 53-58-62-67-74-82 times – inc by making 1 YO, K YO on return row. REMEMBER THE KNITTING TENSION! AT THE SAME TIME on row 2 cast on new sts at the left side of piece (as seen from RS) as follows: on every 6th row: 2 sts 1-2-2-2-2-3 times, then on every 4th row: 2 sts 1-2-3-4-6-8 times, then on every other row: 2 sts 1-1-1-4-4-5 times, then cast on 40-38-38-33-31-26 sts 1 time. AT THE SAME TIME on row 4 inc 1 st at the right side of piece (as seen from RS) and repeat the inc on every 8 row a total of 16 times. AT THE SAME TIME when piece measures 18-20-22-23-26-28 cm cast on 14-14-14-17-17-17 new sts for collar at the left side of piece (as seen from RS). When these sts have been cast on continue with shortened rows as follows (row 1 = WS): * 4 rows on all sts, 2 rows on the top 60-64-66-68-70-72 sts on the left side of piece (as seen from RS) *, repeat from *-*. REMEMBER INCREASES! When piece measures 22-24-26-28-31-34 cm – increases on each side of st with marker are now complete – slip sts to the left of st with marker + st with marker (= 143-153-161-174-186-199 sts) on a stitch holder. Insert a new marker in piece. Now work next row on sts on the right side of piece as follows: *K2 tog, 1 YO *, repeat from *-* and finish with K2. Continue in garter st on all sts – continue inc on the right side of piece = 70-75-79-84-91-99 sts left on row when inc are complete. When piece measures 10-9-8-7-5-3 cm from marker cast off these 70-75-79-84-91-99 sts sts. Pick up 24-22-20-16-12-7 sts towards mid front and slip sts from stitch holder back on needle = 167-175-181-190-198-206 sts. Now work all sts (no shortened rows) for front band. K 1 row from WS, and work next row as follows from RS and bottom edge: K 24-22-20-16-12-7 sts, * K2 tog, 1 YO *, repeat from *-* and finish with K2. Continue in garter st. When front band measures 2 cm make BUTTONHOLES – see above – and cast off when front band measures 4 cm. LEFT FRONT PIECE: Like right front piece, but without buttonholes. Assemble left front piece with WS out (i.e. mirrored). LEFT BACK PIECE: Worked back and forth on circular needle from side towards mid back. NOTE: make all measurements from cast on row. READ ALL OF THIS SECTION BEFORE KNITTING IT! Cast on 31-34-36-38-41-43 sts on needle size 3 mm with Fabel. Insert a marker in the 2nd st on the right side of piece (as seen from RS). Row 1 = WS. Work garter st on all sts, AT THE SAME TIME on row 2 (= RS) inc 1 st on each side of st with marker, and repeat the inc on every other row a total of 53-58-62-67-74-82 times – inc by making 1 YO, K YO on next row. AT THE SAME TIME on row 2 cast on new sts at the left side of piece (as seen from RS) as follows: on every 6th row: 2 sts 1-2-2-2-2-3 times, then on every 4th row: 2 sts 1-2-3-4-6-8 times, then on every other row: 2 sts 1-1-1-4-4-5 times, then cast on 40-38-38-33-31-26 sts 1 time. AT THE SAME TIME on row 4 inc 1 st at the right side of piece (as seen from RS) and repeat the inc on every 8 row a total of 16 times. AT THE SAME TIME when piece measures 18-20-22-23-26-28 cm cast off 4 sts on the left side of piece (as seen from RS). When piece measures 22-24-26-28-31-34 cm – increases on each side of st with marker are now complete – cast off 125-135-143-153-165-178 sts on the left side of piece (as seen from RS). Insert a new marker in piece. Work next row as follows on remaining sts: * K2 tog, 1 YO *, repeat from *-* and finish with K2. Continue in garter st on all sts – continue inc on the right side of piece = 70-75-79-84-91-99 sts when inc are complete. Cast off when piece measures 10-9-8-7-5-3 cm from marker. RIGHT BACK PIECE: Like left back piece. Assemble right back piece with the WS out, i.e. mirrored. SLEEVE: Worked back and forth on needle. Cast on 58-60-62-64-66-70 sts (includes 1 edge st each side) on needle size 3 mm with Fabel. Work garter st. When piece measures 10 cm continue in reverse stocking st, AT THE SAME TIME inc 1 st each side and repeat the inc on every 3-2.5-2-2-1.5-1.5 cm a total of 12-14-16-18-21-21 times = 82-88-94-100-108-112 sts. When piece measures 47-47-46-46-45-43 cm – less for the larger sizes because of longer sleeve cap and wider shoulder – cast off for sleeve cap each side at the beg of every row: 3 sts 1 time, 2 sts 4-4-5-5-5-6 times, 1 st 3-4-4-6-7-9 times, then 2 sts each side until piece measures 54-55-55-56-56-57 cm, now cast off 3 sts each side 1 time and cast off remaining sts. Piece measures approx 55-56-56-57-57-58 cm. ASSEMBLY: Sew back pieces tog mid back. Sew shoulder seams. Set in sleeves. Sew sleeve and side seam inside 1 edge st. Sew collar tog mid back and sew to neckline. Sew on buttons. |
|
 |
|
Have you finished this pattern?Tag your pictures with #dropspattern #cityexplorercardigan or submit them to the #dropsfan gallery. Do you need help with this pattern?You'll find 19 tutorial videos, a Comments/Questions area and more by visiting the pattern on garnstudio.com. © 1982-2026 DROPS Design A/S. We reserve all rights. This document, including all its sub-sections, has copyrights. Read more about what you can do with our patterns at the bottom of each pattern on our site. |
|


With over 40 years in knitting and crochet design, DROPS Design offers one of the most extensive collections of free patterns on the internet - translated to 17 languages. As of today we count 324 catalogues and 12290 patterns translated into English (UK/cm). 12290
We work hard to bring you the best knitting and crochet have to offer, inspiration and advice as well as great quality yarns at incredible prices! Would you like to use our patterns for other than personal use? You can read what you are allowed to do in the Copyright text at the bottom of all our patterns. Happy crafting!
Post a comment to pattern DROPS 113-8
We would love to hear what you have to say about this pattern!
If you want to leave a question, please make sure you select the correct category in the form below, to speed up the answering process. Required fields are marked *.