
Popular categories
Looking for a yarn?


Comments / Questions (24)
![]() Nelly BRECHAIRE wrote:
Nelly BRECHAIRE wrote:
Modèle cape à capuche DROP Extra 0-450 en VIENNA gris : après les 6 mailles bordure", sur l'endroit il faut faire 2 m end. *4m env. 2m end.* etc. Que faut-il faire sur l'env.? m end. sur end. et env. sur env.(ce qui fera du point mousse) ou bien env. sur end. et end. sur env. pour un effet jersey contrarié. Merci d'avance pour votre réponse
12.12.2014 - 15:02DROPS Design answered:
Bonjour Mme Brechaire, sur l'envers, tricotez ces m en côtes (= 4 m env, 2 m end sur l'end = 4 m end, 2 m env sur l'env). Bon tricot!
12.12.2014 - 17:00
![]() Bibi wrote:
Bibi wrote:
Il y aune coquille sur le nombre de maille pour la capuche : il est noté 14 augmentations au lieu de 4.
28.01.2014 - 22:49DROPS Design answered:
Bonjour et merci Bibi, le modèle a été corrigé. Bon tricot !
29.01.2014 - 16:37
![]() Jovaleri wrote:
Jovaleri wrote:
On page 2 of the pattern, why have DROPS used the term "Garter st. pattern" for what is obviously Stocking Stitch. I see that below on this page Garter Stitch and Stocking Stitch are defined according to my understanding of the terms.
08.04.2012 - 05:23DROPS Design answered:
Before the pattern starts, we give some explanations to things that will occur in the pattern. We explain the term garter st, since in the pattern the front band sts are worked in garter st.
10.04.2012 - 01:23
![]() AH wrote:
AH wrote:
This is such a great pattern. Please translate this into American English. Thank you.
15.07.2010 - 19:30
|
|
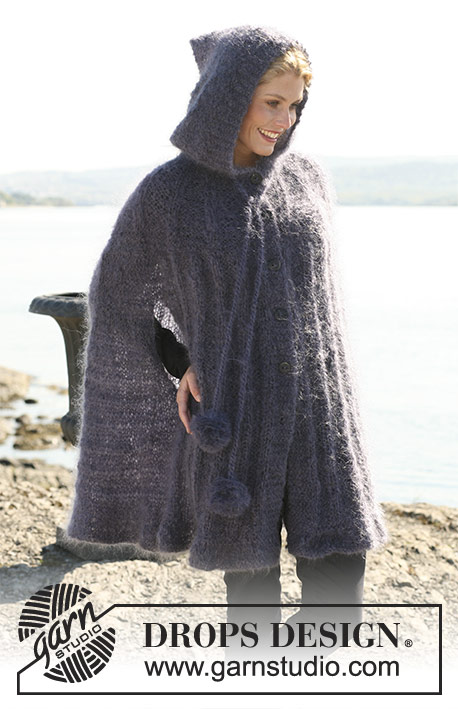
Elven Dance |
|
 |
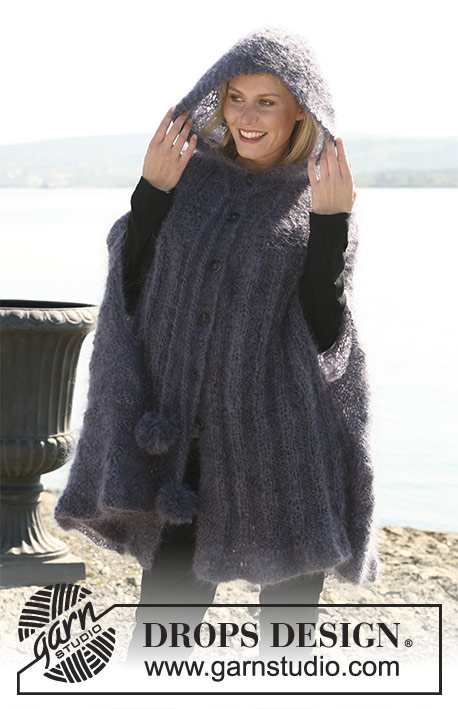 |
DROPS cape with hood in ”Vienna” eller "Melody". Size M.
DROPS Extra 0-450 |
|
|
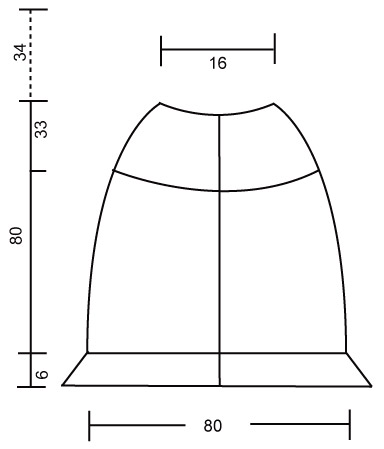
Garter st, back and forth on needle: K all rows. Decreasing tip: Dec 4 sts each side by dec 4 sts evenly on sts worked in Garter st pattern. Dec on rows from RS. Garter st pattern: Row 1: K from RS Row 2: P from WS Row 3: K from RS Row 4: P from WS Row 5: P from RS Row 6: K from WS Repeat row 1 to 6. Double moss st: Row 1: * K2, P2 *, repeat from *-* and finish with K2. Row 2: K over K and P over P. Row 3: P over K and K over P. Row 4: K over K and P over P. Repeat row 3 and 4. Buttonholes: Cast off for buttonholes on right front piece. 1 buttonhole = cast off 3rd front band st from mid front and cast on 1 new st on return row. Cast off for buttonholes when piece measures (measured from the first MT): 34, 43, 52, 61, 70 and 79 cm. Cape: Worked back and forth on circular needle from mid front. Cast on 325 sts (includes 6 front band sts each side towards mid front) on circular needle size 7 mm with Vienna or Melody. K 2 rows. Continue in stocking st with 6 front band sts each side in garter st. Remember the knitting tension! When piece measures 6 cm work next row as follows from RS: 6 front band sts in garter st, * K1, K2 tog *, repeat from *-* until 7 sts remain, K1, 6 front band sts in garter st = 221 sts. K 1 row from WS. Insert a Marking Thread (MT) and now measure piece from here. K 1 row from RS, at the same time dec 1 st after the 6 front band sts = 220 m. K from row from WS. Continue as follows from RS: 6 front band sts in garter st, K2, * P4, K2 *, repeat from *-* on the next 30 sts, Garter st pattern – see above - on the next 41 sts, K2, repeat from *-* on the next 60 sts, Garter st pattern on the next 41 sts, K2, repeat from *-* on the next 30 sts and finish with 6 front band sts in garter st. At the same time when piece measures 10 cm from MT dec 4 sts each side – see Decreasing tip! Repeat the dec on every 7 cm a total of 6 times. At the same time when piece measures 27 cm from MT (after 3 dec = 196 sts on row) continue as follows from RS: 6 front band sts in garter st, K2, * P4, K2 *, repeat from *-* on the next 30 sts, 6 garter sts, Garter st pattern on the next 23 sts, K2, repeat from *-* on the next 60 sts, Garter st pattern on the next 23 sts, 6 garter sts, K2, repeat from *-* on the next 30 sts and finish with 6 front band sts in garter st. When piece measures 29 cm from MT divide the piece as follows: keep the first 41 sts on needle and slip the remaining 155 sts on a stitch holder. Right front piece: Continue back and forth on needle on the 41 sts as follows: 6 front band sts in garter st, K2, * P4, K2 * repeat from *-* on the next 30 sts, 3 garter sts. Continue like this until piece measures 18 cm from where piece was divided. Note! Remember to cast off for buttonholes – see above. Slip the 41 sts on a stitch holder. Back piece: Slip the next 114 sts back on needle and work pattern as before back and forth on needle. Note! Remember dec at sides. Continue like this until piece measures 18 cm from where piece was divided (= 47 cm from MT). All dec are now complete = 90 sts. Slip the 90 sts on a stitch holder. Left front piece: Slip the last 41 sts back on needle and continue back on forth on needle as follows: 3 garter sts, * P4, K2 *, repeat from *-* on the next 30 sts, K2, 6 front band sts in garter st. Continue like this until piece measures 18 cm from where piece was divided. Yoke: Slip all sts back on needle = 172 m. Insert a MT and now measures piece from here. Continue as follows from RS: 6 front band sts in garter st, K2, * P4, K2 *, repeat from *-* on the next 30 sts, 6 garter sts, Garter st pattern on the next 11 sts, K2, repeat from *-* on the next 60 sts, m, Garter st pattern on the next 11 sts, 6 garter sts, K2, repeat from *-* on the next 30 sts and finish with 6 front band sts in garter st. Continue like this until piece measures 2 cm from MT. Continue as follows: 6 front band sts in garter st, K2, * P4, K2 *, repeat from *-* on the next 30 sts, Garter st pattern on the next 17 sts, K2, repeat from *-* over de next 60 sts, Garter st pattern on the next 17 sts, K2, repeat from *-* on the next 30 sts and finish with 6 front band sts in garter st. Continue like this until piece measures 7 cm from MT. K 1 row from RS on all sts at the same time dec 14 sts evenly = 158 sts. K 1 row from WS. K 1 row from RS, at the same time dec 14 sts evenly = 144 sts. K 1 row from WS. Now continue as follows: 6 front band sts, K2, * P8, K2 *, repeat from *-* on the next 130 sts and finish with 6 front band sts. When piece measures 11 cm from MT dec 1 st in each P section and repeat the dec on every 3.5 cm a total of 6 times = 66 sts. Continue with K over K and P over P (with front bands in garter st as before) until piece measures 31 cm from MT and now K 6 rows on all sts. Hood: K 1 rows from RS, at the same time inc 4 sts evenly = 70 sts. Insert a MT and now measure piece from here. Continue in Double moss st – see above – with 6 front band sts in garter st each side. Continue like this until hood measures approx 34 cm from MT and cast off loosely. Assembly: Sew tog hood at the top, edge to edge with neat sts. Sew on buttons. Twisted ribbon: Cut 4 threads measuring 3 meters each. Twist them until they resist, fold threads double and let them twist again. Tie a knot each end and thread the ribbon round neckline. Make 2 pompoms with a diameter of approx 8 cm and attach to the ends of ribbon. www.garnstudio.com |
|
 |
|
Have you finished this pattern?Tag your pictures with #dropspattern or submit them to the #dropsfan gallery. Do you need help with this pattern?You'll find 20 tutorial videos, a Comments/Questions area and more by visiting the pattern on garnstudio.com. © 1982-2026 DROPS Design A/S. We reserve all rights. This document, including all its sub-sections, has copyrights. Read more about what you can do with our patterns at the bottom of each pattern on our site. |
|


With over 40 years in knitting and crochet design, DROPS Design offers one of the most extensive collections of free patterns on the internet - translated to 17 languages. As of today we count 324 catalogues and 12290 patterns translated into English (UK/cm). 12290
We work hard to bring you the best knitting and crochet have to offer, inspiration and advice as well as great quality yarns at incredible prices! Would you like to use our patterns for other than personal use? You can read what you are allowed to do in the Copyright text at the bottom of all our patterns. Happy crafting!
Post a comment to pattern DROPS Extra 0-450
We would love to hear what you have to say about this pattern!
If you want to leave a question, please make sure you select the correct category in the form below, to speed up the answering process. Required fields are marked *.