
Popular categories
Looking for a yarn?


Comments / Questions (69)
![]() Nicole wrote:
Nicole wrote:
Comment faire 1 diminution en début et fin du même rang ?
23.05.2015 - 19:11DROPS Design answered:
Bonjour Nicole, pour diminuer 1 m de chaque côté, vous pouvez tricoter 2 m ens à l'end à 1 m du bord (= en début de rang sur l'endroit, tricotez 1 m, puis 2 m ens à l'end, à la fin du même rang quand il reste 3 m, tricotez 2 m ens à l'end, 1 m). Bon tricot!
26.05.2015 - 09:41
![]() Nicole wrote:
Nicole wrote:
Merci à la personne qui m'aide avec ses explications. Cela est très apprécié.
20.05.2015 - 20:39
![]() Nicole wrote:
Nicole wrote:
Dans le diagramme j'ai 2 lignes de carré blanc 2 lignes de x ce qui veux dire je tricote 1 rag endroit puis le 2 e en envers pour les cases blanches et pour les x envers 1e ragd endroit le 2e rang ? Merci de la première réponse mais je voudrais savoir si je comprend bien l 'explication que je décrit ci haut..?
19.05.2015 - 01:33DROPS Design answered:
Bonjour Nicole, le diagramme se lit en commençant en bas à droite (voir ici) - 1er rang = sur l'endroit: tout à l'env, 2ème rang = sur l'env: tout à l'end - 3ème rang: tout à l'end, 4ème rang: tout à l'env. Répétez encore 1 fois ces 4 rangs = 8 rangs (= 2 x 2 rangs jersey env + 2 rangs jersey end). Bon tricot!
19.05.2015 - 08:19
![]() Nicole wrote:
Nicole wrote:
Que veux dire 1 maille end sur l'end, env sur l'envers je tricote en endroit sur un rang envers ? et ma maille lisière je la tricote comment ? Je suis de niveau 1 débutante et je voudrais bien offrir ce gilet à ma fille mais j'ai besoin d'explication .Merci
16.05.2015 - 17:37DROPS Design answered:
Bonjour Nicole, dans le diagramme, 1 case blanche = 1 m jersey endroit (à tricoter à l'end sur l'endroit, à l'env sur l'envers), et 1 croix = 1 m jersey envers (à tricoter à l'env sur l'endroit, à l'end sur l'envers). Bon tricot!
18.05.2015 - 09:41
![]() Jerina wrote:
Jerina wrote:
Kun je dit vest ook breinen met Andes wol zonder het patroon aan te hoeven passen? Of is de Andes wol veel dikker dan Eskimo Alvast bedankt!
21.11.2014 - 16:09DROPS Design answered:
Hoi Jerina. DROPS Andes heeft dezelfde dikte als DROPS Eskimo (E) (zie de garencategorieën hier). Je hoeft daarom niets aan het patroon aan te passen, maar brei wel een proeflapje om zeker van de stekenverhouding te zijn.
21.11.2014 - 16:22
![]() Jacqueline wrote:
Jacqueline wrote:
Super bedankt ,vest is klaar ben erg blij mee Groetjes Jacquelin
04.11.2014 - 12:18Sofia wrote:
I made this cardigan for my sweet little girl and became pretty nice. She loves it.
09.03.2014 - 19:19
![]() Chaudet wrote:
Chaudet wrote:
Bonjour, je voudrais savoir à quelle mensuration correspond la taille M ou L. Je n'ai trouvé aucun tableau sur le site.
05.01.2014 - 19:04DROPS Design answered:
Bonjour Mme Chaudet, les normes évoluent au fur et à mesures des années et les tailles sont différentes d'un pays à l'autre. Pour trouver votre taille, comparez les mesures du schéma (à plat, en cm), à un vêtement analogue. Bon tricot!
06.01.2014 - 09:39
![]() Anni wrote:
Anni wrote:
Wie genau wird das Muster M1 gestrickt? Wie fange ich an zu stricken nach der Randmasche? Muss ich immer im Wechsel eine rechte und eine linke Masche stricken?
14.11.2013 - 15:10DROPS Design answered:
Liebe Anni, wir haben die Erklärung zum Muster überarbeitet, es sollte jetzt klarer sein, wie in der Hin-R und in der Rück-R gestrickt wird.
15.11.2013 - 11:28
![]() Heide wrote:
Heide wrote:
Diese Jacke habe ich schon zweimal in ANDES gestrickt. Sie sieht super aus, paßt perfekt und ist einfach zu stricken. Allerdings benötigt man für die Grössen S und M jeweils 1 Knäuel mehr als für ESKIMO angegeben.
13.02.2013 - 11:39
|
|||||||
Wisdom |
|||||||
 |
 |
||||||
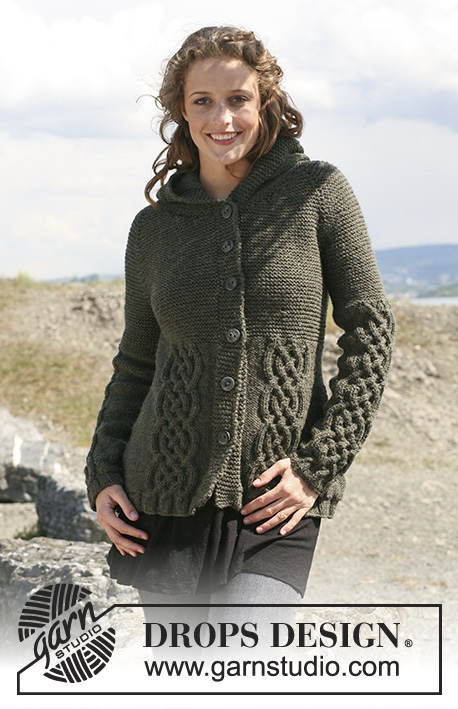
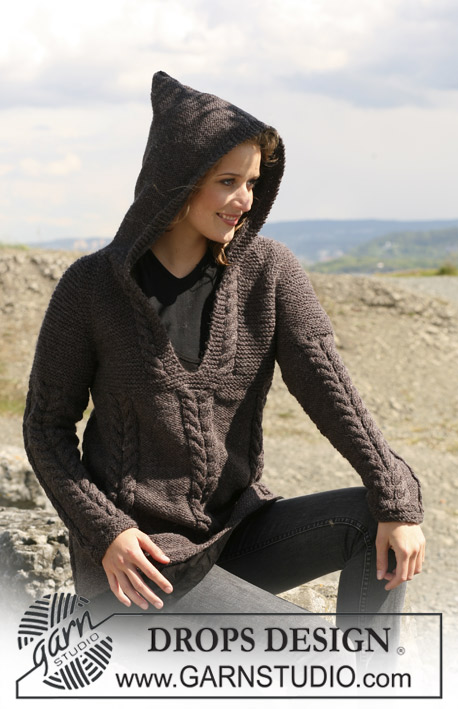
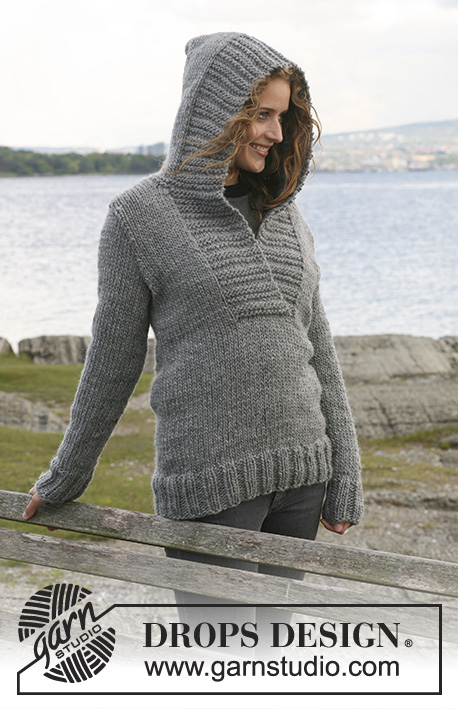
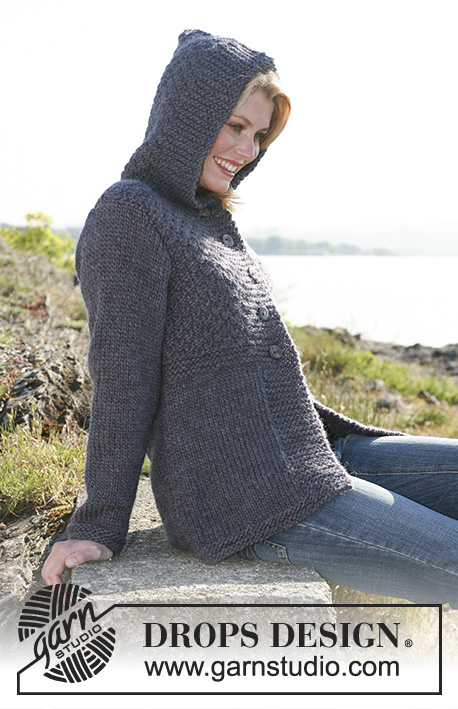
Knitted DROPS jacket in ”Snow”. Size S-XXXL.
DROPS 109-8 |
|||||||
|
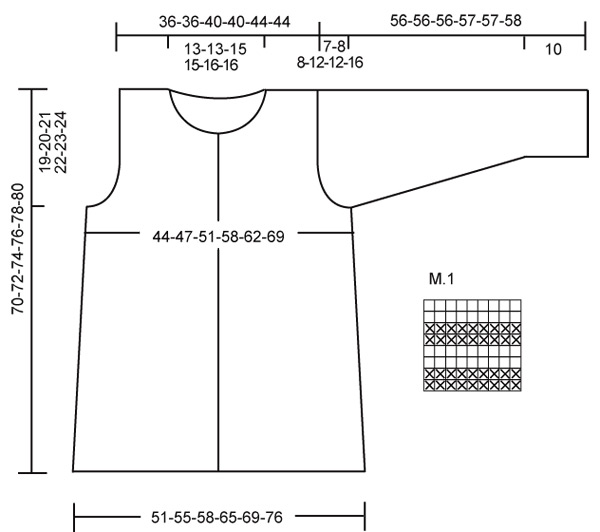
Garter st, back and forth on needle: K all rows. Double moss st: Row 1: *K2, P2 *, repeat from *-*. Row 2: K over K and P over P. Row 3: P over K, K over P. Row 4: P over P and K over K. Repeat row 1-4. Pattern: See diagram M.1. The diagram shows the pattern from the RS. Buttonhole: Make buttonholes on right front band. 1 buttonhole = cast off 5th front band st and cast on 1 new st on return row. Cast off for buttonholes when piece measures: Size S: 37, 44, 50, 57 and 63 cm. Size M: 37, 44, 51, 58 and 65 cm. Size L: 37, 45, 52, 59 and 67 cm. Size XL: 37, 43, 50, 56, 63 and 69 cm. Size XXL: 37, 44, 51, 58, 65 and 71 cm. Size XXXL: 37, 44, 51, 58, 65 and 73 cm. Back piece: Worked back and forth on needle. Cast on 58-62-66-74-78-86 sts (includes 1 edge st each side) on needle size 8 mm with Snow. Work M.1. Remember the knitting tension! After M.1 continue in stocking st, at the same time when piece measures 10 cm dec 1 st each side and repeat the dec on every 6 cm a total of 4 times = 50-54-58-66-70-78 sts. When piece measures 35 cm work 8 rows garter st – see above. Now continue in double moss st – see above – with 1 edge st each side. At the same time when piece measures 49-50-51-52-53-54 cm work 4 rows garter st on 5 sts each side, work remaining sts as before. On next row when piece measures 51-52-53-54-55-56 cm cast off 3 sts each side for armhole and continue with 2 garter sts each side. Cast off to shape the armhole each side at the beg of every row: 2 sts 1-2-2-4-4-6 times = 40-40-44-44-48-48 sts. Continue in double moss st with 2 garter sts each side. When piece measures 68-70-72-74-76-78 cm cast off the middle 12-12-14-14-16-16 sts for neck and complete each side separately. Dec 1 st on neckline on next row and cast off remaining sts when piece measures 70-72-74-76-78-80 cm. Left front piece: Cast on 35-37-39-43-45-49 sts (includes 1 edge st at side and 10 front band sts towards mid front) on needle size 8 mm with Snow. Work M.1. After M.1 continue in stocking st with 10 garter sts towards mid front. At the same time when piece measures 10 cm dec at side as described for back piece = 31-33-35-39-41-45 sts. When piece measures 35 cm work 8 rows garter st on all sts. Now continue in double moss st with 1 edge st at side and 10 front band sts towards mid front in garter st. At the same time when piece measures 49-50-51-52-53-54 cm work 4 rows garter st on 5 sts at side, work remaining sts as before. On next row when piece measures 51-52-53-54-55-56 cm cast off 3 sts at side for armhole and cast off to shape the armhole as described for back piece = 26-26-28-28-30-30 sts. When piece measures 64-66-68-70-72-74 cm slip 10-10-11-11-12-12 sts towards mid front on stitch holder for neck. Cast off to shape the neckline on every other row: 2 sts 1 time and 1 st 1 time = 13-13-14-14-15-15 sts left on shoulder. Cast off when piece measures 70-72-74-76-78-80 cm. Right front piece: Like left front piece, but mirrored. Remember buttonholes! See above. Sleeve: Cast on 30-31-31-33-33-33 sts on needle size 8 mm with Snow. Work M.1. After M.1 continue in stocking st. At the same time when piece measures 10 cm inc 1 st each side, and repeat the inc on every 6-6-5-4.5-4-3 cm a total of 7-7-8-8-9-10 times = 44-45-47-49-51-53 sts. When piece measures 49-48-48-45-45-42 cm - Note! Less on the larger sizes because of longer sleeve cap and wider shoulder – cast off 3 sts each side for armhole. Cast off to shape the sleeve cap each side at beg of every row: 2 sts 1 time, 1 st 1-2-2-5-5-7 times, then cast off 2 sts each side until piece measures 55-55-55-56-56-57 cm, and now cast off 3 sts 1 time each side. Cast off remaining sts, piece measures approx 56-56-57-57-57-58 cm. Assembly: Sew shoulder seams. And set in sleeves. Sew side and sleeve seams inside 1 edge st. Sew on buttons Hood: Pick up approx 48 to 56 sts round neckline (incl sts on stitch holder) on needle size 8 mm with Snow. Note! Continue in garter st on front band sts. K 1 row from WS, at the same time inc 10 sts evenly (do not inc on front band sts). Work 4 rows garter st on all sts and now continue in double moss st with 10 garter sts each side until hood measures approx 32-32-32-34-34-34 cm. Cast off. Fold hood double and sew tog with duplicate sts at the top. |
|||||||
Diagram explanations |
|||||||
|
|||||||
 |
|||||||
Have you finished this pattern?Tag your pictures with #dropspattern or submit them to the #dropsfan gallery. Do you need help with this pattern?You'll find 21 tutorial videos, a Comments/Questions area and more by visiting the pattern on garnstudio.com. © 1982-2026 DROPS Design A/S. We reserve all rights. This document, including all its sub-sections, has copyrights. Read more about what you can do with our patterns at the bottom of each pattern on our site. |
|||||||


With over 40 years in knitting and crochet design, DROPS Design offers one of the most extensive collections of free patterns on the internet - translated to 17 languages. As of today we count 324 catalogues and 12245 patterns translated into English (UK/cm). 12245
We work hard to bring you the best knitting and crochet have to offer, inspiration and advice as well as great quality yarns at incredible prices! Would you like to use our patterns for other than personal use? You can read what you are allowed to do in the Copyright text at the bottom of all our patterns. Happy crafting!
Post a comment to pattern DROPS 109-8
We would love to hear what you have to say about this pattern!
If you want to leave a question, please make sure you select the correct category in the form below, to speed up the answering process. Required fields are marked *.