
Popular categories
Looking for a yarn?


Comments / Questions (29)
![]() Adam wrote:
Adam wrote:
Kiedy bedzie wzor po polsku?
12.09.2019 - 20:13DROPS Design answered:
Witam! Będzie dostępny w przyszłym tygodniu. Dziękujemy za zainteresowanie naszą stroną. Pozdrowienia od DROPS Design!
13.09.2019 - 08:35
![]() Cindy wrote:
Cindy wrote:
Bonjour, je suis arrivée au 11 cm et je ne comprends pas du tout la suite. Pourriez-vous m'aider svp.
28.10.2018 - 12:35DROPS Design answered:
Bonjour Cindy, à 11 cm, vous augmentez 1 m au-dessus des mailles de M.1 = 58 mailles. Au tour suivant, mettez les mailles de l'auriculaire en attente, montez 1 m au-dessus des m en attente et terminez le tour. Tricotez maintenant 4 tours sur les 48 m et tricote ensuite chaque doigt séparément - en terminant par l'auriculaire (= les m en attente). Bon tricot!
29.10.2018 - 08:20
![]() Christine wrote:
Christine wrote:
Bonjour, J'ai terminé la mitaine gauche et je tricote la droite. Quand je dois constituer l'index, le majeur, l'annulaire et l'auriculaire, est- ce que je dois commencer par l'index ? Merci pour votre aide.
23.01.2018 - 15:55DROPS Design answered:
Bonjour Christine, oui vous continuez de la même façon, mais les doigts doivent bien être du côté opposé par rapport à la 1ère mitaine (vérifiez bien avant de commencer). Bon tricot!
23.01.2018 - 18:01
![]() Christine wrote:
Christine wrote:
Bonsoir, Je viens de terminer la 1ère mitaine. Merci beaucoup pour vos explications. Grâce à elles, j'ai finalement réussi à achever la mitaine. J'ai travaillé pour la première fois en magic loop. Je trouve cette méthode formidable !
12.01.2018 - 20:58
![]() Christine wrote:
Christine wrote:
Bonjour, Je commence à tricoter les différents doigts de la mitaine et je rencontre des difficultés. J'ai regardé s'il existait un tutoriel mais je n'ai trouvé que celui concernant le pouce. Il serait très utile d'avoir une de vos vidéos magiques et si utiles ! Merci.
10.01.2018 - 11:00DROPS Design answered:
Bonjour Christine, chaque doigt se fait individuellement dans un ordre précis, en commençant d'abord par l'index (= 7 m côté paume + 1 m montée côté auriculaire + 7 m côté dessus de la main + 1 m à monter = 16 m). Tricotez 4 cm sur ces 16 m et rabattez. Tricotez ensuite chaque doigt comme indiqué en relevant des mailles le long du doigt précédent et en montant 1 m côté mailles en attente. Bon tricot!
10.01.2018 - 13:36
![]() Heidi wrote:
Heidi wrote:
Hei. Jeg kjøper vanligvis Drops garn, men hadde noe rest fra Sandnes liggende. Tenkte å bruke opp dette. Garnet er alpakka og sier pinne 3,5. Tenkte at jeg kjører på med pinne 2,5 og at pinnestørrelsen vil kompensere for at garnet er noe tykkere. Det gjør det ikke, og vantene blir alt for vise. Er det slik at jeg bare kan kutte vekk 10 masker for eksempel (og regne ut oppskriften med ferre masker), så vil vantene bli passelige?
11.11.2017 - 14:16DROPS Design answered:
Hej Heidi, Du er nødt til at få strikkefastheden til at stemme med det som står i opskriften, ellers vil vanterne blive enten for store eller for små.
13.11.2017 - 14:37
![]() Monica wrote:
Monica wrote:
Det er litt uklart for meg hvor jeg skal begynne å øke til tommel-kile, det kommer vel ann på hvor mange masker man har felt mellom merketråd og M1? Så hvor mange masker før M1 skal man begynne å øke slik at M1 blir midt oppå hånda?
13.10.2017 - 01:27DROPS Design answered:
Hei Monica. Man må felle det antallet (før M.1) slik at man kan strikke vrangborden med start og slutt med 2 vrang. Om man feller 4 masker jevnt fordelt før M.1 og 20 masker jevnt fordelt etter M.1, vil man kunne starte og slutte med 2 vrang før og etter M.1 (ikke fell maskene som har merketråden mellom seg). God Fornøyelse!
17.10.2017 - 08:32
![]() Jayne Walsh wrote:
Jayne Walsh wrote:
Hi sorry forgot to put this as a question and not a comment Hi, Don't understand this part - Knit the next row as follows: 4 sts above gusset, 21 sts, put 13 sts on a st holder for little finger, cast on 1 new st and knit the remaining 24 sts. Join and knit 4 rows over these 48 sts. So 4 + 21 +1new + 24 = 50sts and not 48sts. Or am I reading this wrong? '
23.11.2016 - 16:31DROPS Design answered:
Dear Mrs Walsh, there should be only 2 sts above gusset - correction will be added soon. Thank you. Happy knitting!
30.11.2016 - 11:53
![]() Nazzaro wrote:
Nazzaro wrote:
Peux t on m aider sur la finition des doigts, suis arrivée au 11 cm, et je ne comprends pas la suite. Merci de bien vouloir m aider
05.12.2015 - 00:19DROPS Design answered:
Bonjour Mme Nazzaro, à 11 cm, augmentez 1 m au-dessus des mailles du diagramme et terminez le tour = 60 m au total. Terminez ensuite chaque doigt séparément en divisant les mailles comme indiqué, vous tricotez ensuite un doigt après l'autre sur les mailles indiquées. Bon tricot!
07.12.2015 - 09:27Beatriz wrote:
Dear Drops, I believe something must me corrected on this pattern: After you increased 6 times, and there are 14 stitches for the gusset, there is a total of 71 stitches on the needles. If you put 16 stitches on a scrap yarn, there will be 55 stitches on the needles. In order to have the 59 stitches needed to continue the rib, you have to cast on 4 (FOUR) stitches behind the gusset, and not 2 like the pattern says. Kind regards, Beatriz
06.04.2015 - 19:17
|
|||||||||||||
DROPS 86-4 |
|||||||||||||
|
|
|||||||||||||
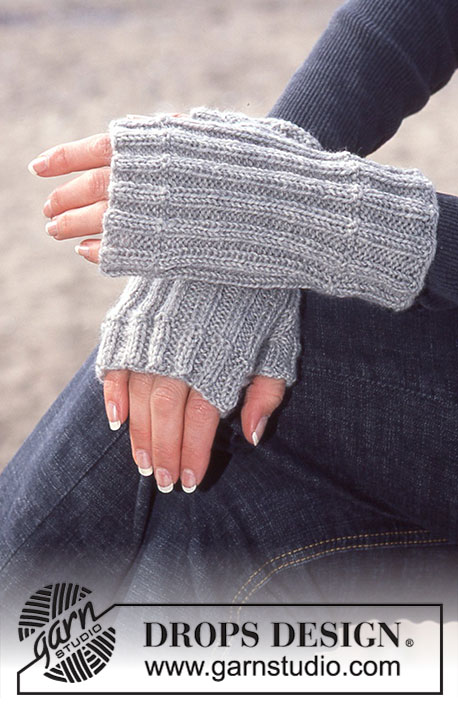
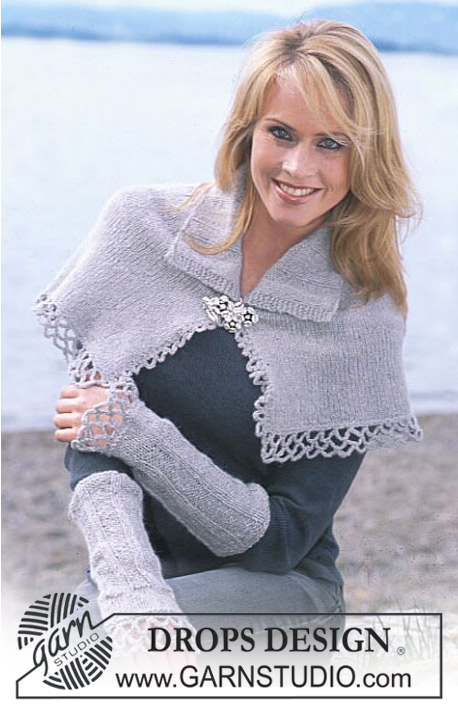
DROPS Open-finger Gloves in Alpaca
DROPS 86-4 |
|||||||||||||
|
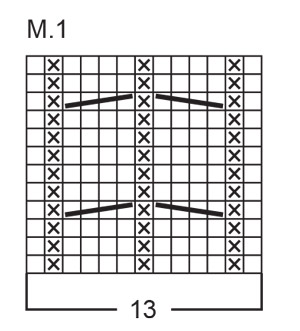
Gauge: 24 sts x 32 rows in stockinette st = 10 x 10 cm. Pattern: See the chart. 1 chart = 1 repeat. The pattern is seen from the right side. Rib: *K 2, P 2 . Repeat *-* Gloves: Cast on 83 sts evenly distributed on double-pointed needles; join and place a marker at the join. Establish pattern as follows: 18 sts rib – start row with P 2 and put a marker between these sts, then knit Pattern (= center of glove), 52 sts rib (start with a P 2). When the piece measures 24 cm K 1 row over all the rib sts (continue Pattern over the pattern sts), decreasing 24 sts evenly distributed over the rib sts = 59 sts. Now knit rib and Pattern again (begin with P 2) and measure the work from here. When the piece measures 2 cm inc for thumb gusset as follows: inc 1 st at each side of the marker, these 2 sts = thumb gusset. Continue to inc 1 st at each side of these 2 sts every other row a total of 6 times = 14 sts in the gusset (knit the increased sts in rib as you go along). On the next row put these 14 sts + 1 st each side (16 sts) on st holder and cast on 2 new sts behind gusset and join = 57 sts. Place a marker before the 2 new sts for beginning of row. Continue in rib and Pattern as established. When the piece measures 11 cm inc 1 st over Pattern = 58 sts, then knit rib over all sts. Knit the next row as follows: 2 sts above gusset, 21 sts, put 11 sts on a st holder for little finger, cast on 1 new st and knit the remaining 24 sts. Join and knit 4 rows over these 48 sts. Put the new st and 16 sts at each side of it on a st holder. Index finger: knit 15 sts and cast on 1 new st = 16 sts. Join and knit 4 cm rib, bind off. Middle finger: knit 8 sts from palm, cast on 1 new st, knit 8 sts from upper hand and pick up 3 sts at index finger = 20 sts. Join and knit 4 cm rib, bind off. Ring finger: knit the last 17 sts from st holder and pick up 3 sts at middle finger = 20 sts. Join and knit 4 cm rib, bind off. Little finger: knit the 11 sts from st holder and inc 3 sts at ring finger side = 14 sts. Join and knit 4 cm rib, bind off. Thumb: knit 16 sts from st holder with gusset, pick up 4 sts in sts behind gusset = 20 sts. Join and knit 5 rows rib, bind off. Knit the other glove om the same way, reversing shaping as follows: Inc for the thumb gusset at the end of the row. Divide for little finger as follows: knit 24 sts, put 11 sts on st holder, cast on 1 st and continue with the 21 sts + 2 sts above gusset. |
|||||||||||||
Diagram explanations |
|||||||||||||
|
|||||||||||||
 |
|||||||||||||
Have you finished this pattern?Tag your pictures with #dropspattern or submit them to the #dropsfan gallery. Do you need help with this pattern?You'll find 19 tutorial videos, a Comments/Questions area and more by visiting the pattern on garnstudio.com. © 1982-2026 DROPS Design A/S. We reserve all rights. This document, including all its sub-sections, has copyrights. Read more about what you can do with our patterns at the bottom of each pattern on our site. |
|||||||||||||


With over 40 years in knitting and crochet design, DROPS Design offers one of the most extensive collections of free patterns on the internet - translated to 17 languages. As of today we count 324 catalogues and 12290 patterns translated into English (UK/cm). 12290
We work hard to bring you the best knitting and crochet have to offer, inspiration and advice as well as great quality yarns at incredible prices! Would you like to use our patterns for other than personal use? You can read what you are allowed to do in the Copyright text at the bottom of all our patterns. Happy crafting!
Post a comment to pattern DROPS 86-4
We would love to hear what you have to say about this pattern!
If you want to leave a question, please make sure you select the correct category in the form below, to speed up the answering process. Required fields are marked *.