
Popular categories
Looking for a yarn?


Comments / Questions (29)
Adela wrote:
Detrás de los 3pts de corte ,del centro delantero,quedan las hebras (en la parte diagrama)que cruzan,Pregunto si tengo que tomar precaución especial cuando corte por el centro de los 3pts.para que no se destejan los pts del saco..Si es asi cómo se hace?Saludos
16.04.2016 - 21:11DROPS Design answered:
Hola Adela, los pts del corte no son 3, sino 5. Se trabajan como el resto de la chaqueta en pt jacquard. Hacemos 2 costuras antes de hacer el corte para que no se destejan los pts.
17.04.2016 - 09:28Adela wrote:
Al tejer el cuerpo en jersey en redondo ¿los pts de orillo los tejo en musgo hastat el final?Gracias .(me refiero a los pts que están en cada extremo de los 3 pts agregados)
14.04.2016 - 14:36DROPS Design answered:
Hola Adela. Cuando se trabaja en redondo ya no hay pts orillo. A partir de aquí el patrón entero se trabaja en pt jersey.
17.04.2016 - 09:18Adela wrote:
Es un desafio para quienes amamos realizar prendas tejidas.Me encanta La "técnica del corte y costura,es desconocida para mi, espero hacerla correctamente..Lo nombro modelo VIRGINIAFELICITACIONES.
14.04.2016 - 13:14Adela wrote:
Gracias,Entendí.Me descuidé en la lectura del primer renglón :"La chaqueta se trabaja en redondo después del elástico y al terminar se corta. ......". y seguí tejiendo en ida y vuelta.Un abrazo
14.04.2016 - 13:06Adela wrote:
"Insertar un hilo marcador en el centro de los pts de la costura a cada lado (de la manga?)( y en que lugar es el centro del delantero?). Hacer 2 costuras con máquina de coser alrededor del marcador de la sisa y del centro del delantero etc,( es el centro delantero de la parte de arriba de la manga? . Cortar para la sisa y el delantero(a dónde se corta en el delantero?que se corta? A que parte de la prenda se refiere?El video lo comprendí,no me doy cuenta en que lugar es "delantero"
12.04.2016 - 20:04DROPS Design answered:
Hola Adela, pasamos el hilo marcador por el pt central de los 3 pts nuevos montados. Por ahí vamos a cortar para la abertura del delantero. Finalmente trabajamos la abertura según el video que te envíe antes.
13.04.2016 - 09:30Adela wrote:
, CUERPO T12 : aumento los 7 pts y continua diciendo...: " montando 3pts nuevos en el centro delantero". Total,. 222pts ¿.En qué lugar exacto del centro delantero debo montar los 3pts? Los monté en el borde del delantero derecho y me parece que no puede ser así,por que están fuera del resorte..Espero tu ayuda valiosa y mientras suspendo el tejido.Gracias
12.04.2016 - 14:13DROPS Design answered:
Hola Adela, el elástico se trabaja de ida y vta. Cuando comenzamos el pt jersey aumentamos 7 pts repartidos y montamos 3 pts nuevos al final de la fila, en el centro delantero. A partir de aquí se trabaja en redondo. Los 3 pts no entran en el patrón y se trabajan en pt jersey.
13.04.2016 - 09:26Adela wrote:
. Mangas: " Insertar un hilo marcador en el centro de los pts de la costura a cada .. Cortar para la sisa y el delantero ...." a que se llama centros.Por donde pasa la costura a máquina?. El borde jersey se empalma con el de la sisa?Por favor si podes con muchos detalles.Gracias
09.04.2016 - 12:32DROPS Design answered:
La respuesta ver abajo.
10.04.2016 - 18:06
![]() Jackie Twerin wrote:
Jackie Twerin wrote:
Hur stickar jag den s.k. infodringen på ärm? Det står bara i mönstret: sätt maskor på en tråd. Inte hur många det ska vara. Vad är en infodring och ärmkulle? Förstår inte hur man ska göra med ärmen, helt enkelt. :/ "Nu sätts maskor på en tråd för ärmkulle. 3 maskor 1 gång sedan 2 m i var sida. Vad synd, fram- och bakstycket är klart och ena ärmen upp till just det där med maskorna på tråd och sticka ärmkulle. Vore tacksam för hjälp! Vänlig hälsning, Jackie Twerin Eskilstuna
24.10.2015 - 21:33DROPS Design answered:
Hej Jackie, jo du fortsätter att sätta maskor på en tråd i varje sida till arb mäter 35-39-44-48-52 cm. Sedan sätter du alla m tillbaka på st 2 cm enligt beskrivningen. Lycka till!
02.11.2015 - 11:17
![]() Hanna Vakkilainen wrote:
Hanna Vakkilainen wrote:
Ihanan villatakin ohjeesta Drops 70-6 puuttuu vielä viimeistelyt, kaulus, ja reunukset. Voisiko näistä saada vielä käännöksen?
29.02.2012 - 17:02DROPS Design answered:
Hei! Käännös on tulossa pian!
30.04.2012 - 19:54
|
|||||||||||||
Sweet Marie |
|||||||||||||
 |
 |
||||||||||||
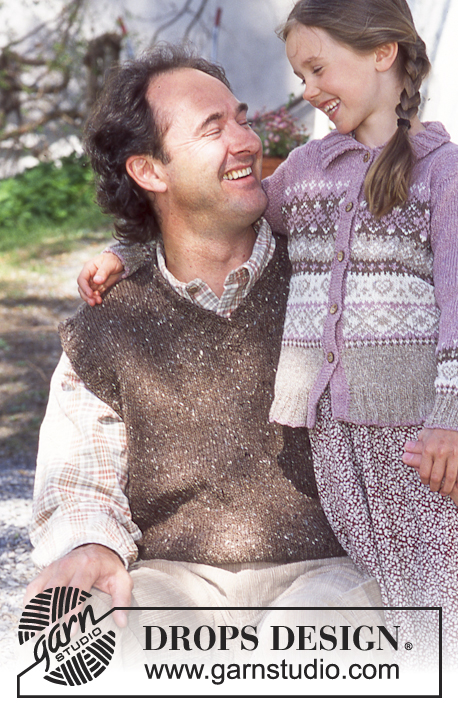
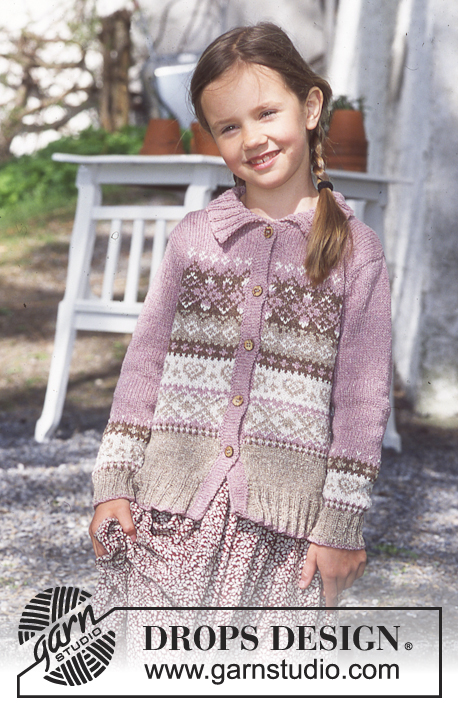
DROPS Cardigan in Silke-Tweed or BabyAlpaca Silk.
DROPS 70-6 |
|||||||||||||
|
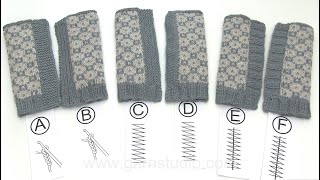
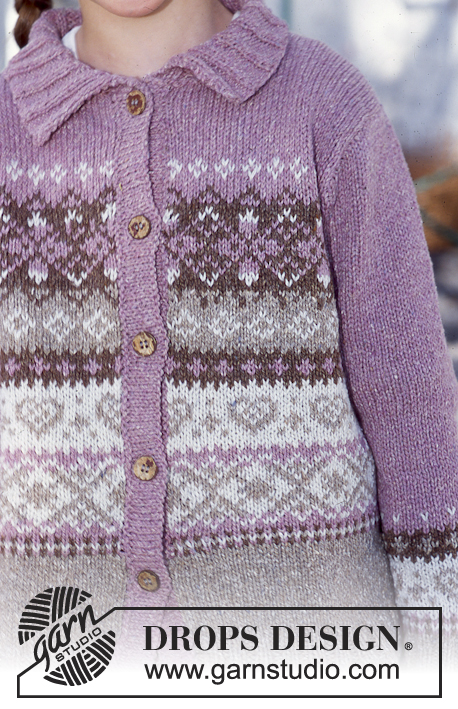
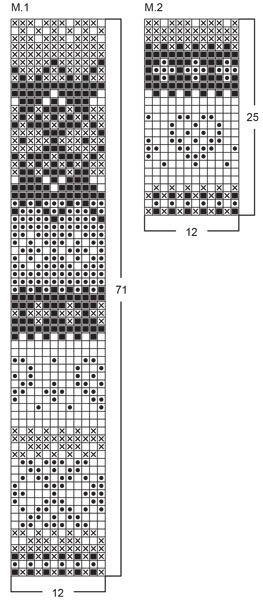
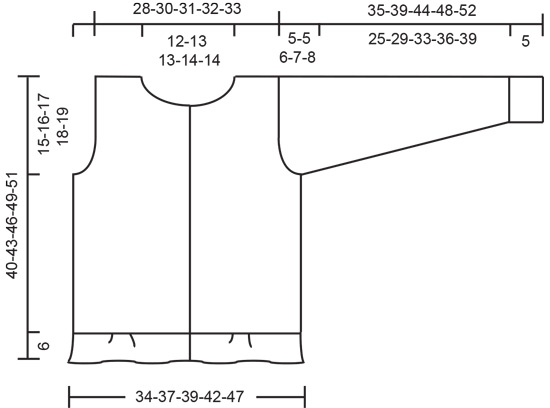
Gauge: 23 sts x 30 rows on larger needles in stockinette st = 10 x 10 cm Garter st, when knitting flat: Knit all sts, all rows. Rib-1: * K 2, P 4 *, repeat from * - *. Rib-2: * K 2, P 2 *, repeat from * - *. Pattern: See charts. The pattern is seen from the right side and is knit entirely in stockinette st. The charts are placed sideways on the page, with the bottom of the charts closest to the inside edge of the page. Body: The cardigan is knit in the round after the rib with steeks cut at center front and for armholes. Cast on 226-244-268-286-316 sts on smaller circular needles with pink /light old pink. Knit 1 row of Rib-1, keeping 1 st at each edge in garter st throughout and beginning rib with K 2 after the 1 garter st. Change to beige / light grey purple and continue in Rib-1. When the piece measures 2 cm dec all P 4 ribs to P 3 = 189-204-224-239-264 sts. When the piece measures 4 cm dec all P 3 ribs to P 2 = 152-164-180-192-212 sts. You are now knitting Rib-2. When the piece measures 6 cm change to larger circular needles and stockinette st, increasing 7-7-3-3-7 sts evenly distributed on the row and cast on 3 new sts at center front (these 3 sts + 2 edge sts = 5 steek sts which are not knit in the pattern) = 162-174-186-198-222 sts. Join and continue with beige / light grey purple in stockinette st over all sts. When the piece measures 8-9-11-12-13 cm knit Pattern 1 (except over steek sts). After Pattern 1 knit the rest with pink. At the same time when the piece measures 25-27-29-31-32 cm knit the next row as follows: 5 steek sts, 36-39-42-44-49 st for the front, bind off 6-6-6-8-10 sts for armhole, 73-79-85-89-99 sts for the back, bind off 6-6-6-8-10 sts for armhole, 36-39-42-44-49 sts for the front. On the next row cast on 5 new sts over the bound-off armhole sts at each side (these 5 sts are for the armhole steek and are not knit in the pattern) = 160-172-184-192-212 sts. Now dec 1 st for armhole at each side of the 5 armhole steek sts at each side every other row 4-5-7-8-12 times = 144-152-156-160-164 sts remain on needles. When the piece measures 36-38-41-44-45 cm bind off 17-17-17-19-19 sts (incl. 5 steek sts) at center front for neck = 127-135-139-141-145 sts and knit the rest back and forth on the needles. Now bind off at each neck edge every other row: 3 sts 1 time, 2 sts 1 time and 1 st 3-4-4-4-4 times = 111-117-121-123-127 sts remain on needles. When the piece measures 38-41-44-47-49 cm bind off the 25-27-27-29-29 sts at center back for the neck. Then bind off 2 sts at each back neck edge on the next row. Bind off the remaining 41-43-45-45-47 sts on each side (incl. 5 armhole steek sts) when the piece measures 40-43-46-49-51 cm Sleeve: Cast on 40-44-44-48-48 sts on smaller double-pointed needles with pink / light old pink. Join and place a marker at the join. Knit 1 row of Rib-2, change to beige / light grey purple and continue the rib. When the piece measures 5 cm change to larger double-pointed needles. Continue with Pattern 2 - centering the pattern on sleeves. At the same time when the piece measures 7 cm inc 1 st each side of marker 12-12-15-16-18 times: Size 3/4: alternately every 5th and 6th row. Size 5/6: alternately every 6th and 7th row. Sizes 7/8, 9/10 and 11/12: every 6 rows = 64-68-74-80-84 sts. After Pattern 2 is complete, knit the rest with pink / light old pink. When the piece measures 30-34-38-41-44 cm bind off 3 sts each side of marker and knit back and forth on needles. Now put sts on a st holder at each side for sleeve caps every other row: 3 sts 1 time, then 2 sts at each side until the piece measures 35-39-44-48-52 cm Put all sts from st holders back on the same needles and knit 2 cm reverse stockinette st back and forth on needles (for seam allowance over cut edge on body), increasing 12 sts evenly distributed on first row. Bind off. Assembly: Sew a marker thread in the center of the steek sts on either side and at the center front. Sew two machine seams around the marker thread, 1st seam = 1/2 st from the marker thread, 2nd seam = 1/2 st from first seam. Cut steeks for armholes and at the center front. Left button band: Pick up approx. 110 to 135 sts along left front on smaller needles with pink / light old pink. P 1 row (seen from the right side) then continue in stockinette st. When button band measures 2 cm P 1 row (seen from the right side) for folding edge, then knit 2 cm stockinette st, bind off. Right button band: Knit the same as the left, but after 1 cm make 5-5-6-6-6 buttonholes evenly distributed along button band - put bottom buttonhole approx. 9 cm from bottom edge and top buttonhole approx. 1 cm from top edge. 1 buttonhole = bind off 2 sts and cast on 2 new sts over the bound-off sts on on the next row. Make corresponding buttonholes on facing after folding edge. Fold button bands against wrong side and sew in place. Collar: Pick up from right side: approx. 68 to 80 sts (divisible by 4) around the neck (including over button bands) on smaller circular needles with pink / light old pink. K 1 row, then knit Rib-2, keeping 1 st at each edge in garter st throughout and beginning with K 2 after the edge st. When the collar measures 2.5 cm inc all P 2 ribs to P 3 and when the collar measures 5 cm inc all P 3 ribs to P 4. Continue in Rib-1 until the collar measures 8 cm ; bind off in pattern. Sew in sleeves. Fold seam allowance from sleeve cap over cut edge on Body and sew in place. Sew on buttons. |
|||||||||||||
Diagram explanations |
|||||||||||||
|
|||||||||||||
 |
|||||||||||||
 |
|||||||||||||
Have you finished this pattern?Tag your pictures with #dropspattern or submit them to the #dropsfan gallery. Do you need help with this pattern?You'll find 23 tutorial videos, a Comments/Questions area and more by visiting the pattern on garnstudio.com. © 1982-2026 DROPS Design A/S. We reserve all rights. This document, including all its sub-sections, has copyrights. Read more about what you can do with our patterns at the bottom of each pattern on our site. |
|||||||||||||


With over 40 years in knitting and crochet design, DROPS Design offers one of the most extensive collections of free patterns on the internet - translated to 17 languages. As of today we count 324 catalogues and 12290 patterns translated into English (UK/cm). 12290
We work hard to bring you the best knitting and crochet have to offer, inspiration and advice as well as great quality yarns at incredible prices! Would you like to use our patterns for other than personal use? You can read what you are allowed to do in the Copyright text at the bottom of all our patterns. Happy crafting!
Post a comment to pattern DROPS 70-6
We would love to hear what you have to say about this pattern!
If you want to leave a question, please make sure you select the correct category in the form below, to speed up the answering process. Required fields are marked *.