
Popular categories
Looking for a yarn?


Comments / Questions (88)
![]() Anna Gilardi wrote:
Anna Gilardi wrote:
Buonasera , alla fine del secondo blocco di aumenti A3A4 mi trovo correttamente con 208 punti . Il blocco successivo, molto sintetico, mi dice di procedere x 5 volte con gli intrecci e 6 giri a coste tra ogni aumento . Così facendo aumenterei 32 punti per ogni giro = 160 punti , non arriverei ai 304 indicati nel pattern , ma molti di più . Potete spiegarmi?
04.01.2025 - 19:02DROPS Design answered:
Buonagiorno Anna, nelle spiegazioji viene indicato di lavorare fino a quando gli intrecci sono stati lavorati per un TOTALE di 5 volte: deve pertanto lavorare ancora 3 volte gli intrecci. Buon lavoro!
06.01.2025 - 09:05
![]() Madelen Valentina Schurmeyer wrote:
Madelen Valentina Schurmeyer wrote:
Jeg har strikket A.3 og A.4 en gang, og så 6 omganger etter dette som vanlig (raglan). Det står at man skal fortsette å strikke økning som vist i A.3 og A.4, men ingenting om hvor mange masker det skal være imellom hver flette, etter den første omgangen. Jeg skal strikke etter disse diagrammene 5 ganger til, men hvor mange masker skal det være imellom flettene i hver omgang?
30.12.2024 - 19:03DROPS Design answered:
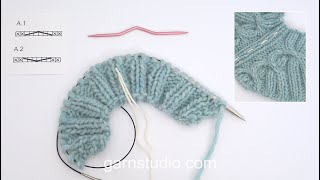
Hei Madelen. Det står kun at de nye maskene skal strikkes i vrangbord, ikke hvor mange masker det er mellom fletttene i de forskjellige størrelsene, men ta en titt på vårt svar til Aina og Maj under, ( fletten (A.3) starter 11 masker før merketrådene og fletten (A.4) starter 1 maske etter merketrådene). mvh DROPS Design
02.01.2025 - 13:54
![]() Sara Roger wrote:
Sara Roger wrote:
Bonjour et merci pour votre précédente aide. J’ai bien avancé, j’ai 216m et ai tricoté les 5 rangs. Je devrais faire « Continuer en augmentant comme indiqué dans A.3 et A.4, jusqu'à ce qu'on ait croisé 5-5-6-7-7-7 fois les mailles au total en hauteur (on a 6-6-6-5-5-5 tours de côtes entre chaque augmentation). On a 304-304-336-376-376-376 mailles » mais je ne comprends rien. Dois-je travailler qu’1 coté ?un peu plus de détail ne serait pas de refus. Merci d’avance
23.12.2024 - 12:05DROPS Design answered:
Bonjour Mme Roger, quand vous avez 216 mailles, vous avez croisé les mailles déjà 2 fois (2 fois les diagrammes/torsades); vous tricotez maintenant 5 tours de côtes puis ainsi: (A.3/A.4 et en côtes comme avant puis 5 tours de côtes) et vous tricotez 5 fois au total de (à), vous allez augmenter 32 mailles à chaque fois x 5 fois = 160 augmentations + les 216 mailles = vous avez maintenant 376 mailles sur l'aiguille. Bon tricot!
02.01.2025 - 10:37
![]() Aina wrote:
Aina wrote:
Har samma problem som Maja. Stickar st M och har också 208 M. Förklara gärna hur man skall sticka första varvet så att man kommer rätt till resp. märktråd.
21.12.2024 - 16:46DROPS Design answered:
Hei Aina. Se vårt svar til Maj under. Husk at ved hver flette/økninger strikkes det flere masker i vrangborden før man strikker fletten igjen. Fletten (A.3) starter 11 masker før merketrådene og fletten (A.4) starter 1 maske etter merketrådene. mvh DROPS Design
02.01.2025 - 13:49
![]() Maj wrote:
Maj wrote:
Stickar st M. Har 208 m . Fr bakstycket till första märktråden har jag 28 m, till nästa 48,56 till nästa, 48 till nästa och 28 till sista märtktråden. Tillsammans 208m. Stickat 6 varv . Vid nästa ökning stickas 13 m resår och därefter A3. Har 3 m kvar till märktråden. Vad är fel?
21.12.2024 - 12:07DROPS Design answered:
Hei Maj. Da du strikket forrige omgang (1. omgang med A.3 og A.4) økte du masker, disse økte maskene / nye maskene i hver flette strikkes inn i vrangborden. Så når du skal strikke neste flette, strikkes det flere masker vrangbord (ikke 13 masker, men 17 masker). 17 masker vrangbord + A.3 (10 masker) + 1 maske rett før 1. merketråd = 28 masker før 1. merketråd. mvh DROPS Design slik at nå rdu skal strikke neste omgang med flett
02.01.2025 - 13:44
![]() Sara Roger wrote:
Sara Roger wrote:
Je ne comprends pas vos calculs de marquage des fils marqueurs. Lorsque que je commence à compter à partir du milieu du devant, la seconde marque (bras) est à 28m, lorsque je suis les explications je dois tricoter 7 m puis A.1, 2 m endroit (le fil marqueur se trouve entre ces 2 m) Pourriez-vous me dire si tout est correct et me donner plus d’informations Je vous remercie d’avance Joyeuses fêtes de fin d’année Mme Roger
19.12.2024 - 13:33DROPS Design answered:
Bonjour Mme Roger, les tours commencent au milieu dos: vous aurez ainsi 7 m en côtes (3 dernières tailles), A.1, 2 m end, A.2, 2 m end, A.1, 2 m end (avec le fil marqueur entre ces 2 mailles), A.2, 14 m en côtes, A.1, 2 m end (avec le fil marqueur entre ces 2 mailles), A.2, 2 m end, A.1, 2 m end (avec le fil marqueur entre ces 2 mailles), A.2, 7 m en côtes., soit: 7+10+2+10+2+10+2+10+14++10+2+10+2+10+2+10+7= 120 mailles. En même temps, en tricotant A.1 et A.2, vous avez augmenté 8 mailles dans chacune des 8 torsades (4 dans chacun des 4 A.1 + 4 dans chacun des 4 A.2) soit 64 mailles au total + les 120 mailles = 184 mailles. Bon tricot!
19.12.2024 - 16:24
![]() Kjerstin Schön wrote:
Kjerstin Schön wrote:
Förstår inte mönstret när jag har gjort till 208 maskor så ska jag öka som tidigare jag gjort med A3 Och A 4, får det inte att stämma, hur ska jag räkna, kommer inte fram till märktråd efter A3??
12.12.2024 - 11:12DROPS Design answered:
Hei Kjerstin. Når du har 208 masker, strikker du 6 omganger vrangbord som før (2 vrang / 2 rett), de nye maskene i hver flette strikkes inn i vrangborden. Så fortsetter du med økningene som vist i A.3 / A.4 til du har flettet det antall ganger i den str. du strikker. Se gjerne hjelpevideoen, Hvordan øke masker i en flette, om du trenger hjelp til økningene. Evnt skriv en mer detaljert beskrivelse hva du trenger hjelp til og hvilken størrelse du strikker. mvh DROPS Design
16.12.2024 - 08:34
![]() Lisbeth Sundahl wrote:
Lisbeth Sundahl wrote:
Hej, jeg er nået til det sted, hvor man skal lave A.6 for første gang. Der skal sættes 4 masker bag arbejdet, strikkes 2 ret, 2 vrang, 2 ret fra snoningspinden. Hvad med de sidste 2 masker på snoningspinden???
24.11.2024 - 14:39DROPS Design answered:
Hej Lisbeth, de 6 midterste masker strikkes således: sæt 4 masker bag arbejdet, strik de sidste 2, og strik nu de 4 fra snoningspinden 2vr, 2 ret :)
27.11.2024 - 14:14
![]() Ida wrote:
Ida wrote:
Patroon; Ga verder met meerderen volgens A.3 en A.4,... ( Ik moet in dit blok van 208 tot 336 steken komen.) Help. Ik begrijp deze instructie niet. Hoe verder? Direct gaan kabelen klopt ieder geval niet met het patroon op de foto.
18.11.2024 - 09:50DROPS Design answered:
Dag Ida,
Ja je gaat daar verder zoals aangegeven met de meerderingen totdat je in totaal 6 keer hebt gekabeld. Na die 6 keer heb je 336 steken op de naald. (Tussen het kabelen brei je dus steeds 6 naalden boordsteek.)
21.11.2024 - 20:35
![]() Joan Conca wrote:
Joan Conca wrote:
How many yards of alpaca yarn & of mohair yarn do I need to purchase to make a size Large White Heron sweater?
14.11.2024 - 02:26DROPS Design answered:
Hi Joan, The Drops Alpaca yarn skeins are approx. 183 yards and you need 8 skeins = 1464 yds. The Drops Kid Silk are 230 yds per skein and you need 13 skeins = 2990 yds. Happy knitting!
14.11.2024 - 06:49
|
||||||||||||||||||||||
White Heron#whiteheronsweater |
||||||||||||||||||||||
 |
 |
|||||||||||||||||||||
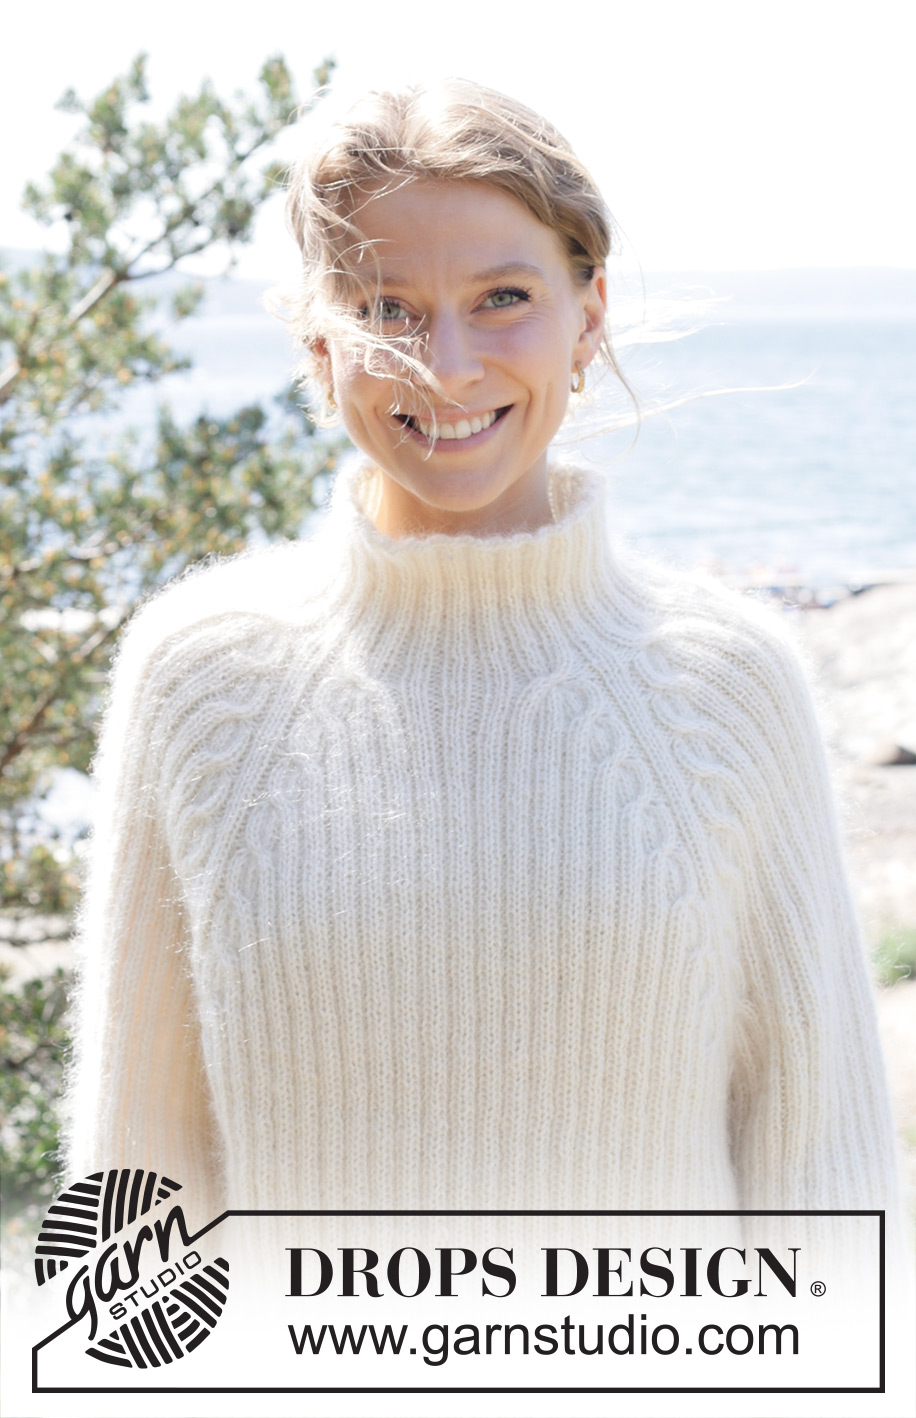
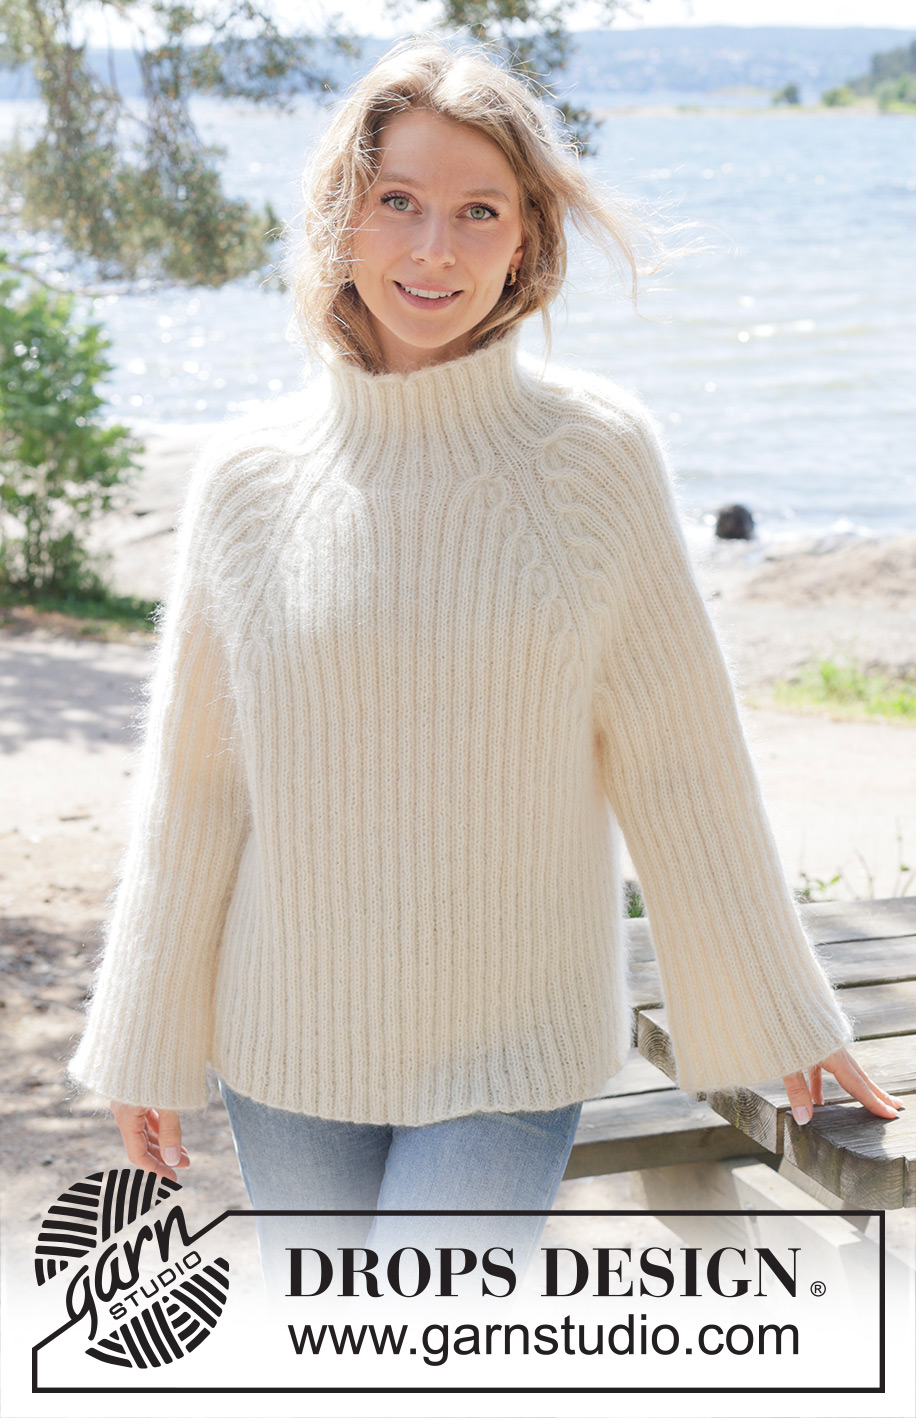
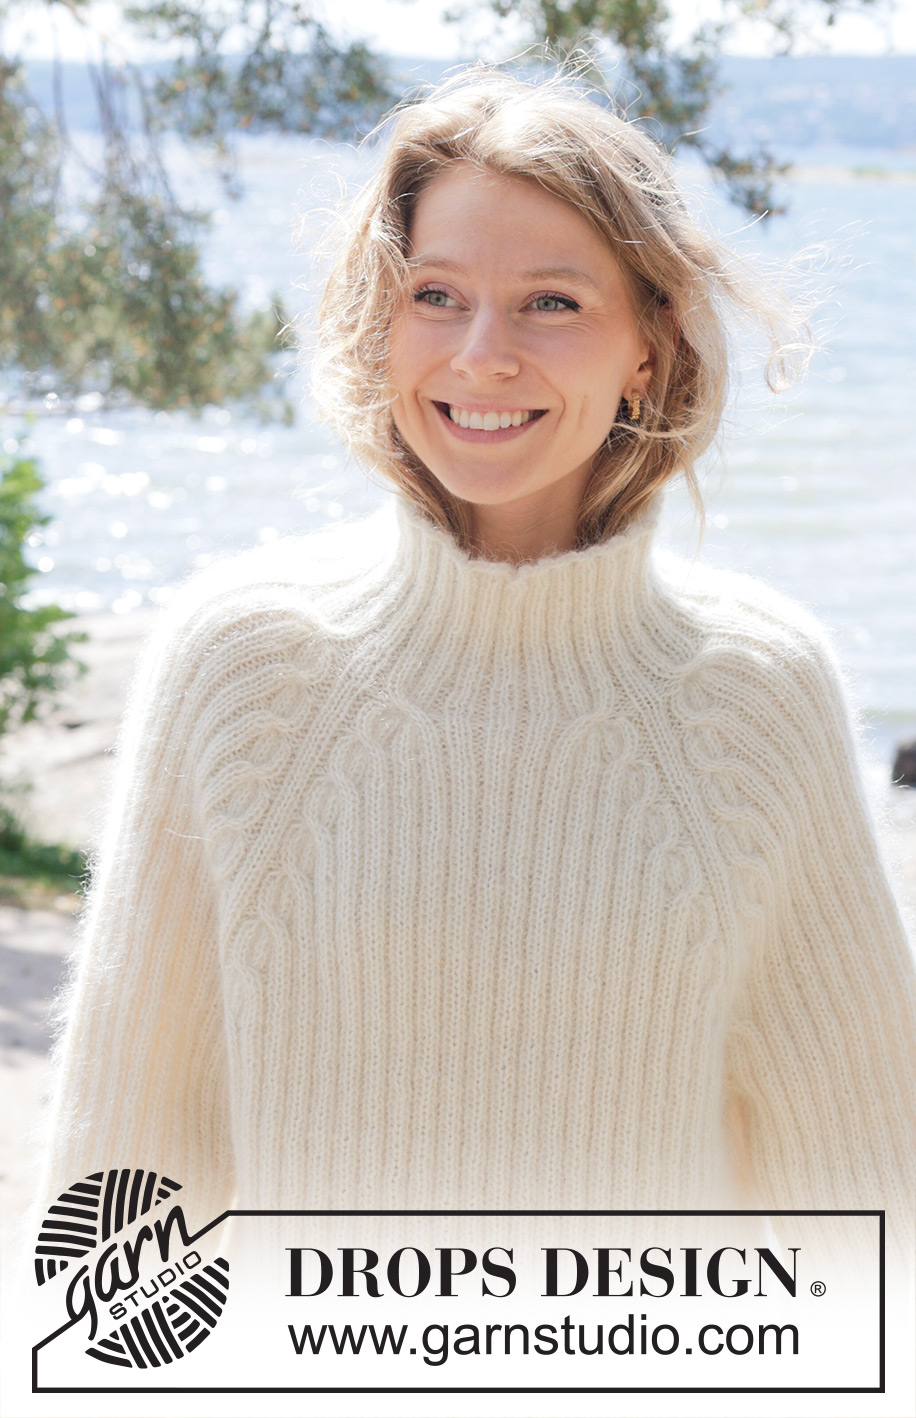
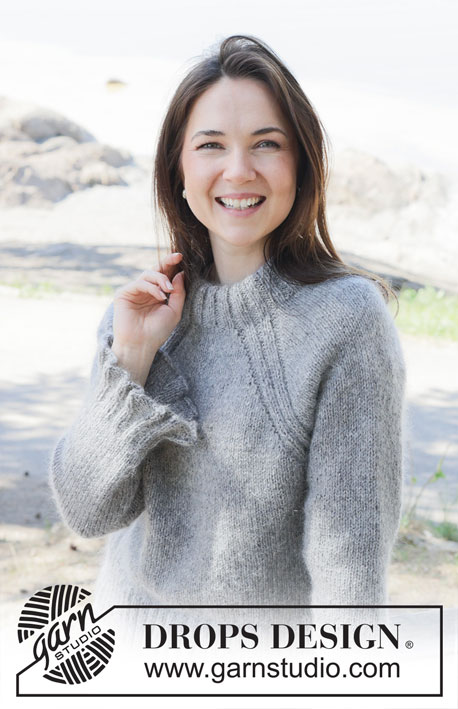
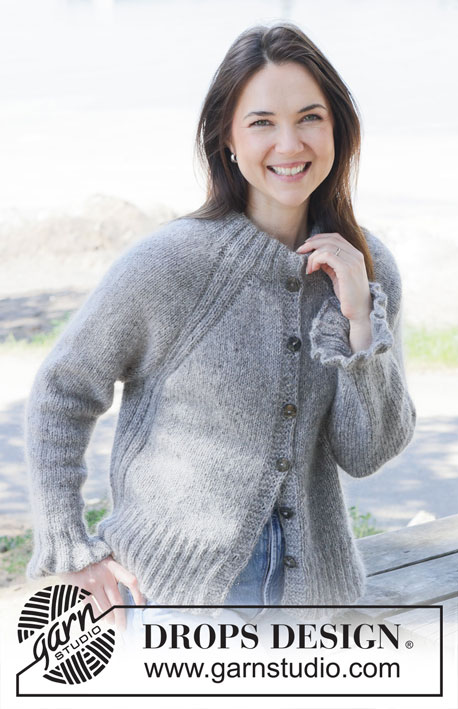
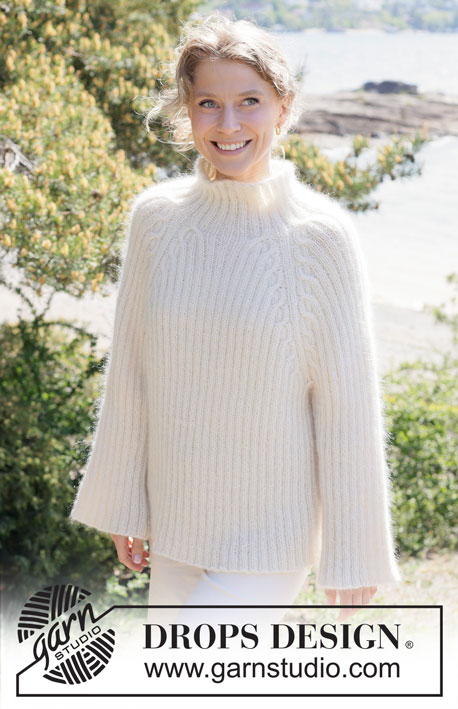
Knitted jumper in 1 strand DROPS Alpaca and 2 strands DROPS Kid-Silk. The piece is worked top down with cables, raglan and rib. Sizes S - XXXL.
DROPS 254-7 |
||||||||||||||||||||||
|
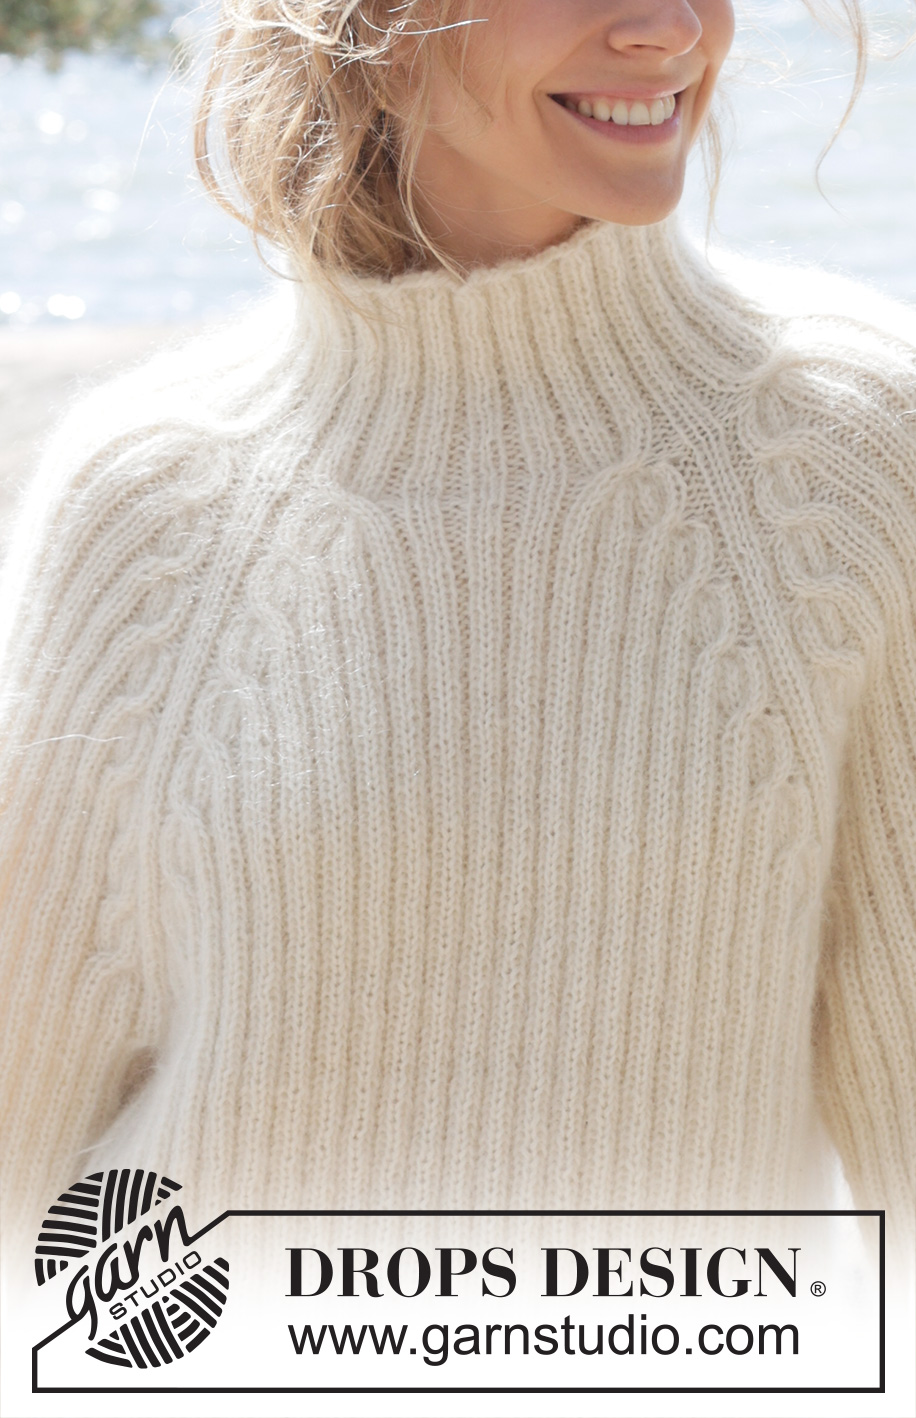
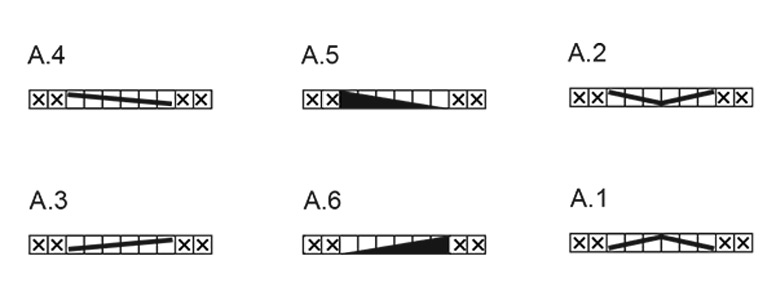
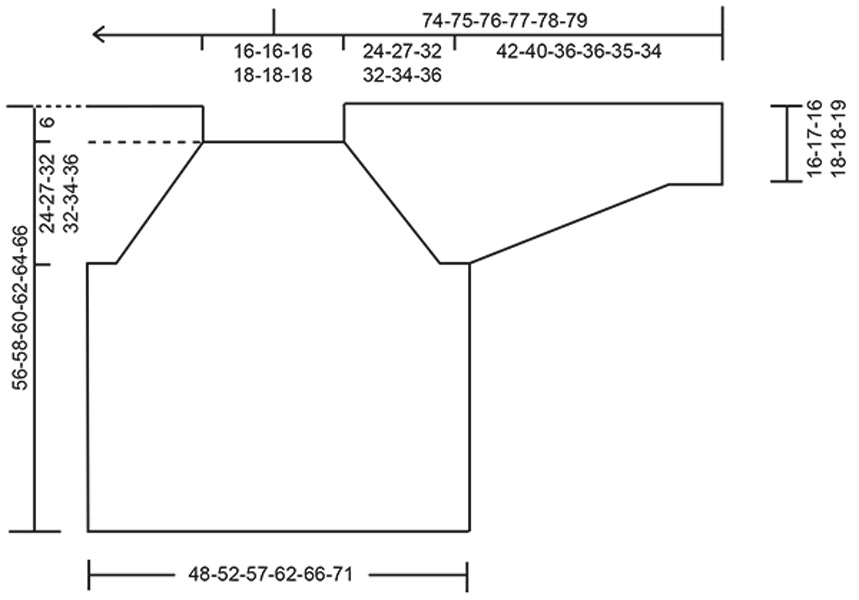
------------------------------------------------------- EXPLANATIONS FOR THE PATTERN: ------------------------------------------------------- PATTERN: See diagrams A.1 to A.6. DECREASE TIP (mid-under sleeve): Decrease alternately before and after the marker-thread. Decrease before marker-thread: Work until there are 6 stitches left before the marker-thread, slip 1 stitch, knit 4 together, pass the slipped stitch over = 4 decreased stitches. Decrease after marker-thread: Purl 1, knit 5 together = 4 decreased stitches. ------------------------------------------------------- START THE PIECE HERE: ------------------------------------------------------- JUMPER – SHORT OVERVIEW OF THE PIECE: The pattern uses both long and short needles; start with the length which fits the number of stitches and change when necessary. The neck and yoke are worked in the round with circular needle, top down and from mid back . When the yoke is finished, it is divided for the body and sleeves and the body continued in the round, while the sleeves wait. The sleeves are worked top down, in the round. NECK: Cast on 112-112-112-120-120-120 stitches with circular needle size 4.5 mm, 1 strand DROPS Alpaca and 2 strands DROPS Kid-Silk (= 3 strands). Knit 1 round then work rib as follows: Sizes S-M-L: Knit 1, * purl 2, knit 2 *, work from *-* until there are 3 stitches left, purl 2, knit 1. Sizes XL-XXL-XXXL: Purl 1, * knit 2, purl 2 *, work from *-* until there are 3 stitches left, knit 2, purl 1. Work this rib for 12 cm. Insert 4 marker-threads, without working the stitches, as follows. The threads are used when increasing for raglan and each thread is inserted between 2 stitches. Count 16-16-16-18-18-18 stitches (half back piece) insert 1 marker-thread, count 24 stitches (sleeve), insert 1 marker-thread, count 32-32-32-36-36-36 stitches (front piece), insert 1 marker-thread, count 24 stitches (sleeve), insert 1 marker-thread, there are 16-16-16-18-18-18 stitches left after the last marker-thread (half back piece). The beginning of the round is mid-back. Insert 1 marker after the first 56-56-56-60-60-60 stitches (mid-front), the piece is measured from here. Now work rib, increase at each marker-thread and work cables in A.1 and A.2 as follows: Work 5-5-5-7-7-7 ribbed stitches, A.1, knit 2 (marker-thread sits between these 2 stitches) A.2, knit 2, A.1, knit 2 (marker-thread sits between these 2 stitches) A.2, 10-10-10-14-14-14 ribbed stitches, A.1, knit 2 (marker-thread sits between these 2 stitches) A.2, knit 2, A.1, knit 2 (marker-thread sits between these 2 stitches) A.2, 5-5-5-7-7-7 ribbed stitches. After this round you have increased 64 stitches - 8 increased stitches in each cable (on each side of each marker-thread) = 176-176-176-184-184-184 stitches. Work 6-6-6-5-5-5 rounds of rib as before, working the new stitches into the rib. Work 13-13-13-15-15-15 ribbed stitches, A.3, knit 2 (marker-thread sits between these 2 stitches) A.4, 18 ribbed stitches, A.3, knit 2 (marker-thread sits between these 2 stitches) A.4, 26-26-26-30-30-30 ribbed stitches, A.3, knit 2 (marker-thread sits between these 2 stitches), A.4, 18 ribbed stitches, A.3, knit 2 (marker-thread sits between these 2 stitches) A.4, 13-13-13-15-15-15 ribbed stitches. After this round you have increased 32 stitches - 4 increased stitches in each cable (on each side of the marker-threads) = 208-208-208-216-216-216 stitches. Work 6-6-6-5-5-5 rounds of rib as before, working the new stitches into the rib. Continue increasing according to A.3 and A.4, until you have cabled a total of 5-5-6-7-7-7 times (with 6-6-6-5-5-5 rounds of rib between each increase). There are 304-304-336-376-376-376 stitches. Work 6-6-6-5-5-5 rounds of rib as before, working the new stitches into the rib. Work 29-29-33-39-39-39 ribbed stitches as before, A.3, knit 2 (marker-thread sits between these 2 stitches) A.5, 50-50-58-66-66-66 ribbed stitches, A.6, knit 2 (marker-thread sits between these 2 stitches) A.4, 58-58-66-78-78-78 ribbed stitches, A.3, knit 2 (marker-thread sits between these 2 stitches) A.5, 50-50-58-66-66-66 ribbed stitches, A.6, knit 2 (marker-thread sits between these 2 stitches) A.4, 29-29-33-39-39-39 ribbed stitches. After this round you have increased 16 stitches - 4 increased stitches in each cable on the front and back pieces. The increases on the sleeves are finished and the cables have been worked on the sleeves without increases = 320-320-352-392-392-392 stitches. Work 6-6-6-5-5-5 rounds of rib as before, working the new stitches into the rib. Work 33-33-37-43-43-43 ribbed stitches as before, A.3, knit 2 (marker-thread sits between these 2 stitches) A.5, 50-50-58-66-66-66 ribbed stitches, A.6, knit 2 (marker-thread sits between these 2 stitches) A.4, 66-66-74-86-86-86 ribbed stitches, A.3, knit 2 (marker-thread sits between these 2 stitches) A.5, 50-50-58-66-66-66 ribbed stitches, A.6, knit 2 (marker-thread sits between these 2 stitches) A.4, 33-33-37-43-43-43 ribbed stitches. After this round you have increased 16 stitches - 4 increased stitches in each cable on the front and back pieces, none on the sleeves = 336-336-368-408-408-408 stitches. Work 6-6-6-5-5-5 rounds of rib as before, then increase 1-2-3-3-4-5 more times on the front and back pieces; no increases on the sleeves = 352-368-416-456-472-488 stitches. You have cabled a total of 8-9-11-12-13-14 times. Continue working rib and cables, without further increases until the yoke measures 24-27-32-32-34-36 cm, finishing after at least 6-6-6-5-5-5 rounds of rib after the last cable-round. Now divide for the body and sleeves as follows: Work the first 52-56-64-70-74-78 stitches (half back piece), place the next 72-72-80-88-88-88 stitches on a thread for the sleeve, cast on 20-24-20-20-24-28 stitches (in side under sleeve), work 104-112-128-140-148-156 stitches (front piece), place the next 72-72-80-88-88-88 stitches on a thread for the sleeve, cast on 20-24-20-20-24-28 stitches (in side under sleeve), work the remaining 52-56-64-70-74-78 stitches (half back piece). BODY: = 248-272-296-320-344-368 stitches. Work rib in the round over all stitches, until the piece measures 50-52-54-56-58-60 cm from the marker mid-front. Cast off. The jumper measures approx. 56-60-62-64-66-68 cm from the shoulder. SLEEVES: Place the 72-72-80-88-88-88 sleeve-stitches from the thread on one side of the piece on circular needle size 4.5 mm and knit up 1 stitch in each of the 20-24-20-20-24-28 stitches cast on under the sleeve = 92-96-100-108-112-116 stitches. Work rib in the round for 4 cm. Now decrease 4 stitches before the marker-thread. Repeat this decrease, alternately before and after the marker-thread every 8-8-6-6-6-6 cm a total of 2-2-4-4-4-4 times - read DECREASE TIP = 84-88-84-92-96-100 stitches. Continue working until the sleeve measures 42-40-36-36-35-34 cm. Cast off. |
||||||||||||||||||||||
Diagram explanations |
||||||||||||||||||||||
|
||||||||||||||||||||||
 |
||||||||||||||||||||||
 |
||||||||||||||||||||||
Have you finished this pattern?Tag your pictures with #dropspattern #whiteheronsweater or submit them to the #dropsfan gallery. Do you need help with this pattern?You'll find 27 tutorial videos, a Comments/Questions area and more by visiting the pattern on garnstudio.com. © 1982-2026 DROPS Design A/S. We reserve all rights. This document, including all its sub-sections, has copyrights. Read more about what you can do with our patterns at the bottom of each pattern on our site. |
||||||||||||||||||||||


With over 40 years in knitting and crochet design, DROPS Design offers one of the most extensive collections of free patterns on the internet - translated to 17 languages. As of today we count 324 catalogues and 12290 patterns translated into English (UK/cm). 12290
We work hard to bring you the best knitting and crochet have to offer, inspiration and advice as well as great quality yarns at incredible prices! Would you like to use our patterns for other than personal use? You can read what you are allowed to do in the Copyright text at the bottom of all our patterns. Happy crafting!
Post a comment to pattern DROPS 254-7
We would love to hear what you have to say about this pattern!
If you want to leave a question, please make sure you select the correct category in the form below, to speed up the answering process. Required fields are marked *.