
Popular categories
Looking for a yarn?


Comments / Questions (88)
![]() Marián Cabréjas wrote:
Marián Cabréjas wrote:
Country flag Marián Cabréjas skrev: Hej, Efter det att jag ökat och flätat A3-A4 första gången, skall man göra samma i 5 gånger (M), men…hur många maskor mellan flätorna? ( första gången är det 13, 18, 26, 18,13) ??
06.02.2025 - 19:17DROPS Design answered:
Hej, du gør det samme sted i forhold til mærketråden hver gang, og du får 2 nye masker på forstykket, 2 nye masker på ærmerne og 2 nye masker på rygstykket for hver gang du har taget de 8 masker ud :)
18.02.2025 - 09:31
![]() Marián Cabréjas wrote:
Marián Cabréjas wrote:
Hej, Efter det att jag ökat och flätat A3-A4 första gången, skall man göra samma i 5 gånger (M), men…hur många maskor mellan flätorna? ( första gången är det 13, 18, 26, 18,13) ??
02.02.2025 - 18:45
![]() Erika wrote:
Erika wrote:
Hallo, Ik zit aan het deeltje waar je van 336 steken naar 368 steken moet gaan. Ik moet 2 keer meerderen op de voor en achterpanden, in totaal goed voor 32 steken. Ik vraag me af of dit dan nog met kabels moet? En zo ja, welke kabels? Alvast bedankt.
28.01.2025 - 18:09DROPS Design answered:
Dag Erika,
Ja, je breit daar inderdaad de kabels zoals je eerder ook deed. Dit staat ook in de beschrijving van dat deel.
19.02.2025 - 10:03
![]() Rossana wrote:
Rossana wrote:
Buongiorno. Quest' modello è molto bello .È possibile avere le istruzioni per eseguirlo con i ferri dritti? Ho difficoltà ad usare i ferri circolari. Grazie
26.01.2025 - 22:22DROPS Design answered:
Buonasera Rossana, questo modello è stato progettato per essere lavorato in tondo: se preferisce lavorarlo in piano può riadattare il modello e aggiungere una maglia per lato per la cucitura. Buon lavoro!
29.01.2025 - 23:04
![]() Rossana wrote:
Rossana wrote:
Buongiorno. Quest' modello è molto bello .È possibile avere le istruzioni per eseguirlo con i ferri dritti? Ho difficoltà ad usare i ferri circolari. Grazie
26.01.2025 - 22:20DROPS Design answered:
Buonasera Rossana, questo modello è stato progettato per essere lavorato in tondo: se preferisce lavorarlo in piano può riadattare il modello e aggiungere una maglia per lato per la cucitura. Buon lavoro!
29.01.2025 - 23:03
![]() MV wrote:
MV wrote:
Ik verduidelijk: Moet ik het boordpatroon volgen of moet ik de twee averechte steken die zich aandienen na de twee rechte steken die ik op de kabelnaald zet, toch recht breien (hoewel dit niet het boordsteekpatroon is) omdat ze deel uitmaken van een nieuwe kabel (A5)?
23.01.2025 - 20:59DROPS Design answered:
Dag MV,
Sorry, ik was de draad even kwijt, je moet inderdaad de uitleg van het symbool volgen dus nadat je 2 steken op een kabelnaald hebt gezet, breien volgends de uitleg: 2 recht, 2 averecht, dan de 2 recht van de kabelnaald. Verder heb ik bij de ontwerpafdeling een vraag neergelegd over A.6 omdat het volgens bij niet klopt dat je daar eerst 4 steken op een kabelnaald moet zetten (ik denk dat het 2 moet zijn). Hopelijk krijg ik snel antwoord.
26.01.2025 - 19:18
![]() Mona Versyp wrote:
Mona Versyp wrote:
Bij mij wordt het boordsteekpatroon niet voortgezet, nadat ik 2 steken op de kabelnaald heb gezet zijn de volgende twee averecht.
23.01.2025 - 20:46
![]() Mona Versyp wrote:
Mona Versyp wrote:
Ik ben bezig met het breien van de A5. Ik plaats twee steken op een kabelnaald voor het werk, waarna ik 2 rechte steken moet breien, vervolgens 2 averechte en dan 2 steken recht van de kabelnaald. Op de kabelbaan staan echter twee rechte steken, dan is de steek na de kabelnaald een averechtse en geen rechte. Klopt dit? Moet ik deze averechte steken dan toch recht breien?
23.01.2025 - 20:25DROPS Design answered:
Dag Mona,
Dit klopt, nadat je de 2 steken op de kabelnaald hebt gezet brei je 2 recht en dan 2 averecht en dan weer de 2 steken van de kabelnaald recht. Op deze manier wordt het boordsteekpatroon voortgezet.
23.01.2025 - 20:44
![]() Oma Myriam wrote:
Oma Myriam wrote:
Beste, dank u voor uw antwoord, maar op een rondbreinaald, waar is het begin van de naald? In de uitleg staat, vanaf midden voor wordt het werk gemeten? Maar als ik dat als begin naald neem, dan komt de markeerdraad NIET tussen de twee steken. Is er een filmpje? DROPS Design answered: vanaf het begin van de naald brei je eerst 5 of 7 steken (afhankelijk van je maat) in boordsteek, dan brei je A.1, dan 2 recht en tussen deze 2 recht zit de eerste markeerdraad.
23.01.2025 - 12:39DROPS Design answered:
Dag Myriam,
Het begin van de naald is waar je de naald steeds begint en eindigt en dus waar je ook de draad nog ziet hangen van het opzetten, als het goed is. Dit hoeft inderdaad niet perse midden voor te zijn, maar in dit geval is het een aantal steken voor de raglanlijn.
23.01.2025 - 20:40
![]() Oma Myriam wrote:
Oma Myriam wrote:
Beste, breek al meer dan een dag het hoofd en dito probeersels om beschrijving van patroon z-1039 uit te voeren. Na het plaatsen van de 4 markeerdraden snap ik niet waar ik die 5-5-5.... boordsteken moet beginnen tellen om de A1 en A2 kabels juist te beginnen, zodat de markeerdraad tussen de twee steken na de kabel komen. Heb zowat alle combinaties geprobeerd, maar lukt nooit. Kan iemand verduidelijken waar ik de mist inga? Bedankt.
22.01.2025 - 18:49DROPS Design answered:
Dag Myriam,
Vanaf het begin van de naald brei je eerst 5 of 7 steken (afhankelijk van je maat) in boordsteek, dan brei je A.1, dan 2 recht en tussen deze 2 recht zit de eerste markeerdraad.
22.01.2025 - 21:31
|
||||||||||||||||||||||
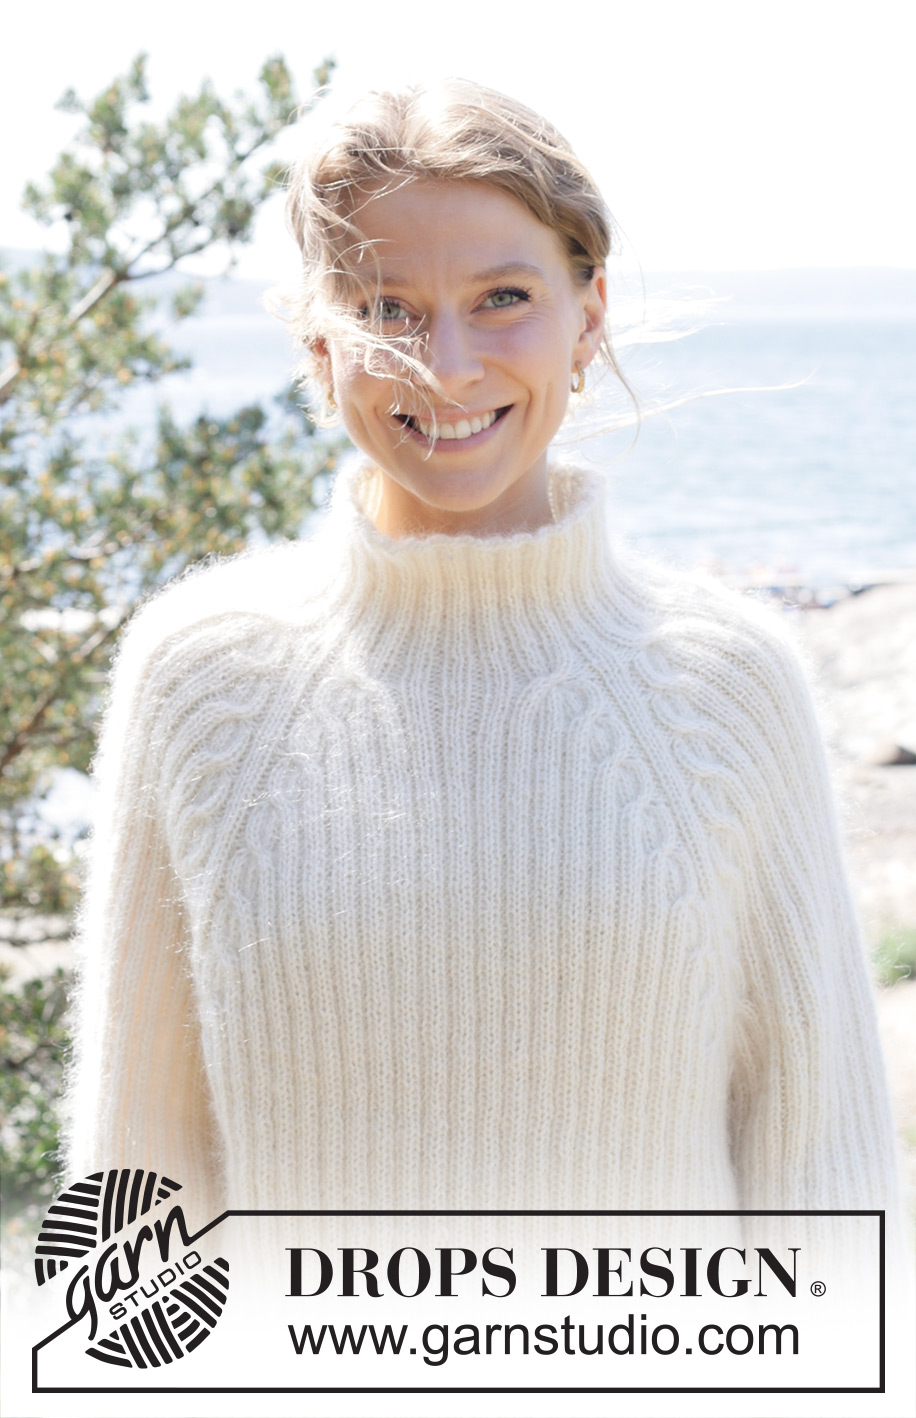
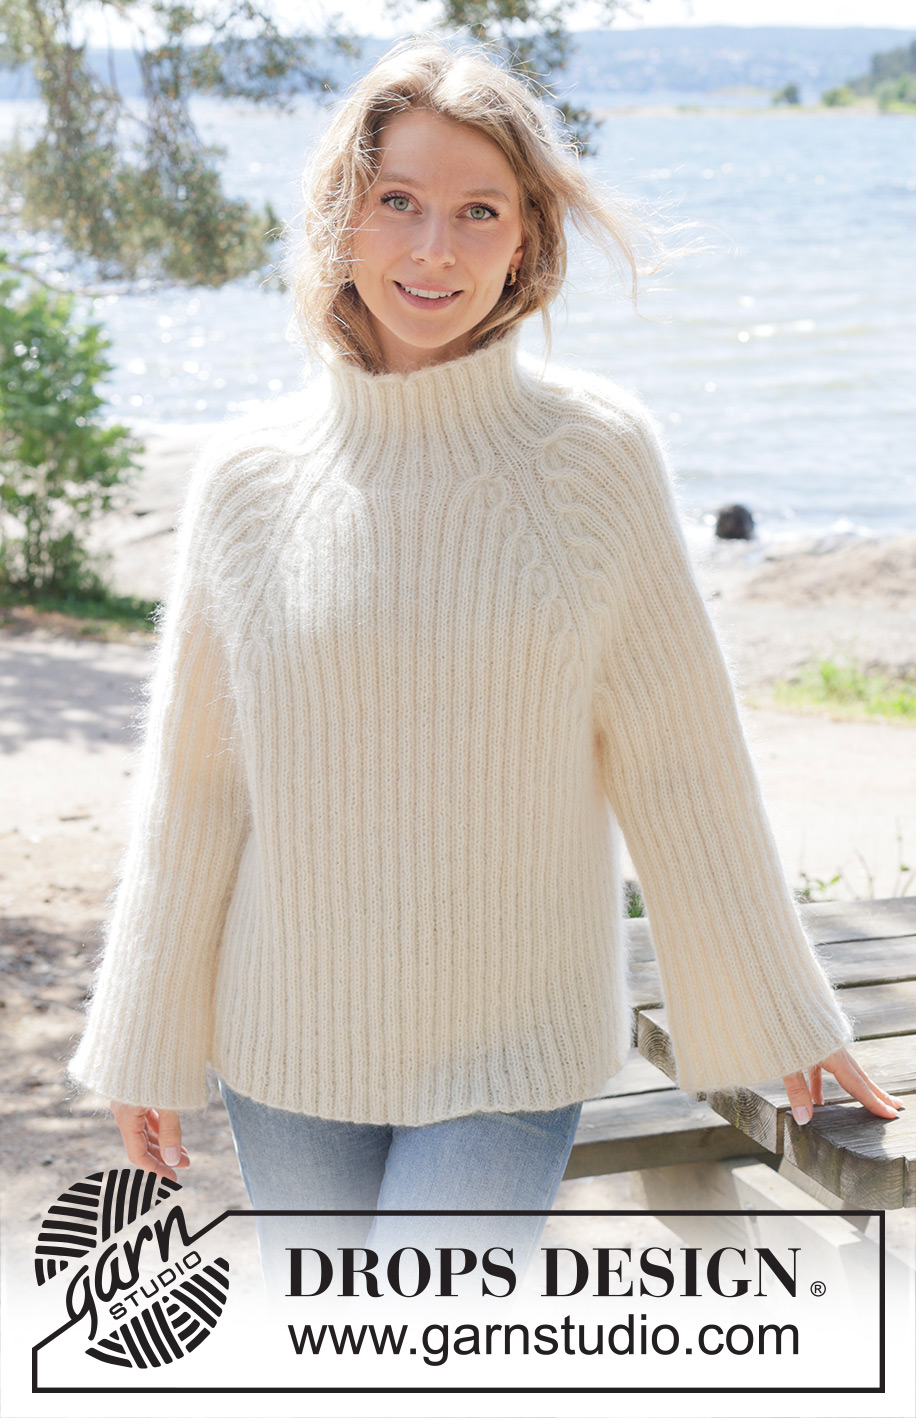
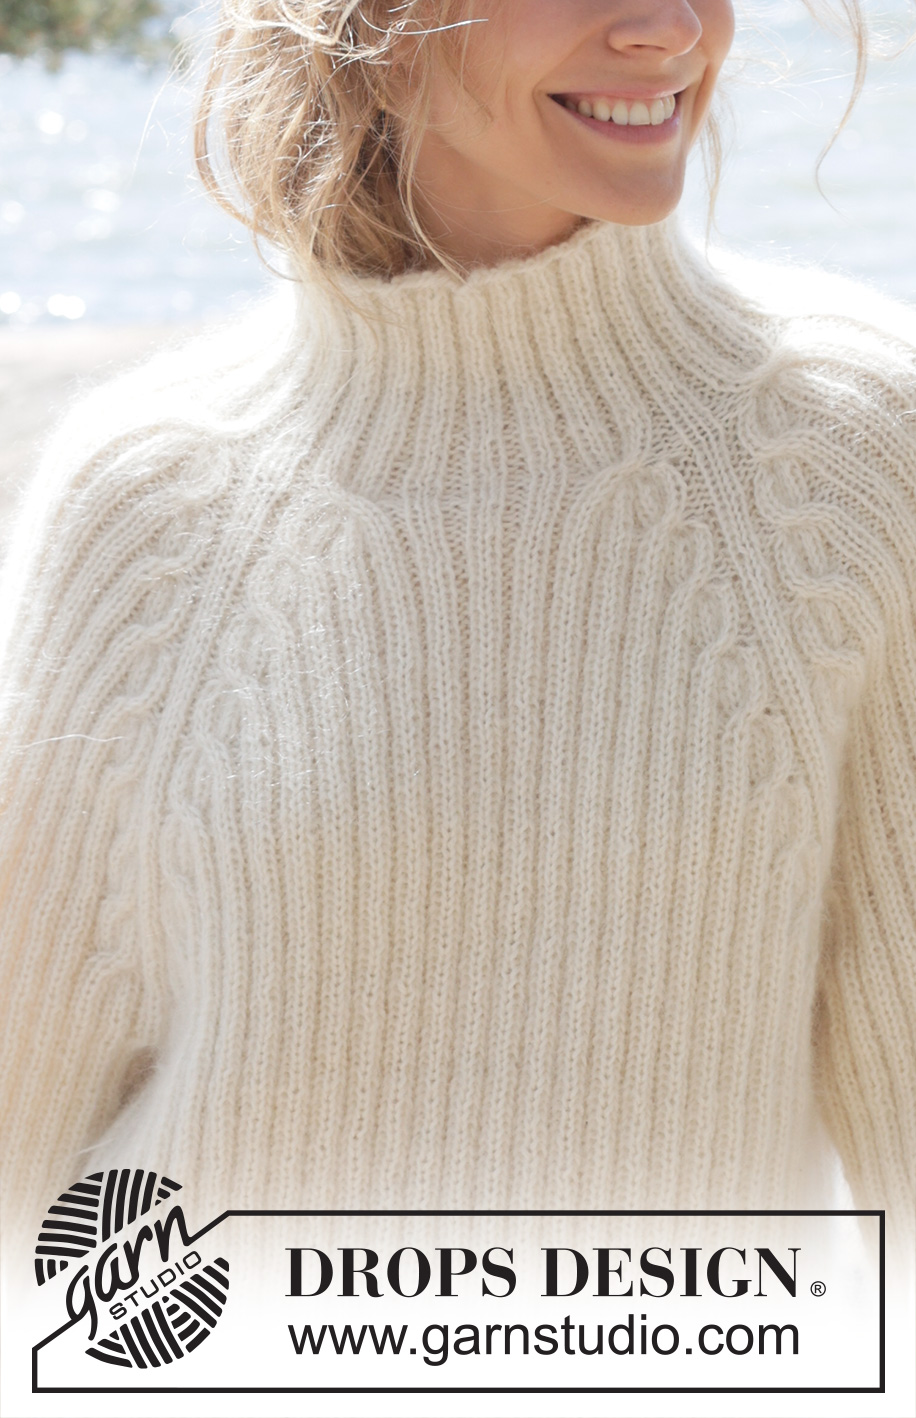
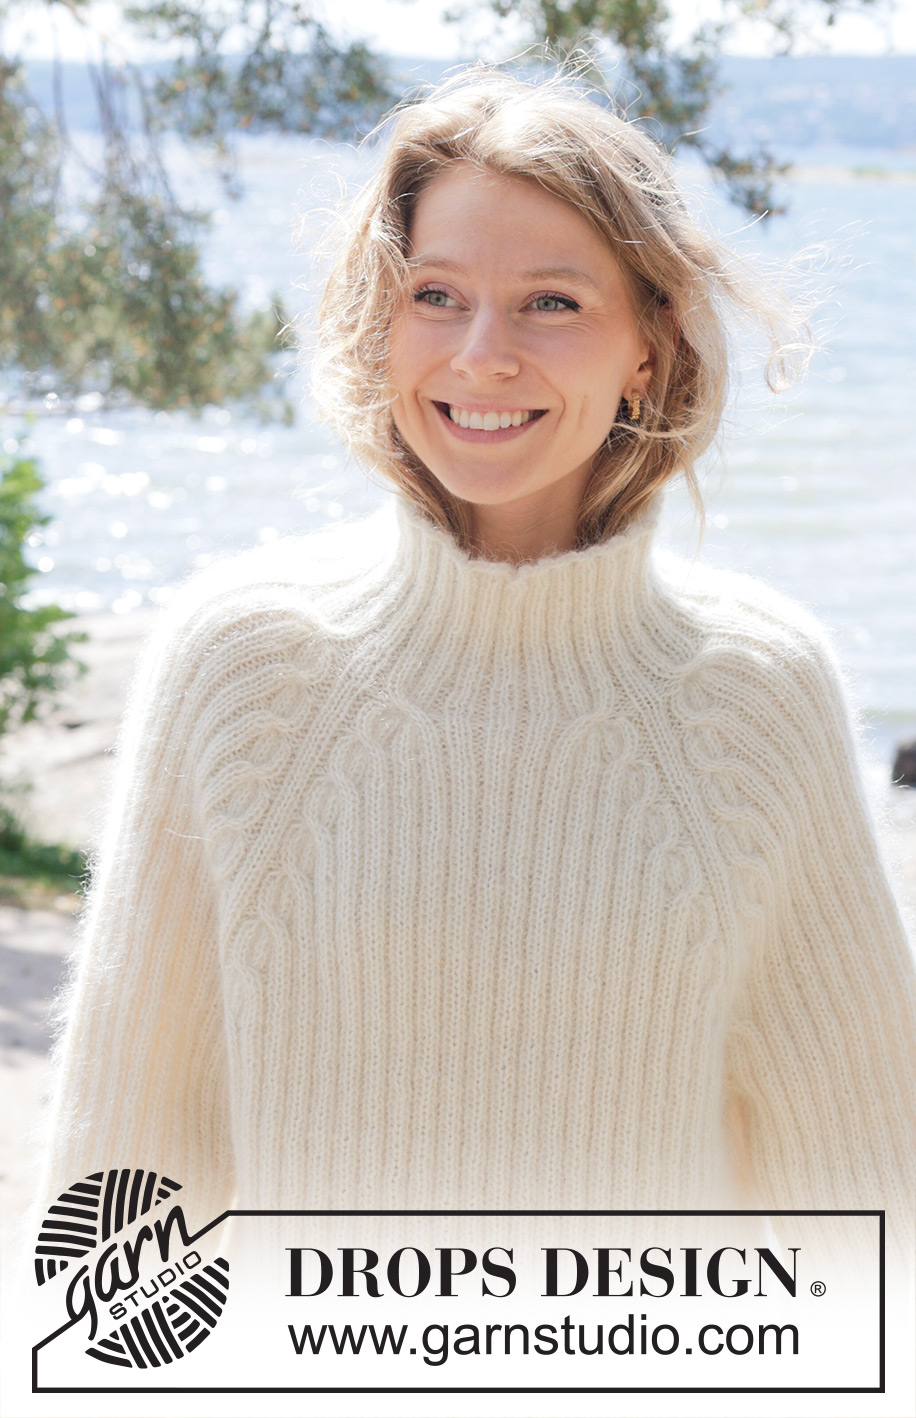
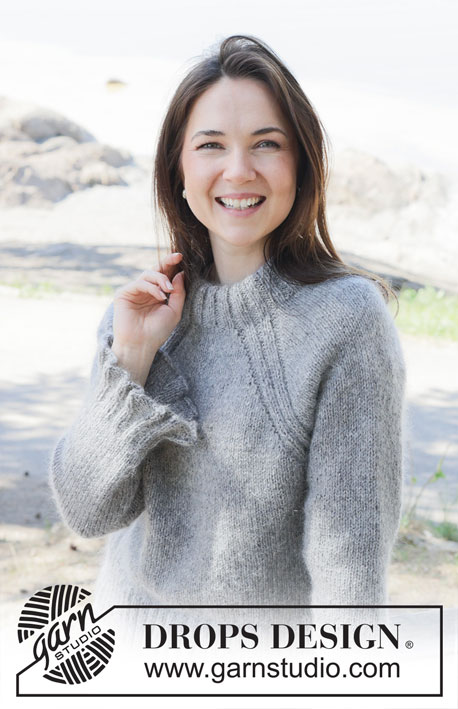
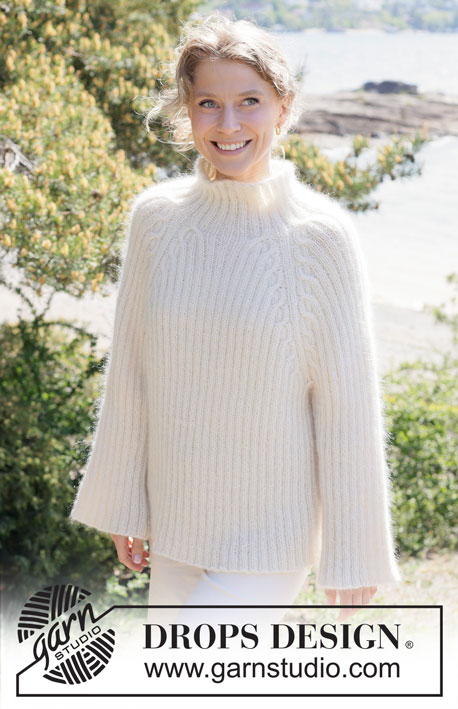
White Heron#whiteheronsweater |
||||||||||||||||||||||
 |
 |
|||||||||||||||||||||
Knitted jumper in 1 strand DROPS Alpaca and 2 strands DROPS Kid-Silk. The piece is worked top down with cables, raglan and rib. Sizes S - XXXL.
DROPS 254-7 |
||||||||||||||||||||||
|
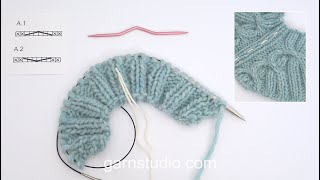
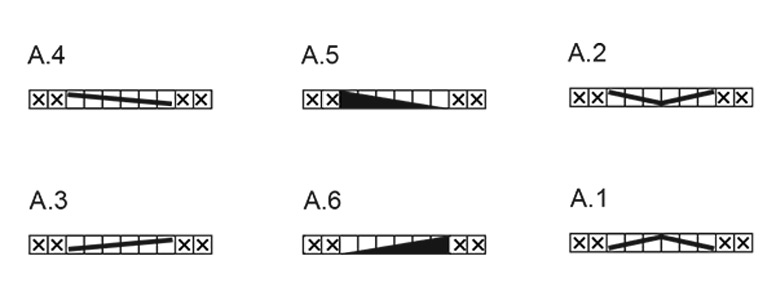
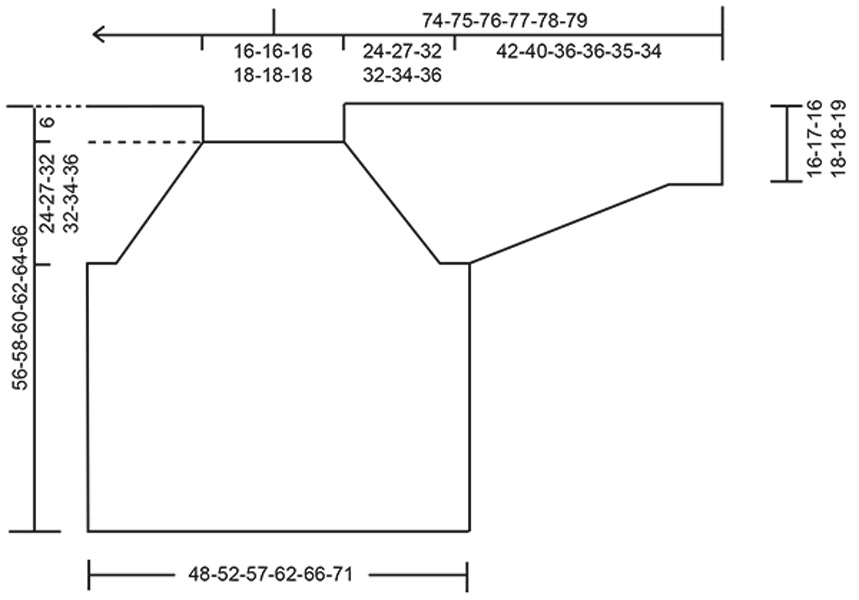
------------------------------------------------------- EXPLANATIONS FOR THE PATTERN: ------------------------------------------------------- PATTERN: See diagrams A.1 to A.6. DECREASE TIP (mid-under sleeve): Decrease alternately before and after the marker-thread. Decrease before marker-thread: Work until there are 6 stitches left before the marker-thread, slip 1 stitch, knit 4 together, pass the slipped stitch over = 4 decreased stitches. Decrease after marker-thread: Purl 1, knit 5 together = 4 decreased stitches. ------------------------------------------------------- START THE PIECE HERE: ------------------------------------------------------- JUMPER – SHORT OVERVIEW OF THE PIECE: The pattern uses both long and short needles; start with the length which fits the number of stitches and change when necessary. The neck and yoke are worked in the round with circular needle, top down and from mid back . When the yoke is finished, it is divided for the body and sleeves and the body continued in the round, while the sleeves wait. The sleeves are worked top down, in the round. NECK: Cast on 112-112-112-120-120-120 stitches with circular needle size 4.5 mm, 1 strand DROPS Alpaca and 2 strands DROPS Kid-Silk (= 3 strands). Knit 1 round then work rib as follows: Sizes S-M-L: Knit 1, * purl 2, knit 2 *, work from *-* until there are 3 stitches left, purl 2, knit 1. Sizes XL-XXL-XXXL: Purl 1, * knit 2, purl 2 *, work from *-* until there are 3 stitches left, knit 2, purl 1. Work this rib for 12 cm. Insert 4 marker-threads, without working the stitches, as follows. The threads are used when increasing for raglan and each thread is inserted between 2 stitches. Count 16-16-16-18-18-18 stitches (half back piece) insert 1 marker-thread, count 24 stitches (sleeve), insert 1 marker-thread, count 32-32-32-36-36-36 stitches (front piece), insert 1 marker-thread, count 24 stitches (sleeve), insert 1 marker-thread, there are 16-16-16-18-18-18 stitches left after the last marker-thread (half back piece). The beginning of the round is mid-back. Insert 1 marker after the first 56-56-56-60-60-60 stitches (mid-front), the piece is measured from here. Now work rib, increase at each marker-thread and work cables in A.1 and A.2 as follows: Work 5-5-5-7-7-7 ribbed stitches, A.1, knit 2 (marker-thread sits between these 2 stitches) A.2, knit 2, A.1, knit 2 (marker-thread sits between these 2 stitches) A.2, 10-10-10-14-14-14 ribbed stitches, A.1, knit 2 (marker-thread sits between these 2 stitches) A.2, knit 2, A.1, knit 2 (marker-thread sits between these 2 stitches) A.2, 5-5-5-7-7-7 ribbed stitches. After this round you have increased 64 stitches - 8 increased stitches in each cable (on each side of each marker-thread) = 176-176-176-184-184-184 stitches. Work 6-6-6-5-5-5 rounds of rib as before, working the new stitches into the rib. Work 13-13-13-15-15-15 ribbed stitches, A.3, knit 2 (marker-thread sits between these 2 stitches) A.4, 18 ribbed stitches, A.3, knit 2 (marker-thread sits between these 2 stitches) A.4, 26-26-26-30-30-30 ribbed stitches, A.3, knit 2 (marker-thread sits between these 2 stitches), A.4, 18 ribbed stitches, A.3, knit 2 (marker-thread sits between these 2 stitches) A.4, 13-13-13-15-15-15 ribbed stitches. After this round you have increased 32 stitches - 4 increased stitches in each cable (on each side of the marker-threads) = 208-208-208-216-216-216 stitches. Work 6-6-6-5-5-5 rounds of rib as before, working the new stitches into the rib. Continue increasing according to A.3 and A.4, until you have cabled a total of 5-5-6-7-7-7 times (with 6-6-6-5-5-5 rounds of rib between each increase). There are 304-304-336-376-376-376 stitches. Work 6-6-6-5-5-5 rounds of rib as before, working the new stitches into the rib. Work 29-29-33-39-39-39 ribbed stitches as before, A.3, knit 2 (marker-thread sits between these 2 stitches) A.5, 50-50-58-66-66-66 ribbed stitches, A.6, knit 2 (marker-thread sits between these 2 stitches) A.4, 58-58-66-78-78-78 ribbed stitches, A.3, knit 2 (marker-thread sits between these 2 stitches) A.5, 50-50-58-66-66-66 ribbed stitches, A.6, knit 2 (marker-thread sits between these 2 stitches) A.4, 29-29-33-39-39-39 ribbed stitches. After this round you have increased 16 stitches - 4 increased stitches in each cable on the front and back pieces. The increases on the sleeves are finished and the cables have been worked on the sleeves without increases = 320-320-352-392-392-392 stitches. Work 6-6-6-5-5-5 rounds of rib as before, working the new stitches into the rib. Work 33-33-37-43-43-43 ribbed stitches as before, A.3, knit 2 (marker-thread sits between these 2 stitches) A.5, 50-50-58-66-66-66 ribbed stitches, A.6, knit 2 (marker-thread sits between these 2 stitches) A.4, 66-66-74-86-86-86 ribbed stitches, A.3, knit 2 (marker-thread sits between these 2 stitches) A.5, 50-50-58-66-66-66 ribbed stitches, A.6, knit 2 (marker-thread sits between these 2 stitches) A.4, 33-33-37-43-43-43 ribbed stitches. After this round you have increased 16 stitches - 4 increased stitches in each cable on the front and back pieces, none on the sleeves = 336-336-368-408-408-408 stitches. Work 6-6-6-5-5-5 rounds of rib as before, then increase 1-2-3-3-4-5 more times on the front and back pieces; no increases on the sleeves = 352-368-416-456-472-488 stitches. You have cabled a total of 8-9-11-12-13-14 times. Continue working rib and cables, without further increases until the yoke measures 24-27-32-32-34-36 cm, finishing after at least 6-6-6-5-5-5 rounds of rib after the last cable-round. Now divide for the body and sleeves as follows: Work the first 52-56-64-70-74-78 stitches (half back piece), place the next 72-72-80-88-88-88 stitches on a thread for the sleeve, cast on 20-24-20-20-24-28 stitches (in side under sleeve), work 104-112-128-140-148-156 stitches (front piece), place the next 72-72-80-88-88-88 stitches on a thread for the sleeve, cast on 20-24-20-20-24-28 stitches (in side under sleeve), work the remaining 52-56-64-70-74-78 stitches (half back piece). BODY: = 248-272-296-320-344-368 stitches. Work rib in the round over all stitches, until the piece measures 50-52-54-56-58-60 cm from the marker mid-front. Cast off. The jumper measures approx. 56-60-62-64-66-68 cm from the shoulder. SLEEVES: Place the 72-72-80-88-88-88 sleeve-stitches from the thread on one side of the piece on circular needle size 4.5 mm and knit up 1 stitch in each of the 20-24-20-20-24-28 stitches cast on under the sleeve = 92-96-100-108-112-116 stitches. Work rib in the round for 4 cm. Now decrease 4 stitches before the marker-thread. Repeat this decrease, alternately before and after the marker-thread every 8-8-6-6-6-6 cm a total of 2-2-4-4-4-4 times - read DECREASE TIP = 84-88-84-92-96-100 stitches. Continue working until the sleeve measures 42-40-36-36-35-34 cm. Cast off. |
||||||||||||||||||||||
Diagram explanations |
||||||||||||||||||||||
|
||||||||||||||||||||||
 |
||||||||||||||||||||||
 |
||||||||||||||||||||||
Have you finished this pattern?Tag your pictures with #dropspattern #whiteheronsweater or submit them to the #dropsfan gallery. Do you need help with this pattern?You'll find 27 tutorial videos, a Comments/Questions area and more by visiting the pattern on garnstudio.com. © 1982-2026 DROPS Design A/S. We reserve all rights. This document, including all its sub-sections, has copyrights. Read more about what you can do with our patterns at the bottom of each pattern on our site. |
||||||||||||||||||||||


With over 40 years in knitting and crochet design, DROPS Design offers one of the most extensive collections of free patterns on the internet - translated to 17 languages. As of today we count 324 catalogues and 12290 patterns translated into English (UK/cm). 12290
We work hard to bring you the best knitting and crochet have to offer, inspiration and advice as well as great quality yarns at incredible prices! Would you like to use our patterns for other than personal use? You can read what you are allowed to do in the Copyright text at the bottom of all our patterns. Happy crafting!
Post a comment to pattern DROPS 254-7
We would love to hear what you have to say about this pattern!
If you want to leave a question, please make sure you select the correct category in the form below, to speed up the answering process. Required fields are marked *.