
Popular categories
Looking for a yarn?


Comments / Questions (88)
![]() Waltraud wrote:
Waltraud wrote:
Ich habe bereits Ende Jänner 2026 eine Frage gestellt. Leider wurde sie nie beantwortet. Ich habe mir selbst geholfen und den Pullover schon fertig gestrickt.
10.02.2026 - 12:11
![]() Dagmar wrote:
Dagmar wrote:
White Heron is very beautiful. Is there another choice of yarn possible without using three strands? One yarn or perhaps two strands? It is otherwise quite expensive. I know it won't have so same effect.
08.02.2026 - 20:18DROPS Design answered:
Hi Dagmar, 2 strands from a yarn from yarn group A is the same thickness as 1 strand from a yarn from yarn group C. Click on Yarns & Needles at the top of the page, select Yarn Groups on the right-hand side and Yarn group C. You can then use 1 strand of your chosen yarn together with 1 strand of Drops Alpaca for this jumper. Regards, Drops Team.
09.02.2026 - 06:45
![]() Laura wrote:
Laura wrote:
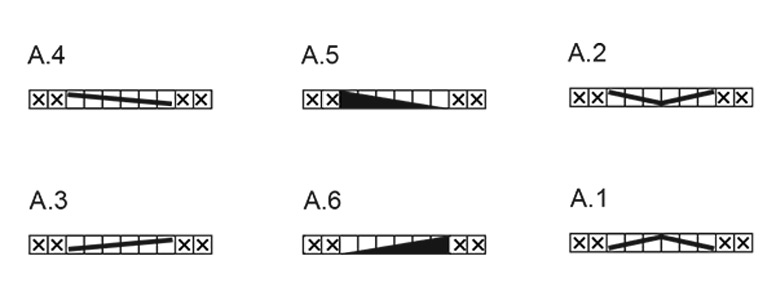
Hei! Onko A.6 kaavion selityksessä virhe? Jollekin oli dropsilta vastattu, että apupuikolle pitäisi ottaa työn taakse 2 silmukkaa 4:n sijaan. Joku oli taas sanonut, että 4 silmukkaa apupuikolle, 2 oikein, sitten apupuikon 2 silmukkaa nurin ja 2 oikein. Tein itse tällä tavalla, mutta jouduin purkamaan kun ei näyttänyt joustinneule "pylväät" jatkuvan alaspäin.
28.01.2026 - 08:44DROPS Design answered:
Hei, neulo kuten ohjeessa neuvotaan: Siirrä 4 silmukkaa apupuikolle työn taakse, neulo 2 silmukkaa oikein, neulo 2 silmukkaa nurin, neulo apupuikon 2 silmukkaa oikein. Katso myös seuraava video: Lisäysten tekeminen palmikon kohdalla.
30.01.2026 - 18:43
![]() Birgitta wrote:
Birgitta wrote:
"Fortsätt ökningarna som visas i A.3 och A.4 tills det har flätats totalt 5-5-6-7-7-7 gånger (med 6-6-6-5-5-5 varv resår mellan varje ökning)." Hur många maskor i resår stickas mellan ökningarna? Samma som på föregående varv? 13, 18, 26, 18, 13?? Eller ska man lägga till?
15.01.2026 - 22:40DROPS Design answered:
Hei Birgitta. Litt usikker på spørsmålet ditt. Tenker du på hvor mange masker /vrangbord mellom økningene på for/bakstykket eller ermene? (det økes med 4 masker hver gang A.3/A.4 strikkes). mvh DROPS Design
29.01.2026 - 12:27
![]() Mona Åström wrote:
Mona Åström wrote:
Ni är inte speciellt snabba med att svara.
15.01.2026 - 12:54
![]() Mona Åström wrote:
Mona Åström wrote:
Nu håller jag på att stick ärmarna. Men det framgår inte klart om jag ska minska fyra maskor i var sida av ärmen.
14.01.2026 - 18:23DROPS Design answered:
Hei Mona. Det står: det minskas växelvis före och efter märktråden. Les også MINSKNINGSTIPS (gäller mitt under ärmarna) øverst i oppskriften. mvh DROPS Design
29.01.2026 - 12:01
![]() Mona wrote:
Mona wrote:
Mönstret är verkligen lite svårt att förstå.
12.01.2026 - 13:30
![]() Mona wrote:
Mona wrote:
Hej! Fråga ang mönstret till white heron. Har kommit till fram- och bakstycket men förstår inte det sista där. Står att när arbetet mäter 54 cm från markören mitt fram och maska av. Men sedan står det att tröjan mäter 62 cm från axeln och ner. Menas det att man ska mäta arbetet från halskanten???? Tacksam för förklaring.
12.01.2026 - 13:29DROPS Design answered:
Hej Mona, ja du har 8 cm fra halskanten og op til øverst på skulderen og 54 cm fra halskanten og ned = totalt 62 cm. Men da du strikker oppefra og ned kan du prøve tøjet og strikke til ønsket længde :)
26.01.2026 - 15:02
![]() Liliana wrote:
Liliana wrote:
Il maglione è lavorato con i ferri 4.5 o 3? Vengono citati entrambi
03.01.2026 - 22:26DROPS Design answered:
Buonasera Liliana, grazie per la segnalazione, abbiamo corretto il testo. Il modello è lavorato con i ferri 4,5 mm. Buon lavoro!
03.01.2026 - 22:50
![]() Birgitta wrote:
Birgitta wrote:
Vad är främre bakre maskbågen?? "sätt 2 maskor på flätsticka framför arbetet, sticka 3 maskor i var och en av de 4 nästa maskorna (sticka i främre, bakre och främre bakre maskbågen i varje maska), sticka 2 rätmaskor från flätstickan. Det har ökats 8 maskor."
25.12.2025 - 15:27DROPS Design answered:
Hej Birgitta. Den främre maskbågen är den som ligger framför stickan och den bakre maskbågen är den som ligger bakom stickan. I denna video ser du hur du ska göra. Mvh DROPS Design
07.01.2026 - 14:05
|
||||||||||||||||||||||
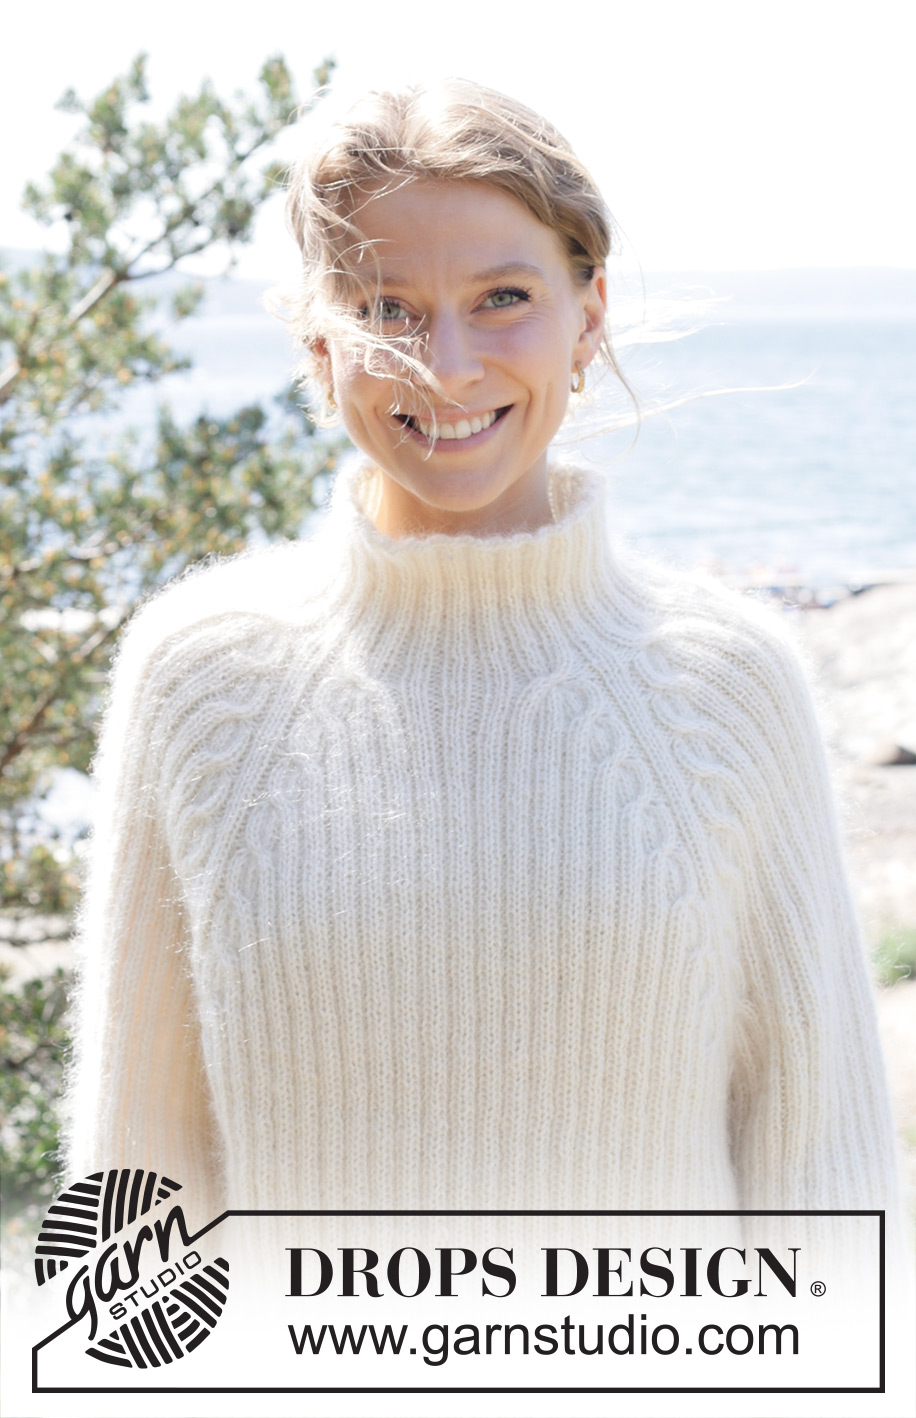
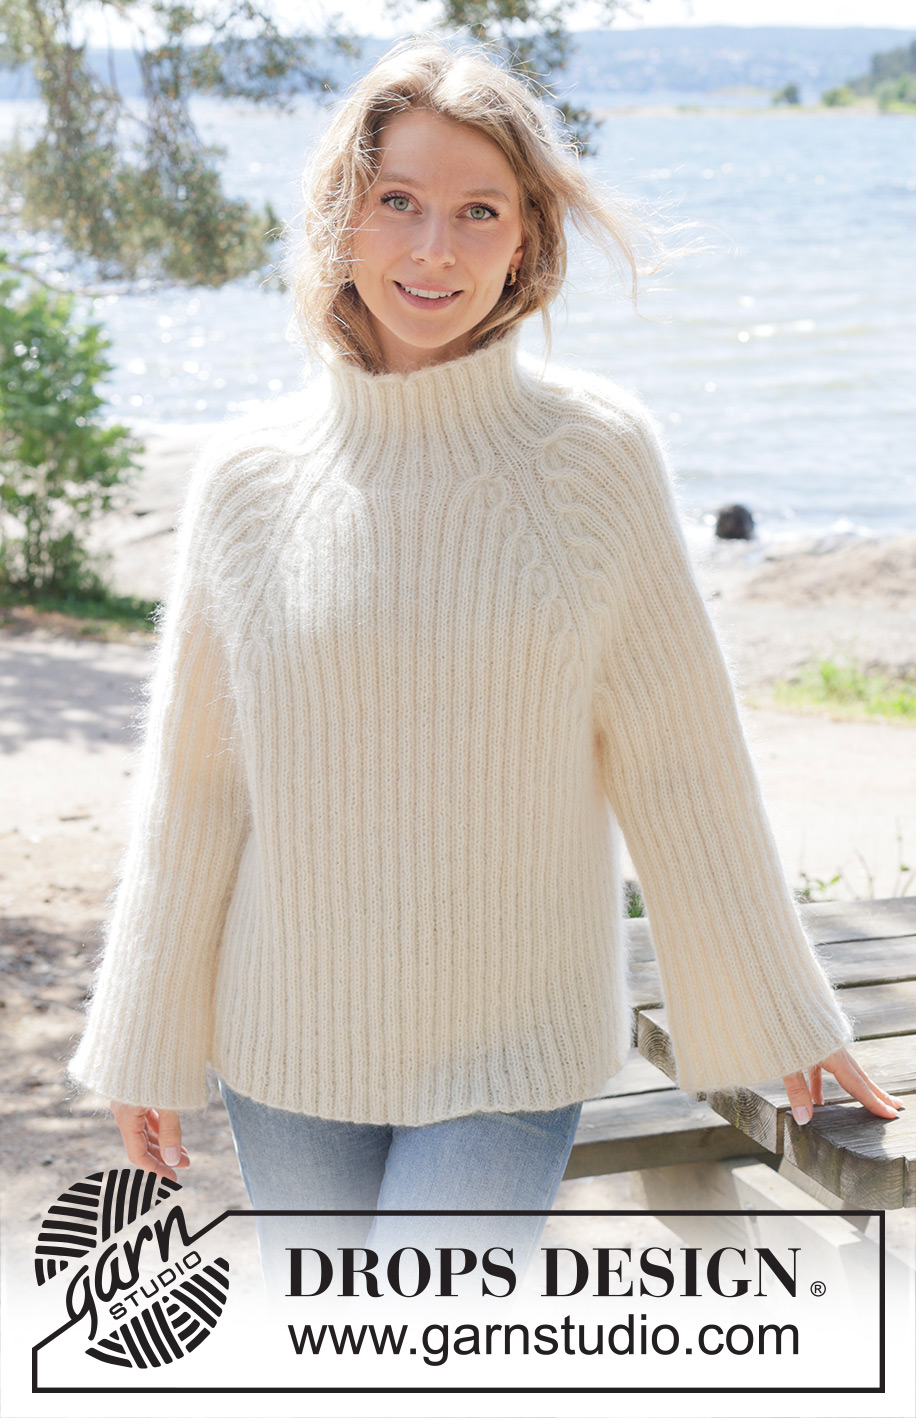
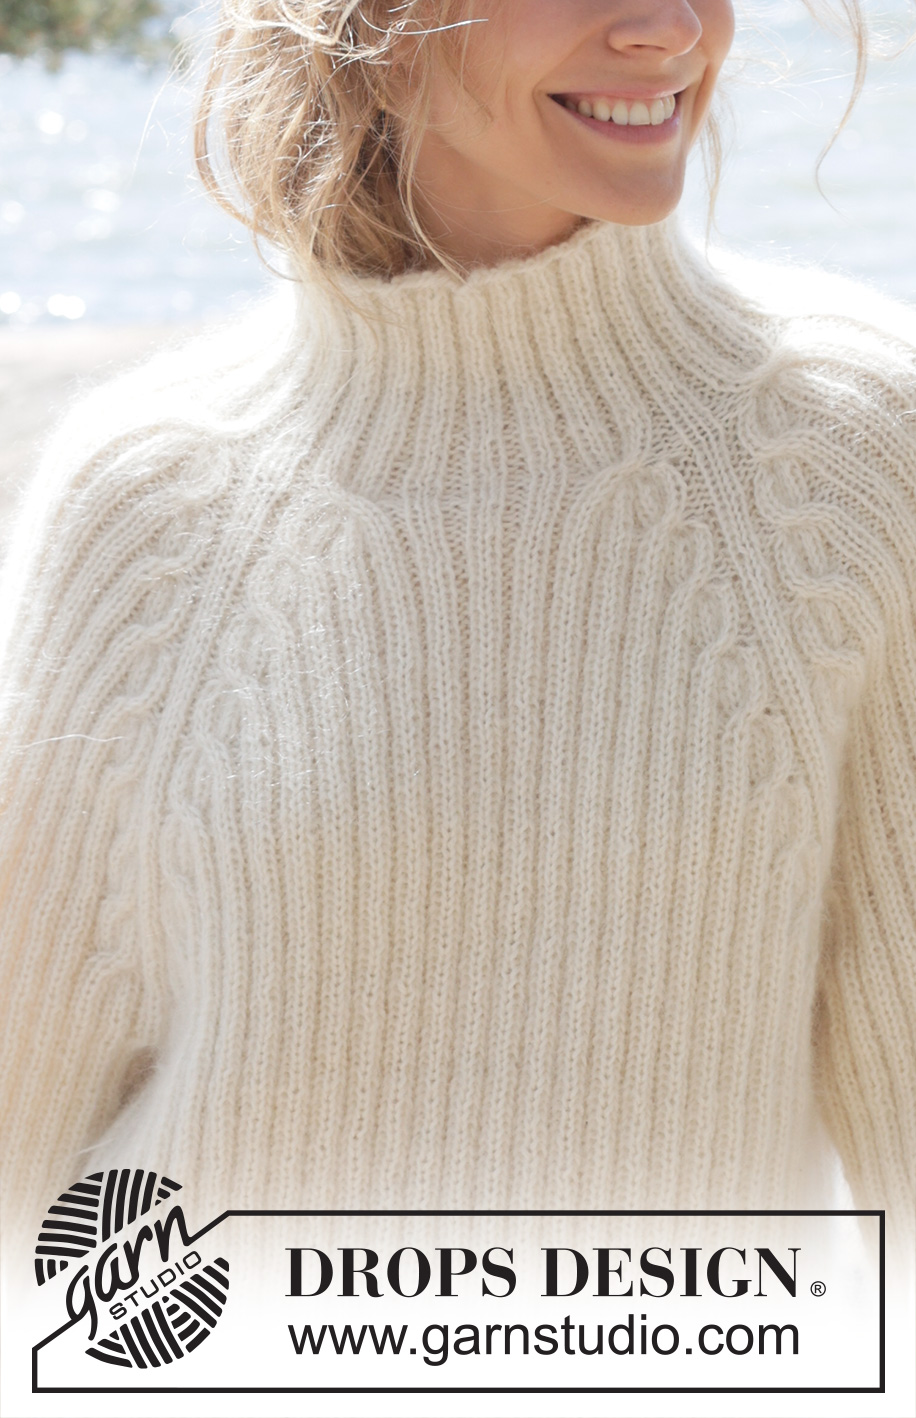
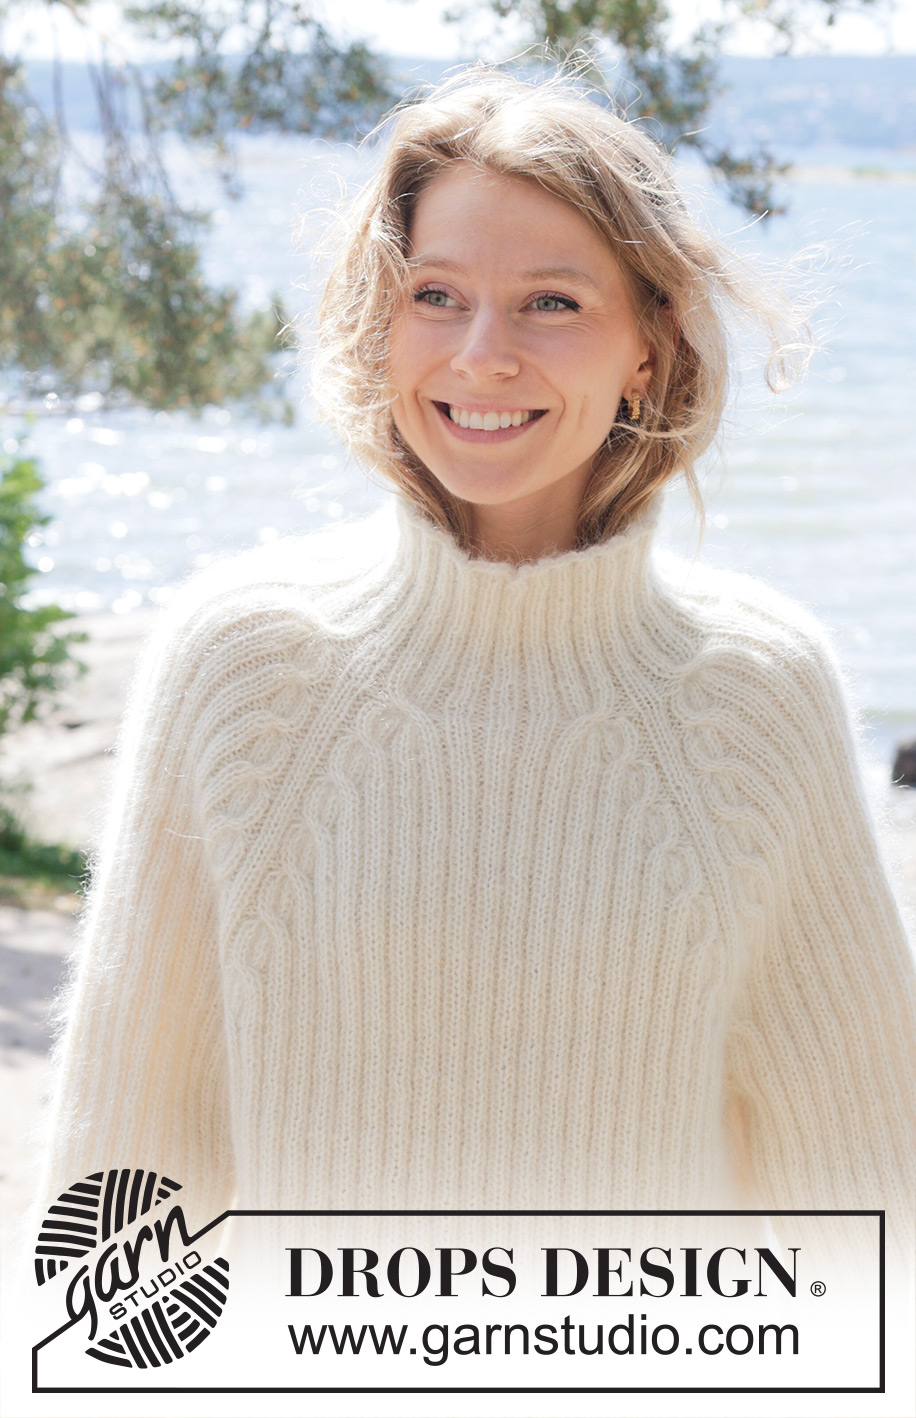
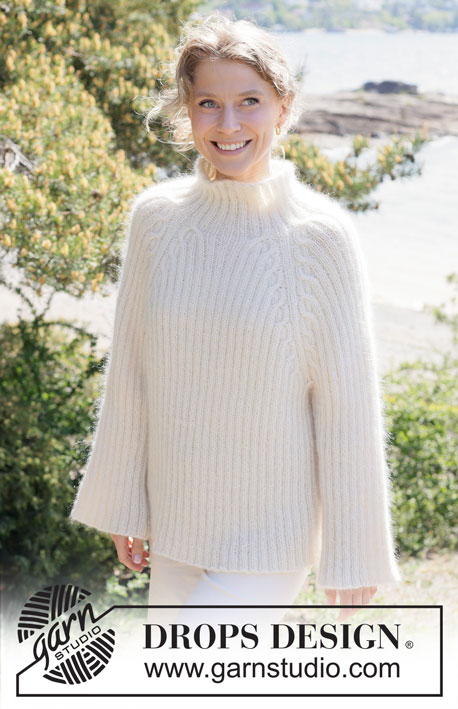
White Heron#whiteheronsweater |
||||||||||||||||||||||
 |
 |
|||||||||||||||||||||
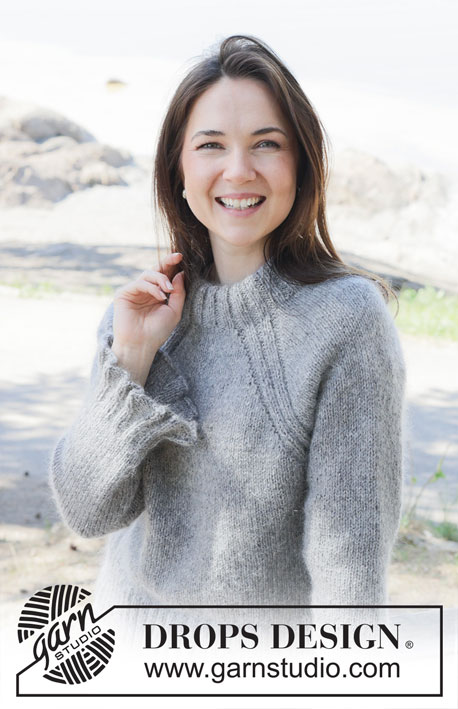
Knitted jumper in 1 strand DROPS Alpaca and 2 strands DROPS Kid-Silk. The piece is worked top down with cables, raglan and rib. Sizes S - XXXL.
DROPS 254-7 |
||||||||||||||||||||||
|
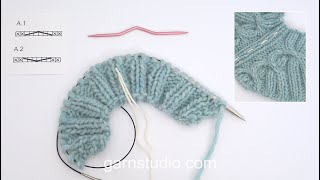
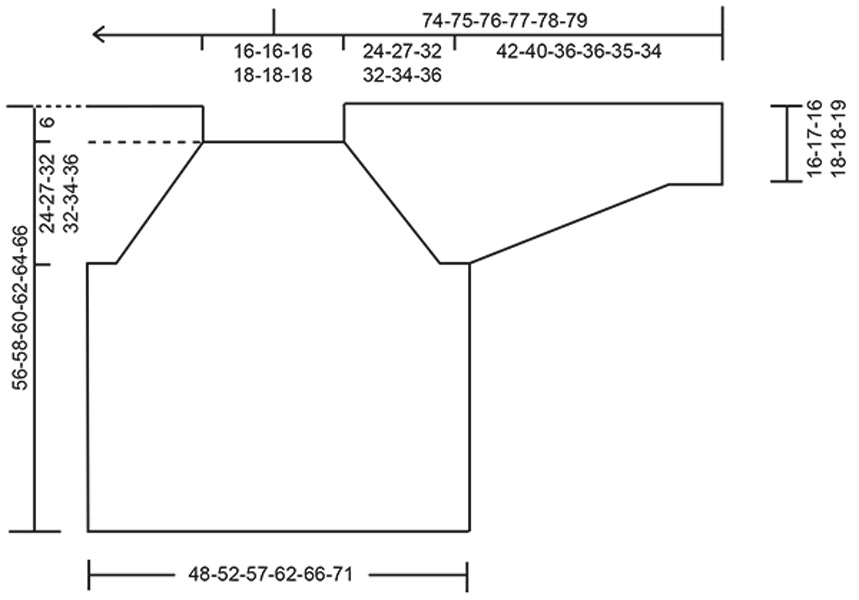
------------------------------------------------------- EXPLANATIONS FOR THE PATTERN: ------------------------------------------------------- PATTERN: See diagrams A.1 to A.6. DECREASE TIP (mid-under sleeve): Decrease alternately before and after the marker-thread. Decrease before marker-thread: Work until there are 6 stitches left before the marker-thread, slip 1 stitch, knit 4 together, pass the slipped stitch over = 4 decreased stitches. Decrease after marker-thread: Purl 1, knit 5 together = 4 decreased stitches. ------------------------------------------------------- START THE PIECE HERE: ------------------------------------------------------- JUMPER – SHORT OVERVIEW OF THE PIECE: The pattern uses both long and short needles; start with the length which fits the number of stitches and change when necessary. The neck and yoke are worked in the round with circular needle, top down and from mid back . When the yoke is finished, it is divided for the body and sleeves and the body continued in the round, while the sleeves wait. The sleeves are worked top down, in the round. NECK: Cast on 112-112-112-120-120-120 stitches with circular needle size 4.5 mm, 1 strand DROPS Alpaca and 2 strands DROPS Kid-Silk (= 3 strands). Knit 1 round then work rib as follows: Sizes S-M-L: Knit 1, * purl 2, knit 2 *, work from *-* until there are 3 stitches left, purl 2, knit 1. Sizes XL-XXL-XXXL: Purl 1, * knit 2, purl 2 *, work from *-* until there are 3 stitches left, knit 2, purl 1. Work this rib for 12 cm. Insert 4 marker-threads, without working the stitches, as follows. The threads are used when increasing for raglan and each thread is inserted between 2 stitches. Count 16-16-16-18-18-18 stitches (half back piece) insert 1 marker-thread, count 24 stitches (sleeve), insert 1 marker-thread, count 32-32-32-36-36-36 stitches (front piece), insert 1 marker-thread, count 24 stitches (sleeve), insert 1 marker-thread, there are 16-16-16-18-18-18 stitches left after the last marker-thread (half back piece). The beginning of the round is mid-back. Insert 1 marker after the first 56-56-56-60-60-60 stitches (mid-front), the piece is measured from here. Now work rib, increase at each marker-thread and work cables in A.1 and A.2 as follows: Work 5-5-5-7-7-7 ribbed stitches, A.1, knit 2 (marker-thread sits between these 2 stitches) A.2, knit 2, A.1, knit 2 (marker-thread sits between these 2 stitches) A.2, 10-10-10-14-14-14 ribbed stitches, A.1, knit 2 (marker-thread sits between these 2 stitches) A.2, knit 2, A.1, knit 2 (marker-thread sits between these 2 stitches) A.2, 5-5-5-7-7-7 ribbed stitches. After this round you have increased 64 stitches - 8 increased stitches in each cable (on each side of each marker-thread) = 176-176-176-184-184-184 stitches. Work 6-6-6-5-5-5 rounds of rib as before, working the new stitches into the rib. Work 13-13-13-15-15-15 ribbed stitches, A.3, knit 2 (marker-thread sits between these 2 stitches) A.4, 18 ribbed stitches, A.3, knit 2 (marker-thread sits between these 2 stitches) A.4, 26-26-26-30-30-30 ribbed stitches, A.3, knit 2 (marker-thread sits between these 2 stitches), A.4, 18 ribbed stitches, A.3, knit 2 (marker-thread sits between these 2 stitches) A.4, 13-13-13-15-15-15 ribbed stitches. After this round you have increased 32 stitches - 4 increased stitches in each cable (on each side of the marker-threads) = 208-208-208-216-216-216 stitches. Work 6-6-6-5-5-5 rounds of rib as before, working the new stitches into the rib. Continue increasing according to A.3 and A.4, until you have cabled a total of 5-5-6-7-7-7 times (with 6-6-6-5-5-5 rounds of rib between each increase). There are 304-304-336-376-376-376 stitches. Work 6-6-6-5-5-5 rounds of rib as before, working the new stitches into the rib. Work 29-29-33-39-39-39 ribbed stitches as before, A.3, knit 2 (marker-thread sits between these 2 stitches) A.5, 50-50-58-66-66-66 ribbed stitches, A.6, knit 2 (marker-thread sits between these 2 stitches) A.4, 58-58-66-78-78-78 ribbed stitches, A.3, knit 2 (marker-thread sits between these 2 stitches) A.5, 50-50-58-66-66-66 ribbed stitches, A.6, knit 2 (marker-thread sits between these 2 stitches) A.4, 29-29-33-39-39-39 ribbed stitches. After this round you have increased 16 stitches - 4 increased stitches in each cable on the front and back pieces. The increases on the sleeves are finished and the cables have been worked on the sleeves without increases = 320-320-352-392-392-392 stitches. Work 6-6-6-5-5-5 rounds of rib as before, working the new stitches into the rib. Work 33-33-37-43-43-43 ribbed stitches as before, A.3, knit 2 (marker-thread sits between these 2 stitches) A.5, 50-50-58-66-66-66 ribbed stitches, A.6, knit 2 (marker-thread sits between these 2 stitches) A.4, 66-66-74-86-86-86 ribbed stitches, A.3, knit 2 (marker-thread sits between these 2 stitches) A.5, 50-50-58-66-66-66 ribbed stitches, A.6, knit 2 (marker-thread sits between these 2 stitches) A.4, 33-33-37-43-43-43 ribbed stitches. After this round you have increased 16 stitches - 4 increased stitches in each cable on the front and back pieces, none on the sleeves = 336-336-368-408-408-408 stitches. Work 6-6-6-5-5-5 rounds of rib as before, then increase 1-2-3-3-4-5 more times on the front and back pieces; no increases on the sleeves = 352-368-416-456-472-488 stitches. You have cabled a total of 8-9-11-12-13-14 times. Continue working rib and cables, without further increases until the yoke measures 24-27-32-32-34-36 cm, finishing after at least 6-6-6-5-5-5 rounds of rib after the last cable-round. Now divide for the body and sleeves as follows: Work the first 52-56-64-70-74-78 stitches (half back piece), place the next 72-72-80-88-88-88 stitches on a thread for the sleeve, cast on 20-24-20-20-24-28 stitches (in side under sleeve), work 104-112-128-140-148-156 stitches (front piece), place the next 72-72-80-88-88-88 stitches on a thread for the sleeve, cast on 20-24-20-20-24-28 stitches (in side under sleeve), work the remaining 52-56-64-70-74-78 stitches (half back piece). BODY: = 248-272-296-320-344-368 stitches. Work rib in the round over all stitches, until the piece measures 50-52-54-56-58-60 cm from the marker mid-front. Cast off. The jumper measures approx. 56-60-62-64-66-68 cm from the shoulder. SLEEVES: Place the 72-72-80-88-88-88 sleeve-stitches from the thread on one side of the piece on circular needle size 4.5 mm and knit up 1 stitch in each of the 20-24-20-20-24-28 stitches cast on under the sleeve = 92-96-100-108-112-116 stitches. Work rib in the round for 4 cm. Now decrease 4 stitches before the marker-thread. Repeat this decrease, alternately before and after the marker-thread every 8-8-6-6-6-6 cm a total of 2-2-4-4-4-4 times - read DECREASE TIP = 84-88-84-92-96-100 stitches. Continue working until the sleeve measures 42-40-36-36-35-34 cm. Cast off. |
||||||||||||||||||||||
Diagram explanations |
||||||||||||||||||||||
|
||||||||||||||||||||||
 |
||||||||||||||||||||||
 |
||||||||||||||||||||||
Have you finished this pattern?Tag your pictures with #dropspattern #whiteheronsweater or submit them to the #dropsfan gallery. Do you need help with this pattern?You'll find 27 tutorial videos, a Comments/Questions area and more by visiting the pattern on garnstudio.com. © 1982-2026 DROPS Design A/S. We reserve all rights. This document, including all its sub-sections, has copyrights. Read more about what you can do with our patterns at the bottom of each pattern on our site. |
||||||||||||||||||||||


With over 40 years in knitting and crochet design, DROPS Design offers one of the most extensive collections of free patterns on the internet - translated to 17 languages. As of today we count 324 catalogues and 12290 patterns translated into English (UK/cm). 12290
We work hard to bring you the best knitting and crochet have to offer, inspiration and advice as well as great quality yarns at incredible prices! Would you like to use our patterns for other than personal use? You can read what you are allowed to do in the Copyright text at the bottom of all our patterns. Happy crafting!
Post a comment to pattern DROPS 254-7
We would love to hear what you have to say about this pattern!
If you want to leave a question, please make sure you select the correct category in the form below, to speed up the answering process. Required fields are marked *.