
Popular categories
Looking for a yarn?


Comments / Questions (31)
Kath Lenglet wrote:
Bonjour, Ok. {En même temps, après 4 tours jersey après la réhausse} **Là je commence le point fantaisie Et je continue ?? : {Augmenter 1 maille APRÈS les fils-marqueurs -2 et -4 et AVANT les fils-marqueurs -1 et -3 – } ?? D avance merci Catherine
30.09.2024 - 11:52DROPS Design answered:
Bonjour Mme Lenglet, après la réhausse, vous commencez à augmenter pour les épaules/manches marteau et en même temps, vous tricotez le point fantaisie, mais lui ne commence qu'au 5ème tour après la réhausse. Bon tricot!
30.09.2024 - 16:03Kath Lenglet wrote:
Bonsoir, J ai réussi mes rangs raccourcis, après les 4 rangs d augmentations = Quelle est la suite, au 5eme rang : - commence-t-on le point fantaisie ? A partir de quelle maille ? - est-ce que je continue jusqu'au 18ème tour les mêmes augmentations ? D avance merci pour ces précisions Catherine
28.09.2024 - 19:40DROPS Design answered:
Bonjour Mme Lenglet, à la fin des rangs raccourcis, coupez le fil et glissez les mailles jusqu'au fil marqueur -1 sur l'aiguille droite sans les tricoter; vous commencez maintenant au niveau du fil marqueur-1 - à la transition entre le dos et l'épaule droite, autrement dit, les premières mailles sont celles de l'épaule. Bon tricot!
30.09.2024 - 08:12
![]() Kath Lenglet wrote:
Kath Lenglet wrote:
Bonjour, J'ai défait, refait, et re-re-re...fait ☹ je ne comprends pas, surtout au moment des rangs raccourcis !! Je tricote en fil double, et je n arrive pas... : quand il faut tricoter 47 mailles par ex. et tourner, c'est bien ces 47 mailles ,que l'on compte sans l augmentation ?? Est-ce plus facile les rangs raccourcis à l allemande ?? Merci
27.09.2024 - 18:20DROPS Design answered:
Bonjour Mme Lenglet, ces 47 mailles ne comprennent pas les augmentations des raglans, il faut les ajouter dans le nombre de mailles; autrement dit, vous tricotez 8 mailles en plus à la fin de chaque rang; utilisez votre technique favorite pour les rangs raccourcis, celle avec laquelle vous êtes le plus à l'aise - retrouvez ici différentes techniques (y compris à l'allemande). Bon tricot!
30.09.2024 - 07:39Kath Lenglet wrote:
Merci pour ces précisions
25.09.2024 - 09:35Kath Lenglet wrote:
Bonjour, Encore une question ; Pour les augmentations inclinées, lorsque vous dites : avant ou après le fil marqueur = >>> On le fait avant le fil marqueur : ****c'est a dire dans le fil de la maille avant ? Et pour après = dans le fil de la maille après ? Merci pour ces précisions
24.09.2024 - 11:47DROPS Design answered:
Bonjour Mme Lenglet, quand vous augmentez avant le fil marqueur, relevez le fil avant la 1ère maille juste avant le fil marqueur, et quand vous augmentez après le fil marqueur, relevez le fil après la dernière maille juste après le fil marqueur pour que le nombre de mailles soit augmenté au bon endroit - cf vidéo augmentations épaules/manches marteau. Bon tricot!
25.09.2024 - 07:48
![]() Kath Lenglet wrote:
Kath Lenglet wrote:
Merci
20.09.2024 - 19:57Kath Lenglet wrote:
Je vous remercie pour votre réponse, toujours en attente. Cordialement Catherine
20.09.2024 - 18:02
![]() Kath Lenglet wrote:
Kath Lenglet wrote:
Oui d' accord. Aussi, j' ai lu "augmentations épaules....", donc on reprend un nouveau fil, on augmente les 4 mailles et cela 18 fois ts les tours. Et ensuite 2 tours en augmentant seulement après marqueur 2 et avant marqueur 3. Est-ce exact ? Ensuite on tricote "augmentations manches" ? A quel moment on tricote le point fantaisie ? D'avance merci Catherine.
20.09.2024 - 09:38DROPS Design answered:
Bonjour Catherine, vous coupez le fil à la fin de la réhausse et tricotez désormais à partir du 1er fil marqueur, vous joignez le fil à cet endroit et tricotez 18 tours (tailles M, L et XL en augmentant 2 m pour le devant et 2 m pour le dos. Le point fantaisie commence 4 tours après la réhausse, autrement dit, lorsque vous tricotez le 5ème tour des augmentations épaules/manches marteau, vous tricotez le point fantaisie. Vous augmentez ensuite seulement pour les manches (4 m) puis pour l'empiècement (8 m ). Bon tricot!
20.09.2024 - 16:30
![]() Catherine LENGLET wrote:
Catherine LENGLET wrote:
Bonjour, Pour ce modèle ; je ne comprends pas lorsque vous dites augmentation épaules/manches : -- comment savoir si c'est une augmentation inclinée à droite ? ou à gauche ?? D'avance merci Catherine
19.09.2024 - 15:25DROPS Design answered:
Bonjour Mme Lenglet, augmentez comme indiqué sous AUGMENTATIONS -2 (sur l'endroit):, en augmentant comme indiqué après ou avant les fils marqueurs indiqués, les augmentations seront inclinées comme elles doivent l'être. Bon tricot!
19.09.2024 - 16:03
![]() Megan wrote:
Megan wrote:
But you haven’t answered my question why the other patterns with saddle shoulders do not start rounds from Marker 1. What is the difference between starting here and mid-back? If I start from mid-back, could I still follow the pattern?
12.09.2024 - 16:34DROPS Design answered:
Dear Megan, this is a designer's choice, just. a different way to work this pattern compared to some others you might have already read. Happy knitting!
13.09.2024 - 08:24
|
||||||||||||||||||||||
Oatfield#oatfieldsweater |
||||||||||||||||||||||
 |
 |
|||||||||||||||||||||
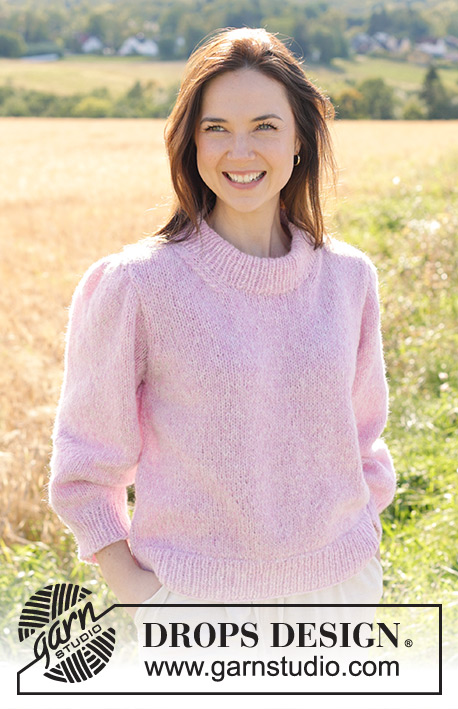
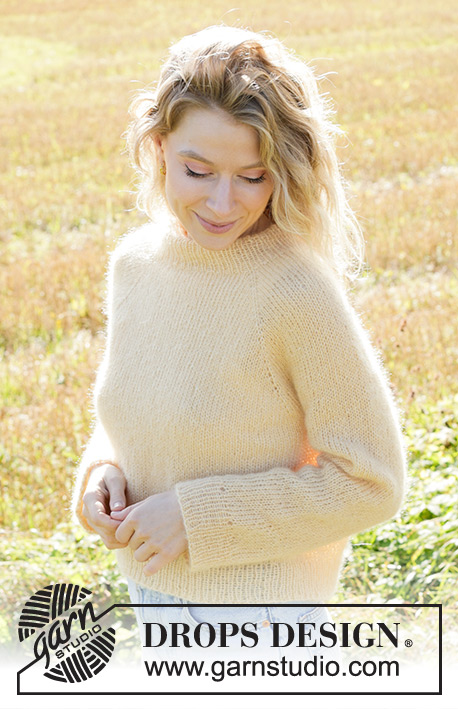
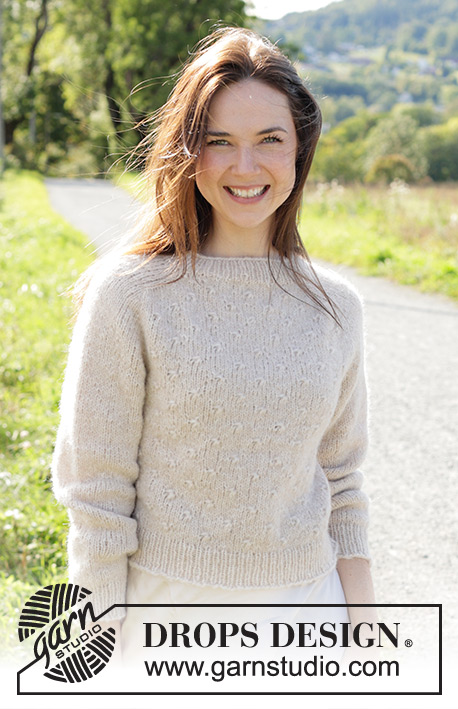
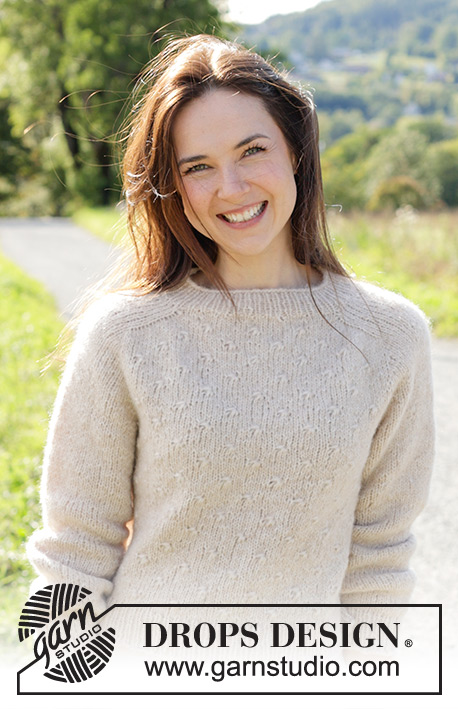
Knitted jumper in DROPS Air or DROPS Big Merino. The piece is worked top down with saddle shoulders and relief-pattern. Sizes S - XXXL.
DROPS 248-7 |
||||||||||||||||||||||
|
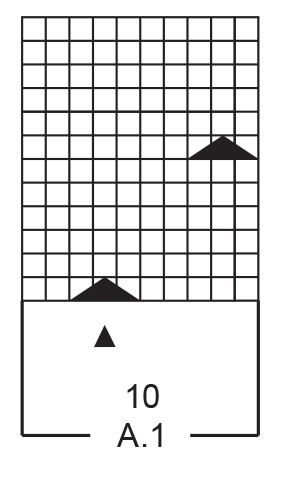
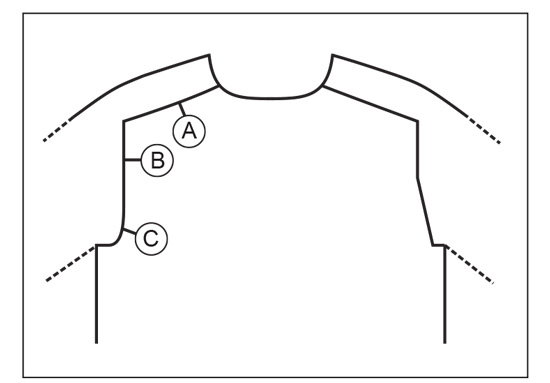
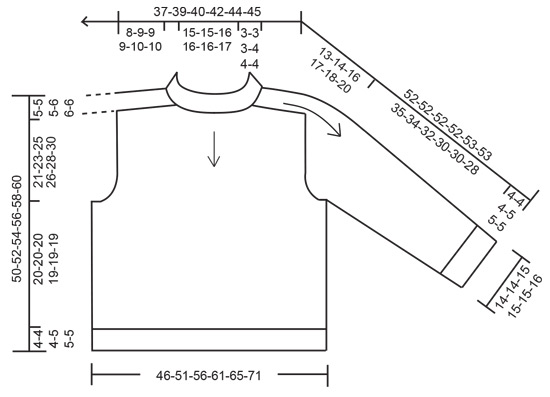
------------------------------------------------------- EXPLANATIONS FOR THE PATTERN: ------------------------------------------------------- PATTERN: See diagram A.1. INCREASE TIP-1 (evenly spaced): Increase 1 stitch by making 1 yarn over, which is knitted twisted on the next round to avoid a hole. INCREASE TIP-2 (from right side): Increase 1 towards the left after marker-thread: Use the left needle to pick up the strand between 2 stitches from the previous row/round, pick up strand from the front and knit the back loop. Increase 1 towards the right before marker-thread: Use the left needle to pick up the strand between 2 stitches from the previous row/round, pick up strand from behind and knit the front loop. INCREASE TIP-3 (from wrong side): Increase 1 towards the left after marker-thread: Use the left needle to pick up the strand between 2 stitches from the previous row/round, pick up strand from behind and purl the front loop. Increase 1 towards the right before marker-thread: Use the left needle to pick up the strand between 2 stitches from the previous row/round, pick up strand from the front and purl the back loop. DECREASE TIP (mid-under sleeves): Decrease 2 stitches on the round by decreasing 1 stitch on each side of the marker-thread as follows: Work until there are 3 stitches left before the marker-thread, knit 2 together, knit 2 (marker-thread sits between these 2 stitches), slip 1 stitch knit-wise, knit 1 and pass the slipped stitch over the knitted stitch. ------------------------------------------------------- START THE PIECE HERE: ------------------------------------------------------- JUMPER – SHORT OVERVIEW OF THE PIECE: The pattern uses both long and short needles; start with the length which fits the number of stitches and change when necessary. The piece is worked top down and in the round (apart from the elevation) with circular needle. When the neck and yoke are finished, the piece is divided for body and sleeves and the body is continued in the round, while the sleeves wait. The sleeves are worked in the round, top down. NECK: Cast on 84-86-90-94-96-100 stitches with circular needle size 4 mm and DROPS Air or DROPS Big Merino. Work rib in the round (knit 1, purl 1) for 3-3-3-4-4-4 cm. YOKE: Change to circular needle size 5 mm. Knit 1 round and increase 18-16-16-20-22-18 stitches evenly spaced – read INCREASE TIP-1 = 102-102-106-114-118-118 stitches. Insert 1 marker in the first stitch on the round (= mid-back) and 1 marker in the 52nd-52nd-54th-58th-60th-60th stitch on the round (= mid-front). The yoke is measured from the marker mid-front. The markers are also used when determining where to start the pattern. In addition, insert 4 marker-threads (used when working the saddle shoulders) without working the stitches and each thread is inserted between 2 stitches as follows: MARKER-THREAD 1: Start mid-back, count 18-18-19-19-20-20 stitches including the marker-stitch (= ½ back piece), insert marker-thread before the next stitch. MARKER-THREAD 2: Count 16-16-16-20-20-20 stitches after marker-thread 1 (= shoulder-stitches), insert marker-thread before the next stitch. MARKER-THREAD 3: Count 35-35-37-37-39-39 stitches after marker-thread 2 (= front piece), insert marker-thread before the next stitch. MARKER-THREAD 4: Count 16-16-16-20-20-20 stitches after marker-thread 3 (= shoulder-stitches), insert marker-thread before the next stitch. There are 17-17-18-18-19-19 stitches left after marker-thread 4 (= ½ back piece). Allow the threads to follow your work onwards, you will increase by each one. Now work an elevation as described below. ELEVATION: The elevation is worked back and forth in stocking stitch. REMEMBER THE KNITTING TENSION! Start mid-back, knit 8-8-9-9-10-10, turn, tighten the strand and purl 15-15-17-17-19-19 – when turning there will be a small hole – this can be closed by tightening the strand or working the technique GERMAN SHORT ROWS (search our videos). Turn, tighten the strand and knit 23-23-26-26-29-29, turn, tighten the strand and purl 31-31-35-35-39-39. Turn, tighten the strand and knit 39-39-44-44-49-49 – in addition, increase 1 stitch BEFORE marker-thread 1 – read INCREASE TIP-2 (the increased stitch is in addition to the stitch count in the elevation), turn, tighten the strand and purl 47-47-53-53-59-59 – in addition, increase 1 stitch AFTER marker-thread 1 and BEFORE marker-thread 4 – read INCREASE TIP-3 (remember the increased stitches are in addition to the stitch count), turn, tighten the strand and knit to mid-back – in addition, increase 1 stitch AFTER marker-thread 4, cut the strand. You have increase 2 stitches before marker-thread 1 and 2 stitches after marker-thread 4 (seen from the right side). There are 4 more stitches on the back piece than on the front piece = 106-106-110-118-122-122 stitches. OVERVIEW OF NEXT SECTION: The round now starts just after marker-thread 1 (stitches between mid-back and marker-thread 1 are moved onto the right needle). Work in the round and start to increase for the saddle shoulders and work pattern on the front and back pieces. Read SADDLE SHOULDER INCREASES and PATTERN before continuing! SADDLE SHOULDER INCREASES: Work stocking stitch and increase 4 stitches for the saddle shoulders on the first round as follows: Increase 1 stitch AFTER marker-threads 2 and 4 and BEFORE marker-threads 1 and 3 – remember INCREASE TIP-2. You only increase on the front and back pieces and the number of shoulder stitches remains the same. Increase like this each round a total of 16-18-18-18-20-20 times. Then work 2 rounds where you only increase on each side of the front piece, (so the stitch count is the same on the front and back pieces), i.e., increase AFTER marker-thread 2 and BEFORE marker-thread 3 on both rounds = 174-182-186-194-206-206 stitches (= 16-16-16-20-20-20 stitches on each shoulder and 71-75-77-77-83-83 stitches on the front and back pieces). After the last increase, the piece measures approx. 8-9-9-9-10-10 cm from the marker-stitch mid-front. You now increase for the sleeves as described further down. PATTERN: At the same time, after 4 rounds of stocking stitch from the elevation, begin working pattern. A.1 is only worked on the front and back pieces, the shoulders are worked in stocking stitch. On the front piece, count out from the marker-stitch mid-front – see symbols in A.1 marking mid-front/back, towards the side (towards marker-thread 2) and as far as possible to the saddle shoulder increases. NOTE: It is neatest to avoid a «knot» close to the saddle shoulder increases, here you can work stocking stitch. Work A.1 as far as the saddle shoulder increases on the other side (towards marker-thread 3), then work the remaining stitches in stocking stitch (the pattern is symmetrical on both sides). Work stocking stitch over the shoulder and pattern on the back piece in the same way as on the front piece. Continue in the round. The stitches from the saddle shoulder increases, and later from the yoke increases, are worked into the pattern but try to avoid a «knot» close to the increases. SLEEVE INCREASES: When the saddle shoulders increases are finished, increase 4 stitches for the sleeves on the next round as follows: Increase 1 stitch AFTER marker-threads 1 and 3, and BEFORE marker-threads 2 and 4 – remember INCREASE TIP-2! You now only increase on the sleeves and the number of stitches on the front and back pieces remains the same. The increased stitches are worked in stocking stitch. Increase like this every 2nd round a total of 12-13-15-13-13-10 times, then every round 3-2-0-0-0-0 times = 234-242-246-246-258-246 stitches. The piece measures approx. 20-22-23-21-22-19 cm from the marker-stitch mid-front. Now increase for the yoke. YOKE INCREASES: Remove the 4 marker-threads from the previous increases and insert 1 marker in the outermost stitch on each side of the front and back pieces (4 new markers), with 71-75-77-77-83-83 stitches on the front and on the back (including the marker-stitches) and 46-46-46-46-46-40 stitches on each sleeve. On the next round increase 1 stitch before and after all 4 marker-stitches (8 increased stitches). You now increase on both the front/back pieces and on the sleeves – the increased stitches are worked into pattern A.1 on the front/back pieces and in stocking stitch on the sleeves. Increase like this every 2nd round a total of 0-0-1-3-5-12 times, then every round 1-2-3-5-3-0 times. After the last increase there are 242-258-278-310-322-342 stitches and the piece measures approx. 21-23-25-26-28-30 cm from the marker-stitch mid-front (approx. 26-28-30-32-34-36 cm from the shoulder). DIVIDE FOR BODY AND SLEEVES: Place the first 48-50-54-62-62-64 stitches on 1 thread for the sleeve (= all stitches between marker-threads 1 and 2), cast on 6-8-10-10-12-14 stitches (= in side under sleeve), continue the pattern over the next 73-79-85-93-99-107 stitches (= front piece), place the next 48-50-54-62-62-64 stitches on 1 thread for the sleeve (= all stitches between marker-threads 3 and 4), cast on 6-8-10-10-12-14 stitches (= in side under sleeve), continue the pattern over the last 73-79-85-93-99-107 stitches (= back piece). Remove all markers and marker-threads. The body and sleeves are finished separately. The piece is now measured from here! BODY: = 158-174-190-206-222-242 stitches. Insert 1 marker in the middle of the 6-8-10-10-12-14 cast on stitches under one sleeve). Knit to the marker – the round now starts here. Continue pattern in the round. NOTE: The stitches which do not fit into the pattern under the sleeves are worked in stocking stitch. Work until the body measures 20-20-20-19-19-19 cm from the division – adjusting so there are several rounds of stocking stitch after the last round of «knots». Change to circular needle size 4 mm and work rib (knit 1, purl 1), AT THE SAME TIME increase 16-20-22-24-24-28 stitches evenly on round 1 = 174-194-212-230-246-270 stitches. When the rib measures 4-4-4-5-5-5 cm, cast off a little loosely. The jumper measures approx. 50-52-54-56-58-60 cm from the shoulder. SLEEVES: Place the 48-50-54-62-62-64 stitches from the thread on the one side of the piece on short circular needle/double pointed needles size 5 mm and knit up 1 stitch in each of the 6-8-10-10-12-14 stitches cast on under the sleeve = 54-58-64-72-74-78 stitches. Insert a marker-thread in the middle of the 6-8-10-10-12-14 stitches under the sleeve. Start at the marker-thread and work stocking stitch in the round. When the sleeve measures 4-4-4-3-3-3 cm from the division, decrease 2 stitches under the sleeve – read DECREASE TIP. Decrease like this every 8-6-4-2½-2½-2 cm a total of 4-5-7-10-11-12 times = 46-48-50-52-52-54 stitches. Continue working until the sleeve measures 35-34-32-30-30-28 cm from the division (There is 4-4-4-5-5-5 cm left; try the jumper on and work to desired length before the rib). Change to double pointed needles size 4 mm. Work rib (knit 1, purl 1) AT THE SAME TIME as you increase 6 stitches evenly on round 1 = 52-54-56-58-58-60 stitches. When the rib measures 4-4-4-5-5-5 cm, cast off a little loosely The sleeve measures approx. 39-38-36-35-35-33 cm from the division. |
||||||||||||||||||||||
Diagram explanations |
||||||||||||||||||||||
|
||||||||||||||||||||||
 |
||||||||||||||||||||||
 |
||||||||||||||||||||||
 |
||||||||||||||||||||||
Have you finished this pattern?Tag your pictures with #dropspattern #oatfieldsweater or submit them to the #dropsfan gallery. Do you need help with this pattern?You'll find 35 tutorial videos, a Comments/Questions area and more by visiting the pattern on garnstudio.com. © 1982-2026 DROPS Design A/S. We reserve all rights. This document, including all its sub-sections, has copyrights. Read more about what you can do with our patterns at the bottom of each pattern on our site. |
||||||||||||||||||||||


With over 40 years in knitting and crochet design, DROPS Design offers one of the most extensive collections of free patterns on the internet - translated to 17 languages. As of today we count 324 catalogues and 12290 patterns translated into English (UK/cm). 12290
We work hard to bring you the best knitting and crochet have to offer, inspiration and advice as well as great quality yarns at incredible prices! Would you like to use our patterns for other than personal use? You can read what you are allowed to do in the Copyright text at the bottom of all our patterns. Happy crafting!
Post a comment to pattern DROPS 248-7
We would love to hear what you have to say about this pattern!
If you want to leave a question, please make sure you select the correct category in the form below, to speed up the answering process. Required fields are marked *.