
Popular categories
Looking for a yarn?


Comments / Questions (15)
![]() Karina wrote:
Karina wrote:
Als ik na de onderboord ga minderen, ga ik er van uit dat dit allen moet, nadat ik de voorbijsteken en a1 en a2 gebreid heb, en dat ook niet minder in de laatste 19 steken van de toer, dit staat niet goed aangegeven!
05.08.2025 - 12:46
![]() Juliane wrote:
Juliane wrote:
Stimmt es, dass die Verzopfungen in Rückreihen stattfinden? A1 und A3 gaben mehr Reihen als A2 - irrtümlich?
14.12.2024 - 08:01DROPS Design answered:
Liebe Juliane, also stimmt, die 1. Reihe A.1b und A.3b muss 1 Hinreihe sein, damit die Zöpfe bei der Vorderseite stattfinden (so anpassen, unser Design Team wird das mal schauen); A.2 wiederholen Sie nur in der Höhe wenn A.1/A.3 fertig sind. Viel Spaß beim Stricken!
16.12.2024 - 10:03
![]() Tina wrote:
Tina wrote:
Er i tvivl om hvor vende rækkerne på sjals kraven skal være...... Mod nakken/håret eller mod ryggen
10.10.2024 - 17:43
![]() Christina wrote:
Christina wrote:
Anleitung korrigieren: 7 Rippen, A1a, A2, nun A3 wiederholen bis 19 Maschen Rest, dann A2, A1a, 7 RippenIch habe 2x gestartet bis ich den Fehler gefunden hatte. Und dies obwohl ich in 40 Jahren einige Anleitungen gelesen habe 6nd dementsprechend Erfahrung.
24.05.2024 - 22:20
![]() May wrote:
May wrote:
Her er noe feil. Tegning og beskrivelse sier noe om sjalskrage men dette er en V-jakke. Oppdatering ønskes.
02.03.2024 - 13:39
![]() Vivi Engholm Tecza wrote:
Vivi Engholm Tecza wrote:
Der er en fejl i diagram beskrivelsen. Iflg den, er hvid firkant og sort firkant det samme. Heldigvis tjekkede jeg med den norske udgave, da jeg har haft rimelig problem med at strikke det korrekt, så min fornemmelse af, at der var noget galt med vejledningen, var korrekt
17.02.2024 - 19:05
![]() Ene Jalakas wrote:
Ene Jalakas wrote:
Tere. Teen mustreid A1a, A2 ja A3a ja jôudes rea lõppu enne 19 silma, lõpetan kolme vasakpidi silmaga A3. Alustan ju A3a kahe vasakpidi silmaga. Kaks hôlma tulevad ju nii erinevad? Ene
31.01.2024 - 08:01DROPS Design answered:
Tere Ene Jalakas! See 1 silmus jääb ripskoes esiliistu kõrvale ja ei jää näha. Soovikorral võite teha mõlemad pooled ühesugused. Head kudumist!
31.01.2024 - 23:03
![]() Ute wrote:
Ute wrote:
Hallo, leider ist die deutsche Übersetzung hier mangelhaft. Im Englischen steht eindeutig „then“ A.3a until there are 19 stitches left. Im deutschen Text „ A.1a,A.2,A.3a bis noch 19 Maschen übrig sind. Das liest sich nach einer Wiederholung von A1.a,A.2 und A.3a und NICHT von der eigentlich gemeinten alleinigen Wiederholung von NUR A.3a. Ich stricke seit Jahrzehnten eigentlich alles und gerne schwierige Muster. Das kann man besser und eindeutiger formulieren. Danke
19.01.2024 - 16:45DROPS Design answered:
Liebe Ute, es tut uns leid, dass es bei Ihnen zu einem Missverständnissen gekommen ist. Die deutsche Übersetzung entspricht allerdings der bei Strickanleitungen etablierten Darstellungsweise, jeden Einzelschritt mit einem Komma abzutrennen, und ist daher nicht mangelhaft. Wir können die Anleitung hier zwar deutlicher machen, Sie werden diese Formulierung allerdings auch in anderen Anleitungen finden. Weiter gutes Gelingen!
22.01.2024 - 10:03
![]() Ute wrote:
Ute wrote:
Es wäre schön, wenn die Anleitung längst korrigiert worden wäre. Ich saß jetzt selbst daran und habe gerechnet und nach Bild meine Berechnung vorgenommen. Und natürlich erstmal wieder aufgetrennt. Maschenzahl 283: 7 Maschen Rippen, A.1a(6Maschen) A2(6Maschen)= 19 Maschen Jetzt A.3a 35x wiederholen (35x7= 245) A2, A1.a und 7 Maschen Rippen, =19 Maschen Gesamtanzahl Maschen: 283
18.01.2024 - 15:32DROPS Design answered:
Liebe Ute, ja genauso soll man am Anfang vom Rumpfteil in M stricken, missverstehe ich Ihre Frage?
19.01.2024 - 08:30
![]() Ida Razmilic wrote:
Ida Razmilic wrote:
Mw Pultrum heeft gelijk. Nu zie ik het ook. Het patroon klopt niet. Graag gecorrigeerd patroon publiceren.
28.11.2023 - 15:12DROPS Design answered:
Dag Ida,
Als je volgens patroon breit en ook A.2 breit, krijg je ribbelsteken naast A.1
29.11.2023 - 19:22
|
||||||||||||||||
Lavender Romance Cardigan#lavenderromancecardigan |
||||||||||||||||
 |
 |
|||||||||||||||
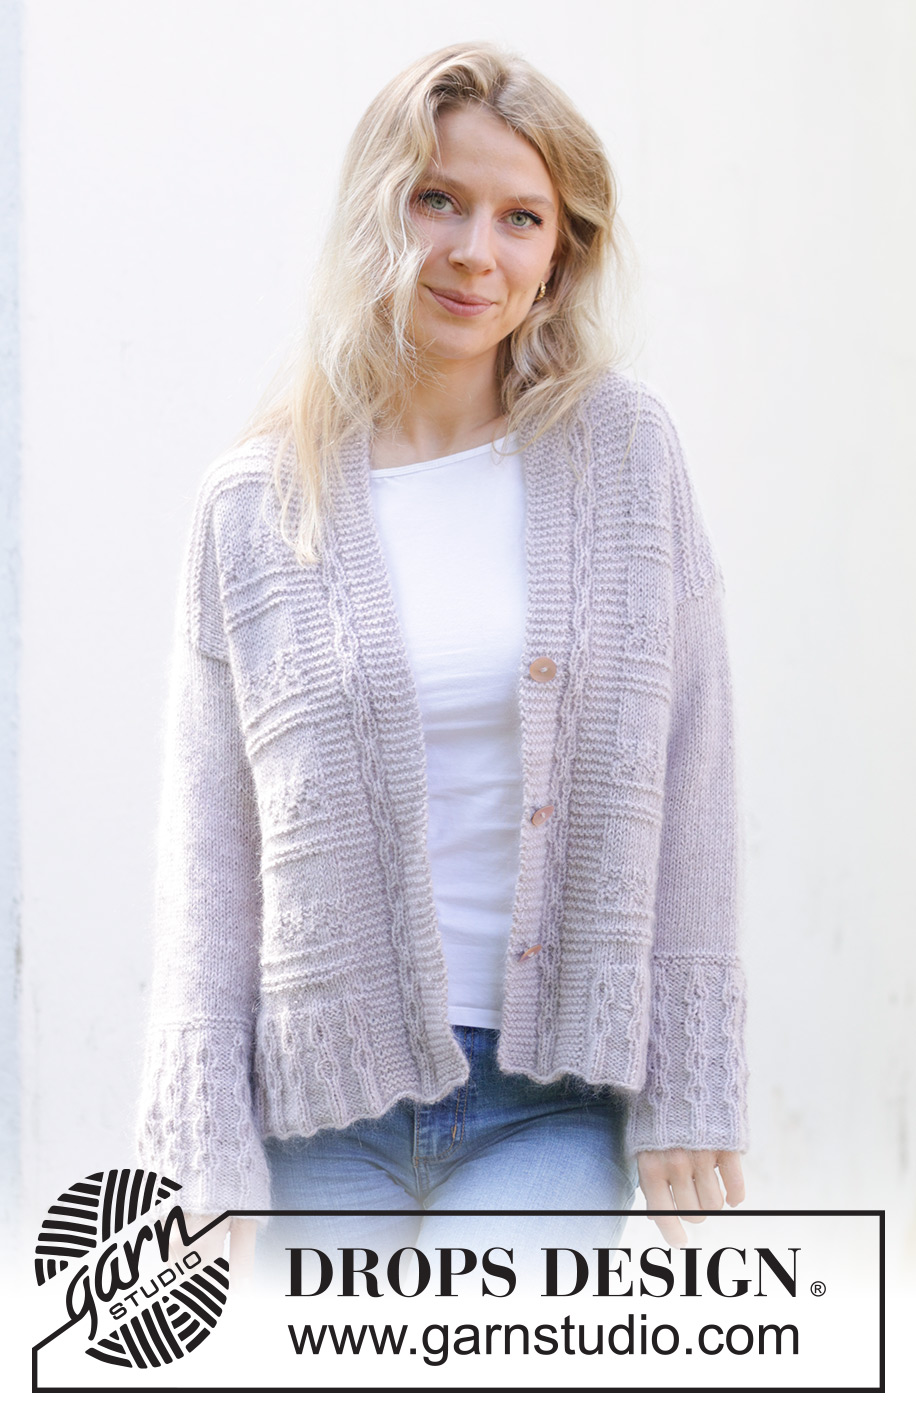
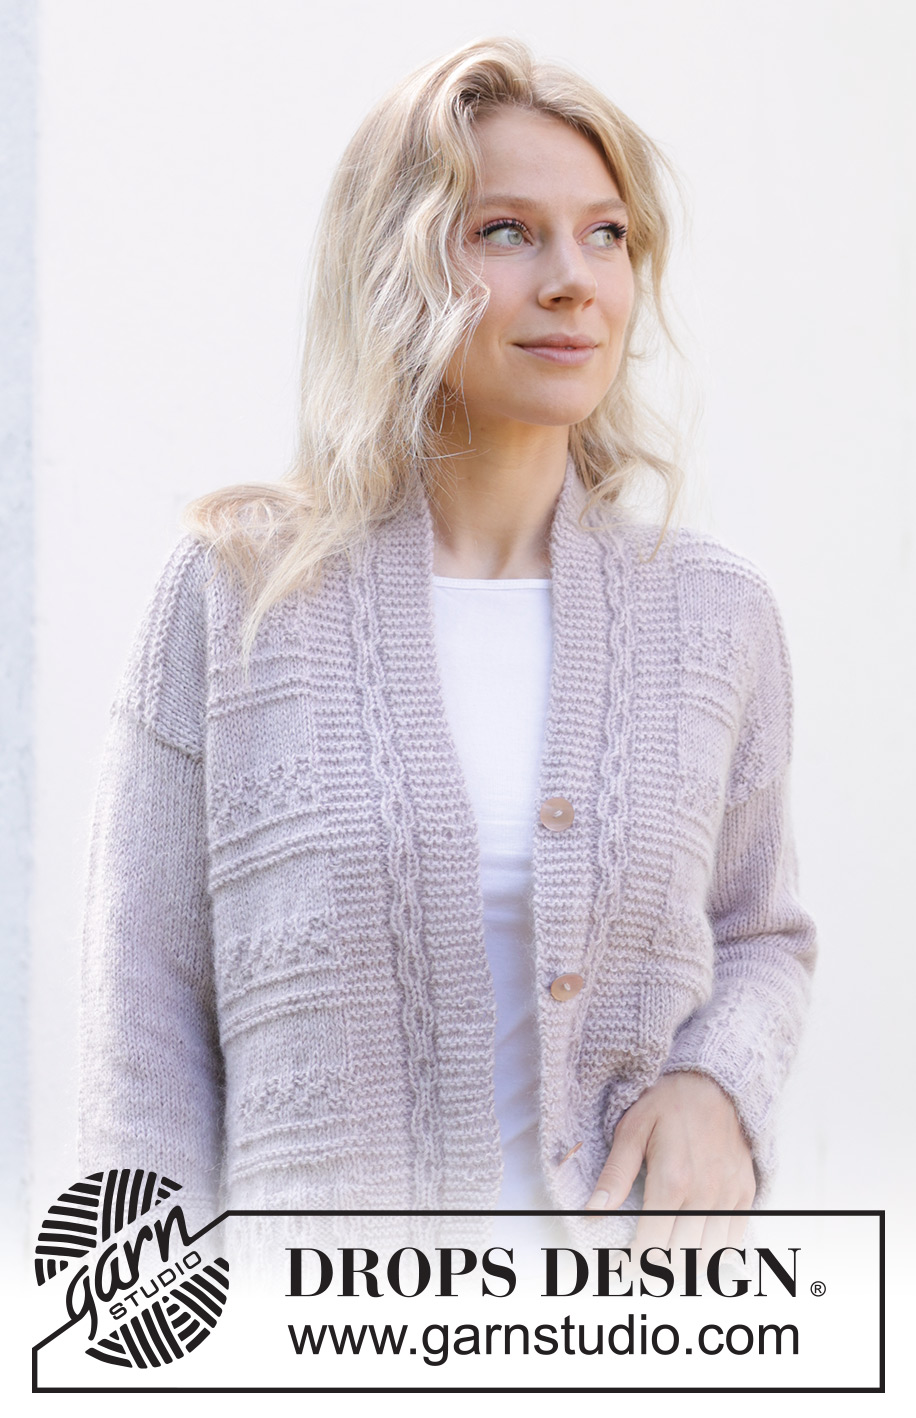
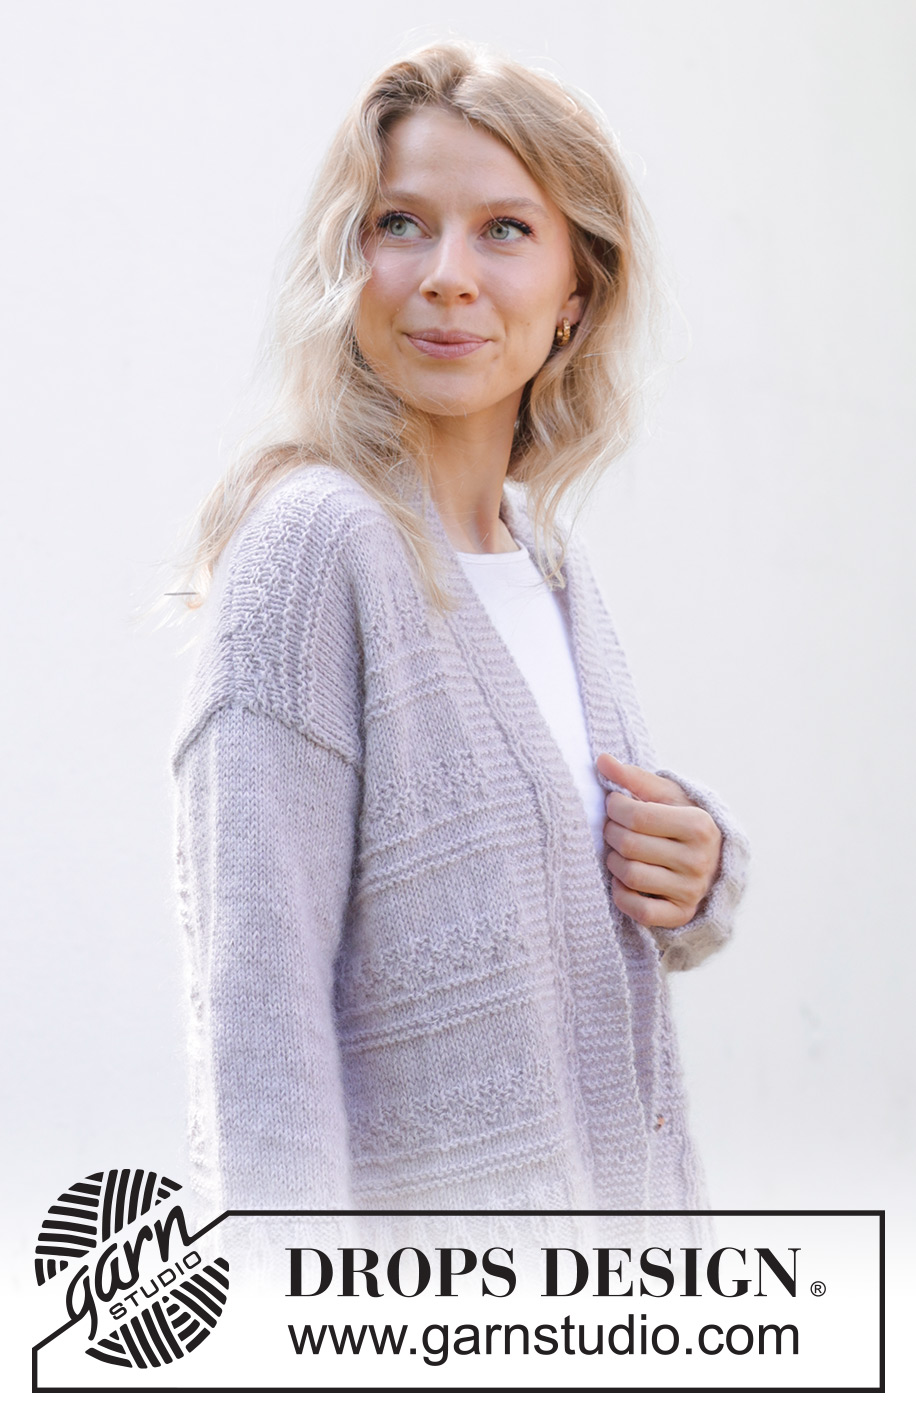
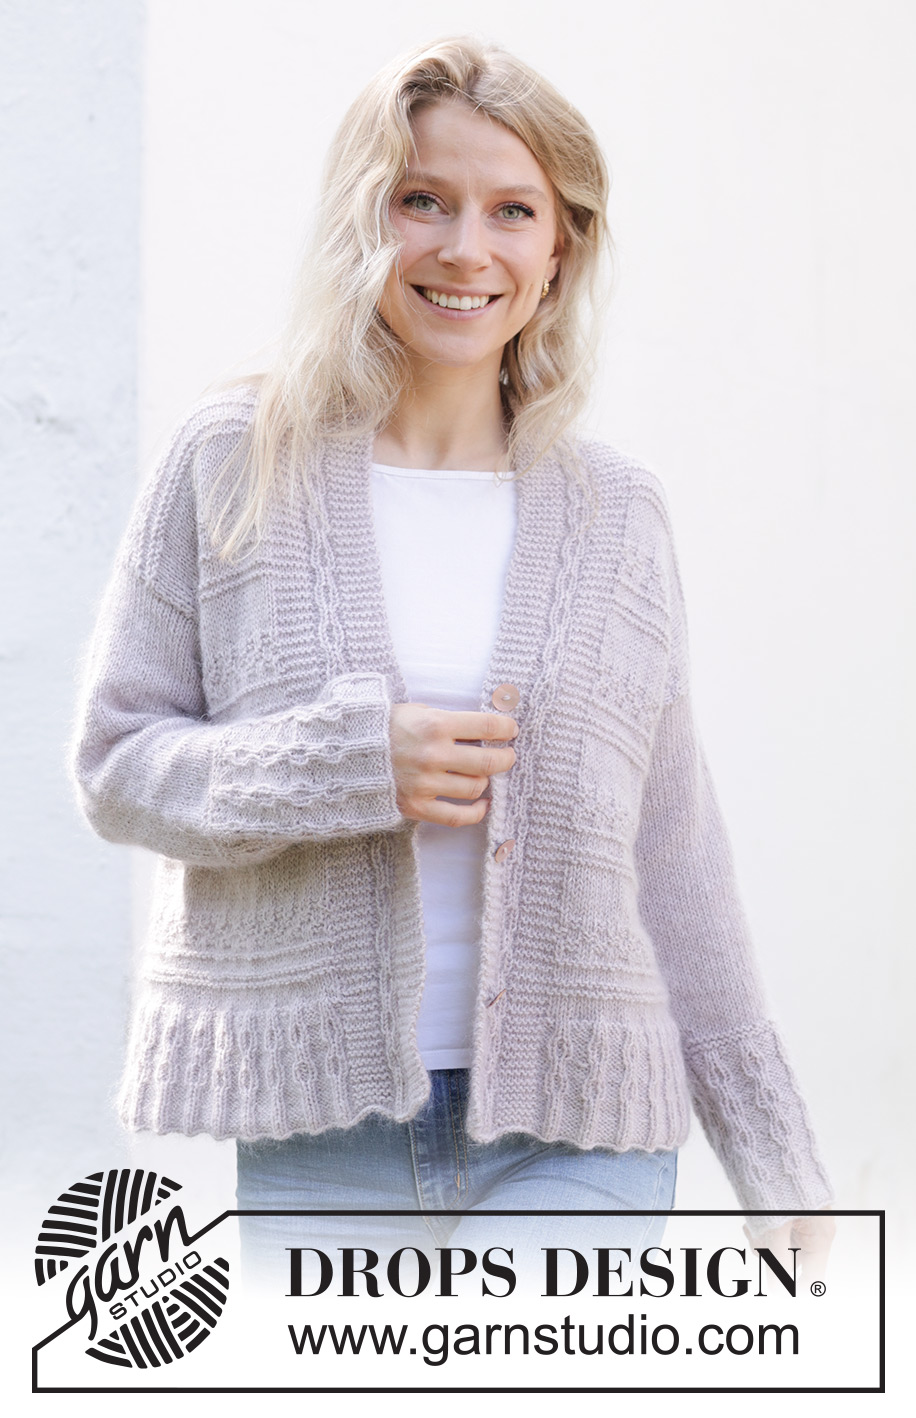
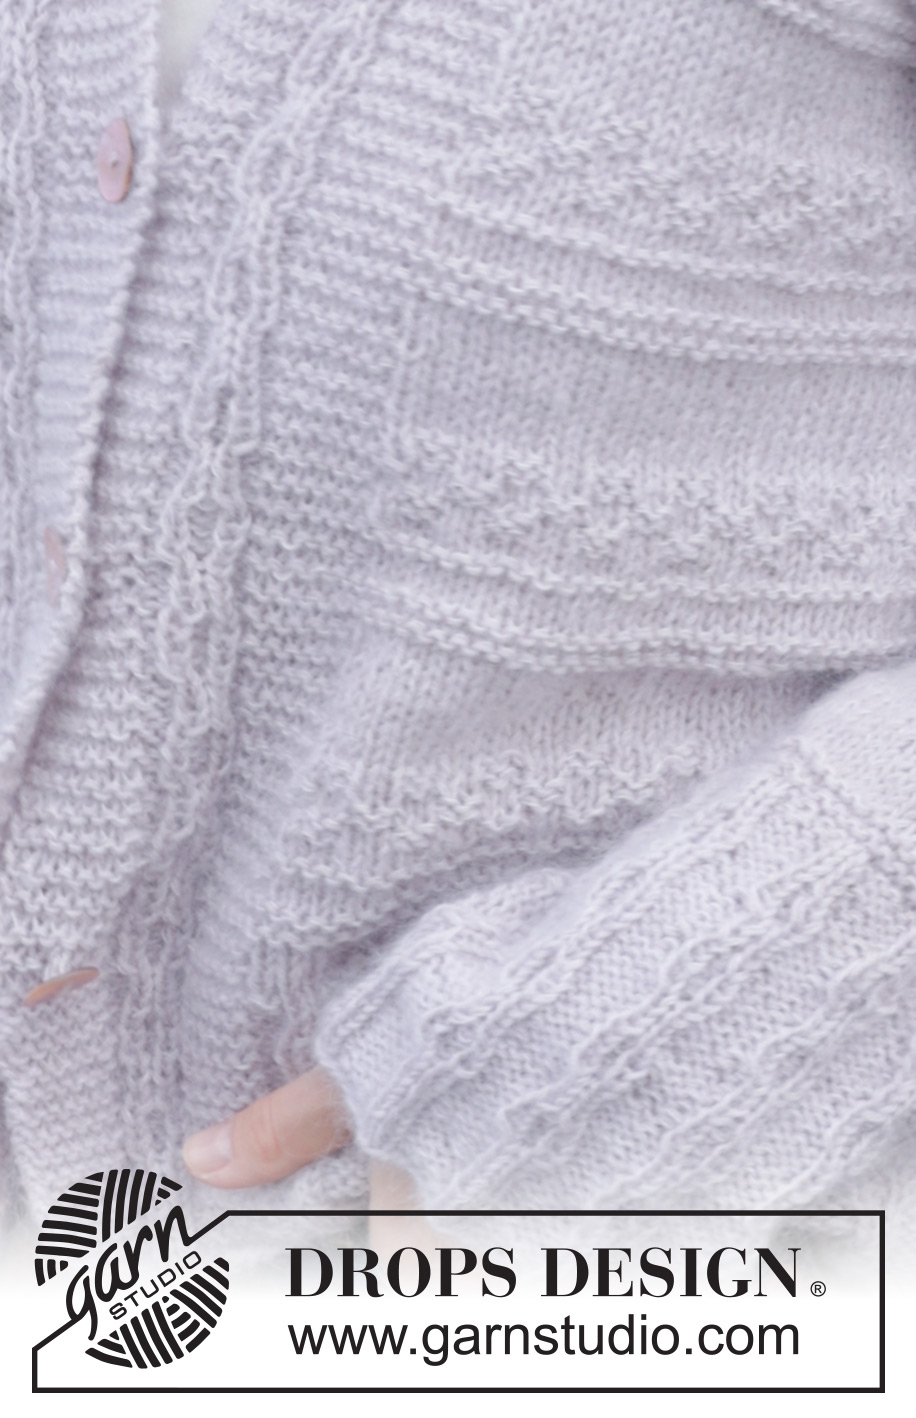
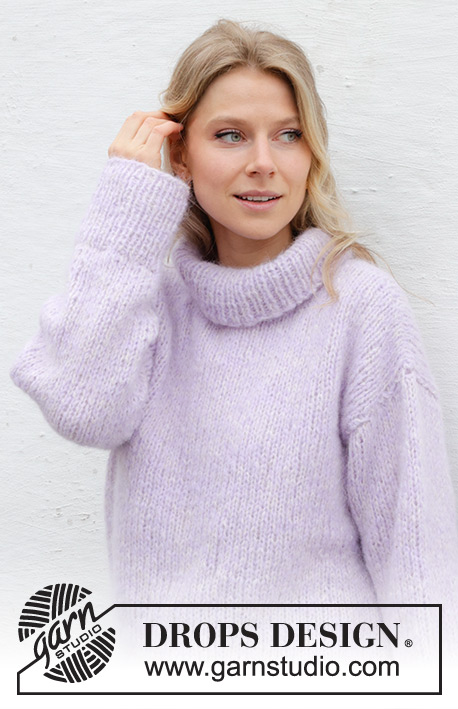
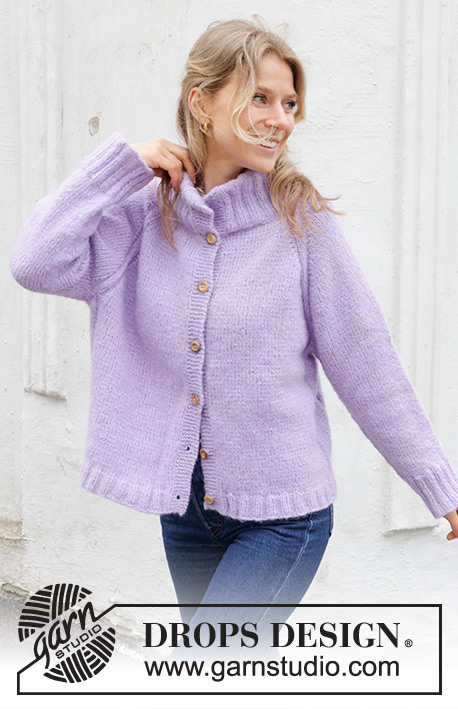
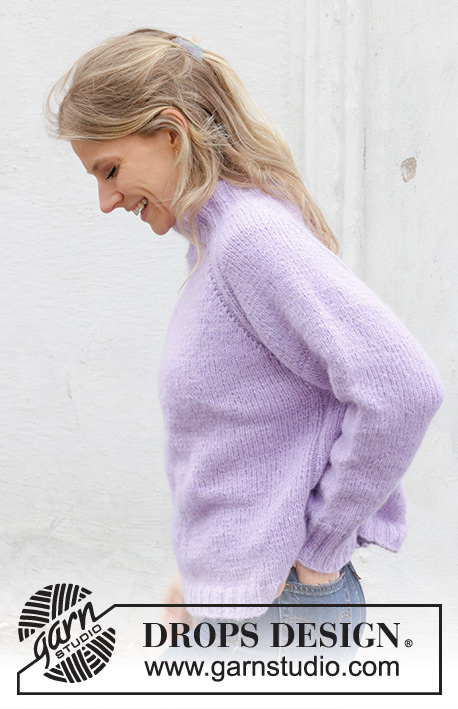
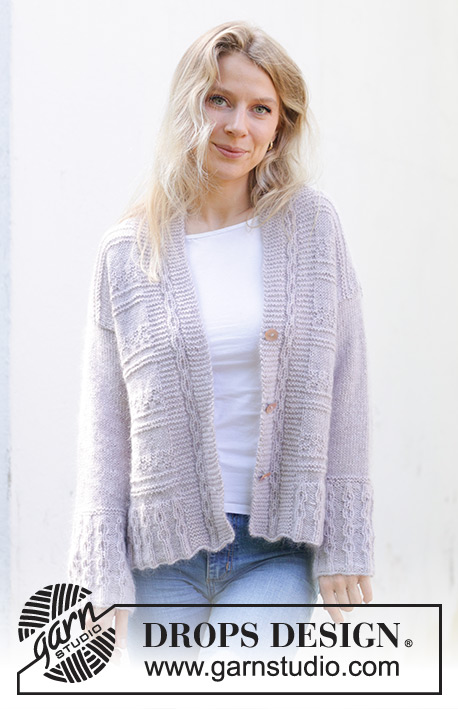
Knitted jacket in DROPS Alpaca and DROPS Kid-Silk. The piece is worked bottom up with garter stitch and relief-pattern. Sizes S - XXXL.
DROPS 243-18 |
||||||||||||||||
|
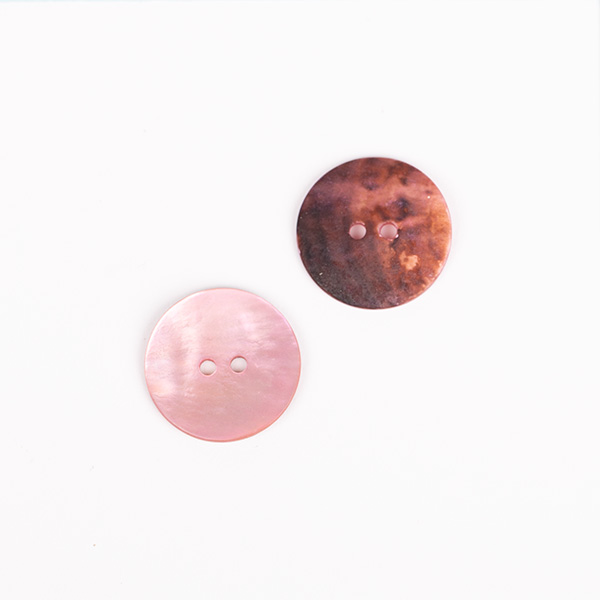
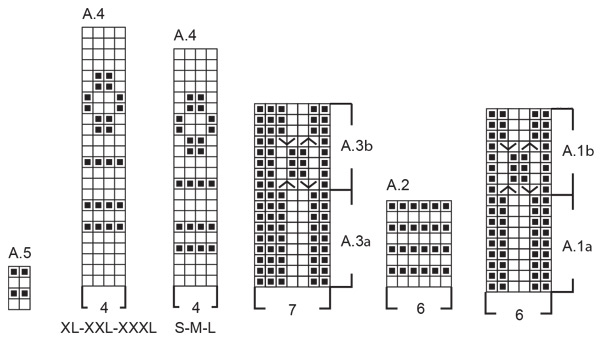
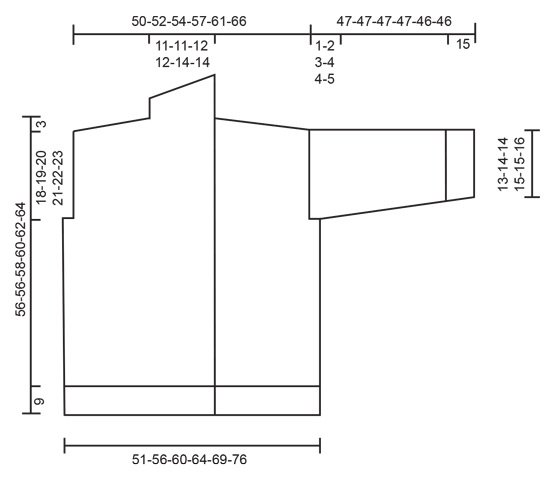
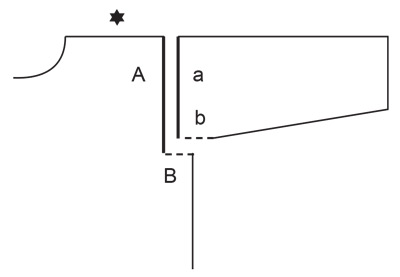
------------------------------------------------------- EXPLANATIONS FOR THE PATTERN: ------------------------------------------------------- GARTER STITCH (worked back and forth): Knit all rows. 1 ridge = knit 2 rows. PATTERN: See diagrams A.1 to A.5. Choose diagram for your size (applies to A.4). The diagrams show all rows in the pattern from the right side. BUTTONHOLES (bottom up): Work the buttonholes on the right band. 1 BUTTONHOLE = knit together the 3rd and fourth stitch from the edge and make 1 yarn over. On the next row knit the yarn over to leave a hole. Work the buttonholes when the piece measures: S: 9, 19 and 29 cm. M: 9, 19 and 29 cm. L: 9, 19 and 29 cm. XL: 9, 18, 27 and 36 cm. XXL: 9, 18, 27 and 36 cm. XXXL: 9, 18, 27 and 36 cm. INCREASE TIP (sleeves): Work until there is 1 stitch left before the marker thread, 1 yarn over, knit 2 (marker thread sits between these 2 stitches), 1 yarn over. On the next round knit the yarn overs twisted to avoid holes. ------------------------------------------------------- START THE PIECE HERE: ------------------------------------------------------- JACKET - SHORT OVERVIEW OF THE PIECE: The body is worked from bottom up, back and forth with circular needle as far as the armholes, then divided and the front and back pieces continued separately, back and forth. The sleeves are worked in the round wit double pointed needles/short circular needle as far as the sleeve cap, which is finished back and forth. BODY: Cast on 262-283-297-318-346-374 stitches with circular needle size 3.5 mm and 1 strand of each quality (2 strands). Purl 1 row from the wrong side, then work rib from the right side as follows: Work 7 band stitches in GARTER STITCH – read description above, A.1a, A.2, then A.3a until there are 19 stitches left, A.2, A.1a and 7 band stitches in garter stitch. Continue this pattern until A.1a is finished in height. Continue as follows: 7 band stitches in garter stitch, A.1b, A.2, then A.3b until there are 19 stitches left, A.2, A.1b and 7 band stitches in garter stitch. Continue this pattern until A.3b has been worked 2 times in height. The piece measures approx. 9 cm. Remember the BUTTONHOLES – read description above. Change to circular needle size 4.5 mm. Work 7 band stitches in garter stitch, A.1b, A.2, then A.4 until there are 19 stitches left AT THE SAME TIME as you decrease 64-69-67-72-84-88 stitches evenly on the first row, A.2, A.1b and 7 band stitches in garter stitch = 198-214-230-246-262-286 stitches. REMEMBER THE KNITTING TENSION! When A.4 is finished in height, the piece measures approx. 18-18-18-19-19-19 cm from the cast-on edge. Continue the pattern until the piece measures 35-34-35-36-37-38 cm. On the next row from the right, side cast off for the armholes as follows: Work 52-54-56-58-62-66 stitches as before (right front piece), place these stitches on a stitch holder, cast off 2-6-10-14-14-18 stitches, work 90-94-98-102-110-118 stitches (back piece), place these stitches on a stitch holder, cast off 2-6-10-14-14-18 stitches, work the last 52-54-56-58-62-66 stitches (left front piece). Each section is finished separately. LEFT FRONT PIECE: = 52-54-56-58-62-66 stitches. The first row is from the wrong side. Continue the pattern until A.4 has been worked a total of 5 times in height. Now work stocking stitch over A.4. AT THE SAME TIME when the piece measures 18-19-20-21-22-23 cm from the division, work the diagonal shoulders on the next row from the neck as follows: Work until there are 7-8-8-9-9-10 stitches left, turn and work back. Continue like this, working 7-8-8-9-9-10 fewer stitches each time you turn 2 more times. On the last row towards the neck, work until there are 17-17-18-18-19-20 stitches left, place these 17-17-18-18-19-20 stitches on a thread for the collar. Work 1 row of stocking stitch back over the 35-37-38-40-43-46 shoulder stitches. Cast off. The piece measures approx 56-56-58-60-62-64 cm measured closest to the neck. SHAWL-COLLAR: Place the 17-17-18-18-19-20 stitches from the thread on circular needle size 4.5 mm. Continue the band, A.1b and A.2 at the same time as short rows are worked as follows: ROW 1 (right side): Work all stitches, turn, tighten the strand. ROW 2 (wrong side): Work the first 7 stitches, turn, tighten the strand. ROW 3 (right side): Work the 7 stitches, turn, tighten the strand. ROW 4 (wrong side): Work all stitches. Repeat rows 1 to 4 until the collar measures 7-8-8-9-9-9 cm at the shortest point. Work 1 ridge (see GARTER STITCH) over all stitches. Cast off. RIGHT FRONT PIECE: = 52-54-56-58-62-66 stitches. The first row is from the wrong side. Continue the pattern until A.4 has been worked a total of 5 times in height. Now work stocking stitch over A.4. AT THE SAME TIME when the piece measures 18-19-20-21-22-23 cm from the division, work the diagonal shoulders on the next row from the neck as follows: Work until there are 7-8-8-9-9-10 stitches left, turn and work back. Continue like this, working 7-8-8-9-9-10 fewer stitches each time you turn 2 more times. On the last row towards the neck, work until there are 17-17-18-18-19-20 stitches left, place these 17-17-18-18-19-20 stitches on a thread for the collar. Work 1 row of stocking stitch back over the 35-37-38-40-43-46 shoulder stitches. Cast off. The piece measures approx 56-56-58-60-62-64 cm measured closest to the neck. SHAWL-COLLAR: Place the 17-17-18-18-19-20 stitches from the thread on circular needle size 4.5 mm. Continue the band, A.1b and A.2 at the same time as short rows are worked as follows: ROW 1 (wrong side): Work all stitches, turn, tighten the strand. ROW 2 (right side): Work the first 7 stitches, turn, tighten the strand. ROW 3 (wrong side): Work the 7 stitches, turn, tighten the strand. ROW 4 (right side): Work all stitches. Repeat rows 1 to 4 until the collar measures 7-8-8-9-9-9 cm at the shortest point. Work 1 ridge over all stitches. Cast off. BACK PIECE: = 90-94-98-102-110-118 stitches. Continue the pattern until A.4 has been worked 5 times in height and the piece measures approx. 54-54-54-59-59-59 cm from the cast-on edge. Continue with stocking stitch. When the piece measures 18-19-20-21-22-23 cm from the division, work diagonal shoulders and cast off for the neck on the next row from the right side as follows: Work 36-38-39-41-44-47 stitches, cast off the next 18-18-20-20-24-24 stitches for the neck, work until there are 7-8-8-9-9-10 stitches left on the row. Turn and work back. Each shoulder is finished separately. Continue like this, working 7-8-8-9-9-10 fewer stitches at the end of each row from the neck a total of 3 times. AT THE SAME TIME cast off 1 stitch for the neck at the beginning of the first row from the neck = 35-37-38-40-43-46 stitches. Work 1 row of stocking stitch over all the shoulder stitches. Cast off. The piece measures approx. 56-56-58-60-62-64 cm measured closest to the neck. Work the other shoulder in the same way. SLEEVES: Cast on 63-70-70-77-77-77 stitches with double pointed needles size 3.5 mm and 1 strand of each quality (2 strands). Insert 1 marker-thread at the beginning of the round, allow it to follow your work onwards. Knit 1 round. Work rib as shown in A.3a over all stitches. When A.3a is finished in height, work A.3b over all stitches 4 times in height. Work A.5 over all stitches and decrease 17-20-20-23-23-19 stitches evenly on first round = 46-50-50-54-54-58 stitches. The sleeve measures approx. 15 cm. Change to short circular needle size 4.5 mm. Continue with stocking stitch. When the sleeve measures 17-17-16-17-17-16 cm, increase 1 stitch on each side of the marker-thread – read INCREASE TIP. Increase like this every 3-3-2½-2-2-2 cm a total of 9-9-11-11-12-12 times = 64-68-72-76-78-82 stitches. When the sleeve measures 46-45-44-43-42-41 cm, work the sleeve cap back and forth (from the marker-thread). Cast off when the sleeve measures 47-47-47-47-46-46 cm (a split of 1-2-3-4-4-5 cm at the top of the sleeve). Work the other sleeve in the same way. ASSEMBLY: Sew the shoulder seams inside the cast-off edge. Sew the collar together mid-back and sew it to the neckline. Sew the sleeve cap to the armhole and the split to the bottom of the armhole - see sketch. Sew the buttons onto the left band. |
||||||||||||||||
Diagram explanations |
||||||||||||||||
|
||||||||||||||||
 |
||||||||||||||||
 |
||||||||||||||||
 |
||||||||||||||||
 |
||||||||||||||||
Have you finished this pattern?Tag your pictures with #dropspattern #lavenderromancecardigan or submit them to the #dropsfan gallery. Do you need help with this pattern?You'll find 28 tutorial videos, a Comments/Questions area and more by visiting the pattern on garnstudio.com. © 1982-2026 DROPS Design A/S. We reserve all rights. This document, including all its sub-sections, has copyrights. Read more about what you can do with our patterns at the bottom of each pattern on our site. |
||||||||||||||||


With over 40 years in knitting and crochet design, DROPS Design offers one of the most extensive collections of free patterns on the internet - translated to 17 languages. As of today we count 324 catalogues and 12290 patterns translated into English (UK/cm). 12290
We work hard to bring you the best knitting and crochet have to offer, inspiration and advice as well as great quality yarns at incredible prices! Would you like to use our patterns for other than personal use? You can read what you are allowed to do in the Copyright text at the bottom of all our patterns. Happy crafting!
Post a comment to pattern DROPS 243-18
We would love to hear what you have to say about this pattern!
If you want to leave a question, please make sure you select the correct category in the form below, to speed up the answering process. Required fields are marked *.