
Popular categories
Looking for a yarn?


Comments / Questions (5)
![]() Margret wrote:
Margret wrote:
“Pull out the strand which was used over the 10-11 stitches for the thumb-opening = 20-22 stitches.” I don’t understand where the extra 10 stitches come from? Only 10 are on the different coloured strand?
28.09.2024 - 14:35DROPS Design answered:
Dear Margret, you can see how to do this in the following video: https://www.garnstudio.com/video.php?id=1499&lang=en. Since the differently coloured thread joins together the 10 stitches from one round to the 10 stitches worked over them in the next round, after you take out the thread you will have 20 stitches out. Happy knitting!
29.09.2024 - 20:55
![]() Marie wrote:
Marie wrote:
Hi, just for information : when you have 56 stitches, you have to place a marker every 7 stitches. In the French translation, it says only every 6 stitches ;) Bonjour, pour info, petit manque dans la traduction française : si vous faites la taille L/XL (56mailles), il faudra un marqueur toutes les 7 mailles, et pas toutes les 6. L'info est dans la version anglais mais pas dans la trad en français ;) Bon tricot!
01.01.2024 - 14:08
![]() Estelle wrote:
Estelle wrote:
Bonjour, pour les diminutions, vous indiquez 8 diminutions espacées de 6 mailles, ce qui fonctionne si l'on a 48 mailles, mais pas du tout si l'on en a 56, donc comment fait-on ? et également je ne comprends pas on fait un rang de diminutions on tricote ensuite 2 autres rangs puis ensuite un autre rang pour les nouvelles diminutions ? Merci d'avance pour vos réponses
25.11.2023 - 09:13DROPS Design answered:
Bonjour Estelle, effectivement, vous aurez 7 mailles entre chacun des 8 marqueurs dans la 2ème taille. Je transfère de suite à nos stylistes, merci pour votre retour. Bon tricot!
27.11.2023 - 08:30
![]() Emilija wrote:
Emilija wrote:
I'm confused. We have 48 stiches to start with. We put 10st on hold, so 38st left. And when we start decreasing, 8 markers 6st apart 8x6=48. How is that?
04.12.2022 - 21:23DROPS Design answered:
Hi Emilija, You work the 10 stitches for the thumb-opening with a different coloured strand, then place these 10 stitches back on the left needle and work pattern as before over all stitches = 48 stitches. When you start the thumb, the different coloured strand is pulled out before working the thumb. Hope this helps and happy knitting!
05.12.2022 - 06:52
![]() Kathy wrote:
Kathy wrote:
Would it be possible to create a double lined mitten pattern.
01.12.2022 - 18:03
|
||||||||||
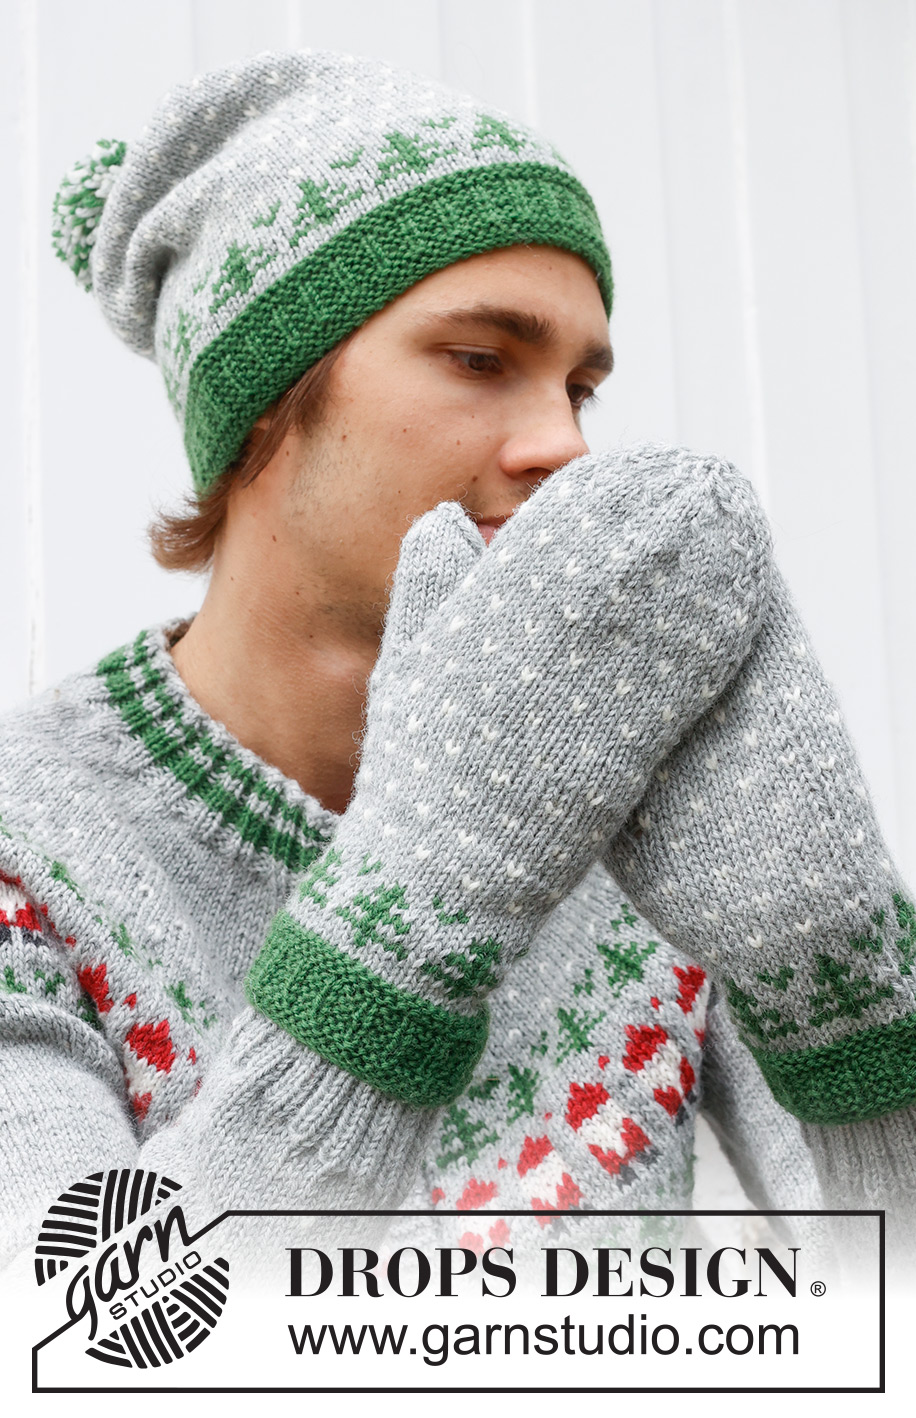
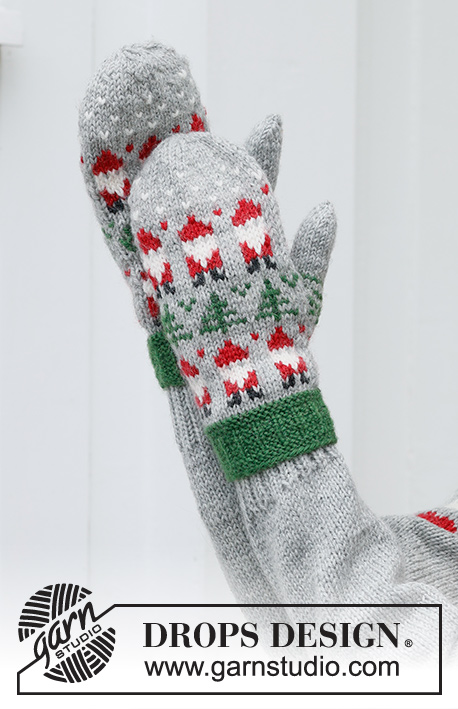
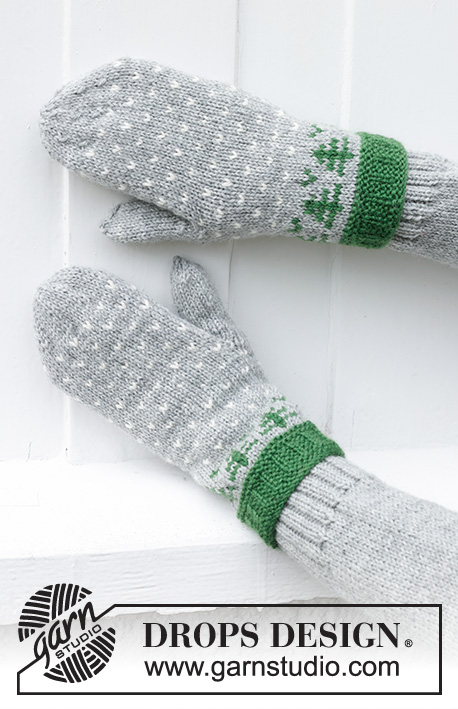
Christmas Time Mittens#christmastimemittens |
||||||||||
 |
 |
|||||||||
Knitted mittens for men in DROPS Karisma. The piece is worked bottom up with coloured Christmas tree-pattern. Theme: Christmas.
DROPS 233-15 |
||||||||||
|
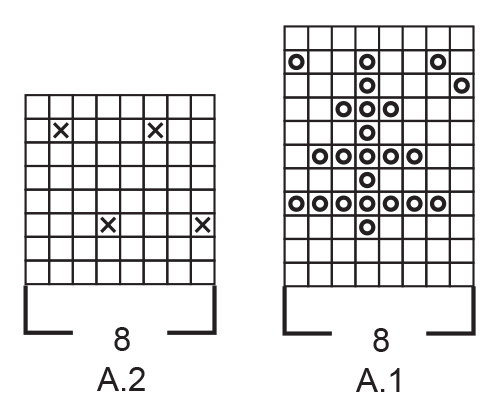
------------------------------------------------------- EXPLANATIONS FOR THE PATTERN: ------------------------------------------------------- RIDGE/GARTER STITCH (worked in the round): 1 ridge in height = 2 rounds; Knit 1 round and purl 1 round. PATTERN: See diagrams A.1 and A.2. The pattern is worked in stocking stitch. KNITTING TIP-1: If you want mittens with a different circumference, you can use a half-size larger or smaller needle. A half-size difference will give 1 cm more/less in circumference, a whole size 2 cm more/less. KNITTING TIP-2: To avoid the knitting tension losing its elasticity when working pattern it is important that the strands at the back are not tight. Use a size larger needle when working pattern if the piece becomes tight. KNITTING TIP-3: The length of the thumb-opening kan be adjusted by working more/less rounds before working the marking for the opening. DECREASE TIP: Knit to 2 stitches before the marker, then knit 2 together. ------------------------------------------------------- START THE PIECE HERE: ------------------------------------------------------- MITTENS – SHORT OVERVIEW OF THE PIECE: The piece is worked in the round with double pointed needles, bottom up. LEFT MITTEN: Read KNITTING TIP-1 and cast on 48-54 stitches with double pointed needles size 2.5 mm and colour forest green DROPS Karisma. Work 2 RIDGES in the round – read description above. Continue as follows: ROUND 1: Knit. ROUND 2: * Knit 1, purl 2 *, work from *-* to the end of the round. Repeat rounds 1 and 2 until the piece measures 3 cm. Work 2 more ridges. Change to double pointed needles size 3 mm and colour light grey. Read KNITTING TIP-2 and work A.1 on the round – AT THE SAME TIME on the first round, increase 0-2 stitches evenly spaced = 48-56 stitches (6-7 repeats of A.1 in width). When A.1 is finished, work A.2 (6-7 repeats on the round). A.2 is repeated in height. REMEMBER THE KNITTING TENSION! AT THE SAME TIME when the piece measures 14-16 cm – read KNITTING TIP-3, work a marking of the thumb-opening: Work 13-16 stitches of pattern, 10-11 stitches in stocking stitch with a different colour so they are visible, place these stitches back on the left needle and work pattern to the end of the round. Work until the piece measures 23-24 cm from the cast-on edge. There is approx. 3-4 cm left; try the mitten on and work to desired length before beginning to decrease. The rest of the mitten is worked in stocking stitch with colour light grey. Insert 8 markers with 6-7 stitches between each marker. On the first round decrease 1 stitch before each marker – read DECREASE TIP (8 stitches decreased). Decrease like this every 3rd round a total of 3-4 times = 24 stitches. On the next round knit all stitches together 2 and 2 = 12 stitches. Knit 1 round. On the next round knit all stitches together 2 and 2 = 6 stitches. Cut the strand, pull it through the remaining stitches, tighten and fasten well. The mitten measures approx. 26-28 cm. THUMB: Pull out the strand which was used over the 10-11 stitches for the thumb-opening = 20-22 stitches. Place these stitches on double pointed needles size 3 mm, work stocking stitch with colour light grey and knit up 2 stitches on each side of the thumb (on each side of the 10-11 stitches) = 24-26 stitches. AT THE SAME TIME, on round 2 decrease 2 stitches evenly spaced = 22-24 stitches. Knit 2 rounds. Repeat the decrease on the next round = 20-22 stitches. Work until the thumb measures 5½-6 cm. There is 3 cm left; try the mitten on and work to desired length before starting to decrease. Knit 3 rounds and decrease 4 stitches evenly spaced on each of these 3 rounds = 8-10 stitches. On the next round knit all stitches together 2 and 2 = 4-5 stitches. Cut the strand, pull it through the remaining stitches, tighten and fasten well. The thumb measures approx. 6½-7 cm. RIGHT MITTEN: Cast on and work in the same way as the left mitten until the piece measures 14-16 cm. Now work a marking of the thumb-opening: Work 25-29 stitches in pattern, 10-11 stitches in stocking stitch with a different colour so it is visible, place these stitches back on the left needle and work pattern to the end of the round. The rest of the mitten is worked in the same way as the left mitten. THUMB: Work in the same way as the left thumb. |
||||||||||
Diagram explanations |
||||||||||
|
||||||||||
 |
||||||||||
Have you finished this pattern?Tag your pictures with #dropspattern #christmastimemittens or submit them to the #dropsfan gallery. Do you need help with this pattern?You'll find 17 tutorial videos, a Comments/Questions area and more by visiting the pattern on garnstudio.com. © 1982-2026 DROPS Design A/S. We reserve all rights. This document, including all its sub-sections, has copyrights. Read more about what you can do with our patterns at the bottom of each pattern on our site. |
||||||||||


With over 40 years in knitting and crochet design, DROPS Design offers one of the most extensive collections of free patterns on the internet - translated to 17 languages. As of today we count 324 catalogues and 12290 patterns translated into English (UK/cm). 12290
We work hard to bring you the best knitting and crochet have to offer, inspiration and advice as well as great quality yarns at incredible prices! Would you like to use our patterns for other than personal use? You can read what you are allowed to do in the Copyright text at the bottom of all our patterns. Happy crafting!
Post a comment to pattern DROPS 233-15
We would love to hear what you have to say about this pattern!
If you want to leave a question, please make sure you select the correct category in the form below, to speed up the answering process. Required fields are marked *.