
Popular categories
Looking for a yarn?


Comments / Questions (136)
![]() Clemens wrote:
Clemens wrote:
Hallo gibt es dieses Drop desinge auch in Koreanischer Sprache?
06.11.2022 - 12:59DROPS Design answered:
Liebe Frau Clemens, leider noch nicht - es sind doch viele anderen Sprachen erhältlich: klicken Sie auf dem drop-down Menu unter dem Foto. Viel Spaß beim stricken!
07.11.2022 - 09:11
![]() Fay wrote:
Fay wrote:
Thank you very much Drops Design.
23.09.2022 - 14:10
![]() Fay wrote:
Fay wrote:
Hallo Drops Design. How many rows back and forth on straight needles do I have to work in order to get 2 ridges in garter stitch vertically? 4 is the right number? After these rows I start decreasing for armholes and V neck from the right side? Thank you.
23.09.2022 - 10:06DROPS Design answered:
Dear Fay, correct, you will need to work 4 rows with only knit stitches over the 8-26 stitches on each side while working the other stitches as before (1 ridge = knit 2 rows). When casting off the stitches for armhole on the next row you cast off the middle stitch on front piece and then work each piece separately, on each front piece you will decrease for armhole and neck at the same time (but on a different rythm: on every 2nd row for armhole but on every row for neck). Happy knitting!
23.09.2022 - 13:17
![]() Fay wrote:
Fay wrote:
2 ridges in garter stitch I mean... Sorry!
21.09.2022 - 10:40
![]() Fay wrote:
Fay wrote:
Hallo Drops Design. How many rows back and forth on straight needles do I have to work in order to get 2 ridges vertically? 4 is the right number? After these rows I start decreasing for armholes and V neck from the right side? Thank you.
21.09.2022 - 10:37DROPS Design answered:
Dear Fay, yes, you need to work 4 rows. And yes, you start decreasing after working the 2 ridges. Happy knitting!
25.09.2022 - 20:55
![]() Josie wrote:
Josie wrote:
Rebonjour, j'ai bien lu et relu, j'ai oublié 18m. Désolée mais c'est en faisant et refaisant qu'on y arrive. Merci encore
29.08.2022 - 14:45
![]() Josie wrote:
Josie wrote:
Bonjour, je commence mon top. Je choisis la T L. Lorsque j'ai fait mes premières diminutions après les côtes, j'ai 231m. Ensuite je dois faire 9m jersey + A1 = 3 motifs de 10 + A2 37m + A3 3 motifs de 10 +A1 9 motifs de 10, fhinir avec A4 8m + 9 m = 213 m. Je devrais en avoir 231 ? Où est ce que je me trompe ? Merci beaucoup et bonne journée à vous tous
29.08.2022 - 14:41DROPS Design answered:
Bonjour Josie, il manque des mailles dans votre descriptif: les 18 mailles jersey sur le 2ème côté, au niveau du 2ème fil marqueur: 9 m jersey, A.1 (= 30 m), A.2 (= 37 mailles), A.3 (= 30 m), 18 m jersey (fil marqueur ), A.1 (= 90 m) A.4 (= 8 mailles), 9 m jersey soit 9+30+37+30+18+90+8+9=231 m. Bon tricot!
29.08.2022 - 15:07
![]() Ines wrote:
Ines wrote:
En el patrón 223-27 hay un error. En la primera vuelta del dibujo donde dice tejer 14 puntos,no es. Realmente hay que tejer solo 4 puntos. Si lo podéis corregir mejor para no liarnos. Por lo demás todo bien. Un saludo.
08.08.2022 - 21:19
![]() Paulina wrote:
Paulina wrote:
Dzień dobry. Powinno być zaznaczone, żeby mierzyć robótkę z przodu, a nie z boku lub tyłu, ponieważ z przodu jest ona krótsza o około 2 cm ze względu na schemat.
03.08.2022 - 14:11
![]() Rosie wrote:
Rosie wrote:
Hiya! Loving this pattern so far. When doing the back piece, it says to continue pattern as before but how do I continue the rows containing “knit 2 together, yo” when doing back and forth? Do I only count the knit rows as part of the pattern?
21.07.2022 - 08:09DROPS Design answered:
Hi Rosie! Our diagrams show ALL rows in pattern seen from the right side, so all rows are part of the pattern. When knitting in rows: in right side row you work “knit 2 together, yo”, in wrong side row you knit all sts. Happy knitting!
24.07.2022 - 17:56
|
||||||||||||||||
Heart on Fire#heartonfiretop |
||||||||||||||||
 |
 |
|||||||||||||||
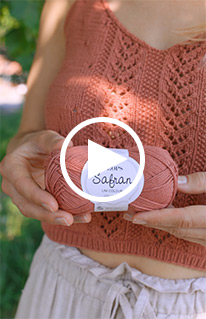
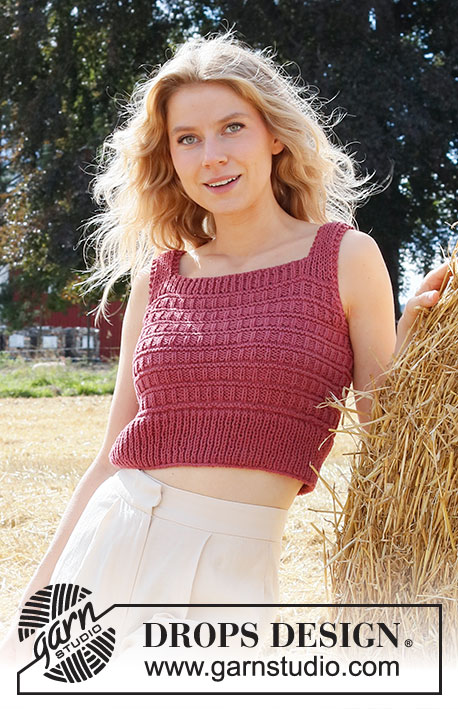
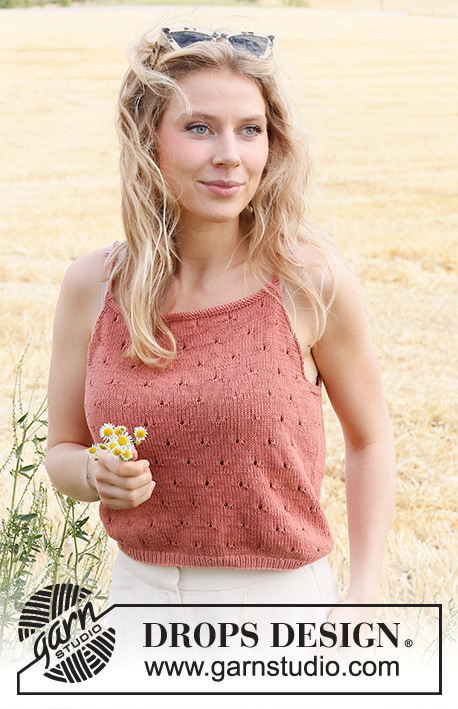
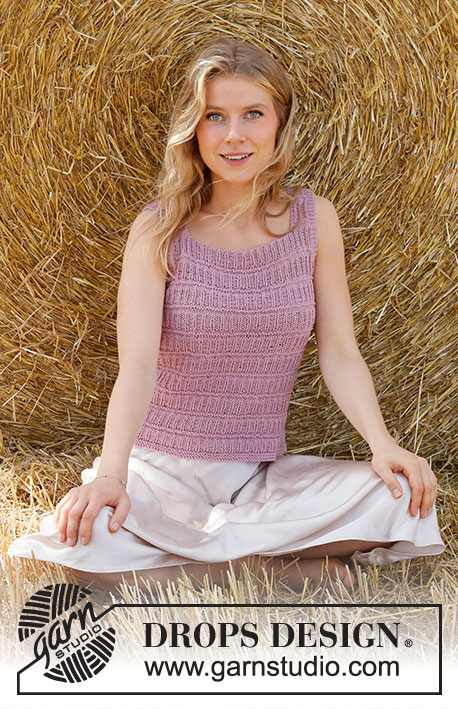
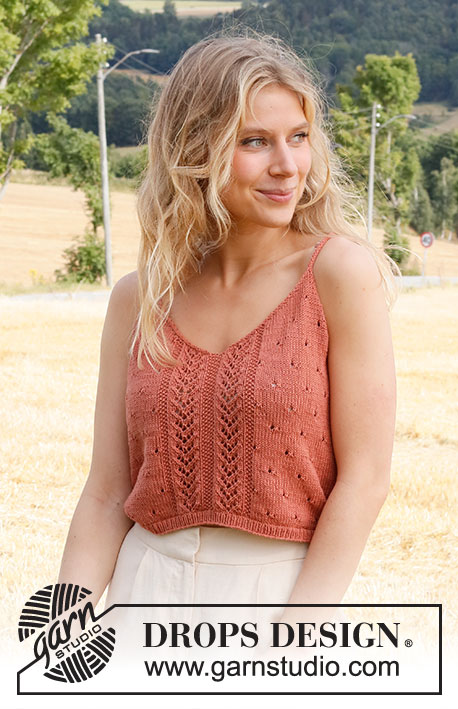
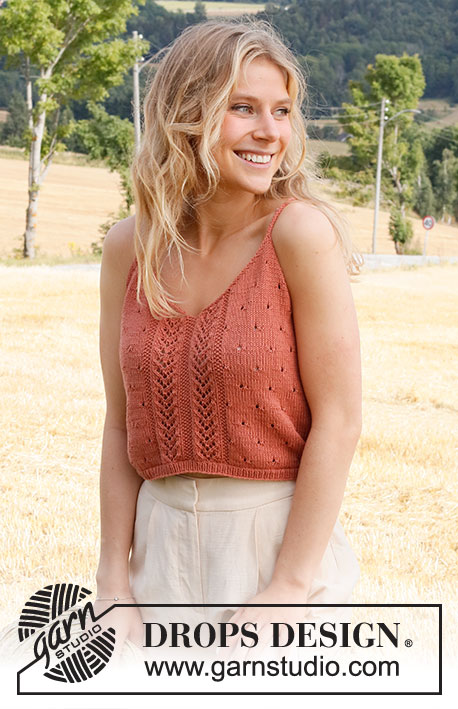
Knitted top in DROPS Safran. Piece is knitted with lace pattern and V-neck. Size: XS - XXL.
DROPS 223-27 |
||||||||||||||||
|
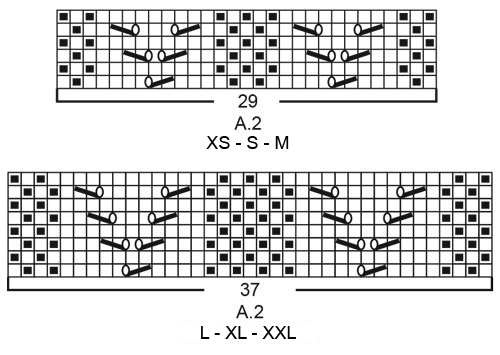
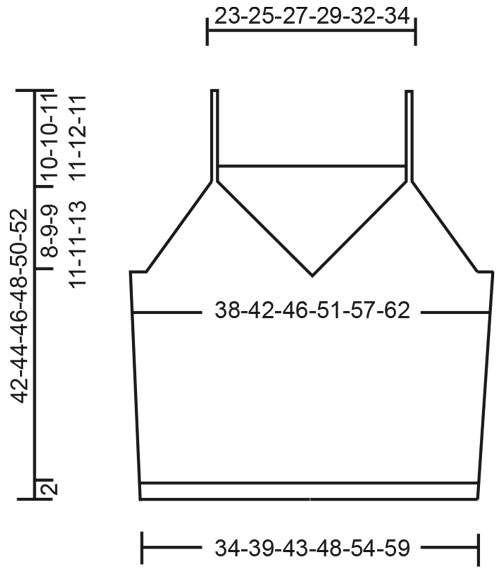
------------------------------------------------------- EXPLANATION FOR THE PATTERN: ------------------------------------------------------- GARTER STITCH (worked in the round): 1 ridge vertically = 2 rounds, i.e. knit 1 round and purl 1 round. GARTER STITCH (back and forth): Knit all rows. 1 ridge vertically = knit 2 rows. PATTERN: See diagrams A.1 to A.4. Choose diagram for your size (applies to A.2). Diagrams show all rows in pattern seen from the right side. DECREASE TIP-1 (evenly spaced): To calculate how to decrease evenly use the total number of stitches on row (e.g. 174 stitches) and divide stitches by number of decreases to be done (e.g. 10) = 17.4. In this example work alternately approx. every 16th and 17th stitch and every 17th and 18th stitch together. DECREASE TIP-2 (applies to the armholes and V-neck): Decrease inside 1 edge stitch in garter stitch. FROM RIGHT SIDE: DECREASE AS FOLLOWS AFTER 1 EDGE STITCH IN GARTER STITCH: Slip 1 stitch knitwise, knit 1, pass slipped stitch over stitch worked DECREASE AS FOLLOWS BEFORE 1 EDGE STITCH IN GARTER STITCH: Work until 2 stitches remain before edge stitch in garter stitch, knit these 2 together. FROM WRONG SIDE: DECREASE AS FOLLOWS AFTER 1 EDGE STITCH IN GARTER STITCH: Purl 2 together. DECREASE AS FOLLOWS BEFORE 1 EDGE STITCH IN GARTER STITCH: Work until 2 stitches remain before edge stitch in garter stitch, purl these 2 twisted together. INCREASE TIP (applies to sides of body): Work until 2 stitches remain before marker thread, make 1 yarn over, knit 4 (marker thread is in the middle of these 4 stitches), make 1 yarn over (= 2 stitches increased at the marker thread and 4 stitches increased on increase round in total). On next round knit yarns over twisted to avoid holes. Then work the new stitches in stocking stitch until they fit the pattern. ------------------------------------------------------- START THE PIECE HERE: ------------------------------------------------------- TOP - SHORT OVERVIEW OF THE PIECE: Work body in the round on circular needle, from the bottom and up to armholes. Then finish front piece and back piece separately. Divide the front piece mid front for V-neck, and work the two parts back and forth on circular needle separately until finished measurements, then work strap on each front piece. Work back piece back and forth on circular needle until finished measurements. Sew straps from front piece on to back piece. BODY: Cast on 174-196-216-244-272-298 stitches on circular needle size 2.5 mm with Safran. Knit 1 round. Then work rib in the round (= knit 1/purl 1) for 1½ to 2 cm. When rib is done, knit 1 round while decreasing 9-11-11-13-13-15 stitches evenly - read DECREASE TIP-1= 165-185-205-231-259-283 stitches. Switch to circular needle size 3 mm. Insert 1 marker thread at beginning of round and 1 marker thread after 83-93-103-115-129-141 stitches. 82-92-102-116-130-142 stitches remain on round for back piece. Move the marker threads upwards when working; they should be used for increase later in the sides on body. Work next round as follows: Work 7-2-7-9-6-2 stitches in stocking stitch, work A.1 over the next 20-30-30-30-40-50 stitches (= 2-3-3-3-4-5 repetitions of 10 stitches), work A.2 (= 29-29-29-37-37-37 stitches), work A.3 over the next 20-30-30-30-40-50 stitches (= 2-3-3-3-4-5 repetitions of 10 stitches), work 14-4-14-18-12-4 stitches in stocking stitch (marker thread is in the middle of these stitches), work A.1 over the next 60-80-80-90-110-130 stitches (= 6-8-8-9-11-13 repetitions of 10 stitches), work A.4 (= 8 stitches), and finish with 7-2-7-9-6-2 stitches in stocking stitch. Continue pattern like this. REMEMBER THE KNITTING TENSION! When piece measures 5-5-5-6-6-6 cm, increase 1 stitch on each side of both marker threads – read INCREASE TIP (= 4 stitches increased). Increase like this every 5-5-5-5½-5½-6 cm 4 times in total in each side = 181-201-221-247-275-299 stitches. Work until piece measures 23-24-25-25-26-27 cm - adjust so that next round is an odd numbered round in A.1 (this is important to avoid the lace pattern begin worked from wrong side when piece is divided into front and back piece). Now work in 2 ridges in GARTER STITCH - read explanation above, over the middle 8-10-12-16-20-26 stitches in each side (i.e. work 4-5-6-8-10-13 stitches in garter stitch on each side of both marker threads – work the other stitches as before). After the 2 ridges cast off for armholes and V-neck, i.e. work next round as follows: Cast off 3-4-5-7-9-12 stitches for armhole, work 42-46-50-54-59-62 stitches as before (= left front piece), cast off 1 stitch (= mid front), work 42-46-50-54-59-62 stitches as before (= right front piece), cast off 6-8-10-14-18-24 stitches for armhole, work as before over stitches on back piece until 3-4-5-7-9-12 stitches remain on round, and cast off the last 3-4-5-7-9-12 stitches for armhole. Cut the yarn and pull yarn through last stitch Finish back piece and front pieces separately. BACK PIECE: = 84-92-100-110-120-126 stitches. Begin from wrong side and continue pattern back and forth with 1 edge stitch in garter stitch in each side. AT THE SAME TIME on next row from right side begin decrease for armholes - read DECREASE TIP-2. Decrease for armholes in each side on every other row (i.e. every row from right side) 14-16-18-20-22-22 times in total in each side = 56-60-64-70-76-82 stitches. After last decrease work 1 row from wrong side as before. Switch to circular needle size 2.5 mm. Work 2 ridges back and forth over all stitches. Cast off knitting from right side. LEFT FRONT PIECE (when garment is worn): = 42-46-50-54-59-62 stitches. Begin from wrong side and continue pattern back and forth with 1 edge stitch in garter stitch in each side. AT THE SAME TIME on next row from right side begin decrease for armholes and V-neck and decrease as explained below – read DECREASE TIP-2: ARMHOLE: Decrease 1 stitch on every other row 13-14-15-17-18-20 times in total. V-NECK: Decrease 1 stitch on every row (i.e. from both right and wrong side) 24-27-30-32-36-37 times total. After all decreases for armholes and V-neck, 5 stitches remain on row for strap. Work strap as explained below. STRAP: Switch to 2 double pointed needles 2.5 mm (slip stitches on one needle and work with the other). * Move stitches to the beginning of row, tighten yarn and knit the 5 stitches from right side *, work from *-* until strap measures approx. 18-18-19-20-21-20 cm (10-10-11-11-12-11 cm of this length belongs to front piece, the rest belongs to back piece - sew strap to back piece). Cut the yarn and pull yarn through the 5 stitches, tighten together and fasten. RIGHT FRONT PIECE (when garment is worn): = 42-46-50-54-59-62 stitches. Begin from wrong side and continue pattern back and forth with 1 edge stitch in garter stitch in each side. AT THE SAME TIME on next row from right side begin decreases for V-neck and armholes and decrease as explained below – read DECREASE TIP-2: V-NECK: Decrease 1 stitch on every row (i.e. from both right and wrong side) 24-27-30-32-36-37 times total. ARMHOLE: Decrease 1 stitch on every other row 13-14-15-17-18-20 times in total. After all decreases for V-neck and armholes, 5 stitches remain on row for strap. Work strap the same way as on left front piece. ASSEMBLY: Sew straps to back piece at the edge in each side. |
||||||||||||||||
Diagram explanations |
||||||||||||||||
|
||||||||||||||||
 |
||||||||||||||||
 |
||||||||||||||||
 |
||||||||||||||||
Have you finished this pattern?Tag your pictures with #dropspattern #heartonfiretop or submit them to the #dropsfan gallery. Do you need help with this pattern?You'll find 26 tutorial videos, a Comments/Questions area and more by visiting the pattern on garnstudio.com. © 1982-2026 DROPS Design A/S. We reserve all rights. This document, including all its sub-sections, has copyrights. Read more about what you can do with our patterns at the bottom of each pattern on our site. |
||||||||||||||||


With over 40 years in knitting and crochet design, DROPS Design offers one of the most extensive collections of free patterns on the internet - translated to 17 languages. As of today we count 324 catalogues and 12290 patterns translated into English (UK/cm). 12290
We work hard to bring you the best knitting and crochet have to offer, inspiration and advice as well as great quality yarns at incredible prices! Would you like to use our patterns for other than personal use? You can read what you are allowed to do in the Copyright text at the bottom of all our patterns. Happy crafting!
Post a comment to pattern DROPS 223-27
We would love to hear what you have to say about this pattern!
If you want to leave a question, please make sure you select the correct category in the form below, to speed up the answering process. Required fields are marked *.