
Popular categories
Looking for a yarn?


Comments / Questions (135)
![]() Sandra wrote:
Sandra wrote:
Hallo, Ik begrijp dit niet goed Brei nu in 2 ribbels in RIBBELSTEEK - lees uitleg hierboven, over de middelste 8-10-12-16-20-26 steken aan elke kant (dus brei 4-5-6-8-10-13 steken in ribbelsteek aan elke kant van beide markeerdraden – brei de andere steken zoals hiervoor). Moet ik nu 2 naalden ribbelsteek breien ter hoogte van het armsgaten voor ik afkant? Dank u
04.07.2025 - 09:15DROPS Design answered:
Dag Sandra,
Je breit 2 ribbels over die steken, dus 4 naalden in totaal.
04.07.2025 - 19:17
![]() Sandra wrote:
Sandra wrote:
Hallo, Ik begrijp dit niet goed Brei nu in 2 ribbels in RIBBELSTEEK - lees uitleg hierboven, over de middelste 8-10-12-16-20-26 steken aan elke kant (dus brei 4-5-6-8-10-13 steken in ribbelsteek aan elke kant van beide markeerdraden – brei de andere steken zoals hiervoor). Moet ik nu 2 naalden ribbelsteek breien ter hoogte van het armsgaten voor ik afhankelijk? Dank u
03.07.2025 - 10:49
![]() Kasia wrote:
Kasia wrote:
Gdzie dodane oczka mieszczą się we wzorze? Po 5cm, należy dodawać 4 oczka co każde 5 cm, ale jak je przerabiać, żeby wzór się zgadzał? Czy po prostu wydłużyć schematy A1, A3 i A4 o te dodane oczka i przerabiać je, jakby to był początek schematu? Np. w rozm. M. mam 7 oczek dżersejem i 3x schemat A1, więc jeśli będzie tam dodatkowe oczko, to zrobić 7 oczek + 3x schemat + 1 oczko z początku schematu A1?
22.06.2025 - 20:06DROPS Design answered:
Witaj Kasiu, na początku nie dodawaj nowego motywu. Kolejny rząd przerabiasz: 7 o. + 1 dodane oczko, 3 x schemat A.1 itd. Możesz wykonać motyw ze schematu A.1 dopiero, gdy pojawi się na niego miejsce (w wyniku dodawania oczek). Pozdrawiamy!
23.06.2025 - 08:52
![]() Shakedra wrote:
Shakedra wrote:
I am working size large but the lace keeps turning out wrong. Is there video tutorial or written tutorial of how to work the yarn overs on the next row? All the holes are in the wrong spots for the front the back is fine.
21.06.2025 - 19:02DROPS Design answered:
Dear Shakedra, the yarn over should be knitted so that a larger hole is formed (not twisted). You can see in this video how yarn overs are worked. Happy knitting!
22.06.2025 - 19:57
![]() Meizepol wrote:
Meizepol wrote:
Hola! Hay un error importante en la traducción española al dar las instrucciones para la talla S: se habla de 14 puntos con el marcador en medio, pero los números totales son erróneos. He visto en la traducción francesa que el 14 se ha substituido por 4 (lo cual encaja perfectamente).Gracias por corregirlo y evitar dolores de cabeza a futuras tejedoras
30.05.2025 - 10:24
![]() Prescilia wrote:
Prescilia wrote:
Bonjour, je ne suis pas sûre d'avoir compris l'explications ( A1 "au dessus des mailles suivantes") en Taille S. dans la partie dos/Devant dès que le passage A1 est abordé , ai ce que cela correspond aux rangs du diagramme? mais je vois pas 30 d'écart dessus. je débute la lecture de diagramme alors... 🙃😅 Désolé,je comprends pas lorsque c'est écrit "au dessus des" après avoir fait quoi du coup? Merci d'avance .
23.05.2025 - 13:16DROPS Design answered:
Bonjour Prescilia, quand on doit tricoter "A.1 au-dessus des 30 m suivantes", on va répéter 3 fois les 10 m de A.1 (soit 3x10 = 30),; et sur 80 m, on va répéter 8 fois les 10 m de A.1. Lisez les diagrammes de droite à gauche tous les tours, et de bas en haut, en même temps, tricotez le 1er rang des autres diagrammes, puis au tour suivant, le 2ème tour des diagrammes et ainsi de suite. Bon tricot!
23.05.2025 - 13:57
![]() Luca Vogt wrote:
Luca Vogt wrote:
Hallo! Ich bin nicht sicher, wie genau ich die Zunahmen am Rumpfteil in das Lochmuster einarbeiten soll... Soll ich die Zunahmen mit einberechnen als Anfang vom Muster? Danke!
13.05.2025 - 15:52DROPS Design answered:
Lieber Luca, also ja das Muster wird an den Seiten nicht mehr stimmen, da das Muster sich an beiden Seiten erweitern wird, so stricken Sie die neuen Maschen im Muster., beideseitig haben Sie immer noch 4 Maschen rechts. Viel Spaß beim Stricken!
13.05.2025 - 21:05
![]() Pl wrote:
Pl wrote:
Hallo! Ich verstehe nicht, ob ich die Muster A1 immer wieder von vorne oder weiterlesen soll. Also wenn ich am Anfang 30 Maschen A1 stricken soll und später nochmal 80 A1, soll ich dann das Muster bei 3 Reihen anfangen oder wieder von vorne? Liebe Grüße und vielen Dank!
11.05.2025 - 15:16DROPS Design answered:
Liebe Pl, ich bin leider nicht sicher, ob ich Ihre Frage richtig verstehe, wenn man die Diagramme strickt, strickt man die 1. Reihe alle Diagramme, so bei der 1. Reihe: 1. Reihe A.1, A.2, A.3, und A.1 (+ die glattrechte Maschen); bei der 2. Reihe stricken Sie die 2. Reihe alle Diagramme usw. Wenn man in Runden strickt, liest man die Diagramme immer rechts nach links wie Hinreihen; wenn mann später in Hin- und Rückreihen strickt, werden die Rückreihen links nach rechts gestrickt. Viel Spaß beim Stricken !
12.05.2025 - 08:12
![]() Nicolle wrote:
Nicolle wrote:
Hi, in A2 when there are yarn overs, do I knit them twisted on the second round or knit normally for the holes to be actually visible? Thanks so much in advance for your advice! N
10.05.2025 - 07:03DROPS Design answered:
Dear Nicolle, the yarn overs in the charts are for the lace pattern, so we want the holes to be visible; they don't change the number of stitches in the round. So we purl them normally (not twisted) so that the hole is visible. Happy knitting!
11.05.2025 - 01:08
![]() Elise wrote:
Elise wrote:
Hei! Det er fint om det finnes bilder av hvordan baksiden ser ut også :)
19.03.2025 - 10:48
|
||||||||||||||||
Heart on Fire#heartonfiretop |
||||||||||||||||
 |
 |
|||||||||||||||
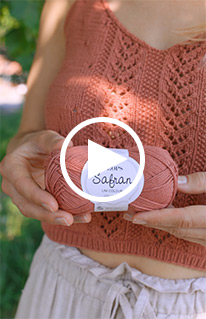
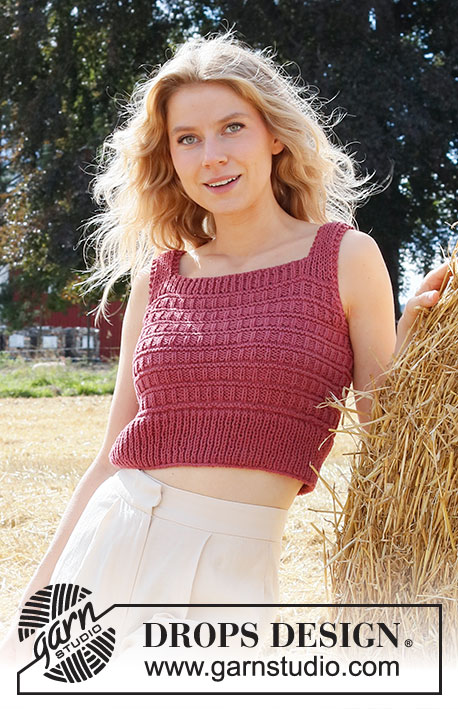
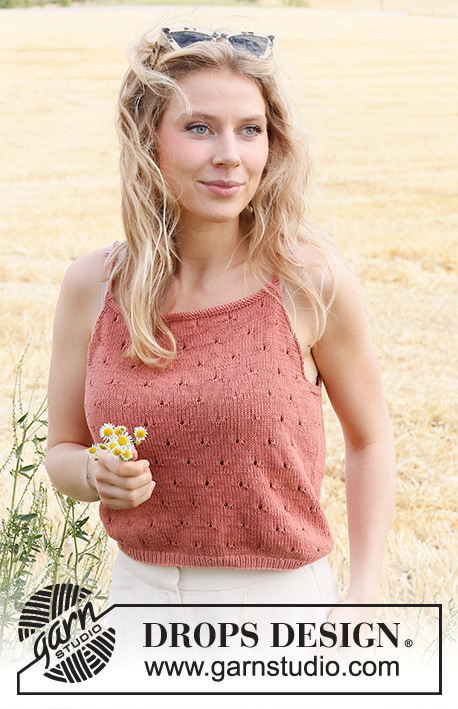
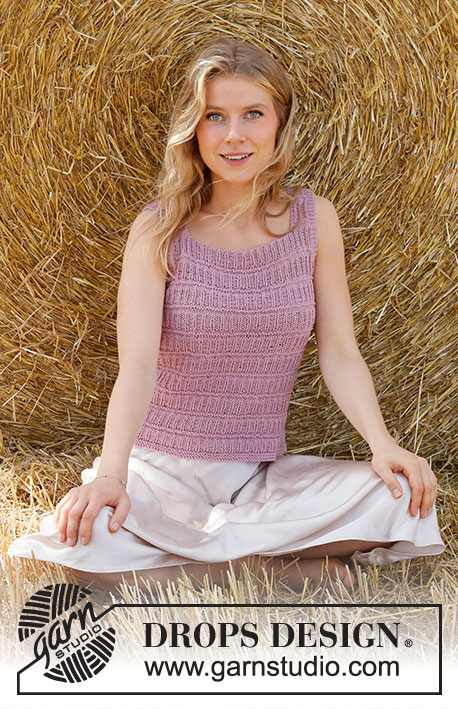
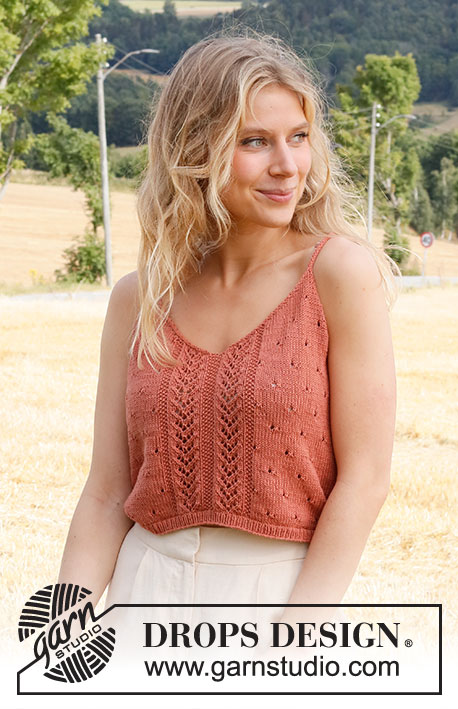
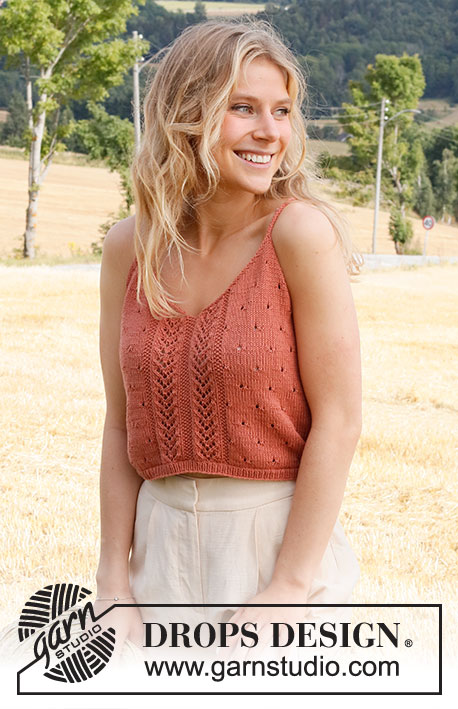
Knitted top in DROPS Safran. Piece is knitted with lace pattern and V-neck. Size: XS - XXL.
DROPS 223-27 |
||||||||||||||||
|
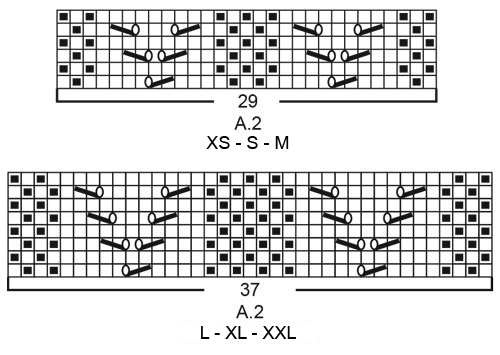
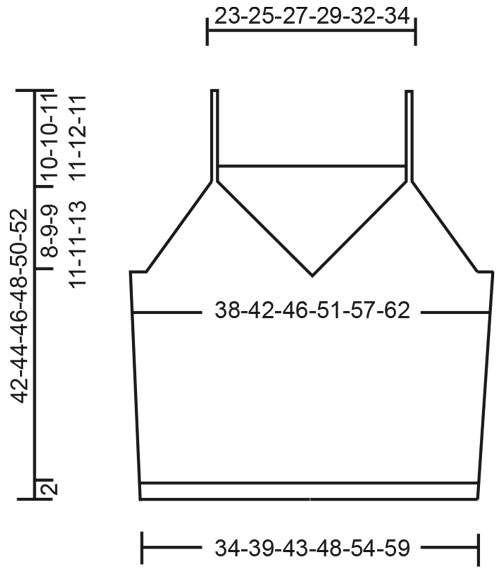
------------------------------------------------------- EXPLANATION FOR THE PATTERN: ------------------------------------------------------- GARTER STITCH (worked in the round): 1 ridge vertically = 2 rounds, i.e. knit 1 round and purl 1 round. GARTER STITCH (back and forth): Knit all rows. 1 ridge vertically = knit 2 rows. PATTERN: See diagrams A.1 to A.4. Choose diagram for your size (applies to A.2). Diagrams show all rows in pattern seen from the right side. DECREASE TIP-1 (evenly spaced): To calculate how to decrease evenly use the total number of stitches on row (e.g. 174 stitches) and divide stitches by number of decreases to be done (e.g. 10) = 17.4. In this example work alternately approx. every 16th and 17th stitch and every 17th and 18th stitch together. DECREASE TIP-2 (applies to the armholes and V-neck): Decrease inside 1 edge stitch in garter stitch. FROM RIGHT SIDE: DECREASE AS FOLLOWS AFTER 1 EDGE STITCH IN GARTER STITCH: Slip 1 stitch knitwise, knit 1, pass slipped stitch over stitch worked DECREASE AS FOLLOWS BEFORE 1 EDGE STITCH IN GARTER STITCH: Work until 2 stitches remain before edge stitch in garter stitch, knit these 2 together. FROM WRONG SIDE: DECREASE AS FOLLOWS AFTER 1 EDGE STITCH IN GARTER STITCH: Purl 2 together. DECREASE AS FOLLOWS BEFORE 1 EDGE STITCH IN GARTER STITCH: Work until 2 stitches remain before edge stitch in garter stitch, purl these 2 twisted together. INCREASE TIP (applies to sides of body): Work until 2 stitches remain before marker thread, make 1 yarn over, knit 4 (marker thread is in the middle of these 4 stitches), make 1 yarn over (= 2 stitches increased at the marker thread and 4 stitches increased on increase round in total). On next round knit yarns over twisted to avoid holes. Then work the new stitches in stocking stitch until they fit the pattern. ------------------------------------------------------- START THE PIECE HERE: ------------------------------------------------------- TOP - SHORT OVERVIEW OF THE PIECE: Work body in the round on circular needle, from the bottom and up to armholes. Then finish front piece and back piece separately. Divide the front piece mid front for V-neck, and work the two parts back and forth on circular needle separately until finished measurements, then work strap on each front piece. Work back piece back and forth on circular needle until finished measurements. Sew straps from front piece on to back piece. BODY: Cast on 174-196-216-244-272-298 stitches on circular needle size 2.5 mm with Safran. Knit 1 round. Then work rib in the round (= knit 1/purl 1) for 1½ to 2 cm. When rib is done, knit 1 round while decreasing 9-11-11-13-13-15 stitches evenly - read DECREASE TIP-1= 165-185-205-231-259-283 stitches. Switch to circular needle size 3 mm. Insert 1 marker thread at beginning of round and 1 marker thread after 83-93-103-115-129-141 stitches. 82-92-102-116-130-142 stitches remain on round for back piece. Move the marker threads upwards when working; they should be used for increase later in the sides on body. Work next round as follows: Work 7-2-7-9-6-2 stitches in stocking stitch, work A.1 over the next 20-30-30-30-40-50 stitches (= 2-3-3-3-4-5 repetitions of 10 stitches), work A.2 (= 29-29-29-37-37-37 stitches), work A.3 over the next 20-30-30-30-40-50 stitches (= 2-3-3-3-4-5 repetitions of 10 stitches), work 14-4-14-18-12-4 stitches in stocking stitch (marker thread is in the middle of these stitches), work A.1 over the next 60-80-80-90-110-130 stitches (= 6-8-8-9-11-13 repetitions of 10 stitches), work A.4 (= 8 stitches), and finish with 7-2-7-9-6-2 stitches in stocking stitch. Continue pattern like this. REMEMBER THE KNITTING TENSION! When piece measures 5-5-5-6-6-6 cm, increase 1 stitch on each side of both marker threads – read INCREASE TIP (= 4 stitches increased). Increase like this every 5-5-5-5½-5½-6 cm 4 times in total in each side = 181-201-221-247-275-299 stitches. Work until piece measures 23-24-25-25-26-27 cm - adjust so that next round is an odd numbered round in A.1 (this is important to avoid the lace pattern begin worked from wrong side when piece is divided into front and back piece). Now work in 2 ridges in GARTER STITCH - read explanation above, over the middle 8-10-12-16-20-26 stitches in each side (i.e. work 4-5-6-8-10-13 stitches in garter stitch on each side of both marker threads – work the other stitches as before). After the 2 ridges cast off for armholes and V-neck, i.e. work next round as follows: Cast off 3-4-5-7-9-12 stitches for armhole, work 42-46-50-54-59-62 stitches as before (= left front piece), cast off 1 stitch (= mid front), work 42-46-50-54-59-62 stitches as before (= right front piece), cast off 6-8-10-14-18-24 stitches for armhole, work as before over stitches on back piece until 3-4-5-7-9-12 stitches remain on round, and cast off the last 3-4-5-7-9-12 stitches for armhole. Cut the yarn and pull yarn through last stitch Finish back piece and front pieces separately. BACK PIECE: = 84-92-100-110-120-126 stitches. Begin from wrong side and continue pattern back and forth with 1 edge stitch in garter stitch in each side. AT THE SAME TIME on next row from right side begin decrease for armholes - read DECREASE TIP-2. Decrease for armholes in each side on every other row (i.e. every row from right side) 14-16-18-20-22-22 times in total in each side = 56-60-64-70-76-82 stitches. After last decrease work 1 row from wrong side as before. Switch to circular needle size 2.5 mm. Work 2 ridges back and forth over all stitches. Cast off knitting from right side. LEFT FRONT PIECE (when garment is worn): = 42-46-50-54-59-62 stitches. Begin from wrong side and continue pattern back and forth with 1 edge stitch in garter stitch in each side. AT THE SAME TIME on next row from right side begin decrease for armholes and V-neck and decrease as explained below – read DECREASE TIP-2: ARMHOLE: Decrease 1 stitch on every other row 13-14-15-17-18-20 times in total. V-NECK: Decrease 1 stitch on every row (i.e. from both right and wrong side) 24-27-30-32-36-37 times total. After all decreases for armholes and V-neck, 5 stitches remain on row for strap. Work strap as explained below. STRAP: Switch to 2 double pointed needles 2.5 mm (slip stitches on one needle and work with the other). * Move stitches to the beginning of row, tighten yarn and knit the 5 stitches from right side *, work from *-* until strap measures approx. 18-18-19-20-21-20 cm (10-10-11-11-12-11 cm of this length belongs to front piece, the rest belongs to back piece - sew strap to back piece). Cut the yarn and pull yarn through the 5 stitches, tighten together and fasten. RIGHT FRONT PIECE (when garment is worn): = 42-46-50-54-59-62 stitches. Begin from wrong side and continue pattern back and forth with 1 edge stitch in garter stitch in each side. AT THE SAME TIME on next row from right side begin decreases for V-neck and armholes and decrease as explained below – read DECREASE TIP-2: V-NECK: Decrease 1 stitch on every row (i.e. from both right and wrong side) 24-27-30-32-36-37 times total. ARMHOLE: Decrease 1 stitch on every other row 13-14-15-17-18-20 times in total. After all decreases for V-neck and armholes, 5 stitches remain on row for strap. Work strap the same way as on left front piece. ASSEMBLY: Sew straps to back piece at the edge in each side. |
||||||||||||||||
Diagram explanations |
||||||||||||||||
|
||||||||||||||||
 |
||||||||||||||||
 |
||||||||||||||||
 |
||||||||||||||||
Have you finished this pattern?Tag your pictures with #dropspattern #heartonfiretop or submit them to the #dropsfan gallery. Do you need help with this pattern?You'll find 26 tutorial videos, a Comments/Questions area and more by visiting the pattern on garnstudio.com. © 1982-2026 DROPS Design A/S. We reserve all rights. This document, including all its sub-sections, has copyrights. Read more about what you can do with our patterns at the bottom of each pattern on our site. |
||||||||||||||||


With over 40 years in knitting and crochet design, DROPS Design offers one of the most extensive collections of free patterns on the internet - translated to 17 languages. As of today we count 324 catalogues and 12290 patterns translated into English (UK/cm). 12290
We work hard to bring you the best knitting and crochet have to offer, inspiration and advice as well as great quality yarns at incredible prices! Would you like to use our patterns for other than personal use? You can read what you are allowed to do in the Copyright text at the bottom of all our patterns. Happy crafting!
Post a comment to pattern DROPS 223-27
We would love to hear what you have to say about this pattern!
If you want to leave a question, please make sure you select the correct category in the form below, to speed up the answering process. Required fields are marked *.