
Popular categories
Looking for a yarn?


Comments / Questions (22)
![]() Jj wrote:
Jj wrote:
After i bind off the last 4 stitches my 1 last stitch is floating in the middle. How do I start the back piece from the wrong side without purling over the last 4 sts armhole? i’m stuck!
07.04.2026 - 17:32DROPS Design answered:
Hi Jj, Cut the working yarn and thread it through the last stitch. Then begin the back piece from the wrong side. Regards, Drops team.
08.04.2026 - 12:18
![]() Degrieck Rita wrote:
Degrieck Rita wrote:
Waar kan ik patronen bes tellen
01.03.2025 - 18:44
![]() Sonja Christensen wrote:
Sonja Christensen wrote:
Jeg har valgt at strikke str. 5/6. Er i sikre på at 100 gr er nok
25.02.2025 - 12:52DROPS Design answered:
Hej Sonja, ja der er mange som har strikket vesten og vi har ikke hørt at det ikke skulle stemme :)
05.03.2025 - 14:31
![]() Petronela wrote:
Petronela wrote:
Bonjour Pour la taille 7/8 ans vous dites monter 122/128 mailles. C’est pour devant et dos ou juste pour un coté ? Si c’est pour les deux il me semble très peu ? Merci
20.02.2025 - 22:51DROPS Design answered:
Bonjour Petronella, le pull se tricote de bas en haut, d'abord en rond puis on divisera l'ouvrage aux emmanchures pour terminer chaque côté séparément. En taille 7/8 ans, on va monter 128 mailles pour le bas du pull (dos+ devant). Pensez à bien vérifier votre échantillon (ici: 17 m x 22 rangs jersey = 10 x10 cm) pour avoir les bonnes mesures finales correspondant à celles du schéma pour la taille choisie. Bon tricot!
21.02.2025 - 08:45
![]() Elisabeth wrote:
Elisabeth wrote:
Bakstykke: start fra vrangen og strikk glattstrikk samtidig felles det av til ermehull. Da blir det vrangmasker på forsiden. Hvordan skal jeg gjøre dette ?
13.02.2025 - 11:19DROPS Design answered:
Hej Elisabeth, når du strikker glatstrik frem og tilbage, så strikker du vrang fra vrangen og ret fra retsiden :)
18.02.2025 - 09:35
![]() Elisabeth Sandnes wrote:
Elisabeth Sandnes wrote:
Hei. Hva menes med fell av 2 masker 1 gang og fell av 1 maske 1 gang. Hvordan går man frem? Finnes der en hjelpevideo ? Mvh Elisabeth
12.02.2025 - 00:46DROPS Design answered:
Hei Elisabeth, Når du skal felle for skulderen på forstykket, feller du av 2 masker på begynnelsen av pinnen fra halsen, strikker ut pinnen, snur og strikker tilbake. Deretter feller du av 1 maske på begynnelsen av neste pinnen fra halsen, strikker ut pinnen, snur og strikker tilbake. Gjenta felling av 1 maske 2 ganger til. Håper dette hjelper og god fornøyelse!
12.02.2025 - 06:19
![]() Céline wrote:
Céline wrote:
Bonjour, Je suis entrain de faire le modèle Lavender Smiles. J'ai une question au sujet des emmanchures. Vous indiquez qu'il faut rabattre 4 mailles, tricoter x mailles (=devant), puis rabattre 8 mailles, tricoter x mailles (= dos) puis rabattre les 4 dernières mailles. C'est à ce moment que je coince. Que faire avec la maille qu'il nous reste ? Car elle se retrouve au milieu des mailles rabattues. Merci pour votre aide.
04.10.2024 - 19:36DROPS Design answered:
Bonjour Céline, rabattez la dernière maille = coupez le fil, passez le dans la dernière maille et serrez. Continuez à tricoter ensuite en allers et retours en commençant par le dos, sur l'envers. Bon tricot!
07.10.2024 - 07:16
![]() Ida wrote:
Ida wrote:
Findes denne opskrift i større størrelse? Fx voksen? Jeg har en teenager der har set sig lun på denne model, men kan ikke finde den blandt voksenmodellerne..
16.05.2023 - 19:46DROPS Design answered:
Hej Ida, ja her har du den: DROPS 235-17 og her har du masser andre veste: slipover
17.05.2023 - 07:39
![]() Rannveig wrote:
Rannveig wrote:
Strikker vest i 7/8 år,og har 128 masker.Der står fell 4 strikk 56 og fell 8 strikk 56. Dette blir berre 124 masker.Kva er feil her?
10.03.2023 - 18:42DROPS Design answered:
Hei Rannveig. Du har nok bare glemt å felle av de siste 4 maskene :) Du har 128 masker, fell av 4 masker, strikk 56 masker, fell av 8 masker, strikk 56 masker og fell av de 4 siste maskene på omgangene. Du har da felt av 8 masker under hvert ermhull og har 56+56 masker på pinnen. mvh DROPS Design
13.03.2023 - 11:18
![]() Anna wrote:
Anna wrote:
Buonasera Vorrei sapere quando dice a 21 cm altezza del lavoro cosa significa ? Che si misura dalle dall inizio lavoro? Grazie mille
13.02.2023 - 16:32DROPS Design answered:
Buonasera Anna, se non diversamente indicato le misure sono dall'inizio del lavoro. Buon lavoro!
13.02.2023 - 21:10
|
|
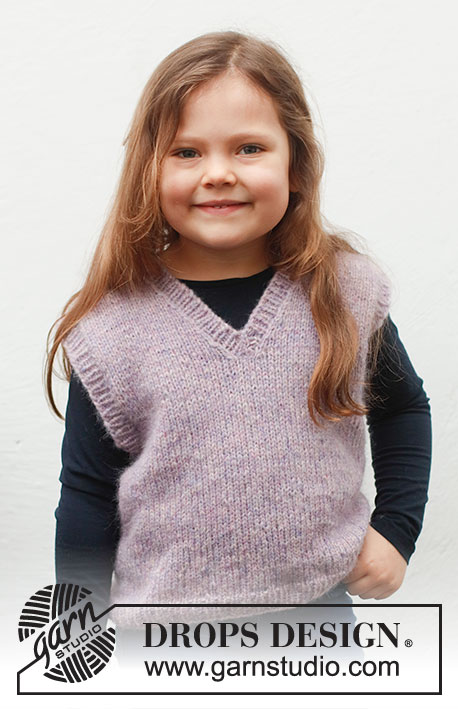
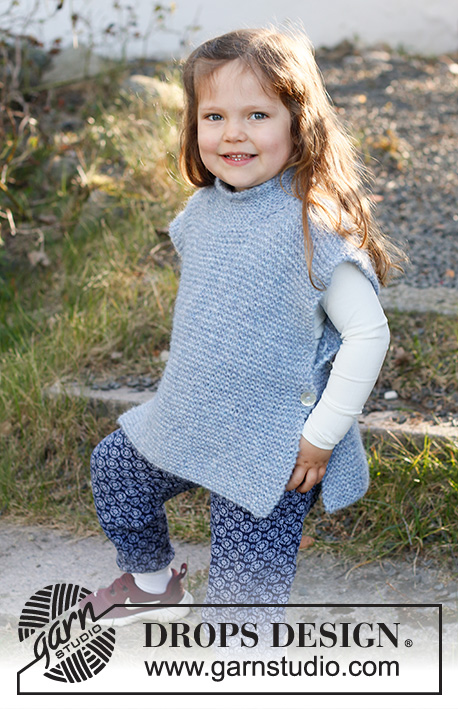
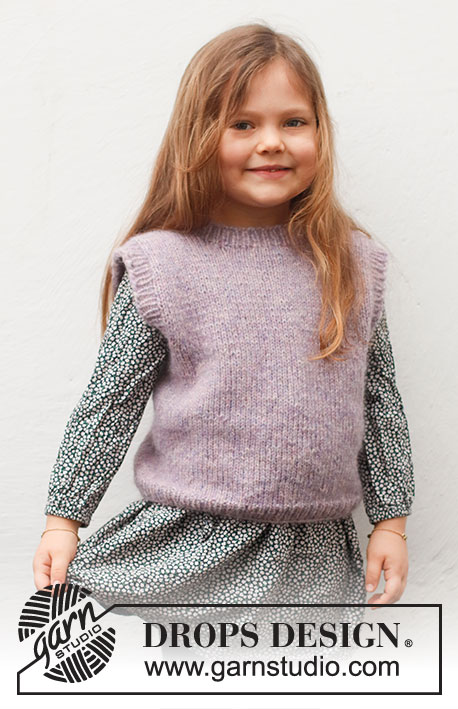
Lavender Smiles#lavendersmilesvest |
|
 |
 |
Knitted vest / slipover for children in DROPS Air. The piece is worked in stocking stitch with ribbed edges. Sizes 3-12 years.
DROPS Baby & Children 38-24 |
|
|
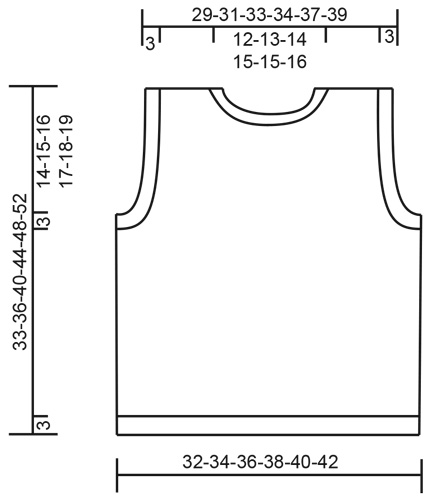
------------------------------------------------------- EXPLANATIONS FOR THE PATTERN: ------------------------------------------------------- CASTING-OFF TIP: To avoid the cast-off edge being tight you can cast off with a larger size needle. If the edge is still tight, make 1 yarn over after approx. each 4th stitch at the same time as casting off; the yarn overs are cast off as normal stitches. ------------------------------------------------------- START THE PIECE HERE: ------------------------------------------------------- VEST – SHORT OVERVIEW OF THE PIECE: The piece is worked in the round with circular needle bottom up as far as the armholes. Then the front and back pieces are finished separately, back and forth with circular needle. To finish, ribbed edging is worked around the neck and armholes. BODY: Cast on 108-116-124-128-136-144 stitches with circular needle size 4 mm and Air. Knit 1 round, then work rib in the round (knit 1, purl 1) for 3 cm. Change to circular needle size 5 mm. Work stocking stitch. REMEMBER THE KNITTING TENSION! When the piece measures 16-18-21-24-27-30 cm cast off stitches for the armholes as follows: Cast off the first 4 stitches, work the next 46-50-54-56-60-64 stitches (= front piece), cast off 8 stitches, work the next 46-50-54-56-60-64 stitches (= back piece) and cast off the last 4 stitches on the round. Let the stitches for front piece rest in the needle or place them on a thread while working the back piece. BACK PIECE: = 46-50-54-56-60-64 stitches. Start from the wrong side and work stocking stitch back and forth – AT THE SAME TIME cast off for the armholes at the beginning of each row in each side as follows: Cast off 2 stitches 1 time, and cast off 1 stitch 1 time = 40-44-48-50-54-58 stitches. Continue working until the piece measures 31-34-38-42-46-50 cm. On the next row cast off the middle 18-20-22-24-24-26 stitches for neck and finish each shoulder separately. Continue with stocking stitch and cast off 1 stitch on the next row from the neck = 10-11-12-12-14-15 stitches on the shoulder. Continue working until the piece measures 33-36-40-44-48-52 cm. Cast off. Work the other shoulder in the same way. FRONT PIECE: = 46-50-54-56-60-64 stitches. Start from the wrong side and work stocking stitch back and forth – AT THE SAME TIME cast off for the armholes at the beginning of each row in each side as follows: Cast off 2 stitches 1 time, and cast off 1 stitch 1 time = 40-44-48-50-54-58 stitches. Continue working until the piece measures 28-30-34-37-41-44 cm. On the next row place the middle 10-12-14-16-16-18 stitches on a thread for the neck and finish each shoulder separately. Continue with stocking stitch and cast off on each row from the neck as follows: Cast off 2 stitches 1 time, and cast off 1 stitch 3 times = 10-11-12-12-14-15 stitches on the shoulder. Continue working until the piece measures 33-36-40-44-48-52 cm. Cast off. Work the other shoulder in the same way. ASSEMBLY: Sew the shoulder seams. ARMHOLES: Use short circular needle or double pointed needles size 4 mm. Start from the right side at the bottom of the armhole and knit up 58-62-66-70-74-78 stitches inside the 1 edge stitch around the armhole (number of stitches should be divisible by 2). Work rib in the round (knit 1, purl 1) for 3 cm. Cast off with knit over knit and purl over purl – read CASTING-OFF TIP! Work the other armhole in the same way. NECK: Use short circular needle or double pointed needles size 4 mm. Start from the right side, by the shoulder seam, and knit up 56-60-64-70-74-78 stitches around the neck (including the stitches on the thread; the number of stitches should be divisible by 2). Work rib in the round (knit 1, purl 1) for 3 cm. Cast off with knit over knit and purl over purl – remember CASTING-OFF TIP! |
|
 |
|
Have you finished this pattern?Tag your pictures with #dropspattern #lavendersmilesvest or submit them to the #dropsfan gallery. Do you need help with this pattern?You'll find 24 tutorial videos, a Comments/Questions area and more by visiting the pattern on garnstudio.com. © 1982-2026 DROPS Design A/S. We reserve all rights. This document, including all its sub-sections, has copyrights. Read more about what you can do with our patterns at the bottom of each pattern on our site. |
|


With over 40 years in knitting and crochet design, DROPS Design offers one of the most extensive collections of free patterns on the internet - translated to 17 languages. As of today we count 324 catalogues and 12290 patterns translated into English (UK/cm). 12290
We work hard to bring you the best knitting and crochet have to offer, inspiration and advice as well as great quality yarns at incredible prices! Would you like to use our patterns for other than personal use? You can read what you are allowed to do in the Copyright text at the bottom of all our patterns. Happy crafting!
Post a comment to pattern DROPS Baby & Children 38-24
We would love to hear what you have to say about this pattern!
If you want to leave a question, please make sure you select the correct category in the form below, to speed up the answering process. Required fields are marked *.