
Popular categories
Looking for a yarn?


Comments / Questions (30)
![]() Anneli Ahnstedt Stengård wrote:
Anneli Ahnstedt Stengård wrote:
När man plockat upp maskor på båda sidorna av mittendelen, ska man sticka dem var för sig eller sticka ihop dem? Om man inte ska sticka ihop dem undrar jag varför man ska sätta en mittmarkering för den hamnar ju emellan stickdelarna.
29.01.2024 - 10:25DROPS Design answered:
Hei Anneli. Når du har strikket midtpartiet, felt 1 maske i hver side, har 30 masker på pinnen og klippet tråden, starter du i den ene siden av midtpartiet, ved oppleggskanten (fra retten) og strikker opp 33-37 masker innenfor 1 kantmaske i rille, fortsett A.1 som før over de 30-30 maskene på pinnen (merketråden settes midt mellom disse 30 maskene), strikk opp 33-37 masker langs den andre siden på midtpartiet innenfor 1 kantmaske i rille = 96-104 masker. mvh DROPS Design
05.02.2024 - 13:10
![]() Kayla wrote:
Kayla wrote:
Hey there, This states it's worked on circular knitting needles but mentions a wrong side and right side. Are we not supposed to join in the round for this piece? Is it worked flat so that it does have a wrong/right side?
22.01.2024 - 03:24DROPS Design answered:
Hi Kayla, yes, we work back and forth at the beginning (mid front to back of head), then pick up stitches in the sides of this part and work back and forth in the sides and back ("around the head"). When the chin is reached and the opening for the face is finished, then join and work in the round for the neck. Happy knitting!
22.01.2024 - 05:13
![]() Val wrote:
Val wrote:
Hallo, ik ben zo goed als klaar met dit leuke patroon. Ik moet nu de steken opnemen langs het gezicht om de boordrand te breien. ik heb moeilijkheden om te zien waar ik moet steken met de breinaald . Heeft u een tip? en hoe kan ik elastisch vastnaaien .moet dit met elastische draad? groetjes . Trouwens ik ben erg tevreden met de duidelijke patronen van uw site. Elders begrijp ik er vaak niks van!!
16.08.2023 - 23:53DROPS Design answered:
Dag Val,
Bij de hals en midden voor kun je steken zo opnemen dat de boordsteek mooi doorloopt. Bij de lijst van video's staat ook een video over het opnemen van steken langs de zijkant. Misschien helpt dat je verder?
20.08.2023 - 15:40
![]() Val wrote:
Val wrote:
Ik denk dat ik zelf heb gevonden.ik heb alle steken op 3 naalden gezet en heen en weer gebreid.Toch heb ik een vraag wat betekent vermeerderen aan de binnenkant van de buitenste 7 steken. is dit aan de kant vanhet middelgedeelte of aan de gezichtsopening? Dank je voor jullie reactie.
22.07.2023 - 22:26DROPS Design answered:
Dag Val,
Je meerdert steeds vlak naast de 7 buitenste steken en is aan de kant van de gezichtsopening.
24.07.2023 - 20:05
![]() Val wrote:
Val wrote:
Ik begrijp het capuchon deel niet goed. ik heb 37 s opgenomen aan de zijkant. moet ik nu 16 cm A1 doen , en zet ik deze steken dan in wacht voor ik de steken aan de andere zijde opneem. ik begrijp ook niet waar ik de markeerdraad hang. dankje voor een reactie
19.07.2023 - 17:13
![]() Nicole wrote:
Nicole wrote:
Bonjour Désolé mais j'ai trouvé J'avais seulement mal lu Merci
03.01.2023 - 23:14
![]() Nicole wrote:
Nicole wrote:
Bonjour Vous dites de monter 21 mailles de chaque côtés = 64 m. Se pourrais t'il que vous vouliez dire 10 de chaque côtés à la place pour faire 64 total
03.01.2023 - 14:26DROPS Design answered:
Bonjour Nicole, êtes-vous vraiment en train de faire ce modèle ? Ou plutôt un autre peut-être? Je ne trouve pas ces informations dans ce modèle (ni 21 mailles de chaque côté ni 64 mailles au total) - n'hésitez pas à poster votre question dans la rubrique "questions" de celui que vous tricotez, ce sera ainsi plus simple pour nous de vérifier. Merci pour votre compréhension.
03.01.2023 - 16:49
![]() Carol Strydom wrote:
Carol Strydom wrote:
Thank you so much. I was in a panic when I couldn't figure it out. My daughter requested a balaclava as a birthday gift that is on Saturday. Now I will be able to finish it. Thanks again. Love your patterns and yarn. Unfortunately we don't have any shops stocking your yarn and I just don't trust shipping to S. A. at this time. I think I should ask my local yarn shop to stock your yarn.....
17.03.2022 - 11:57
![]() Carol Strydom wrote:
Carol Strydom wrote:
Please can you simplify the increases for me. I don't understand what you mean by " Increase on the inside of the outermost 7 stitches". Do I increase after the 6th stitch or can I increase after any stitch within thd seven stitches. 🤔Thank you.
17.03.2022 - 08:37DROPS Design answered:
Dear Mrs Strydom, you have to increase on each side of piece, from RS, ie work 7 st as before, increase 1 stitch (by making 1 yarn over), work until 7 sts remain before the end of the row, increase 1 stitch (by making a yarn over), and work the last 7 sts as before. Repeat this row on every 4th row (= every other row from RS). Happy knitting!
17.03.2022 - 09:57
![]() Nancy wrote:
Nancy wrote:
Increases:: are the increases 1 time each end in the 4 row repeat or twice ? i.e. rows 1 & 3, right side rows or only row 1? Your instructions say I”ever 4th row, so that would mean1 increase each end on row 1 only.
31.01.2022 - 14:38DROPS Design answered:
Dear Nancy, work the increases as follows: *work 1 row increasing 1 stitch on each side, work 3 rows without increasing*, repeat from *-* a total of 8 times. Happy knitting!
31.01.2022 - 17:47
|
|||||||
Northern Spirit#northernspiritbalaclava |
|||||||
 |
 |
||||||
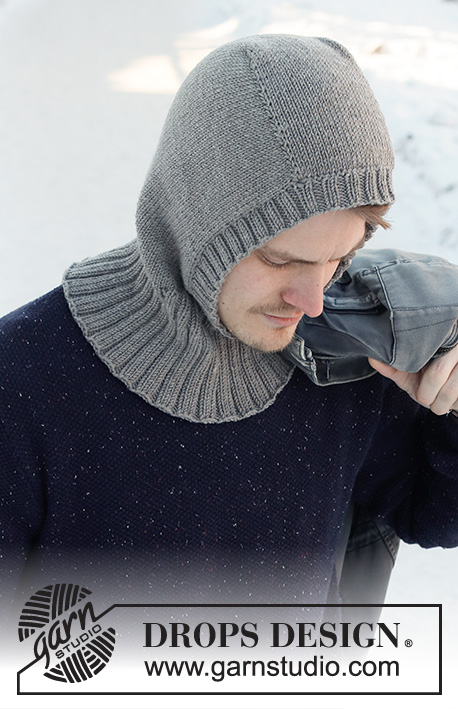
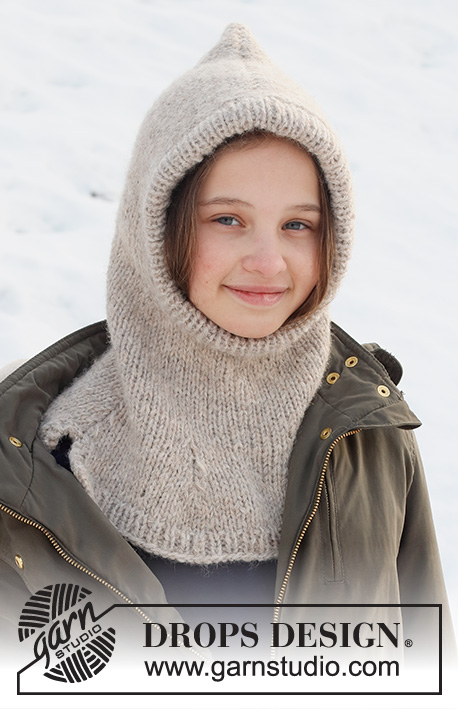
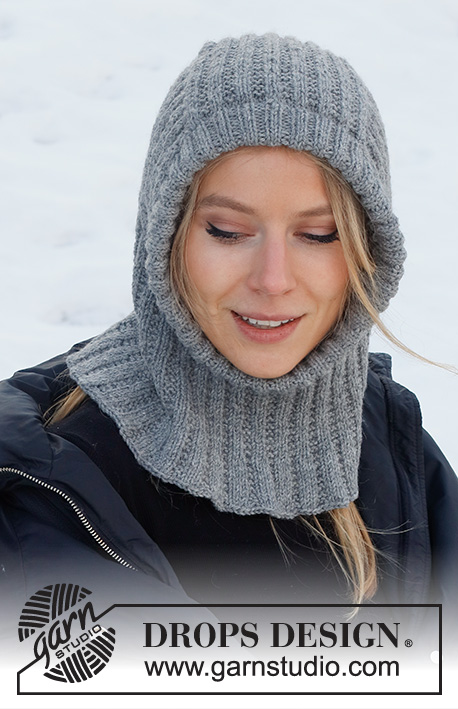
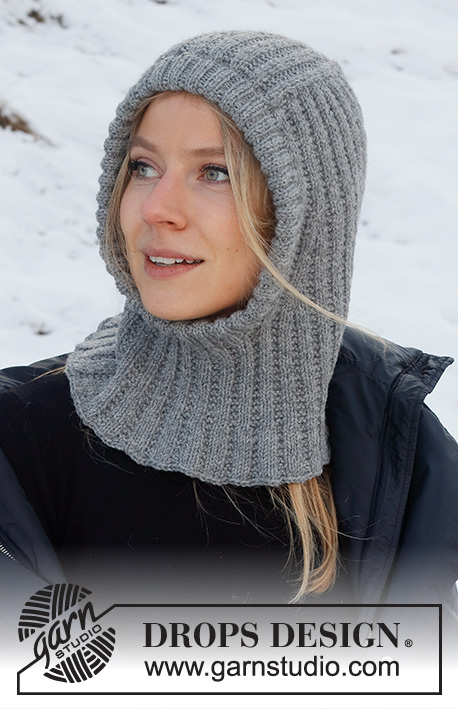
Knitted hat / balaclava in DROPS Lima. The piece is worked with textured pattern and ribbed edging.
DROPS 214-70 |
|||||||
|
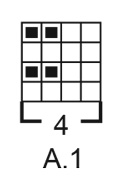
------------------------------------------------------- EXPLANATIONS FOR THE PATTERN: ------------------------------------------------------- RIDGE/GARTER STITCH (worked back and forth): Knit all rows. 1 ridge in height = Knit 2 rows. PATTERN: See diagram A.1. The diagram shows all rows in the pattern from the right side. INCREASE TIP (for sides of face-opening): Increase on the inside of the outermost 7 stitches on each side. All increases are worked from the right side! Increase 1 stitch by making 1 yarn over. On the next row (wrong side) work the yarn overs twisted to avoid holes. The increased stitches are worked into A.1, i.e. the first 2 stitches are worked in stocking stitch, the next 2 in garter stitch, the next 2 in stocking stitch, etc.. DECREASE TIP (mid-back): All decreases are worked from the right side! Start 4 stitches before the marker thread mid-back, knit 2 together, knit 4 (marker thread sits between these 4 stitches), slip 1 stitch as if to knit, knit 1 and pass the slipped stitch over the knitted stitch (= 2 stitches decreased). CASTING-OFF TIP: To avoid the cast-off edge being tight you can cast off with a larger size needle. If the edge is still tight, make 1 yarn over after approx. each 8th stitch at the same time as casting off; the yarn overs are cast off as normal stitches. ------------------------------------------------------- START THE PIECE HERE: ------------------------------------------------------- BALACLAVA – SHORT OVERVIEW OF THE PIECE: The middle section is worked back and forth with circular needle, from mid front and backwards. Stitches are knitted up on each side of this section. The piece is continued back and forth before stitches are cast on for the neck mid-front. The rest of the balaclava is finished in the round with circular needle. A ribbed edge is worked around the face-opening to finish. MID-SECTION: Cast on 32-32 stitches (including 1 edge stitch on each side) with circular needle size 3.5 mm and Lima. Purl 1 row from the wrong side. The next row is worked as follows from the right side: 1 edge stitch in GARTER STITCH – read description above, work A.1 until there are 3 stitches left, work the first 2 stitches in A.1 (so the pattern begins and finishes in the same way) and finish with 1 edge stitch in garter stitch. Continue this pattern. REMEMBER THE KNITTING TENSION! When the piece measures 14-16 cm, cast off the 1 edge stitch on each side = 30-30 stitches. Cut the strand. Then work the hood as described below. HOOD: Now knit up stitches on each side of the middle section on the next row from the right side as follows: Knit up 33-37 along the side of the mid-section inside the 1 edge stitch, continue A.1 as before over the 30-30 stitches on the needle and knit up 33-37 stitches along the other side of the mid-section inside the 1 edge stitch = 96-104 stitches. Insert 1 marker thread in the middle of the row (= mid-back). Allow the thread to follow your work onwards; it is used later when decreasing mid-back. THE PIECE IS NOW MEASURED FROM WHERE THE MARKER THREAD WAS INSERTED! Continue A.1 back and forth with 1 edge stitch in garter stitch on each side towards mid-front – the pattern should match the pattern on the middle section. Then increase on each side towards mid front and decrease mid-back as described below – read the sections on increasing and decreasing before continuing! INCREASES ON EACH SIDE TOWARDS MID FRONT: When the piece measures 10-12 cm from where the marker thread was first inserted, increase 1 stitch on each side towards mid front – read INCREASE TIP (= 2 stitches increased). Increase like this every 4th row (i.e. every 2nd row from the right side) a total of 8 times on each side. DECREASING MID-BACK: AT THE SAME TIME when you are about to increase for the 5th time, decrease 2 stitches mid-back – read DECREASE TIP. Decrease like this every 4th row a total of 4 times (the increases and decreases finish at the same time). After all the increases and decreases there are 104-112 stitches. When the piece measures 21-23 cm from where the marker thread was first inserted, cast on stitches mid-front for the neck; you can try the balaclava on and work to the desired length. Cast on 16-20 stitches at the end of the next row from the right side = 120-132 stitches. Remove the marker thread and insert 1 marker on the row. THE PIECE IS NOW MEASURED FROM THIS MARKER. Work the neck as described below. NECK: Continue working in the round with A.1 over all stitches – make sure the pattern matches the whole way round. When the piece measures 9-10 cm from the marker on the neck, increase all knit 2 sections to knit 3 by making 1 yarn over after each knit 2 (the yarn overs are knitted twisted on the next round) = 150-165 stitches. Continue working until the piece measures 12-13 cm from the marker. Now increase all 2 garter stitches to 3 garter stitches by making 1 yarn over after all 2 garter stitches = 180-198 stitches. Work 1 round with knit 3, 3 garter stitches (the yarn overs are worked twisted to avoid holes). Then cast off loosely with knit – read CASTING-OFF TIP. The piece measures approx. 41-44 cm from the middle of the mid-section and down. EDGE AROUND FACE-OPENING: Start from the right side at the bottom, where stitches were cast on for the neck, and knit up 160 TO 180 stitches around the opening, inside the 1 edge stitch using short circular needle size 3 mm and Lima. The number of stitches should be divisible by 4. Work rib in the round (knit 2, purl 2) for 6-6 cm – make sure the rib matches the stitches on the mid-section and on the cast-on stitches on the neck. Loosely cast off with knit over knit and purl over purl – read CASTING-OFF TIP. Fold the rib double to the inside and sew down. To avoid the edge being tight and rolling outwards, it is important the seam is elastic. |
|||||||
Diagram explanations |
|||||||
|
|||||||
 |
|||||||
Have you finished this pattern?Tag your pictures with #dropspattern #northernspiritbalaclava or submit them to the #dropsfan gallery. Do you need help with this pattern?You'll find 23 tutorial videos, a Comments/Questions area and more by visiting the pattern on garnstudio.com. © 1982-2026 DROPS Design A/S. We reserve all rights. This document, including all its sub-sections, has copyrights. Read more about what you can do with our patterns at the bottom of each pattern on our site. |
|||||||


With over 40 years in knitting and crochet design, DROPS Design offers one of the most extensive collections of free patterns on the internet - translated to 17 languages. As of today we count 324 catalogues and 12290 patterns translated into English (UK/cm). 12290
We work hard to bring you the best knitting and crochet have to offer, inspiration and advice as well as great quality yarns at incredible prices! Would you like to use our patterns for other than personal use? You can read what you are allowed to do in the Copyright text at the bottom of all our patterns. Happy crafting!
Post a comment to pattern DROPS 214-70
We would love to hear what you have to say about this pattern!
If you want to leave a question, please make sure you select the correct category in the form below, to speed up the answering process. Required fields are marked *.