
Popular categories
Looking for a yarn?


Comments / Questions (11)
![]() Edith wrote:
Edith wrote:
Bonjour je ne sais pas comment faire quand vous dites: « BONNET: Monter 129-138 mailles avec l'aiguille circulaire 2.5. NE PAS TOURNER L’ OUVRAGE Merci pour votre réponse
16.12.2024 - 22:27DROPS Design answered:
Bonjour Edith, joignez vos mailles en rond et tricotez simplement le 1er tour en mailles endroit puis tricotez en côtes 1 m end, 2 m env, puis après 12 cm, vous allez tourner l'ouvrage pour tricoter dans l'autre sens, comme on le montre dans cette vidéo (pour un autre modèle/point mais la technique sera la même).. Bon tricot!
17.12.2024 - 09:52
![]() Magdalena wrote:
Magdalena wrote:
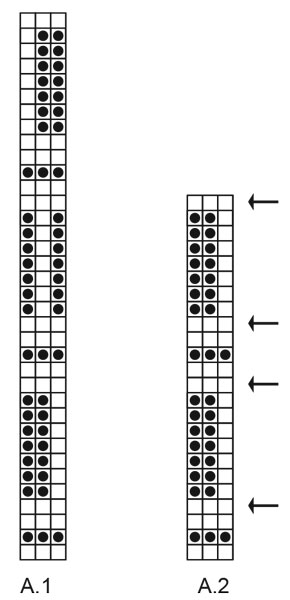
Wonderful pattern, but as Emma asked 3 years ago, I also wonder about the decrease in first arrow in A2. It should be 96 loops left, shouldn’t it? Or how should I knit over the last loop?
03.01.2024 - 15:44DROPS Design answered:
Dear Magdalena, you can decrease 24 sts at 1st arrow and only 22 sts at 2nd arrow to get the pattern working. This has been forwarded to our design team, thank you. Happy knitting!
04.01.2024 - 07:49
![]() Magdalena wrote:
Magdalena wrote:
Wonderful pattern, but as Emma asked 3 years ago, I also wonder about the decrease in first arrow in A2. It should be 96 loops left, shouldn’t it? Or how should I knit over the last loop?
03.01.2024 - 15:43
![]() Noel Kerns wrote:
Noel Kerns wrote:
Does it matter what type of increase I use in the pattern? I like "knit right loop increase" or "Knit left loop increase." Thanks. Noel
18.12.2023 - 18:27DROPS Design answered:
Dear Mrs Kerns, it's just okay to use your favorite technique to increase. Happy knitting!
19.12.2023 - 07:44
![]() Ghislaine Gagnon wrote:
Ghislaine Gagnon wrote:
Trois pelotes de laine et déjà quatre noeuds . J'ai acheté la Mérino extra fine mix et je suis très déçue, ce qui n'était pas le cas pour la Karisma ou autres, j'ai été toujours satisfaite, jusqu'à ce jour. Il me rest encore cinq pelotes que je n'ai pas vérifiées. Je ne sais pas qui est votre fournisseur, mais il se laisse aller, sans parler de l'augmentation par pelote. Merci
16.11.2023 - 22:29
![]() Elina Puonti wrote:
Elina Puonti wrote:
I tried to do the mittens but the instructions don\'t tell how you manage to keep the pattern in order while you are adding stitches all the time. Should one do only right stitches in the area, were you make room for the thumb?
11.05.2023 - 13:06DROPS Design answered:
Dear Mrs Puonti, the increases for the thumb are worked in stocking stitch, not in pattern. This means, the new stitches for thumb are knitted while the remaining stitches around the hand are worked in pattern. Happy knitting!
12.05.2023 - 07:36
![]() Emma wrote:
Emma wrote:
Og skal 29 m være 27 eller 30?
10.01.2021 - 07:50
![]() Emma wrote:
Emma wrote:
Tror ikke fellingen på luen i A2 er riktig. Sitter igjen med maske for mye i forhold til mønsteret. 24 (8*3) må vel være riktig?
10.01.2021 - 07:45
![]() Isabel wrote:
Isabel wrote:
Liebes Drops-Team Das Wenden der Arbeit nach dem Bündchen ergibt ein Loch. Gibt es hier einen Tipp oder eine Lösung ohne Loch? Es ist nicht wirklich schlimm, man sieht es unter dem Bündchen ja nicht, aber mich stört es doch ein wenig. Vielen Dank und liebe Grüesse
16.11.2020 - 16:32DROPS Design answered:
Liebe Isabel, Sie können vielleicht die erste Masche wie beim verkürzten Reihen deutsche Technik (also mit doppeltem Maschen) stricken oder mit dem Umschlag (siehe Video: sog. wrap & turn, nur am Anfang der 1. Runde in die andere Richtung. Viel Spaß beim stricken!
16.11.2020 - 16:35
![]() Isabel wrote:
Isabel wrote:
Diese Mütze mit dem äusserst schönen und klaren Strukturmuster ist sehr gut gelungen! Ich habe sie mit dem Originalgarn in olive gestrickt und dazu noch passende Fingerhandschuhe. Beim Bündchen der Fingerhandschuhe habe ich es leider verpasst, die Arbeit zu wenden. So ist das Bündchen halt verkehrt herum; merkt niemand. Vielen herzlichen Dank für diese wunderbare Anleitung.
11.11.2020 - 19:34
|
||||||||||
Honey Sweet#honeysweetset |
||||||||||
 |
 |
|||||||||
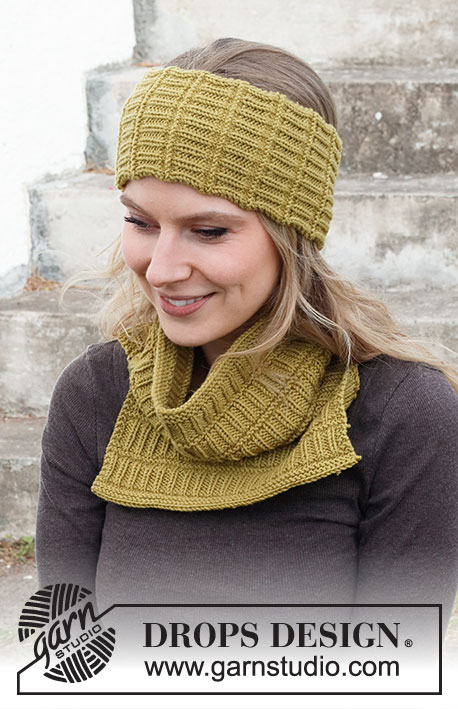
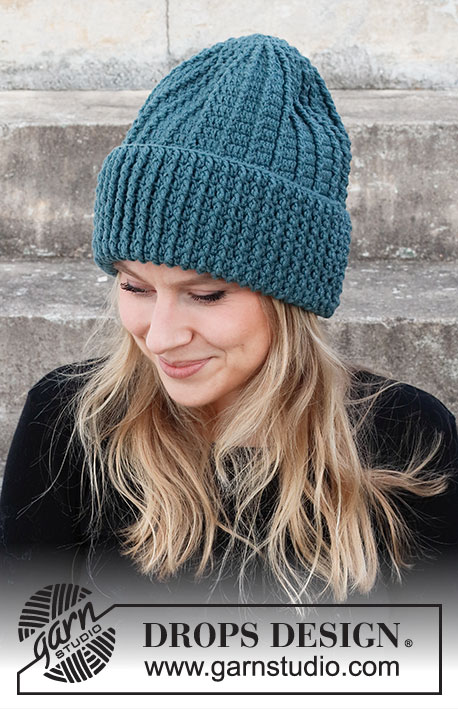
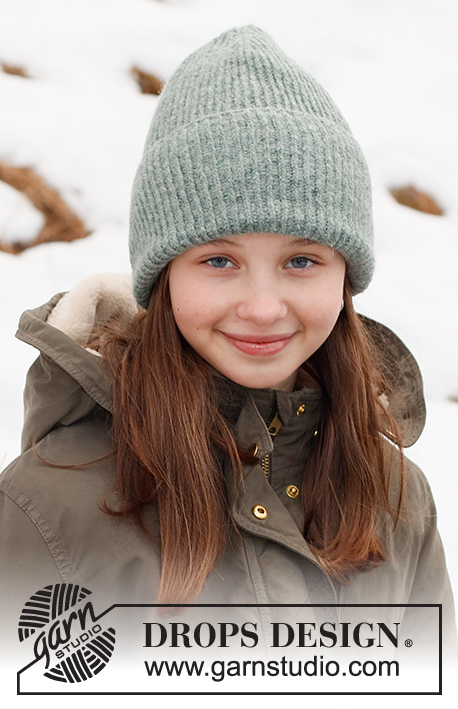
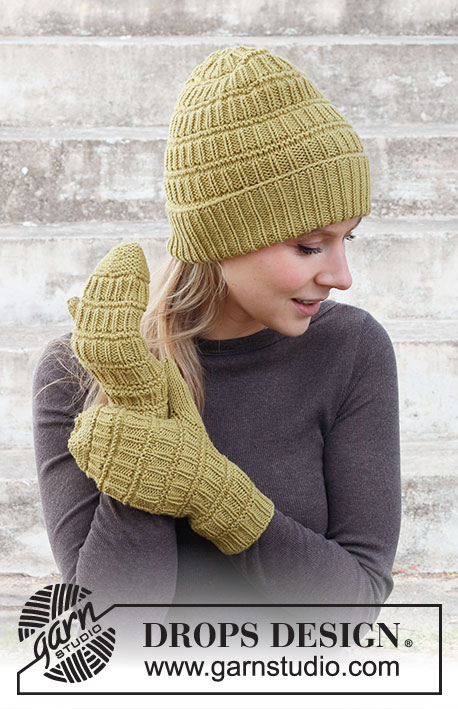
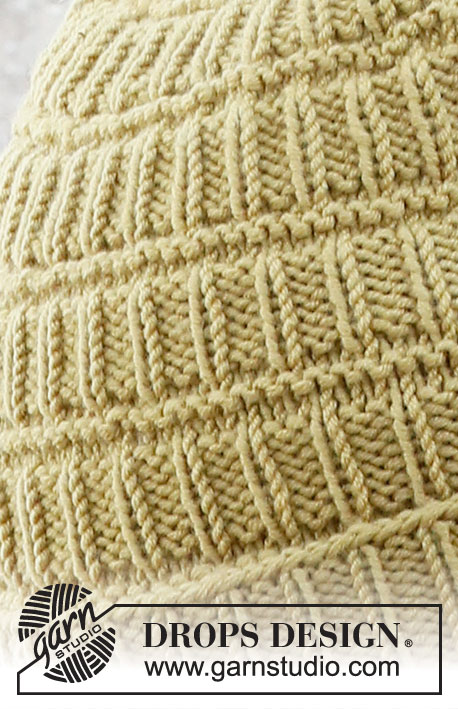
Knitted hat and mittens in DROPS Merino Extra Fine. Piece is knitted with textured pattern.
DROPS 214-39 |
||||||||||
|
------------------------------------------------------- EXPLANATION FOR THE PATTERN: ------------------------------------------------------- GARTER STITCH (worked in the round): 1 ridge vertically = 2 rounds, i.e. knit 1 round and purl 1 round. PATTERN: Hat: See diagrams A.1 and A.2. Mittens: See diagram A.1. INCREASE TIP: Increase 1 stitch by making 1 yarn over. On next round knit yarn over twisted to avoid holes. DECREASE TIP (evenly): To calculate how to decrease evenly, count number of stitches to decrease over (e.g. 129 stitches) and divide by number of decreases to be done (e.g. 18) = 7.1. In this example decrease by knitting approx. every 6th and 7th stitch together ------------------------------------------------------- START THE PIECE HERE: ------------------------------------------------------- HAT - SHORT OVERVIEW OF THE PIECE: Worked in the round on circular needle. Switch to double pointed needles when needed. HAT: Cast on 129-138 stitches on circular needle size 2.5 mm. Do not turn piece, continue in the round as follows: Knit 1 round. Then work rib (= knit 1/purl 2) for 12-12 cm. Turn piece so that right side of piece is on the inside of hat - right side will be visible from right side when rib is folded up when hat is finished. Knit 1 round while decreasing 18-18 stitches evenly – read DECREASE TIP = 111-120 stitches. Switch to circular needle size 3 mm. Work A.1 in the round on round. REMEMBER THE KNITTING TENSION When A.1 has been worked vertically, piece, measures approx. 23-23 cm. Now work pattern A.2 over A.1, AT THE SAME TIME on rounds with arrow, decrease evenly as follows: ARROW-1: Decrease 21-24 stitches evenly = 90-96 stitches. ARROW-2: Decrease 21-24 stitches evenly = 69-72 stitches. ARROW-3: Decrease 27-27 stitches evenly = 42-45 stitches. ARROW-4: Knit stitches together 2 by 2 = 21-23 stitches. Knit 1 round. Then knit stitches together 2 by 2 until 11-12 stitches remain on round. Cut the yarn and pull it through the remaining stitches, tighten together and fasten. Hat measures approx. 25 cm with 6 cm fold at the bottom (31 cm in total). ------------------------------------------------------- MITTENS: Worked in the round on double pointed needles. RIGHT MITTEN: Cast on 42-45 stitches on double pointed needles size 3 mm with Merino Extra Fine. Knit 1 round. Then work rib (= knit 1/purl 2) for 3 cm. Now work pattern A.1 (= 14-15 repetitions of 3 stitches) in the round. REMEMBER THE KNITTING TENSION! When piece measures 8-8 cm, begin increase for thumb gusset. Increase 1 stitch on each side of first stitch on round - read INCREASE TIP! Increase like this on the outside of the increased stitches every other round 6-7 times in total = 54-59 stitches. Work until piece measures 12-13 cm. On next round slip the next 13-15 thumb gusset stitches on 1 stitch holder, continue in the round with pattern as before - AT THE SAME TIME cast on 1 new stitch on needle over stitches on stitch holder = 42-45 stitches. Work until mitten measures 22-22 cm - adjust to finish after 2nd, 14th or 26th round in diagram (approx. 4-5 cm remain until finished length, try the mitten on and work in garter stitch to desired length). Now work in GARTER STITCH - read explanation above, and on next round with knit begin decrease - read DECREASE TIP. Decrease every 8th-10th round as follows: Decrease 6-9 stitches 1 time and 10-10 stitches 2 times = 16-16 stitches. Knit stitches together 2 by 2 = 8-8 stitches. Cut the yarn and pull it through the remaining stitches, tighten together and fasten. THUMB: Slip the 13-15 thumb gusset stitches from stitch holder back on double pointed needles size 3 mm and pick up 2-2 stitches behind thumb with olive = 15-17 stitches. Work in stocking stitch until the thumb itself measures approx. 5-6 cm (try on the mitten, approx. ½ cm remains until finished length). Knit 2 rounds where stitches are knitted together 2 by 2 on both rounds = approx. 4-5 stitches. Cut the yarn and pull it through the remaining stitches, tighten together and fasten. LEFT MITTEN: Cast on and work the same way as on right mitten but when increase for thumb gusset begins, work as follows: Increase 1 stitch on each side of last stitch on round. Work the rest of the mitten the same way as right mitten. |
||||||||||
Diagram explanations |
||||||||||
|
||||||||||
 |
||||||||||
Have you finished this pattern?Tag your pictures with #dropspattern #honeysweetset or submit them to the #dropsfan gallery. Do you need help with this pattern?You'll find 22 tutorial videos, a Comments/Questions area and more by visiting the pattern on garnstudio.com. © 1982-2026 DROPS Design A/S. We reserve all rights. This document, including all its sub-sections, has copyrights. Read more about what you can do with our patterns at the bottom of each pattern on our site. |
||||||||||


With over 40 years in knitting and crochet design, DROPS Design offers one of the most extensive collections of free patterns on the internet - translated to 17 languages. As of today we count 325 catalogues and 12298 patterns translated into English (UK/cm). 12298
We work hard to bring you the best knitting and crochet have to offer, inspiration and advice as well as great quality yarns at incredible prices! Would you like to use our patterns for other than personal use? You can read what you are allowed to do in the Copyright text at the bottom of all our patterns. Happy crafting!
Post a comment to pattern DROPS 214-39
We would love to hear what you have to say about this pattern!
If you want to leave a question, please make sure you select the correct category in the form below, to speed up the answering process. Required fields are marked *.