
Popular categories
Looking for a yarn?


Comments / Questions (12)
![]() Tiina Reponen wrote:
Tiina Reponen wrote:
Mistä tiedän mikä koko on itselle paras jos vaatekoko yleensä on M - L,?
09.02.2025 - 12:10DROPS Design answered:
Hei, löydät puseron mitat ohjeen tekstin alapuolella olevasta mittapiirroksesta.
10.02.2025 - 19:32
![]() Marjolein Van Dijke wrote:
Marjolein Van Dijke wrote:
Als er staat een omslag deed ik dat letterlijk ( dus sloeg het eenmaal om de naald ) waardoor ik telkens verkeerd in het patroon zat, en er niet uitkwam , beter lijkt mij te zeggen haal de draad naar voren ( voor het werk )of haal de draad naar achteren ( achter het werk), want dat is wat je doet ! En is het mij eindelijk gelukt Het instructie filmpje vind ik op dit punt onduidelijk te zien
28.11.2024 - 19:26
![]() Anna-Fulvia wrote:
Anna-Fulvia wrote:
Bonjour, Ce modèle est trop compliqué pour moi ; j'ai 300 g de Flora et 150 g de Kid silk. Comment chercher un modèle alternatif plus simple pour ces quantités ? = Modèle en fil C pour 450 g ? comment gérer les mailles en largeur (14 pour le moon cercles = ? en fil alternatif). Merci de votre retour et éventuelles suggestions.
25.02.2023 - 18:12DROPS Design answered:
Bonjour Anna-Fulvia, vous pouvez tout à fait consulter les modèles du groupe C ou bien ceux du groupe A mais avec une tension de 16-17 m (tension habituelle pour 2 fils du groupe A). Vérifiez les quantités grâce à notre convertisseur. Bon tricot!
27.02.2023 - 10:16
![]() Mattea wrote:
Mattea wrote:
Beste, wat bedoelen jullie hiermee? 1 draad Kid-Silk (= 2 draden) Moet ik met 2 bolletjes kid-silk tegelijkertijd breien + 1 bol flora? Als ik dit patroon volledig wil breien in kid-silk heb ik dan 12 bolletjes nodig? bedankt!
22.04.2021 - 11:30DROPS Design answered:
Dag Mattea,
Het is de bedoeling dat je het hele patroon met 1 draad Kid Silk en 1 draad Flora breit. Je breit dus steeds met 2 draden tegelijkertijd; eentje van elke kwaliteit. Als je geen Flora wilt gebruiken en alleen Kid Silk, dan heb je inderdaad de dubbele hoeveelheid daarvan nodig.
29.04.2021 - 14:24
![]() Bassam Galal wrote:
Bassam Galal wrote:
It is fine
23.02.2021 - 20:01
![]() Bassam Galal wrote:
Bassam Galal wrote:
Hej is thire eny pattern help to those how kint on a machine . I have an old knitmaster 323 with rib and I think at that there are many others would be happy to find that kind of help . Best regards
23.02.2021 - 20:00DROPS Design answered:
Dear Mrs Galal, sorry we do not have any informations about knitting machine and there are so different sort and settings depending on the maching - maybe your yarn store can help you - even per mail or telephone - or you might find help from a specialized forum in machine knitting. Thanks for your comprehension. Happy knitting!
24.02.2021 - 07:25
![]() Elena wrote:
Elena wrote:
Buomgiorno, non riesco a trovare le misure del maglione, siccome lavoro con un filato diverso devo aggiungere più maglie, nello specifico 4 maglie ogni 10 cm. Potreste aiutarmi? Grazie
21.02.2021 - 15:38DROPS Design answered:
Buonasera Elena, in fondo alla pagina trova uno schema con le misure del capo finito. Buon lavoro!
21.02.2021 - 18:25
![]() Pat wrote:
Pat wrote:
Sorry, I am still confused. Before I start the first A1 I have 114 stitches and 54 yarn over. In total I have 168 stitches. It says after 7cm increase stitches to 144, but I already have 168 including yo. What do I do with the yarn overs when I am doing my first knit row in A1
17.02.2021 - 13:03DROPS Design answered:
Dear Pat, the yarn overs made for the English rib are not counting as stitches, since they belong to the slipped stitch, ie when you work English rib over 114 stitches, you have 114 stitches (57 stitches worked and 57 stitches slipped as if to P with a yarn over). When you increase 30 stitches evenly on first round in A.1 you will knit 114 stitches and make 30 yarn overs evenly, on 2nd round in A.1 you will purl all yarn overs twisted (= as in 2nd round in A.1) = 144 sts. Then you increase 30 sts on last row in A.1 = 174 sts. You then work English rib over the 174 sts (= 87 sts + 87 sts slipped with their yarn over). - this is for size S. Can this help?
17.02.2021 - 14:05
![]() Pat wrote:
Pat wrote:
Work A.1 in the round (A.1 = approx. 2 cm vertically). AT THE SAME TIME on first round in A.1 increase 30-38-40-46-50-54 stitches evenly = 144 What do you do with yarn overs when increasing
16.02.2021 - 14:27DROPS Design answered:
Hi Pat, The first row in A.1 is a knitted row (so the whole round is knitted and the yarn overs are evenly spaced on this round. The next round is also knitted and the yarn overs are knitted twisted, (i.e. you work in the back loop of the stitch instead of the front loop) to avoid holes. Happy knitting!
17.02.2021 - 07:45
![]() Patricia Kurl wrote:
Patricia Kurl wrote:
I am knitting moon circles pattern. When you first row of English rib it adds more stitched ROUND 1: * Knit 1, make 1 yarn over, slip 1 stitch purlwise *, work from *-* the rest of round.
09.02.2021 - 11:27DROPS Design answered:
Dear Mrs Kurl, when you work English rib in the round, do not count the yarn overs made over the slipped stitches as separate stitches, ie the yarn over + slipped stitch count as 1 stitch. See video if it helps. Happy knitting!
09.02.2021 - 14:49
|
|||||||
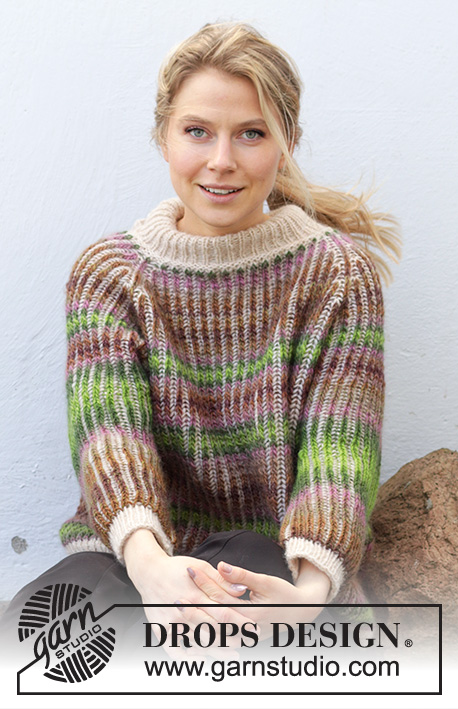
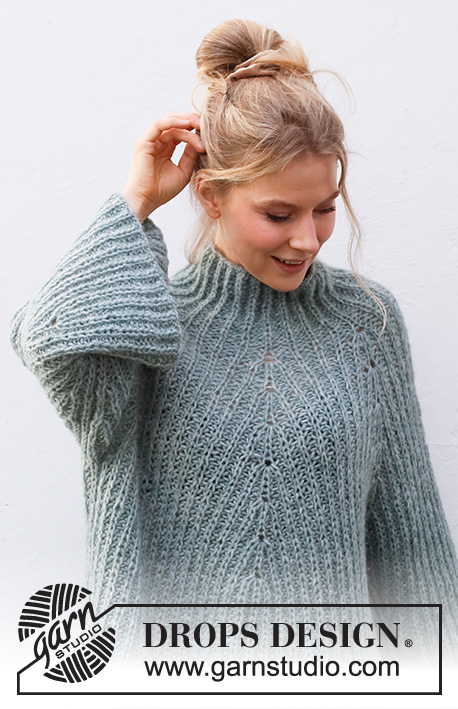
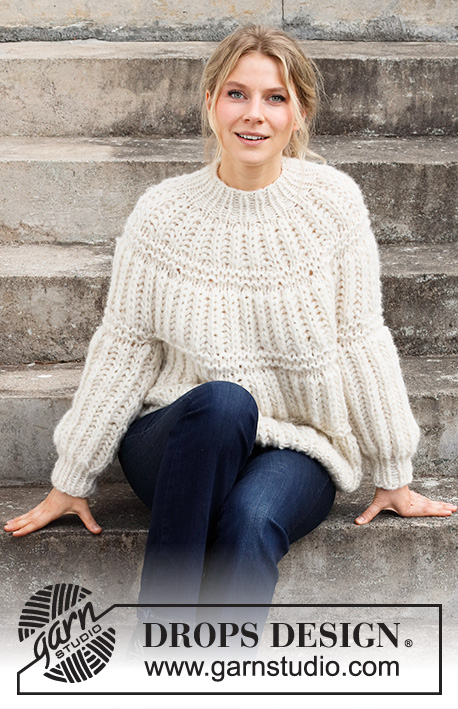
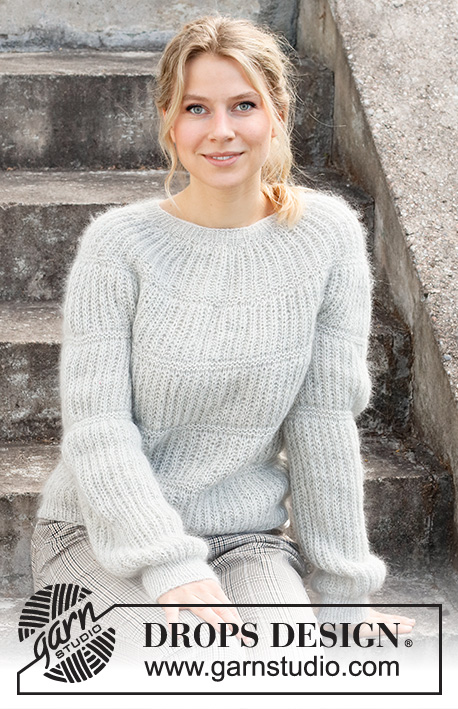
Moon Circles#mooncirclessweater |
|||||||
 |
 |
||||||
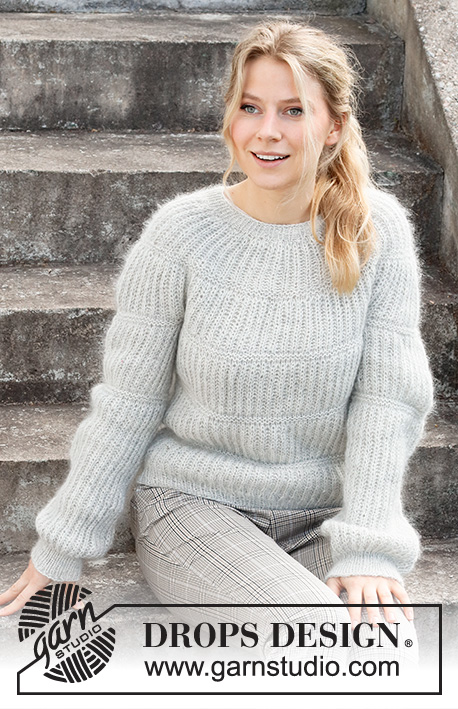
Knitted jumper in DROPS Flora and DROPS Kid-Silk. Piece is knitted top down with English rib and round yoke. Size: S - XXXL
DROPS 215-33 |
|||||||
|
------------------------------------------------------- EXPLANATION FOR THE PATTERN: ------------------------------------------------------- INCREASE TIP (evenly): To calculate how to increase evenly, use the total number of stitches on row (e.g. 76 stitches) and divide stitches by number of increases to be done (e.g. 38) = 2. In this example increase by making 1 yarn over after every other stitch (work yarn overs somewhat tight to avoid big holes). On next round work yarn overs twisted to avoid holes. ENGLISH RIB (worked in the round): ROUND 1: * Knit 1, make 1 yarn over, slip 1 stitch purlwise *, work from *-* the rest of round. ROUND 2: * Make 1 yarn over, slip 1 stitch purlwise, purl together yarn over and slipped stitch *, repeat from *-* the rest of round. ROUND 3: * Knit together yarn over and slipped stitch, 1 yarn over, slip 1 stitch purlwise *, repeat from *-* the rest of round. Repeat rounds 2 to 3. PATTERN: See diagram A.1. DECREASE TIP (applies to mid under sleeves in L, XL, XXL and XXXL): Adjust distance on decreases to decrease in a section with English rib - work all decreases on a round with English rib where yarn over and knit stitch are knitted together. DECREASE 2 STITCHES TOWARDS THE RIGHT AS FOLLOWS (i.e. begin 3 stitches + 2 yarn overs before purl stitch with marker): Slip first knit stitch and yarn over loosely on to right needle knitwise, purl 1, pass slipped stitch and yarn over over purl stitch, slip stitch back on left needle, pass slipped stitch and yarn over over stitch place back on left needle, slip the remaining stitch over on to right needle (= 2 stitches decreased). DECREASE 2 STITCHES TOWARDS THE LEFT AS FOLLOWS (i.e. begin right after purl stitch with marker): Slip first knit stitch and yarn over on to right needle knitwise, knit the next 2 stitches together (i.e. 1 purl + knit stitch and yarn over), then slip the loose stitch and yarn over over stitches worked together (= 2 stitches decreased). CAST-OFF TIP: To avoid a tight cast-off edge you may use a larger needle size. If this also is too tight, work a 1 yarn over after approx. every 4th stitch while casting off (cast off yarn overs as regular stitches). ------------------------------------------------------- START THE PIECE HERE: ------------------------------------------------------- JUMPER - SHORT OVERVIEW OF THE PIECE: Work neck edge and yoke in the round on double pointed needles/circular needle from right shoulder at the back, top down. Now divide yoke for body and sleeves. Body is worked in the round on circular needle, top down. Work sleeves in the round on double pointed needles/short circular needle, top down. NOTE: All number of stitches given when working English rib is counted without yarn overs because yarn overs are counted together with the knit stitch. NECK EDGE: Cast on 76-80-84-86-90-94 stitches on a short circular needle size 4 mm with 1 strand Flora and 1 strand Kid-Silk (= 2 strands). Knit 1 round. Then work rib in the round (= knit 1 / purl 1) for 3-3-3-4-4-4 cm. When rib is done, knit 1 round while increasing 38-40-42-44-46-48 stitches evenly - read INCREASE TIP = 114-120-126-130-136-142 stitches. Switch to circular needle size 5 mm. Insert 1 marker at beginning of round. Work yoke as explained below. Measure yoke from this marker. YOKE: Read all of the following section on yoke before working! Work ENGLISH RIB - read explanation above. REMEMBER THE KNITTING TENSION! When piece measures 7-8-9-10-10-10 cm from marker after neck edge, work A.1 in the round (A.1 = approx. 2 cm vertically). AT THE SAME TIME on first round in A.1 increase 30-38-40-46-50-54 stitches evenly = 144-158-166-176-186-196 stitches, and on last round in A.1 increase 30-36-40-46-50-54 stitches evenly = 174-194-206-222-236-250 stitches. When A.1 has been worked, work English rib (begin with 1st round, then repeat 2nd and 3rd round as before). When piece measures 16-18-20-22-22-22 cm from marker, work A.1 in the round. AT THE SAME TIME on first round increase 26-26-26-34-36-42 stitches evenly = 200-220-232-256-272-292 stitches. When A.1 has been worked, work English rib in the round again. When piece measures 18-20-22-24-26-28 cm from marker, divide yoke for body and sleeves as explained below. NOTE! If knitting tension is not kept in height, division can take place before A.1 is worked in height in S, M, L and XL. In that case, finish A.1 when working body and sleeves. Divide yoke as follows: Slip the first 41-45-47-53-55-57 stitches on 1 stitch holder, cast on 5-5-7-7-9-9 new stitches on needle (= in the side under sleeve) work A.1 or English rib over the next 59-65-69-75-81-89 stitches (= front piece), slip the next 41-45-47-53-55-57 stitches on 1 stitch holder for sleeve, cast on 5-5-7-7-9-9 new stitches on needle (= in the side under sleeve), and work A.1 or English rib as before over the next 59-65-69-75-81-89 stitches (= back piece). Cut the yarn. Finish body and sleeves separately. NOW MEASURE PIECE FROM HERE! BODY: = 128-140-152-164-180-196 stitches. Begin round in the middle of the 5-5-7-7-9-9 stitches that were cast on under one sleeve, and work as explained below. S, M, L and XL: Finish A.1 if A.1 was not finished on yoke. Then work English rib as before for 8-8-9-9 cm. Work A.1. Then work English rib as before for 8-8-9-9 cm. Work A.1. Then work English rib as before for approx. 9-9-9-9 cm. Piece now measures approx. 29-29-31-31 cm from division and approx. 3 cm remain until finished measurements. Try the jumper and work to desired length. Continue to ALL SIZES! XXL and XXXL: Continue with English rib until this section measures 10-10 cm in total including what was worked on yoke before division. Work A.1. Then work English rib as before for 10-10 cm. Work A.1. Then work English rib as before for approx. 9-11 cm. Piece now measures approx. 31-31 cm from division and approx. 3 cm remain until finished measurements. Try the jumper and work to desired length. Continue to ALL SIZES! ALL SIZES: Switch to circular needle size 4 mm. Work rib in the round (= knit 1/purl 1) but adjust so that rib fits nicely over pattern in English rib - on first round rib knit yarn overs from English rib stitches together with knit stitches in rib. Continue rib with knit over knit and purl over purl in the round for 3 cm. Cast off with knit over knit and purl over purl - read CAST-OFF TIP. Jumper measures approx. 54-56-60-62-64-66 cm from shoulder and down. SLEEVE: Slip the 41-45-47-53-55-57 stitches from stitch holder in one side of piece on double pointed needles or a short circular needle size 5 mm and pick in addition up 1 stitch in each of the 5-5-7-7-9-9 new stitches cast on under sleeve = 46-50-54-60-64-66 stitches. Insert 1 marker in the middle of the 5-5-7-7-9-9 stitches under sleeve. Move the marker upwards when working; it should be used for decrease mid under sleeve (applies to XL, XXL and XXXL). Begin round after stitch with marker (i.e. stitch with marker is now last stitch on round), and work as follows: S, M, L and XL: Finish A.1 if A.1 was not finished on yoke. Then work English rib for 10-10-11-11 cm. AT THE SAME TIME when sleeve measures 3 cm from division, decrease 2 stitches towards the right mid under sleeve in size XL (decrease no stitches in S, M and L) - read DECREASE TIP = 46-50-54-58 stitches. When sleeve measures 6 cm from division, decrease 2 stitches towards the left in size XL = 46-50-54-56 stitches. When section with English rib is done, work A.1 in the round. Then work English rib until sleeve measures 43-42-40-38 cm from division. Approx. 6 cm remains until finished measurements. Try the jumper and work to desired length. NOTE! Shorter measurements in the larger sizes because of wider neck and longer yoke. Continue to ALL SIZES! XXL and XXXL: Continue with English rib in the round as before until this section with English rib measures 12-12 cm in total including what was worked on yoke before division. AT THE SAME TIME when sleeve measures 2 cm from division, decrease 2 stitches towards the right mid under sleeve - read DECREASE TIP = 62-64 stitches. When sleeve measures 5 cm from division, decrease 2 stitches towards the left = 60-62 stitches. Repeat the decrease one more time towards the right and one more time towards the left (2 cm between each decrease) = 56-58 stitches remain. When section with English rib is done, work A.1 in the round. Then work English rib until sleeve measures 36-35 cm from division. Approx. 6 cm remains until finished measurements. Try the jumper and work to desired length. NOTE! Shorter measurements in the largest size because of wider neck and longer yoke. Continue to ALL SIZES! ALL SIZES: Knit 1 round while decreasing 6-8-10-10-8-8 stitches evenly - NOTE: Knit yarn overs from English rib stitches together with knit stitches but this does not count as decrease = 40-42-44-46-48-50 stitches on needles. Switch to double pointed needles size 4 mm. Work rib in the round = knit 1/purl 1 for 6 cm. Cast off with knit over knit and purl over purl - remember CAST-OFF TIP! Sleeve measures approx. 49-48-46-44-42-41 cm from division. Work the other sleeve the same way. |
|||||||
Diagram explanations |
|||||||
|
|||||||
 |
|||||||
Have you finished this pattern?Tag your pictures with #dropspattern #mooncirclessweater or submit them to the #dropsfan gallery. Do you need help with this pattern?You'll find 25 tutorial videos, a Comments/Questions area and more by visiting the pattern on garnstudio.com. © 1982-2026 DROPS Design A/S. We reserve all rights. This document, including all its sub-sections, has copyrights. Read more about what you can do with our patterns at the bottom of each pattern on our site. |
|||||||


With over 40 years in knitting and crochet design, DROPS Design offers one of the most extensive collections of free patterns on the internet - translated to 17 languages. As of today we count 324 catalogues and 12290 patterns translated into English (UK/cm). 12290
We work hard to bring you the best knitting and crochet have to offer, inspiration and advice as well as great quality yarns at incredible prices! Would you like to use our patterns for other than personal use? You can read what you are allowed to do in the Copyright text at the bottom of all our patterns. Happy crafting!
Post a comment to pattern DROPS 215-33
We would love to hear what you have to say about this pattern!
If you want to leave a question, please make sure you select the correct category in the form below, to speed up the answering process. Required fields are marked *.