
Popular categories
Looking for a yarn?


Comments / Questions (140)
![]() VIEL wrote:
VIEL wrote:
Bonjour Merci pour votre réponse rapide Par contre je ne comprends pas qu'il faille tricoter A1 pendant 34 cm alors qu'il n'y a pas de motifs, et sur les photos les motifs ajourés sont là depuis le début donc du bas.. Merci d'avance pour votre réponse Marjorie
11.03.2024 - 23:40DROPS Design answered:
Bonjour Marjorie, le diagramme A.1 se tricote ainsi: *1 m env, 2 m end, 1 m env* et on répète de *à* = autrement dit, on va avoir des côtes 2/2 qui commencent et se termine par 1 m env (sur le côté = début des tours). On a donc bien des côtes jusqu'aux emmanchures. Il n'y a pas de motif ajouré en bas de ce modèle. Bon tricot!
12.03.2024 - 07:45
![]() VIEL wrote:
VIEL wrote:
Bonjour Il faut tricoter A1 pendant 34 cm(taille M) Cela me semble beaucoup, il ne reste que 23 cm pour le motif, alors que sur la photo sont tout de suite au début Merci d'avance pour votre réponse Marjorie
11.03.2024 - 00:04DROPS Design answered:
Bonjour Mme Viel, A.1 correspond aux côtes du top, on tricote le top en côtes = en suivant le diagramme A.1 jusqu'aux emmanchures, puis on va suivre d'autres diagrammes pour former la bordure des emmanchures et le haut de chaque devant. Bon tricot!
11.03.2024 - 09:14
![]() Ewa wrote:
Ewa wrote:
Po zrobieniu 35cm robótki mam zacząć schematy, tylko, że A1 ma 4oczka, a 58 się nie dzieli bez reszty przez 4 i wychodzi, że mam zrobić A1x14,5? Tak ma być? Dziwne, nie spotkałam się z tym nihdy.
21.02.2024 - 17:31DROPS Design answered:
Witaj Ewo, w takiej sytuacji, po powtórzeniu 14 całych schematów A1, przerabiasz 2 pozostałe oczka jak 2 pierwsze oczka schematu A.1, Jak postępujemy gdy liczba oczek nie zgadza się z liczbą powtórzeń schematu znajdziesz w kursie DROPS TUTAJ. Pozdrawiamy!
22.02.2024 - 11:57
![]() Maria Camilo Coelho wrote:
Maria Camilo Coelho wrote:
Parabéns maravilhoso amei todas as receitas e gratidão por compartilhar conosco. 🌿🌹🌹🌹🌹🌹🌹🌹🌿👏👏👏👏👏👏👏
14.10.2023 - 19:15
![]() Yvonne wrote:
Yvonne wrote:
Hallo! Ich habe die ersten 4 Maschen für den Armausschnitt abgekettet und die Runde nach Anleitung weiter gestrickt. Nun muss ich die letzten vier Maschen abketten um auf die insgesamt 8 Maschen des ersten Ärmelausschnittes zu kommen. Allerdings bleibt mir dann genau mittig eine Masche auf der Nadel. Was mach ich falsch?
12.09.2023 - 09:15DROPS Design answered:
Liebe Yvonne, haben Sie die vorrige Antwort gesehen? Könnten Sie Ihre Maschenanzahl prüfen?
12.09.2023 - 16:57
![]() Yvonne wrote:
Yvonne wrote:
Hallo! Ich habe die ersten 4 Maschen für den Armausschnitt abgekettet und die Runde nach Anleitung weiter gestrickt. Nun muss ich die letzten vier Maschen abketten um auf die insgesamt 8 Maschen des ersten Ärmelausschnittes zu kommen. Allerdings bleibt mir dann genau mittig eine Masche auf der Nadel. Was mach ich falsch?
11.09.2023 - 21:27DROPS Design answered:
Liebe Yvonne, beachten Sie, daß Sie die richtigen Maschen Anzahl dh je 104 oder 120 Maschen je nach der Größe für Vorder- und Rückenteil auf der Nadel haben, sowie 8 abgekettetene Maschen auf beiden Seiten. Viel Spaß beim stricken!
12.09.2023 - 09:13
![]() Rachel wrote:
Rachel wrote:
When the pattern says, "continue pattern like this until A.2 and A.3 have been worked vertically", does that mean work multiple rows or complete one row in that pattern?
03.07.2023 - 17:48DROPS Design answered:
Dear Rachel, this means that you work whole pattern repeat at height, i.e. all rows from diagram. In row you work as many repeats as indicated in the pattern. Happy knitting!
03.07.2023 - 20:30
![]() Anja wrote:
Anja wrote:
Jeg er netop ved at strikke denne top. Jeg strikker i str xxl/xxxl og der er anført et forbrug på 250 g. Jeg købte for en sikkerheds skyld 300 g (Drops Safran) men har måtte efterbestille yderligere 50g 🤞🏼 for at indfarvningen er den samme
27.06.2023 - 16:41
![]() Tanja wrote:
Tanja wrote:
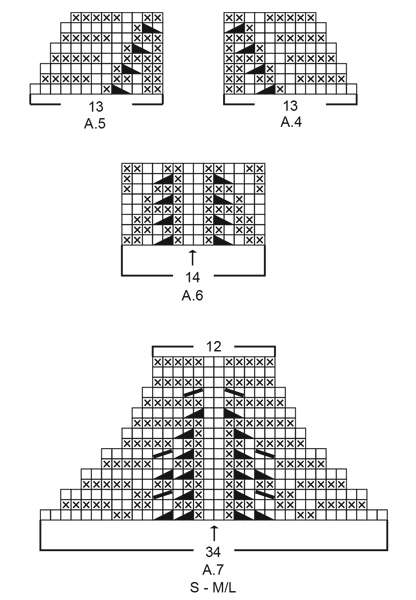
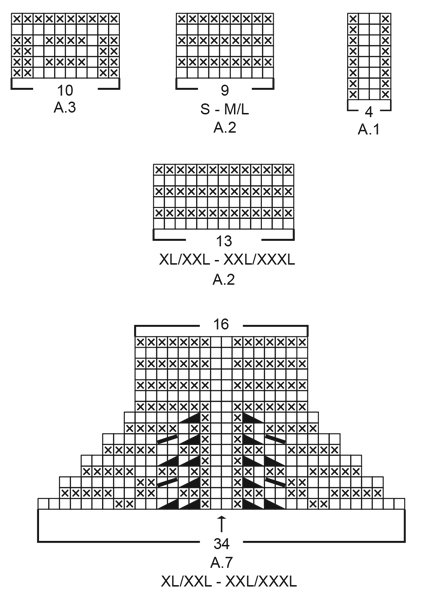
Liebes Drops-Team, Dankeschön für eure Antwort gestern. Ergänzend dazu möchte ich fragen, ob die beschriebenen 5 Maschen kraus rechts und 2 Maschen glatt rechts bei A4 (usw.) als zusätzlich zum Diagramm zu verstehen sind? In dem Diagramm sind diese in der Form nicht abgebildet, wenn ich dieses von unten nach oben richtig lese? Oder sind nur die Hinreihen bei A5, A5 und A7 abgebildet? Dankeschön und liebe Grüße. Tanja
27.04.2023 - 10:03DROPS Design answered:
Liebe Tanja, diese Maschen sind so abgebildet: die weisse Kästchen werden rechts bei den Hinreihen und links bei den Rückreihen gestrickt (mittleren Maschen A.6/A.7 z.B.) und die x werden rechts bein den Rückreihen gestrickt, so strickt man die 5 ersten Maschen A.4 (z.B.) rechts bei den Hinreihen (weisse Kästchen) und rechts bei den Rückreihen (Kreuz). Viel Spaß beim stricken!
27.04.2023 - 17:05
![]() Tanja wrote:
Tanja wrote:
In der Anleitung heißt es grundsätzlich sind in den Diagrammen Hin- und Rückreihen aufgeführt. Folge ich den Diagrammen bei A4 und A5 entsteht am Rand ein Glatt-rechtes Maschenbild, abweichend zum Foto, auf dem die Ränder kraus rechts zu sehen sind. Dies sehe ich auch bei A7. Ist dies ein Fehler im Diagramm? Dankeschön
26.04.2023 - 12:12DROPS Design answered:
Liebe Tanja, A.4 beginnt mit 5 Maschen kraus rechts und 2 Maschen glatt rechts, A.5 endet mit 2 Maschen glatt rechts und 5 Maschen kraus rechts, dh die Abnahmen sind innerhalb 8 Maschen gestrickt. Im A.7 werden die ersten 5 und die letzten 5 Maschen auch kraus rechts gestrickt (bei den Rückreihen beginnt und endet man mit zuerst 5 dann 7 Maschen kraus rechts. Viel Spaß beim stricken!
26.04.2023 - 13:54
|
||||||||||||||||||||||
Strawberry Summer#strawberrysummertop |
||||||||||||||||||||||
 |
 |
|||||||||||||||||||||
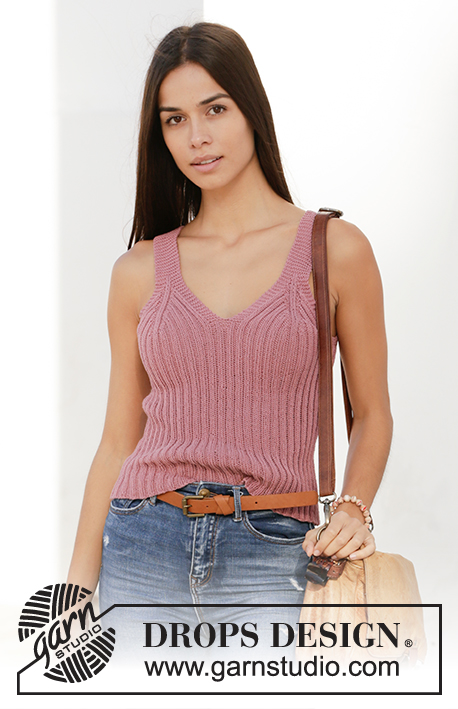
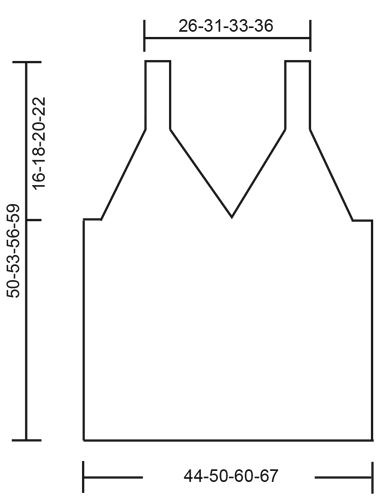
Knitted top in DROPS Safran. Piece is knitted bottom up with rib. Size: S - XXXL
DROPS 211-18 |
||||||||||||||||||||||
|
---------------------------------------------------------- EXPLANATION FOR THE PATTERN: ---------------------------------------------------------- GARTER STITCH (back and forth): Knit all rows. 1 ridge vertically = knit 2 rows. PATTERN: See diagrams A.1 to A.7. Choose diagram for your size (applies to A.2 and A.7). Diagrams show all rows in pattern seen from the right side. ---------------------------------------------------------- START THE PIECE HERE: ---------------------------------------------------------- TOP - SHORT OVERVIEW OF THE PIECE: Work body in the round on circular needle, from the bottom and up to armholes. Then work back piece and the 2 front pieces separately, back and forth on circular needle until finished measurements. Straps on front piece are fastened to back piece. BODY: Cast on 224-256-304-336 stitches on circular needle size 3 mm with Safran. Work A.1 in the round – insert at the same time 1 marker thread at the beginning of round (= left side when garments is worn), and 1 marker thread after 112-128-152-168 stitches (= right side when garment is worn). Both marker threads is between 2 purl stitches. Move the marker thread upwards when working. REMEMBER THE KNITTING TENSION! When piece measures 33-34-35-36 cm, work next round as follows (approx. 1 cm remains until piece is divided mid front, and decrease for armholes): Work A.2 (= 9-9-13-13 stitches), continue A.1 over the next 42-50-58-66 stitches, work A.3 (= 10 stitches mid front), continue A.1 over the next 42-50-58-66 stitches), work A.2 over the next 18-18-26-26 stitches (= 2 repetitions of 9-9-13-13 stitches – marker thread is between these 2 repetitions), continue A.1 over the next 94-110-126-142 stitches (= back piece), and work A.2 over the remaining 9-9-13-13 stitches. Continue pattern like this until A.2 and A.3 have been worked vertically. On next round cast off for armholes, i.e. work next round as follows: Cast off 4-4-8-8 stitches for armhole, work 5 stitches in GARTER STITCH – read explanation above, continue A.1 over the next 42-50-58-66 stitches, work 10 stitches in garter stitch (= mid front), continue A.1 over the next 42-50-58-66 stitches, work 5 stitches in garter stitch, cast off 8-8-16-16 stitches for armhole, work 5 stitches in garter stitch, continue A.1 over the next 94-110-126-142 stitches, work 5 stitches in garter stitch, and cast off the remaining 4-4-8-8 stitches for armhole. Cut the yarn. Finish back piece and front pieces separately. BACK PIECE: = 104-120-136-152 stitches. Begin from wrong side and work 1 row in rib as before with 5 edge stitches in garter stitch in each side. Continue to work in rib with 5 edge stitches in garter stitch in each side while AT THE SAME TIME decreasing for armholes on every row from right side as explained below. I.e. work first row from right side as follows: Work A.4 (= 13 stitches), continue rib as before until 13 stitches remain on row, finish with A.5 (= 13 stitches). Continue pattern like this until A.4 and A.5 have been worked 4-4-5-6 times in total vertically (= 16-16-20-24 stitches decreased in each side) = 72-88-96-104 stitches remain. Work 3 ridges back and forth over all stitches. Cast off - make sure that the cast-off edge is not too tight. Back piece measures approx. 11-11-14-16 cm from where piece was divided for front piece and bac piece. FRONT PIECE: = 104-120-136-152 stitches. Divide the piece mid front and slip half the stitches on 1 stitch holder or extra needle. Then work first part as explained below. PART-1: = 52-60-68-76 stitches. Begin from wrong side and work 1 row in rib as before with 5 edge stitches in garter stitch in each side. Insert 1 marker between the 2 middle stitches on row (= between 2 knit stitch seen from right side). Marker indicates the middle. Continue to work in rib with 5 edge stitches in garter stitch in each side while at the same time decreasing on each side of the middle as explained below. I.e. work first row from right side as follows: 5 edge stitches in garter stitch, work rib as before until 7 stitches remain before marker, work A.6 (= 14 stitches), work rib as before until 5 stitches remain on row, and finish with 5 edge stitches in garter stitch. Continue pattern like this, and repeat A.6 vertically until 34 stitches remain on row – finish after 1 row from wrong side. Now work A.7 over these 34 stitches. When A.7 has been worked, 12-12-16-16 stitches remain on needle for strap, and front piece measures approx. 11-13-16-18 cm from where piece was divided for front and back piece. Work strap as explained below. STRAP: = 12-12-16-16 stitches. Work in garter stitch back and forth until the strap measures approx. 10-12-10-10 cm – try the top on and work to desired length, strap should continue over the shoulder and down to back piece. Cast off. PART-2: Slip the 52-60-68-76 stitches from stitch holder or extra needle back on circular needle size 3 mm, and work part-2 the same way as part-1. Then work strap the same way as on part-1. Cast off. ASSEMBLY: Fasten straps to back piece - begin at the edge in each side and sew stitch to stitch. Cut and fasten the thread. |
||||||||||||||||||||||
Diagram explanations |
||||||||||||||||||||||
|
||||||||||||||||||||||
 |
||||||||||||||||||||||
 |
||||||||||||||||||||||
 |
||||||||||||||||||||||
Have you finished this pattern?Tag your pictures with #dropspattern #strawberrysummertop or submit them to the #dropsfan gallery. Do you need help with this pattern?You'll find 16 tutorial videos, a Comments/Questions area and more by visiting the pattern on garnstudio.com. © 1982-2026 DROPS Design A/S. We reserve all rights. This document, including all its sub-sections, has copyrights. Read more about what you can do with our patterns at the bottom of each pattern on our site. |
||||||||||||||||||||||


With over 40 years in knitting and crochet design, DROPS Design offers one of the most extensive collections of free patterns on the internet - translated to 17 languages. As of today we count 324 catalogues and 12290 patterns translated into English (UK/cm). 12290
We work hard to bring you the best knitting and crochet have to offer, inspiration and advice as well as great quality yarns at incredible prices! Would you like to use our patterns for other than personal use? You can read what you are allowed to do in the Copyright text at the bottom of all our patterns. Happy crafting!
Post a comment to pattern DROPS 211-18
We would love to hear what you have to say about this pattern!
If you want to leave a question, please make sure you select the correct category in the form below, to speed up the answering process. Required fields are marked *.