
Popular categories
Looking for a yarn?


Comments / Questions (151)
![]() Valentina wrote:
Valentina wrote:
Hello, I don’t understand the first time part after the ribbing: the decreases. I’m making a size M and can’t seem to get the numbers right. I don’t know how often I should decrease. 97sts/15decreases= 6.4
08.04.2021 - 01:38DROPS Design answered:
Dear Valentina, this lesson will help you to calculate how to decrease evenly. Happy knitting!
08.04.2021 - 08:11
![]() Gunn Berit Engh wrote:
Gunn Berit Engh wrote:
Hei. Jeg vil gjerne strikke denne på rundpinne, følger jeg bare samme oppskriften uten noen forandringer ..
25.03.2021 - 09:53DROPS Design answered:
Hej Gunn Berit, Ja det går helt fint :)
25.03.2021 - 11:48
![]() Jytte Udengaard wrote:
Jytte Udengaard wrote:
Hej ! Jeg er nybegynder - Jeg forstår ikke hvorfor der står at ryg og forstykke strikkes hver for sig og syes sammen til sidst, når der samtidig står som start, at der skal slåes op på rundpind 4,5. Hvis der skal være slids på 8 cm må det vel være frem og tilbage på 2 pinde og hvis det herefter er på rundpind skal den ikke syes sammen. Er det ikke selvmodsigende. Takker for en forklaring
17.03.2021 - 17:54DROPS Design answered:
Hej Jytte, jo men vi har valgt at strikke frem og tilbage på rundpind, se vores video hvordan man gør, eller strik på jumperpinde om du hellere vil det :)
18.03.2021 - 09:33
![]() Camila Calvo wrote:
Camila Calvo wrote:
Hola Jeanette, cómo estás?, mucho gusto, te escribo desde Colombia, me gustaría hacerte una pregunta, ¿puedo recopilar varios patrones gratuitos de los que compartes y reunirlos todos en un libro para regalarlo como un BONUS?, muchas gracias por leer, espero tu respuesta, PD: ME ENCANTAN TUS DISEÑOS!, TODOS!!
10.03.2021 - 05:05DROPS Design answered:
Hola Camila, estos patrones se pueden distribuir libremente, siempre y cuando sea gratis (sin ánimo de lucro) y se mencione que son propiedad de DROPS Design.
21.03.2021 - 20:06
![]() Coline Prophette wrote:
Coline Prophette wrote:
Je voudrais réaliser ce modèle en s avec une laine rouge vif. Que me proposez-vous pour remplacer la drops air qui n'est pas unie. Et quelle quantité selon la laine ? merci
21.02.2021 - 17:21DROPS Design answered:
Bonjour Mme Prophette, cliquez sur notre convertisseur pour accéder aux alternatives possibles: vous pouvez remplacer DROPS Air par 1 autre fil du groupe C ou bien 2 fils du groupe A - n'hésitez pas à demander conseil à votre magasin, même par mail ou téléphone. Bon tricot!
22.02.2021 - 08:51
![]() Henriette Lærke Jensen wrote:
Henriette Lærke Jensen wrote:
Hej - kan man ,når man ikke ønsker slids strikke på rundpind, i stedet for at strikke frem og tilbage?
01.02.2021 - 14:16DROPS Design answered:
Hej Henriette, Ja det kan du :)
03.02.2021 - 15:32
![]() Inge Schaldemose wrote:
Inge Schaldemose wrote:
Hej igen, jeg spurgte om ikke der skulle lukkes af til ærmegab også på forstykket, ligesom på ryggen. I svarer jo, men opskriften viser det ikke i teksten. Er det ikke en fejl i opskriften?
26.01.2021 - 16:46DROPS Design answered:
Hej igen Inge, jo forstykket skal strikkes som bagstykket, med alt hvad der står af kantmasker, rib, indtagninger, ærmegab helt til du kommer op til halsen, så skal du følge stykket under FORSTYKKE. God fornøjelse!
28.01.2021 - 09:57
![]() Inge Schaldemose wrote:
Inge Schaldemose wrote:
Jeg vil gerne vide om ikke også der skal lukkes af til ærmegab på forstykket (ligesom på bagstykket). Har spurgt tidligere, men ikke fået svar endnu.
26.01.2021 - 15:29DROPS Design answered:
Hej Inge, jo forstykket strikkes som bagstykket helt op til halsen :)
26.01.2021 - 15:58
![]() Elena wrote:
Elena wrote:
Buongiorno, non riesco a capire la lavorazione del dietro quando riferisce di diminuire la maglie, quante volte devono essere diminuite? Ad ogni giro? Grazie
24.01.2021 - 15:54DROPS Design answered:
Buongiorno Elena, sul dietro, quando indica di diminuire in modo uniforme, vanno diminuite le maglie indicate tutte su un ferro. Buon lavoro!
24.01.2021 - 16:15
![]() Antje wrote:
Antje wrote:
Hallo, ich verstehe in der Anleitung folgende Angaben nicht: "für die Armausschnitte abketten: 3 Maschen je 1-1-1-1-1-1 x beidseitig, 2 Maschen je 1-1-1-1-1-1 x beidseitig und 1 Masche je 1-1-2-2-2-3 x beidseitig = 64-70-74-82-92-100 Maschen." Maschen beidseitig abketten ist klar, aber was bedeutet hier 1-1-1-1-1-1 ???? Vielen Dank für eure Hilfe. LG Antje
10.01.2021 - 09:55DROPS Design answered:
Liebe Antje, die Maschenanzahl betreffen je die Größe, hier wird 1 Masche in alle Größe abgekettet. Viel Spaß beim stricken!
11.01.2021 - 09:17
|
|
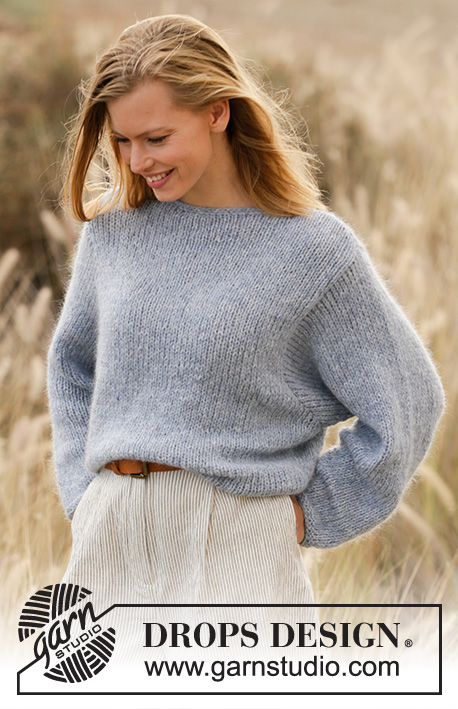
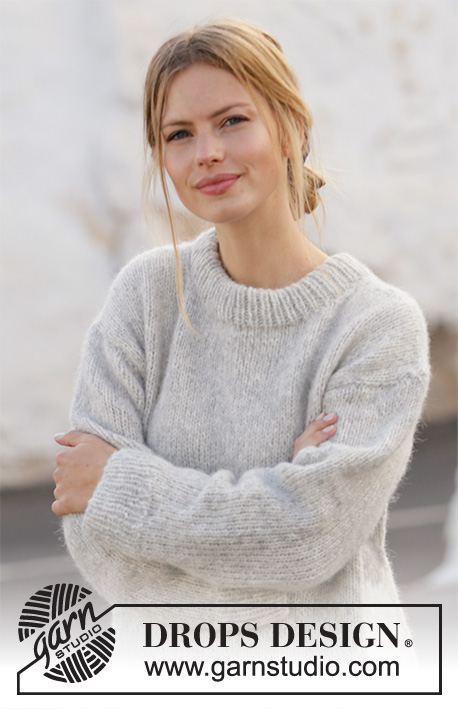
Grey Pearl#greypearlsweater |
|
 |
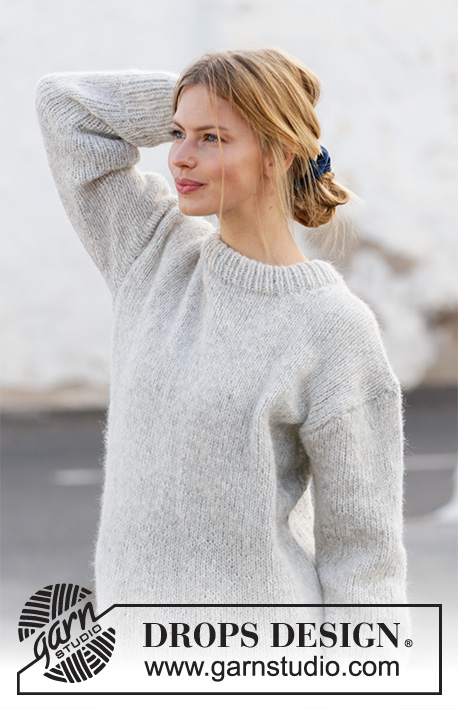 |
Knitted jumper in DROPS Air. Sizes S - XXXL.
DROPS 210-36 |
|
|
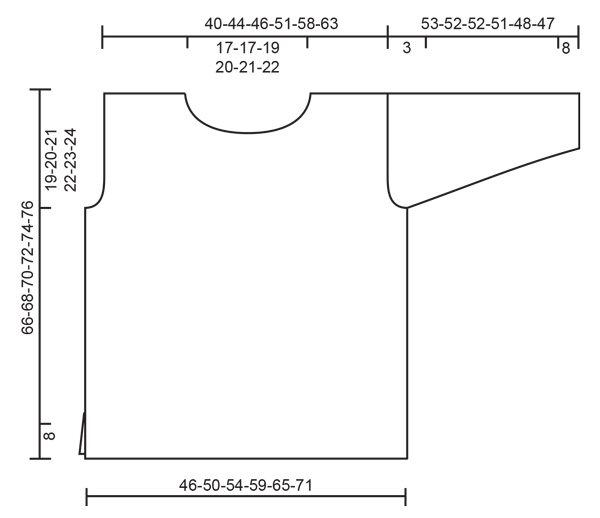
------------------------------------------------------- EXPLANATIONS FOR THE PATTERN: ------------------------------------------------------- RIDGE/GARTER STITCH (worked back and forth): Knit all rows. 1 ridge in height = Knit 2 rows. DECREASE TIP (evenly spaced): To work out how to decrease evenly, count the total number of stitches on needle (e.g. 89 stitches) and divide by number of decreases to be made (e.g. 13) = 6.8. In this example decrease by knitting together alternately each 5th and 6th stitch and each 6th and 7th stitch (approx.). INCREASE TIP (for sleeves): Start 1 stitch before the marker thread, 1 yarn over, work 2 stitches (marker thread sits between these 2 stitches), 1 yarn over. On the next round knit the yarn overs twisted to avoid holes. ------------------------------------------------------- START THE PIECE HERE: ------------------------------------------------------- JUMPER – SHORT OVERVIEW OF THE PIECE: The jumper is worked back and forth in 2 parts which are sewn together to finish. The sleeves are worked in the round with double pointed needles/short circular needle. BACK PIECE: Cast on 89-97-103-113-125-137 stitches with circular needle size 4.5 mm and Air. Purl 1 row from the wrong side then work as follows – from the right side: 2 edge stitches in GARTER STITCH – see description above, *knit 1, purl 1 *, work from *-* until there are 3 stitches left, knit 1 and 2 edge stitches in garter stitch. Continue like this until the piece measures 8 cm. Change to circular needle size 5.5 mm and knit 1 row from the right side where you decrease 13-15-15-17-19-21 stitches evenly spaced – read DECREASE TIP = 76-82-88-96-106-116 stitches. Continue with stocking stitch and 1 edge stitch in garter stitch on each side. When the piece measures 47-48-49-50-51-52 cm, cast off for the armholes on both sides at the beginning of each row as follows: Cast off 3 stitches 1-1-1-1-1-1 time, 2 stitches 1-1-1-1-1-1 time and 1 stitch 1-1-2-2-2-3 times = 64-70-74-82-92-100 stitches. Continue with stocking stitch until the piece measures 64-66-68-70-72-74 cm. Now cast off the middle 26-26-28-30-32-34 stitches for the neck and each shoulder is finished separately. Then cast off at the beginning of next row from the neck as follows: 1 stitch 1 time = 18-21-22-25-29-32 stitches on the shoulder. Continue working until the piece measures 66-68-70-72-74-76 cm and cast off. Work the other shoulder in the same way. FRONT PIECE: Cast on and work as for the back piece until the piece measures 60-62-64-66-68-70 cm. Now place the middle 20-20-22-24-26-28 stitches on 1 thread for the neck and finish each shoulder separately. Then cast off at the beginning of each row from the neck as follows: 2 stitches 1 time and 1 stitch 2 times = 18-21-22-25-29-32 stitches left on the shoulder. Continue working until the piece measures 66-68-70-72-74-76 cm, then cast off. Work the other shoulder in the same way. SLEEVE: The sleeves are worked bottom up, in the round, with double pointed needles/short circular needle. The piece is then divided and worked back and forth for the sleeve cap. Cast on 46-48-50-52-52-56 stitches with double pointed needles size 4.5 mm and Air. Knit 1 round, then work rib (knit 1 / purl 1) for 8 cm. Change to double pointed needles size 5.5 mm and continue with stocking stitch. On the first round decrease 8-8-8-8-8-10 stitches evenly spaced = 38-40-42-44-44-46 stitches. Insert a marker thread at the beginning of the round = mid under sleeve. Continue with stocking stitch, AT THE SAME TIME when the piece measures 10-10-10-10-12-12 cm, increase 1 stitch on each side of the marker thread – read INCREASE TIP. The yarn overs are worked twisted on the next round to avoid holes. Increase like this 3½-3½-3-3-2-2 cm a total of 11-12-13-13-15-15 times = 60-64-68-70-74-76 stitches. When the sleeve measures 50-49-49-48-45-44 cm, cast off 3 stitches on each side of the marker thread (= 6 stitches cast off mid under the sleeve), then continue working back and forth. Cast off for the sleeve cap at the beginning of each row on both sides as follows: 2 stitches 1 time, 3 stitches 1 time, then cast off the remaining stitches. Work the other sleeve in the same way. ASSEMBLY: Sew the shoulder seams. Sew in the sleeves and sew the side seams, inside the 1 edge stitch and until there is 8 cm left at the bottom = split. NECK: Knit up approx. 92-106 stitches with circular needle size 4,5 mm around the neck (including the stitches on the thread and the number divisible by 2). Work rib (knit 1 / purl 1) for 9 cm. Then cast off. Fold the rib at the top to the wrong side and fasten down. To avoid the neck being tight and turning outwards, make sure the seam is elastic. |
|
 |
|
Have you finished this pattern?Tag your pictures with #dropspattern #greypearlsweater or submit them to the #dropsfan gallery. Do you need help with this pattern?You'll find 30 tutorial videos, a Comments/Questions area and more by visiting the pattern on garnstudio.com. © 1982-2026 DROPS Design A/S. We reserve all rights. This document, including all its sub-sections, has copyrights. Read more about what you can do with our patterns at the bottom of each pattern on our site. |
|


With over 40 years in knitting and crochet design, DROPS Design offers one of the most extensive collections of free patterns on the internet - translated to 17 languages. As of today we count 324 catalogues and 12290 patterns translated into English (UK/cm). 12290
We work hard to bring you the best knitting and crochet have to offer, inspiration and advice as well as great quality yarns at incredible prices! Would you like to use our patterns for other than personal use? You can read what you are allowed to do in the Copyright text at the bottom of all our patterns. Happy crafting!
Post a comment to pattern DROPS 210-36
We would love to hear what you have to say about this pattern!
If you want to leave a question, please make sure you select the correct category in the form below, to speed up the answering process. Required fields are marked *.