
Popular categories
Looking for a yarn?


Comments / Questions (8)
![]() Irene wrote:
Irene wrote:
Kunt u aangeven wat er wordt bedoeld met 1 stokje tussen de meerderingen toer 5-10. Het kleurenpatroon klopt dan toch niet meer want je krijgt meer stokjes?
01.02.2021 - 18:01DROPS Design answered:
Dag Irene,
In A.1 wordt er gemeerderd van 1 naar 10 steken. Je ziet ook in A.1 dat er op elke toer een steek bij komt aan de linkerkant. Dit kun je gewoon blijven volgen. Omdat je A.1 12 keer herhaalt en de rondte, komen er dus 12 steken bij, totdat je in totaal op 120 steken zit (12 herhalingen van 10 steken).
06.02.2021 - 12:03
![]() Irene wrote:
Irene wrote:
Ik heb net een vraag gestuurd en is opeens niet meer zichtbaar?
01.02.2021 - 17:55
![]() Monik wrote:
Monik wrote:
Porfavor tutorial soy principiante necesito entender grafico. Gracias
28.07.2020 - 04:58DROPS Design answered:
Hola Monik. Tienes vídeos bajo el patrón que te pueden ayudar a realizar la labor. También te recomendamos leer el siguiente tutorial: https://www.garnstudio.com/lesson.php?id=69&cid=23 para aprender a interpretar el diagrama para ganchillo.
02.08.2020 - 20:31
![]() Sophie wrote:
Sophie wrote:
Bonjour je voulais savoir si on doit fermer chaque tour avec une maille coulée ou crocheter en rond. A mon avis ça doit être avec maille coulée ma je ne suis pas certaine.
22.04.2020 - 15:19DROPS Design answered:
Bonjour Sophie, tout à fait, comme indiqué sous INFO CROCHET au début des explications, chaque tour commence par 3 mailles en l'air (= ces mailles en l'air remplacent la 1ère bride) et chaque tour se termine par 1 maille coulée dans la 3ème maille en l'air du début du tour. Bon crochet!
22.04.2020 - 15:41
![]() Julie wrote:
Julie wrote:
Is the yarn amount for colour 59 old light pink correct? Or should it be the same amount as the mauve colour 60? As having made this I've definitely used more old pink than mauve.
12.05.2019 - 13:44DROPS Design answered:
Dear Julie, thanks for the feedback, a correction will be made. Happy crocheting!
15.05.2019 - 11:09
![]() Sosso wrote:
Sosso wrote:
Tutto chiaro grazie per ora!
15.04.2019 - 19:56
![]() Sosso wrote:
Sosso wrote:
Buongiorno! Nei giri 5-10 cosa significa ‘lavorare una maglia alta in più tra gli aumenti’? Se ad ogni giro per 6 giri (giro 5,6,7,8,9,10) aumento di 24 punti al giro n. 11 avrò 192 maglie totale. Inoltre l’aumento in più in corrispondenza di quale punto deve essere inserito per non rovinare la simmetria del motivo? Grazie mille
15.04.2019 - 11:21DROPS Design answered:
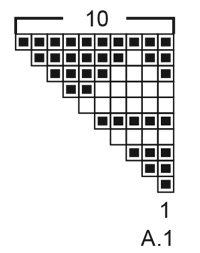
Buongiorno Sosso. P.es al giro 5 lavora: 1 m.alta in ognuna delle prime 3 m.alte, 2 m.alte nella maglia successiva e così su tutto il giro; al giro 6: 1 m.alta in ognuna delle prime 4 m.alte, 2 m.alte nella m successiva. E così via. Il diagramma A.1 viene ripetuto 12 volte sul giro; ad ogni giro aumenta 12 m; quindi negli ultimi 6 giri aumenta 12x6= 72 m, arrivando così a 120 m. Buon lavoro!
15.04.2019 - 11:36
![]() Babs wrote:
Babs wrote:
"Zagg-Bag"
23.01.2019 - 17:16
|
|||||||||||||
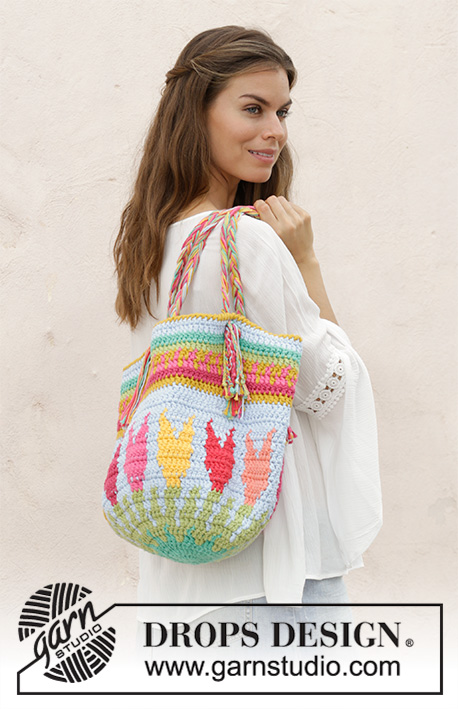
Andes Sunrise#andessunrisebag |
|||||||||||||
 |
 |
||||||||||||
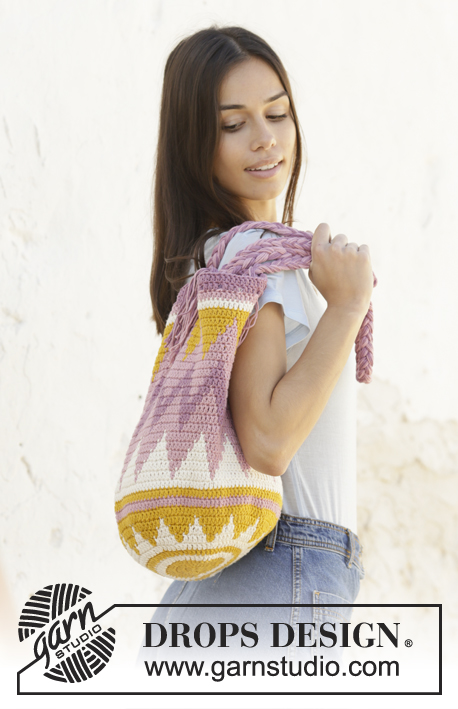
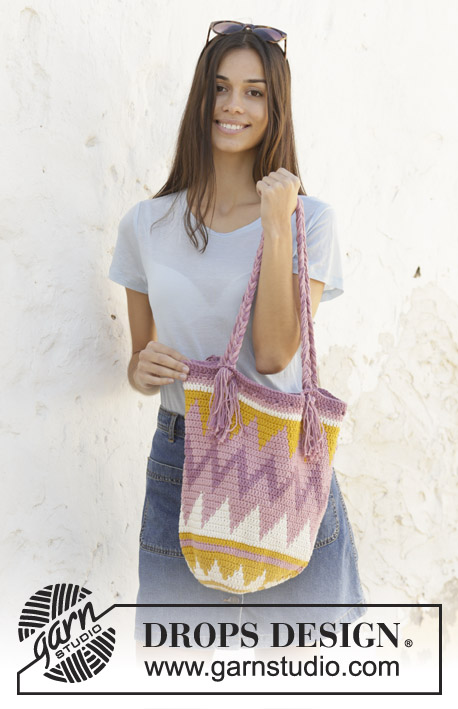
Crochet bag with Nordic pattern in DROPS Paris. Worked from bottom up.
DROPS 201-16 |
|||||||||||||
|
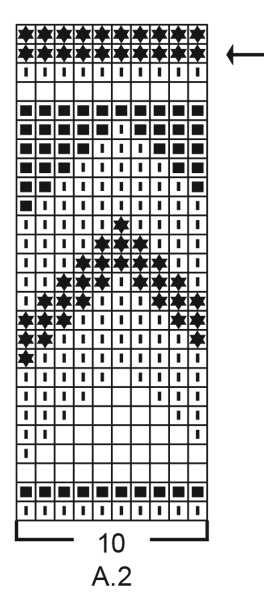
---------------------------------------------------------- EXPLANATION FOR THE PATTERN: ---------------------------------------------------------- PATTERN: See diagrams A.1 and A.2. Diagrams show colours in pattern. 1 square in diagrams = 1 treble crochet. COLOUR CHANGE IN NORDIC PATTERN (worked in the round): When changing colour work as follows: Work last treble crochet with first colour but wait with last yarn over and pull through, switch to next colour and work last yarn over and pull through, then continue working the next treble crochet with the new colour. When working with two colours place strands for the colour not worked over stitches from previous round, work around the strands so that they are hidden and at the same time follow in the round. CROCHET INFO: Replace first treble crochet on round with 3 chain stitches. Finish round with 1 slip stitch in third chain stitch from beginning of round. ---------------------------------------------------------- START THE PIECE HERE: ---------------------------------------------------------- BAG - SHORT OVERVIEW OF THE PIECE: Worked in the round from bottom up. Finish by plaiting straps that are ties on to bag explained below. BAG: Work 5 chain stitches on hook size 3.5 mm with mustard and form a ring with 1 slip stitch in first chain stitch. Then work A.1 in the round as follows (work 12 repetitions with A.1 on round) - read COLOUR CHANGE IN NORDIC PATTERN: ROUND 1: Work 12 treble crochets in ring – READ CROCHET INFO! ROUND 2: Work 2 treble crochet in every treble crochet = 24 treble crochet. ROUND 3: Work * 1 treble crochet in first treble crochet, 2 treble crochets in next treble crochet *, repeat from *-* the entire round = 36 treble crochets. ROUND 4: Work * 1 treble crochet in the first 2 treble crochets, 2 treble crochets in next treble crochet *, repeat from *-* the entire round = 48 treble crochets. REMEMBER THE CROCHET TENSION! ROUNDS 5-10: Continue with increases and pattern as before, i.e. on every round work 1 treble crochet more between increases. When A.1 has been worked vertically, there are 120 treble crochets on round. ROUND 11: Work A.2 in the round (= 12 repetitions of 10 treble crochets). Continue pattern like this without increasing. On round marked with arrow in A.2 work as follows: * 1 treble crochet in each of the first/next 3 treble crochets, 1 chain stitch, skip 1 treble crochet *, repeat from *-* the entire round. Continue until A.2 has been worked, fasten off. Bag measures approx. 34 cm from mid under bag and up. STRAPS: Cut 18 strands mauve and 18 strands old pink (each strand should be approx. 120 cm) = 36 strands. Place the strands together and tie a loose knot in one end, leave approx. 12 cm after knot. Distribute strands in 3 piles with 12 strands in each pile. Plait the three piles tog until plait measures approx. 68 cm. Divide strands into 2 piles. Thread the 2 halves through bag, 3 treble crochets apart, in a round with holes. Tie the 2 halves together in a knot on the front of bag. Untie the knot at beg of plait and fasten to bag in the same way but in the opposite side, approx. 22 cm from the first knot. Make another braid the same way and tie in the opposite side of bag – see picture. |
|||||||||||||
Diagram explanations |
|||||||||||||
|
|||||||||||||
 |
|||||||||||||
 |
|||||||||||||
Have you finished this pattern?Tag your pictures with #dropspattern #andessunrisebag or submit them to the #dropsfan gallery. Do you need help with this pattern?You'll find 10 tutorial videos, a Comments/Questions area and more by visiting the pattern on garnstudio.com. © 1982-2026 DROPS Design A/S. We reserve all rights. This document, including all its sub-sections, has copyrights. Read more about what you can do with our patterns at the bottom of each pattern on our site. |
|||||||||||||


With over 40 years in knitting and crochet design, DROPS Design offers one of the most extensive collections of free patterns on the internet - translated to 17 languages. As of today we count 324 catalogues and 12290 patterns translated into English (UK/cm). 12290
We work hard to bring you the best knitting and crochet have to offer, inspiration and advice as well as great quality yarns at incredible prices! Would you like to use our patterns for other than personal use? You can read what you are allowed to do in the Copyright text at the bottom of all our patterns. Happy crafting!
Post a comment to pattern DROPS 201-16
We would love to hear what you have to say about this pattern!
If you want to leave a question, please make sure you select the correct category in the form below, to speed up the answering process. Required fields are marked *.