
Popular categories
Looking for a yarn?


Comments / Questions (10)
![]() Annick wrote:
Annick wrote:
Bonjour Si j'utilise des aiguilles circulaires ,les explications données sont elles les mêmes ? Merci
30.01.2023 - 15:59DROPS Design answered:
Bonjour Annick, tout à fait, vous pouvez tricoter sur aiguille circulaire, en magic loop, les explications seront exactement les mêmes. Bon tricot!
30.01.2023 - 16:04
![]() Claudine wrote:
Claudine wrote:
Bonjour, je fais ma première chaussette, grâce à vous. Cependant, j’aurais aimé trouver un modèle avec des diminutions du talon avec la maille enveloppée, afin d’éviter le trou au niveau de la diminution. Merci de ce que vous pourrez faire. Cordialement
27.01.2022 - 17:37DROPS Design answered:
Bonjour Claudine, cette technique est rarement employée par nos stylistes, mais vous pouvez la retrouver en vidéo pour les rangs raccourcis: sur l'endroit et sur l'envers (si j'ai bien compris la question). Bon tricot!
27.01.2022 - 17:48
![]() Sandra wrote:
Sandra wrote:
Je viens de me rendre compte qu'il s'agissait du nom de la couleur! Désolée 😅
09.12.2020 - 16:39
![]() Sandra wrote:
Sandra wrote:
"Monter 60-64-68 mailles avec les aiguilles doubles pointes 2.5 en pique-nique et..." En pique-nique ? 😆 Zut alors! 🤣
09.12.2020 - 15:22
![]() Mimi wrote:
Mimi wrote:
For the toe decrease it says to ‘knit 2 together, knit 2 (the marker sits in the middle of these two stitches), slip 1 stitch as if to knit, knit 1, pass the slipped stitch over the knitted stitch’ and that equals 2 stitches decreased. However, this appears to me to be 3 stitches decreased? Could you please explain? Thanks!
07.10.2020 - 02:24DROPS Design answered:
Hi Mimi, Knit 2 together decreases 1 stitch, you then knit 2 (no decrease), slip 1 stitch onto the left needle, knit 1 and pass the slipped stitch over the knitted stitch on the left needle (another stitch decreased). Hope this helps. Happy knitting!
07.10.2020 - 07:11
![]() Christine MacLeod wrote:
Christine MacLeod wrote:
I don't see how this pattern works. If I start with 60 stitches, then decrease to 56, how can the pattern A1 work, as it has a 6 stitch repeat? 6 does not divide into 56. It's the same problem for all the sizes.
12.04.2019 - 19:22DROPS Design answered:
Hello Christine. Pattern A1 is actually a 2 sts based pattern, so it will fit correctly on any even number of stitches. Happy knitting!
12.04.2019 - 22:20
![]() Britt Svaneblom wrote:
Britt Svaneblom wrote:
Hej. Varför får man inte bilden med när man skriver ut.
27.10.2018 - 10:52
![]() Melanie wrote:
Melanie wrote:
Wirklich sehr schöne Socken .... leider hat bei mir ein Knäuel der Farbe picknick Nr. 911 (was im übrigen fun lila heißt) nicht ausgereicht und ich musste ein Knäuel nachbestellen ... also vielleicht besser gleich 2 Knäuel kaufen um Versandkosten zu sparen ;)
28.09.2017 - 12:11
![]() Birgitte Oerskov wrote:
Birgitte Oerskov wrote:
Tror ikke, det er det korrekte billede ..... ??
10.09.2017 - 17:07
![]() Monique wrote:
Monique wrote:
What a cheery pair of socks. Wearing these would lift my spirits on even the dreariest of days. Superb pattern for this yarn.
21.06.2017 - 03:13
|
|||||||
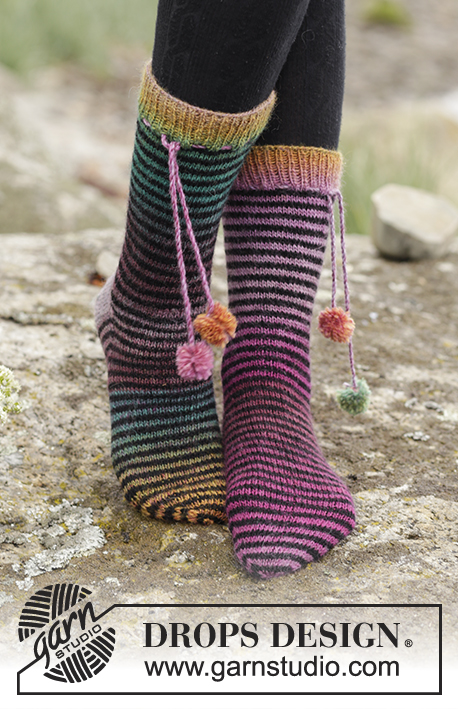
Rock Socks#rocksocks |
|||||||
|
|
|||||||
Knitted socks with multi-coloured stripes. Sizes 35 - 43. The piece is worked in DROPS Fabel.
DROPS 179-21 |
|||||||
|
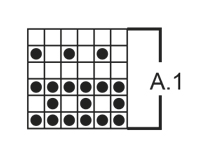
INFORMATION FOR THE PATTERN: PATTERN: See diagram A.1. The whole pattern is worked in stocking stitch. DECREASE/INCREASE TIP: To work out how to decrease/increase evenly, count the total number of stitches on the needle (e.g. 60 stitches) and divide by the number of decreases/increases to be made (e.g. 4) = 15. In this example, work every 14th and 15th stitch together if you are decreasing. In this example, make 1 yarn over after every 15th stitch if you are increasing. On the next row, work the yarn overs twisted to prevent holes. KNITTING TIP: To strengthen the heel, can the heel and heel decrease be worked with 2 strands. Use the strand from the inside and outside of the ball and work 1 stitch alternately with the one and the other strand. In this way, you get a slightly thicker heel without using double strand. HEEL DECREASE: ROW 1 (= right side): Knit until there are 7-8-8 stitches left, slip the next stitch as if to knit, knit 1, pass the slipped stitch over the knitted stitch, turn the piece. ROW 2 (= wrong side): Purl until there are 7-8-8 stitches left, slip the next stitch as if to purl, purl 1, pass the slipped stitch over the purled stitch, turn the piece. ROW 3 (= right side): Knit until there are 6-7-7 stitches left, slip the next stitch as if to knit, knit 1, pass the slipped stitch over the knitted stitch, turn the piece. ROW 4 (= wrong side): Purl until there are 6-7-7 stitches left, slip the next stitch as if to purl, purl 1, pass the slipped stitch over the purled stitch, turn the piece. Continue decreasing in the same way by working until there is 1 stitch less before slipping 1 stitch and until there are 14-14-16 stitches left on the needle. DECREASE TIP (for the toe): Decrease on each side of the marker as follows: Start 3 stitches before the marker, knit 2 together, knit 2 (the marker sits in the middle of these two stitches), slip 1 stitch as if to knit, knit 1, pass the slipped stitch over the knitted stitch (= 2 stitches decreased). ---------------------------------------------------------- SOCK: The piece is worked in the round with double pointed needles, from the leg and down to the toe. Cast on 60-64-68 stitches with double pointed needles size 2.5 mm and picnic. Knit 1 round. Then work rib (= knit 2 / purl 2) for 4 cm. Knit 1 round where you decrease 4-8-4 stitches evenly on round - read DECREASE/INCREASE TIP = 56-56-64 stitches. Continue by working stocking stitch in the round according to diagram A.1, repeat A.1 in height - read PATTERN above. REMEMBER THE KNITTING TENSION! Continue A.1 until the piece measures 16-18-20 cm – finish after round 2 in A.1. Work round 3 in A.1 and adjust the number of stitches to 54-58-62 on this round. Now keep the first 13-15-15 stitches on the needle for the heel, place the next 28-28-32 stitches on 1 thread (= mid top of foot) and keep the last 13-15-15 stitches on the needle for the heel. Read KNITTING TIP and work stocking stitch with picnic, back and forth over the 26-30-30 heel stitches for 5-5½-6 cm. Insert 1 marker in the middle of the row – THE PIECE IS NOW MEASURED FROM HERE! Now work HEEL DECREASE – see description above. When you have completed heel decrease, knit up 13-15-16 stitches on each side of the heel and the 28-28-32 stitches from the thread are placed back on the needle = 68-72-80 stitches. Insert 1 marker on each side of the 28-28-32 stitches on top of foot. Work A.1 in the round (continue the next round in the pattern so that the pattern matches mid top of foot) and decrease on each side of the 28-28-32 stitches on top of foot as follows: Knit the 2 last stitches BEFORE the first marker on top of foot together and knit the 2 first stitches AFTER the last marker on top of foot twisted together. Decrease in this way every 2nd round a total of 8-8-10 times = 52-56-60 stitches. Continue A.1 until the piece measures approx. 18-19-21 cm from the marker on the heel (finish after round 3 in A.1 and, if necessary, continue working with picnic to this measurement) there are now approx. 4-5-6 cm left before finished length). Insert 1 marker in each side of the sock so that there are 26-28-30 stitches both on top and underneath the foot. Now decrease for the toe on each side of these two markers and continue with picnic to finished length - read DECREASE TIP (= 4 stitches decreased). Decrease in this way every 2nd round a total of 4-7-9 times and then every round a total of 6-3-2 times = 12-16-16 stitches left on the needle. On the next round, knit all stitches together 2 and 2 = 6-8-8 stitches. Cut the strand, pull it through the remaining stitches, pull tight and fasten well. Work one more sock in the same way. |
|||||||
Diagram explanations |
|||||||
|
|||||||
 |
|||||||
Have you finished this pattern?Tag your pictures with #dropspattern #rocksocks or submit them to the #dropsfan gallery. Do you need help with this pattern?You'll find 22 tutorial videos, a Comments/Questions area and more by visiting the pattern on garnstudio.com. © 1982-2026 DROPS Design A/S. We reserve all rights. This document, including all its sub-sections, has copyrights. Read more about what you can do with our patterns at the bottom of each pattern on our site. |
|||||||


With over 40 years in knitting and crochet design, DROPS Design offers one of the most extensive collections of free patterns on the internet - translated to 17 languages. As of today we count 324 catalogues and 12290 patterns translated into English (UK/cm). 12290
We work hard to bring you the best knitting and crochet have to offer, inspiration and advice as well as great quality yarns at incredible prices! Would you like to use our patterns for other than personal use? You can read what you are allowed to do in the Copyright text at the bottom of all our patterns. Happy crafting!
Post a comment to pattern DROPS 179-21
We would love to hear what you have to say about this pattern!
If you want to leave a question, please make sure you select the correct category in the form below, to speed up the answering process. Required fields are marked *.