
Popular categories
Looking for a yarn?

























Comments / Questions (26)
 FRANCOISE wrote:
Bonjour, Je suis rendue au devant droit. Où faut-il démarrer les 34 mailles en l'air ? Au bout du rang ou à partir du marqueur placé avant de diviser l'ouvrage. Merci
15.09.2026 - 19:56DROPS Design answered:
Bonjour Françoise, les 34 mailles en l'air sont à monter séparément (vous avez juste coupé le fil à la fin du col châle), quand vous avez crocheté ces 34 mailles en l'air, vous crochetez maintenant les mailles du col châle sur l'envers pour le devant droit: vous répétez 6 ou 7 fois A.1b et vous terminez par A.1a. Tournez et au rang suivant, vous crochetez toutes les mailles (y compris les mailles en l'air): A.1a, répétez A.1b comme avant, crochetez maintenant 2 fois A.3a (14 mailles x 2 = 28) et terminez par A.3b (= 6 mailles). Ainsi vous avez bien crocheté les 34 mailles en l'air du rang précédent (28+6=34). Bon crochet!
16.09.2026 - 07:36
FRANCOISE wrote:
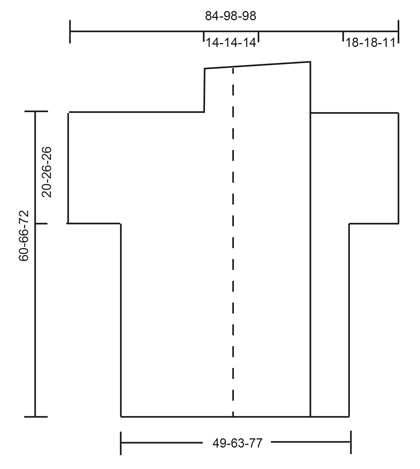
Bonjour Je ne comprends pas le schéma et ses mesures. À quoi correspondent la ligne en pointillés et pleine. Mon échantillon est conforme aux mesures données et pourtant la largeur de mon dos et devant est au moins 30 ans plus large que 49x2 du schéma. Les décrochés sur le schéma correspondent ils aux 34 mailles en l’air pour le dessous des manches. Merci de m’éclairer.
01.07.2026 - 10:20DROPS Design answered:
Bonjour Françoise, la ligne pointillé correspond à la bordure devant qui est ici très large; la largeur totale ne sera donc pas de 49 x 2 dans la 1ère taille, les 49 cm correspondent à la largeur dos, soit 7 fois A.1B x 7 cm le motif de A.1b = 49 cm de largeur. Pour les manches, vous avez 2 x A.2b + A.2a soit environ 18 cm (A.2b a la même largeur que A.1b et A.2a correspond à la moitié approx;) Retrouvez plus d'infos sur les schémas et les mesures ici. Bon crochet!
02.07.2026 - 09:00
 Andrea Bickel wrote:
Guten Tag. Ist es korrekt, dass meine Häkelarbeit am Anfang ca. 168cm messen muss? (Grösse L/ XL 1x A1a, 23x A1b, 1x A1c). Es kommt mir sehr gross vor.... Vielen Dank für Ihre Hilfe!
12.05.2025 - 17:21DROPS Design answered:
Liebe Frau Bickel, ja genau, die Arbeit muss ca 168 cm messen, mit ca 63 cm für das Rückenteil und ca 53 cm für jedes Vorderteil - die Vorderteile sind extra breit, dazu kommt die Blende/der Schalkragen, siehe Maßskizze. Viel Spaß beim Häkeln!
13.05.2025 - 08:05
 Michaela Pircher wrote:
Ich wüsste gerne, was der Rumpfteil ist und wie breit dieser sein soll. Mit der vorgeschlagenen Maschenanzahl für das Modell S/M mit 273 Maschen, erhalte ich eine Breite von mehr als Zwei Metern !
01.05.2025 - 19:04DROPS Design answered:
Liebe Frau Pircher, sollte Ihre Maschenprobe stimmend dann sollten die ca 20 Rapporte A.1b (19 x A.1b + 2 Halb-Rapport = ca 1 Rapport) ca 133 cm messen - die 7 Rapporte für Rückenteil ca 49 cm messen. Viel Spaß beim Häkeln!
02.05.2025 - 08:45
 Beaulieu, Sylvie wrote:
Bonjour, dans le 1er paragraphe je lis de faire A. 1a, 23 fois A 1b au total et terminer par A 1c. Je comprends pas trop. Dois-je faire A 1a, 1b et 1c un a la suite de l'autre 23 fois ?
10.11.2023 - 14:33DROPS Design answered:
Bonjour Mme Beaulieu, vu sur l'endroit, vous allez crocheter: 1 fois A.1A (début du rang sur l'endroit/fin du rang sur l'envers), répéter A.1b (mettez bien les marqueurs comme indiqué) et terminer par A.1C (fin de rang sur l'endroit/début de rang sur l'envers). Bon crochet!
10.11.2023 - 16:01
Ruth Weiss wrote:
Hallo zusammen, ich habe bevor ich angefangen habe eine Maschenprobe gemacht. Für die Größe S/M, habe ich ingesamt 154 cm für die Rumpfbreite. Ich häkle schon mit Nadelstärke 4. Können Sie mir bitte helfen?
10.01.2021 - 03:05DROPS Design answered:
Liebe Frau Weiss, stimmt auch Ihre Maschenprobe mit A.1B? Sie sollten 7 cm für jeden A.1B haben, dh 19 x A.1B = 133 cm + A.1A + A.1C - Viel Spaß beim häkeln!
11.01.2021 - 09:07
 Julia Mödritscher wrote:
Hallo, ich habe das Rumpfteil, das linke Vorderteil und den Schalkragen fertig gehäkelt. Muss ich das rechte Vorderteil nun einzeln mit 34lm anschlagen oder kommen die 34lm beim linken Vorderteil dran? Vielen Dank
19.12.2020 - 20:26DROPS Design answered:
Liebe Frau Mödritscher, das rechte Vorderteil beginnt mit den neuen 34 Luftmaschen für den Ärmel dann häklen Sie die nächste Rückreihe über die Maschen von rechten Vorderteil, bzw: A.1b und wie zuvor enden Sie mit A.1A. Viel Spaß beim häkeln!
21.12.2020 - 07:34
Julia Mödritscher wrote:
Hallo, ich habe das Rumpfteil, das linke Vorderteil und den Schalkragen fertig gehäkelt. Muss ich das rechte Vorderteil nun einzeln mit 34lm anschlagen oder kommen die 34lm beim linken Vorderteil dran? Vielen Dank
19.12.2020 - 20:26
 Ellen Blom wrote:
Ik begrijp niet wat er bij de tekening 14 cm breed is? Enhoe breed is de sjaalkraag?
24.07.2019 - 15:08DROPS Design answered:
Dag Ellen,
De 14 cm is de breedte vanaf waar de hals begint bij de linker schouder tot waar de hals ophoudt bij de rechter schouder. De totale breedte van de sjaalkraag staat inderdaad niet aangegeven in de tekening, maar de stippellijn is middenvoor, dus de hand van wat je over houdt (aantal steken bedoel ik) als je de helft van de steken van het achterpand van een voorpand aftrekt, dan weet je hoe breed de sjaalkraag is.
24.07.2019 - 20:26
 Patsy Gadberry wrote:
The photo of the jacket from the back shows the crocheted shoulder seam on the outside of the jacket. However, the instructions say, "Lay the front piece on the back piece, right side to right side and crochet the shoulders together," which would put the crocheted seam on the inside of the jacket instead of the outside.
27.06.2019 - 17:07
|
||||||||||||||||||||||||||||
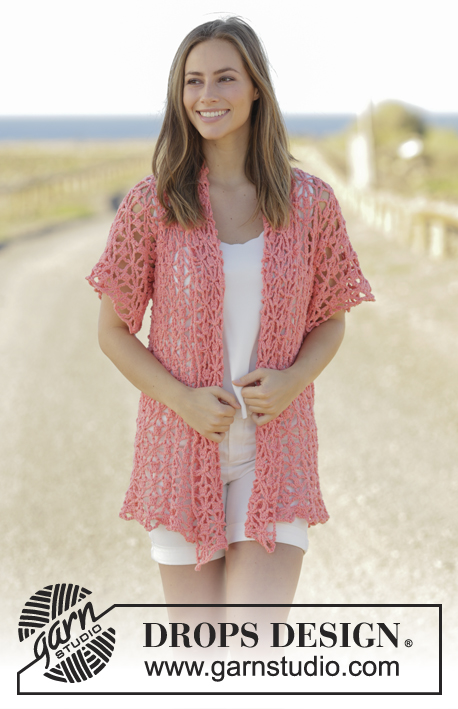
Peach Sorbet#peachsorbetcardigan |
||||||||||||||||||||||||||||
 |
 |
|||||||||||||||||||||||||||
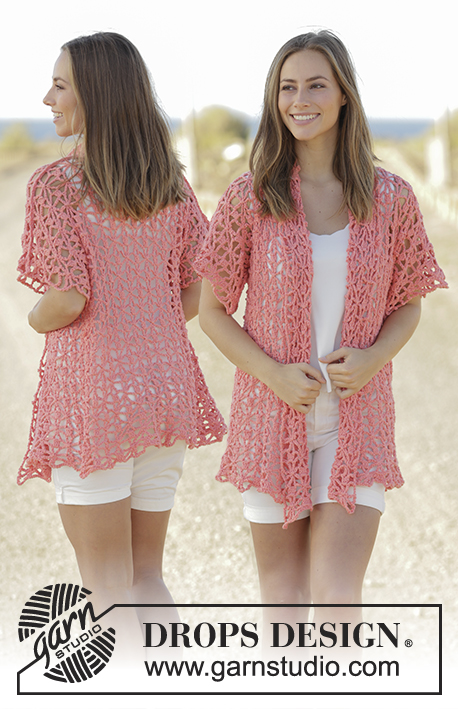
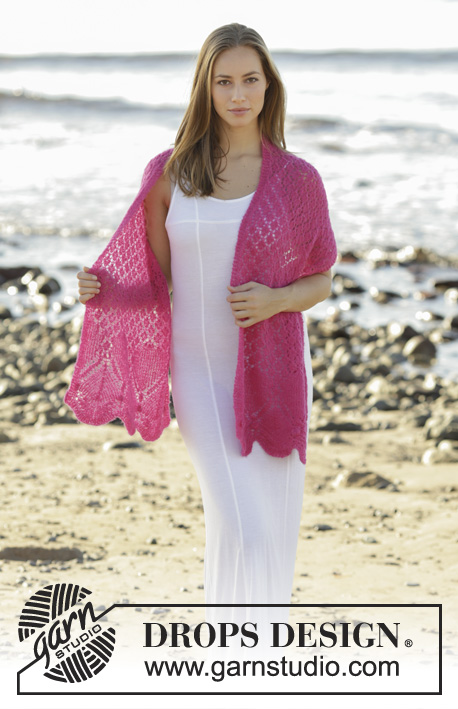
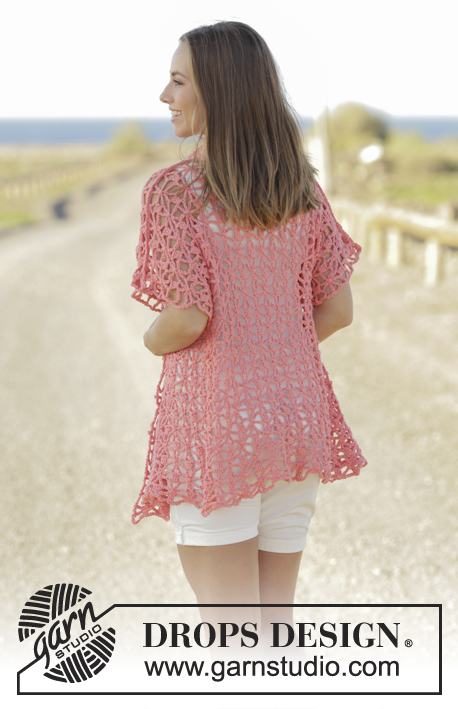
Crochet jacket with seamless sleeves in DROPS Paris. Sizes S - XXXL.
DROPS 175-5 |
||||||||||||||||||||||||||||
|
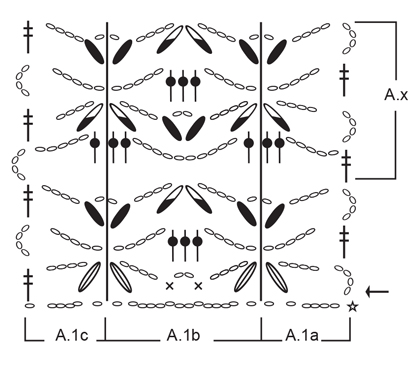
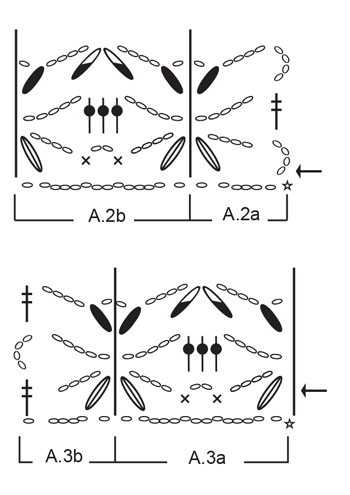
PATTERN: See diagrams A.1 to A.3. ---------------------------------------------------------- JACKET: The piece is worked back and forth. It is worked from the bottom up, the piece is then divided at the armhole and the front and back pieces are worked separately, with the sleeves. THE BODY: Work 278-334-390 chain stitches with hook size 5.5 mm and Paris. Then work as follows starting from the right side: A.1a, A.1b in total 19-23-27 times, finish with A.1c. Continue in this way until A.1 is completed in height, then repeat A.x upwards – REMEMBER THE CROCHET TENSION! Continue in this way until the piece measures approx. 38-38-44 cm, finish after the row 3 in A.x (= row from the wrong side). Then work row 4 in A.x as follows, from the right side: Work A.1a, A.1b in total 6-7-8 times (= right front piece), insert 1 marker in the last chain stitch, work A.1b in total 7-9-11 times (= back piece), insert 1 marker in the last chain stitch, work A.1b in total 6-7-8 times, finish with A.1c (= left front piece). Now divide the piece and each part is worked separately – do not cut the strand. LEFT FRONT PIECE: The next row (= row 1 in A.x) is worked as follows from the wrong side: Work A.1c, A.1b in total 6-7-8 times, finish with 34-34-20 chain stitches for the sleeve. Turn. Next row (= row 2 in A.x and row 1 in A.2) works as follows, from the right side: Work A.2a, A.2b in total 2-2-1 times, A.1b in total 6-7-8 times, finish with A.1c. Continue in this way until A.2 is completed in height. Next row (= row 1 in A.x) is worked as follows, from the wrong side: Work A.1c, A.1b in total 8-9-9 times, finish with A.1a. Continue by repeating A.x in height until the piece measures approx. 60-66-72 cm, adjust so that the last row is row 4 in A.x (= row from the right side). Work the shawl-collar. SHAWL-COLLAR: Next row (= row 1 in A.x) is worked as follows, from the wrong side: Work A.1c, A.1b in total 3-3-3 times, finish with A.1a. Turn. Continue upwards until A.x is completed in height and then work rows 1 and 2 of A.x 1 more time in height. Cut and fasten the strand. RIGHT FRONT PIECE: Next row (= row 1 in A.x) is worked as follows, from the wrong side: Work 34-34-20 chain stitches for the sleeve, continue over the right front piece as follows: A.1b in total 6-7-8 times, finish with A.1a. Turn. Next row (= row 2 in A.x and row 1 in A.3) is worked as follows, from the right side: Work A.1a, A.1b in total 6-7-8 times, A.3a in total 2-2-1 times, finish with A.3b. Continue in this way until A.3 is completed in height. Next row (= row 1 in A.x) is worked as follows, from the wrong side: Work A.1c, A.1b in total 8-9-9 times, finish with A.1a. Repeat A.x in height until the piece measures approx. 60-66-72 cm – adjust to the left front piece. Last row is row 4 in A.x (= row from the right side). Cut the strand and work the shawl-collar in the same way as for the left front piece, but reversed, so you work over the last 12 chain-spaces starting from the wrong side. BACK PIECE: Next row (= row 1 in A.x) is worked as follows, from the wrong side: Work 34-34-20 chain stitches for the sleeve, continue over the back piece and work A.1b in total 7-9-11 times, finish with 34-34-20 chain stitches for the sleeve. Turn. Next row (= row 2 in A.x and row 1 in A.2 and A.3) is worked as follows, from the right side: Work A.2a, A.2b in total 2-2-1 times, A.1b in total 7-9-11 times, A.3a in total 2-2-1 times, finish with A.3b. Continue in this way until A.2 and A.3 are completed in height. Next row (= row 1 in A.x) is worked as follows, from the right side: Work A.1a, A.1b in total 11-13-13 times, finish with A.1c. Repeat A.x in height until the piece measures approx. 60-66-72 cm – adjust to the front pieces. Last row is row 4 in A.x (= row from the right side). Cut and fasten the strand. ASSEMBLY: Lay the front piece on the back piece, right side to right side and crochet the shoulders together as follows: 1 double crochet through both layers, * 3 chain stitches, 1 double crochet around the next chain-space around both layers *, repeat from *-* along the whole shoulder/sleeve and finish with 1 double crochet. Do not work over the middle 5 chain-spaces, the collar will be attached here later. Repeat on the other shoulder. Crochet together under the sleeves as follows: * 1 double crochet around the next chain-space around both layers, 3 chain stitches *, repeat from *-* and finish with 1 double crochet. ASSEMBLING COLLAR: Lay the uppermost edge/last round on the right shawl-collar against the uppermost edge/last round on the left shawl-collar and sew together with small stitches edge to edge. Then sew the side of the collar to the neck. |
||||||||||||||||||||||||||||
Diagram explanations |
||||||||||||||||||||||||||||
|
||||||||||||||||||||||||||||
 |
||||||||||||||||||||||||||||
 |
||||||||||||||||||||||||||||
 |
||||||||||||||||||||||||||||
Have you finished this pattern?Tag your pictures with #dropspattern #peachsorbetcardigan or submit them to the #dropsfan gallery. Do you need help with this pattern?You'll find 8 tutorial videos, a Comments/Questions area and more by visiting the pattern on garnstudio.com. © 1982-2026 DROPS Design A/S. We reserve all rights. This document, including all its sub-sections, has copyrights. Read more about what you can do with our patterns at the bottom of each pattern on our site. |
||||||||||||||||||||||||||||






With over 40 years in knitting and crochet design, DROPS Design offers one of the most extensive collections of free patterns on the internet - translated to 17 languages. As of today we count 333 catalogues and 12525 patterns translated into English (UK/cm). 12525
We work hard to bring you the best knitting and crochet have to offer, inspiration and advice as well as great quality yarns at incredible prices! Would you like to use our patterns for other than personal use? You can read what you are allowed to do in the Copyright text at the bottom of all our patterns. Happy crafting!
Post a comment to pattern DROPS 175-5
We would love to hear what you have to say about this pattern!
If you want to leave a question, please make sure you select the correct category in the form below, to speed up the answering process. Required fields are marked *.