
Popular categories
Looking for a yarn?


Comments / Questions (29)
![]() Carmen Delia Van Bockel wrote:
Carmen Delia Van Bockel wrote:
Leyendo otro tutorial de bolso de Drops he entendido la base Ahora quiero empezar el dibujo propiamente dicho. Dice; A2 - 3repeticiones en el ancho. Tengo 90 ptos. el dibujo indica 30 ptos. Digo: 2 dibujos caerán de frente... pero el tercero....en el lado. ¿Quizá hagamos 2 centrados y rellenamos los laterales? Independientemente de la base, todo las demás vtas ok. Gracias
23.03.2025 - 20:14DROPS Design answered:
Hola Carmen, uno de los dibujos está en el centro de la parte delantera. Los otros dos dibujos se trabajan hacia los lados y se unen por la parte de atrás del bolso.
23.03.2025 - 20:38
![]() Carmen Delia Van Bockel wrote:
Carmen Delia Van Bockel wrote:
He entendido el comienzo pero ¿donde coloco el marcador? Hay que aumentar en vtas. 2 a 6 según marcador ¿ pero donde está el marcador . Gracias
22.03.2025 - 16:39DROPS Design answered:
Hola Carmen, los marcadores se colocaron en la vuelta 1: saltar el 1er punto de cadeneta, trabajar 2 puntos bajos, después 1 punto bajo en los siguientes 32 puntos de cadeneta, en el último punto de cadeneta trabajar 2 puntos bajos, insertar 1 marcapuntos = centro del lateral. Girar y continuar trabajando por el otro lado de la fila de puntos de cadeneta. Trabajar 2 puntos bajos en el 1º punto de cadeneta, ahora trabajar 1 punto bajo en los siguientes 32 puntos de cadeneta y finalizar con 2 puntos bajos en el 1º punto de cadeneta al inicio de la vuelta y un punto enano en el 1º punto bajo de la vuelta. insertar 1 marcapuntos = centro del lateral.
23.03.2025 - 20:07
![]() Carmen Delia Van Bockel wrote:
Carmen Delia Van Bockel wrote:
No tengo muy claro lo de los aumentos en la plantilla del bolso. No tengo ningun marcapuntos puesto que voy a comenzar la vuelta 2. Pregunto: ¿ donde se hacen los aumentos? En los extremos o en el centro? Gracias
18.03.2025 - 21:58DROPS Design answered:
Hola Carmen, en la vuelta 1 insertaste 2 hilos marcadores/ marcapuntos, en el centro de los laterales del bolso. Estos marcadores seguirán la labor hacia delante, así que tienes que dejarlos puestos hasta llegar al punto con el hilo marcador y moverlos hacia arriba a medida que trabajes las vueltas. Los aumentos se hacen a cada lado de los hilos marcadores.
23.03.2025 - 13:50
![]() Carmen Delia Van Bockel wrote:
Carmen Delia Van Bockel wrote:
Muchisimas gracias. Creo haber entendido. Lo intentaré cuanto antes.
18.03.2025 - 16:28
![]() Carmen Van Bockel wrote:
Carmen Van Bockel wrote:
¿ dónde está el principio de este tutorial? Tampoco se indica como hacer la parte baja...aumentos ¿ dónde? Gracias
15.03.2025 - 01:05DROPS Design answered:
Hola Carmen, las vueltas 1 a 6 son la parte inferior con aumentos. Trabajar 35 puntos de cadeneta y trabaja la VUELTA 1 sobre ellos como se indica. Después trabaja las vueltas 2 a 6, aumentando a cada lado del marcapuntos como se indica en TIP PARA LOS AUMENTOS. Después de la vuelta 6 dejas de trabajar aumentos y comienzas a trabajar el patrón de colores según el diagrama A.1, trabajando puntos bajos en los diferentes colores. Después de A.1 ajusta el número de puntos a 90 (disminuyes 2 puntos) y comienza a trabajar A.2. Cierra después de A.2 y trabaja los cordones.
16.03.2025 - 19:16
![]() Aracely Flores wrote:
Aracely Flores wrote:
Excelente Muchas gracias
12.03.2024 - 02:13
![]() Ana wrote:
Ana wrote:
Buenas noches, si quisiera hacer este bolso en un tamaño más grande cual seria el. Número de cadenetas al final, o cual es el múltiplo de número para ir aumentando el tamaño. Espero darme a entender con la pregunta
03.02.2024 - 05:23DROPS Design answered:
Hola Ana, ten en cuenta que necesitarás repeticiones completas de A.2 para que el bolso quede bonito. Así que, a la hora de hacer el bolso más grande, tienes que tener en cuenta el número de puntos en una repetición de A.2 e incrementar el número de cadenetas iniciales a partir de ellos. Nosotros no hacemos patrones personalizados.
04.02.2024 - 22:54
![]() María Serrano wrote:
María Serrano wrote:
En todas las vueltas el primer punto de la vuelta se sustituye por una cadeneta y el último se sustituye por un punto enano en esa primera cadeneta? Hay Algún video para verlo? Gracias
14.07.2021 - 20:24DROPS Design answered:
Hola María Serrano, el último punto no se sustituye por un punto enano; este se trabaja después del último punto. A continuación tienes un vídeo que te puede servir de apoyo: https://www.garnstudio.com/video.php?id=312&lang=es
15.07.2021 - 00:05
![]() Miranda wrote:
Miranda wrote:
Ik blijf de bodem fout doen. Toer 1 lukt. Maar verschillende manier geprobeerd om te meerdere, maar het patroon (de naad) word daardoor schreef. Kortom kun je uitleggen hoe toer 2 precies gaat, stapje voor stapje? Aan het begin heb ik een markeerdraad, en in het midden. Ik neem aan dat daar beide 2 gemeerderd moeten worden, maar hoe... Patroon is hierin best lastig te ontcijferen. 1e losse tel ik trouwens mee in de telling. Alvast bedankt!
13.06.2021 - 19:15DROPS Design answered:
Dag Miranda,
De tas wordt in de rondte gehaakt, dus na het haken van de 35 lossen sluit je de toer. Dan keer je het werk en haak je terug. Dit doe je elke keer, dus de toer sluiten en dan het werk keren. Je hebt 2 markeerdraden in het werk en je meerdert voor en na de markeerdraden. Je begint 2 steken voor de markeerdraad, dan haak je 2 vasten in 1 steek, 1 vaste in de volgende steek, markeerdraad, 1 vaste in de volgende steek, 2 vasten in de volgende steek. Dit doe je ook bij de andere markeerdraad.
24.06.2021 - 09:47
![]() Mary Manoly wrote:
Mary Manoly wrote:
Hello cannot figure out how to place the cords shoul i make only 3 or 6 thank you for all you effort
26.10.2020 - 04:06DROPS Design answered:
Hi Mary, You work 3 cords, which are tied on the inside of the round of holes. They are fastened close together on one side and then again on the other. Happy crocheting!
26.10.2020 - 06:49
|
|||||||||||||
Folk Dance#folkdancebag |
|||||||||||||
 |
 |
||||||||||||
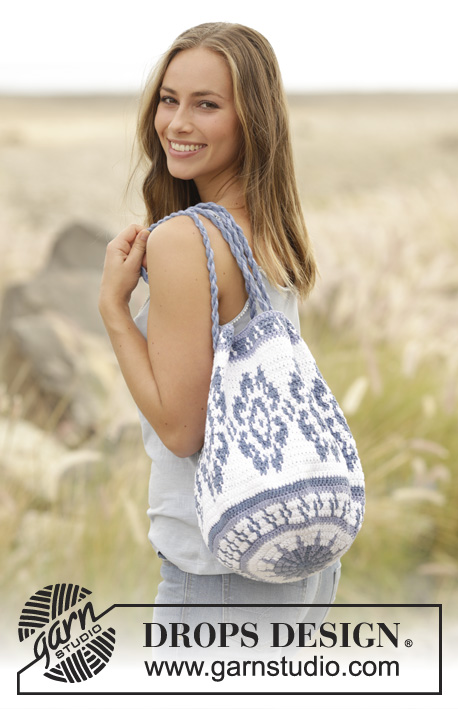
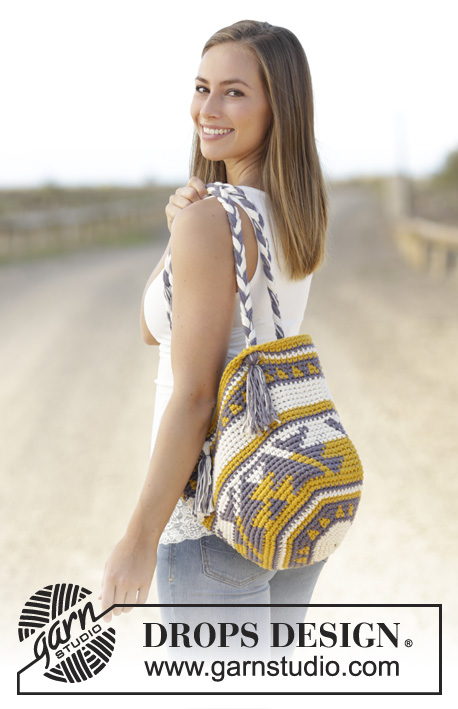
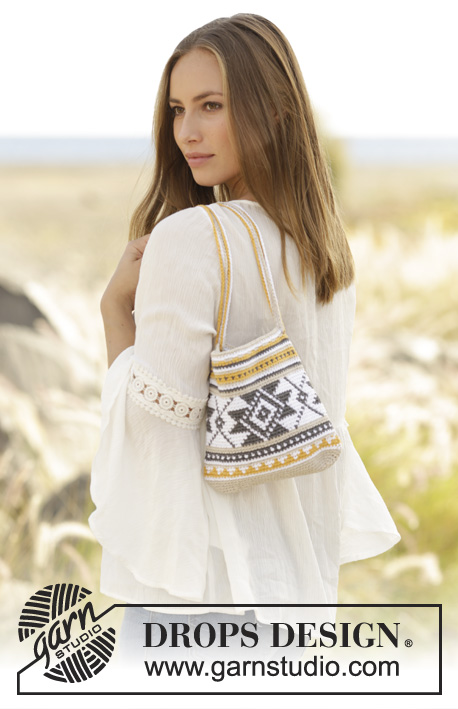
Crochet bag with multi-coloured pattern in DROPS Cotton Light.
DROPS 175-23 |
|||||||||||||
|
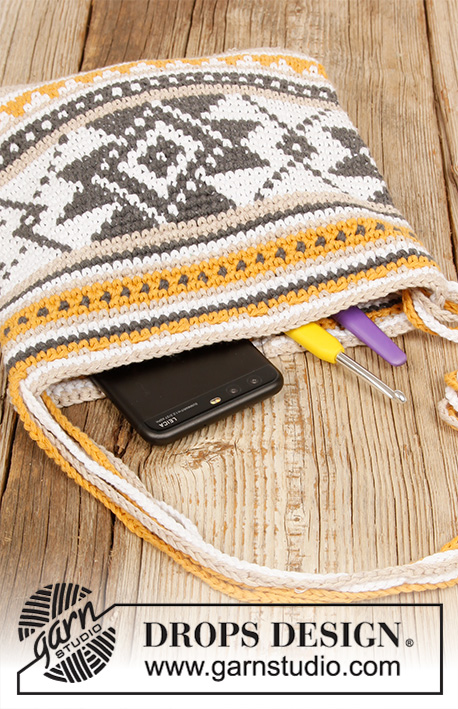
INCREASE TIP: Increase 1 stitch on each side of the marker thread as follows: Start 2 double crochets before the marker thread, work 2 double crochet in the next double crochet, work 2 double crochets, the marker thread sits between these double crochets and work 2 double crochets in the next double crochet. PATTERN: See diagrams A.1 and A.2. The diagrams show the colours in the pattern. 1 square = 1 double crochet. COLOUR PATTERNS (worked in the round): When changing colours, work as follows: Begin on the last double crochet with the first colour, but wait with the last pull through, change to the next colour and work the last pull through, then work the next double crochet. When working with two colours, lay the strand of the colour not being used over the stitches from the previous round and work around the strand so that it is hidden and always available when needed. CROCHET INFO: The first double crochet of the round is replaced by 1 chain stitch, finish the round with 1 slip stitch in the first chain stitch. ---------------------------------------------------------- BAG: The piece is worked in the round with double crochets. First work the bottom with increases. Then work A.1 and A.2 upwards without increases. At the top, work a row of holes for the cords. Work 35 chain stitches with hook size 3 mm and light beige. ROUND 1: Work double crochets down along the one side of the chain stitch row as follows: skip the first chain stitch, work 2 double crochets in the next chain stitch, then work 1 double crochet in each of the next 32 chain stitches, in the last chain stitch work 2 double crochets, insert 1 marker thread = middle of the side. Turn and continue working from the other side of the chain stitch row. Work 2 double crochets in the first chain stitch, then work 1 double crochet in each of the next 32 chain stitches and finish with 2 double crochets in the first chain stitch which was worked in at the beginning of the round and 1 slip stitch in the first double crochet on the round. Insert 1 marker thread = middle of the side. There are now 72 double crochets on the round. ROUNDS 2-6: READ CROCHET INFO! Work 1 double crochet in each double crochet from the previous round, at the same time increase 4 double crochets on each round – READ INCREASE TIP. Work 5 rounds in this way = 92 double crochets. Continue to work in the round with double crochets, but without increases and work according to A.1 (= 23 repeats in width). READ COLOUR PATTERNS! On the last round in A.1 decrease 2 double crochets evenly along the round = 90 double crochets. Continue working with A.2 (= 3 repeats in width). On the round with the arrow, work a row of holes as follows: Work 1 double crochet in each of the first 2 double crochets, * work 2 chain stitches, skip the next 2 double crochets, 1 double crochet in each of the next 2 double crochets*, repeat from *-* the whole round. On the next round work 1 double crochet in each double crochet and 2 double crochets around each chain-space. Finish working A.2. Cut and fasten the strands. CORDS: Work 3 cords, 1 with white, 1 with light beige and 1 with yellow as follows: Work 1 row with chain stitches until the cord measures 130 cm. Tie the cords to the bag with a knot on the inside in each side of the bag, in the round with holes. |
|||||||||||||
Diagram explanations |
|||||||||||||
|
|||||||||||||
 |
|||||||||||||
Have you finished this pattern?Tag your pictures with #dropspattern #folkdancebag or submit them to the #dropsfan gallery. Do you need help with this pattern?You'll find 8 tutorial videos, a Comments/Questions area and more by visiting the pattern on garnstudio.com. © 1982-2026 DROPS Design A/S. We reserve all rights. This document, including all its sub-sections, has copyrights. Read more about what you can do with our patterns at the bottom of each pattern on our site. |
|||||||||||||


With over 40 years in knitting and crochet design, DROPS Design offers one of the most extensive collections of free patterns on the internet - translated to 17 languages. As of today we count 324 catalogues and 12290 patterns translated into English (UK/cm). 12290
We work hard to bring you the best knitting and crochet have to offer, inspiration and advice as well as great quality yarns at incredible prices! Would you like to use our patterns for other than personal use? You can read what you are allowed to do in the Copyright text at the bottom of all our patterns. Happy crafting!
Post a comment to pattern DROPS 175-23
We would love to hear what you have to say about this pattern!
If you want to leave a question, please make sure you select the correct category in the form below, to speed up the answering process. Required fields are marked *.