
Popular categories
Looking for a yarn?


Comments / Questions (26)
![]() Marie Hélène Maquestieau wrote:
Marie Hélène Maquestieau wrote:
Bonjour je tricote l'avant au niveau encolure et emmanchure. J'ai 29 mailles: je dois diminuer de 4 mailles pour l'emmanchure et 13x1 maille pour l'encolure...il doit rester 16 mailles....OR 29-4-13= 12.....je ne comprends pas!!! merci de m'aider :-)
05.05.2026 - 19:01DROPS Design answered:
Bonjour Mme Maquestieau, après les emmanchures en taille M, vous avez 61 mailles (comme pour le dos), vous rabattez les 3 m centrales pour l'encolure = 58 m soit 29 m de chaque côté/pour chaque devant; vous diminuez 13x 1 m = il reste 16 mailles pour l'épaule. Bon tricot!
06.05.2026 - 07:51
![]() Kristin Strandheim wrote:
Kristin Strandheim wrote:
Hei, jeg har kjøpt og strikket Sunny day genseren og opplever at mønsteret bak nederst ikke plasserer seg midt bak, men ca 5 cm til venstre sett bakfra. Maskeantallet stemmer, likt på begge sider av mønsteret, og øverst ved halsen er det plassert helt rett. Hjelp! Dette ser ikke pent ut, er det noen som har opplevd det og har en løsning? Mvh Kristin Strandheim
20.03.2026 - 13:59DROPS Design answered:
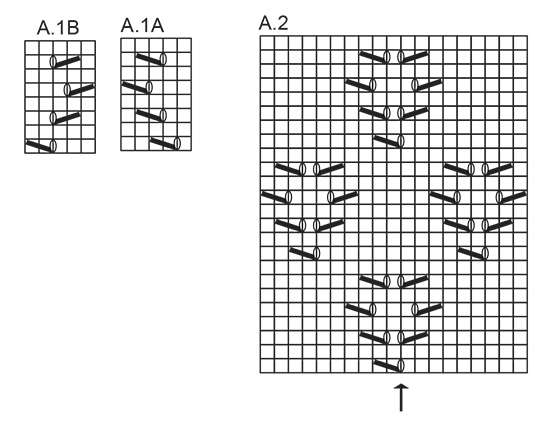
Hei Kristin. Hvilken str. strikker du og hvor mange masker har du på hver side når du begynner på mønstret? Når arbeidet måler 15-16-17-14-15-16 cm strikkes det mønster etter diagram A.1 over de midterste maskene – mønsteret starter fra retten etter merketråden (merketråden = midt bak i arbeidet- HUSK se pil i diagrammet). De andre maskene strikkes som før (glattstrikk og kantmasker). Om dette er blitt fulgt skal mønstret være midt bak. mvh DROPS Design
23.03.2026 - 07:44
![]() Laila Thorp-Rice wrote:
Laila Thorp-Rice wrote:
Hei. Kan denne modellen strikkes rundt?
07.04.2025 - 05:27DROPS Design answered:
Hej Laila, ja det kan du godt :)
08.04.2025 - 15:22
![]() Marilena wrote:
Marilena wrote:
Il modello non sembra fatto con ferri numero 5 , ma più piccoli
02.05.2022 - 14:12DROPS Design answered:
Buonasera Marilena, deve lavorare con i ferri che le permettono di ottenere il campione indicato. Buon lavoro!
02.05.2022 - 23:54
![]() Shio wrote:
Shio wrote:
Hallo liebes drops team ich habe probelme mit den randmaschen bzw mit diesen "2 kraus re beidseitig" wird am anfang und am ende jedesmal die randmasche rechts gestrickt? oder wie muß ich das verstehen? habt ihr dafür evtl auch ein video? wäre für eine antwort sehr dankbar lg shio
23.03.2022 - 23:13DROPS Design answered:
Liebe Shio, es sind hier 2 Randmaschen kraus rechts, dh so stricken Sie die Hinreichen rechts, und bei den Rückreihen stricken Sie: 2 Maschen rechts, links bis 2 Maschen übrig sind, 2 Maschen rechts, so sind es 2 krausrechte Maschen am Anfang und am Ende der Reihe. Viel Spaß beim stricken!
24.03.2022 - 09:42
![]() Mona wrote:
Mona wrote:
Hei. Jeg feller på armene. etter at jeg har fellt 10 masker midt under armen stikker jeg frem og tilbake samtidig som jeg skal felle 2 masker 3 ganger. Er det 3 ganger totalt el 3 ganger hver side? altså 6masker el 12 masker ?
04.10.2021 - 21:43DROPS Design answered:
Hei Mona, Det er 3 ganger i hver side (12 masker). God fornøyelse!
05.10.2021 - 09:05
![]() Bente Madsen wrote:
Bente Madsen wrote:
Hvor mange masker skal der tages op rundt i halskanten og hvor mange pinde ret skal der strikkes
12.12.2019 - 19:41DROPS Design answered:
Hej Bente, Du strikkede 4 pinde retstrik lige før du lukkede halsmaskerne af, det er dem som er halskanten og der skal ikke strikkes flere masker op til hals. God fornøjelse! :)
16.12.2019 - 15:02
![]() Bente Madsen wrote:
Bente Madsen wrote:
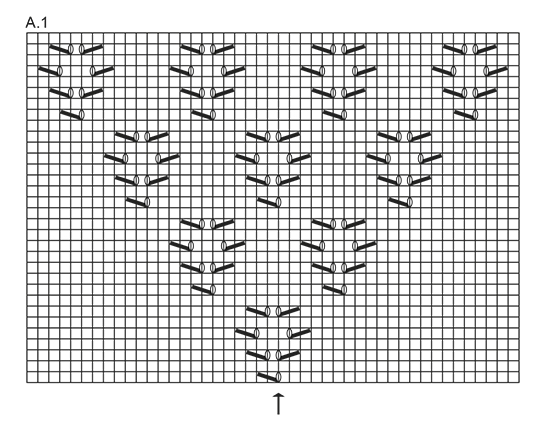
Mønster A1 er der 10 masker imellem mønstrene når man skal strikke 2 og flere ved siden af hinanden Eller er der kun 9 masker.
18.11.2019 - 08:51DROPS Design answered:
Hej Bente, Ja på 9.pind i A.1 er der 10 masker glatstrik imellem de 2 mønstre. God fornøjelse!
21.11.2019 - 14:48
![]() Karolien wrote:
Karolien wrote:
Hallo, Op het rugpand het onderste 'hart' is het midden dus spreekt voor zich waar te beginnen. De 'harten' erboven...hoe weet ik waar ik moet beginnen? Alvast bedankt voor het antwoord.
18.06.2018 - 20:17
![]() Karolien wrote:
Karolien wrote:
Hallo, Op het rugpand het onderste 'hart' is het midden dus spreekt voor zich waar te beginnen. De 'harten' erboven...hoe weet ik waar ik moet beginnen? Alvast bedankt voor het antwoord.
18.06.2018 - 20:12DROPS Design answered:
Dag Karolien, Dit kun je uittellen m.b.v. de telpatronen. De harten die erboven komen verschuiven 6 steken naar rechts of links t.o.v. het onderste hart.
19.06.2018 - 14:44
|
||||||||||||||||
Sunny Day#sunnydaysweater |
||||||||||||||||
 |
 |
|||||||||||||||
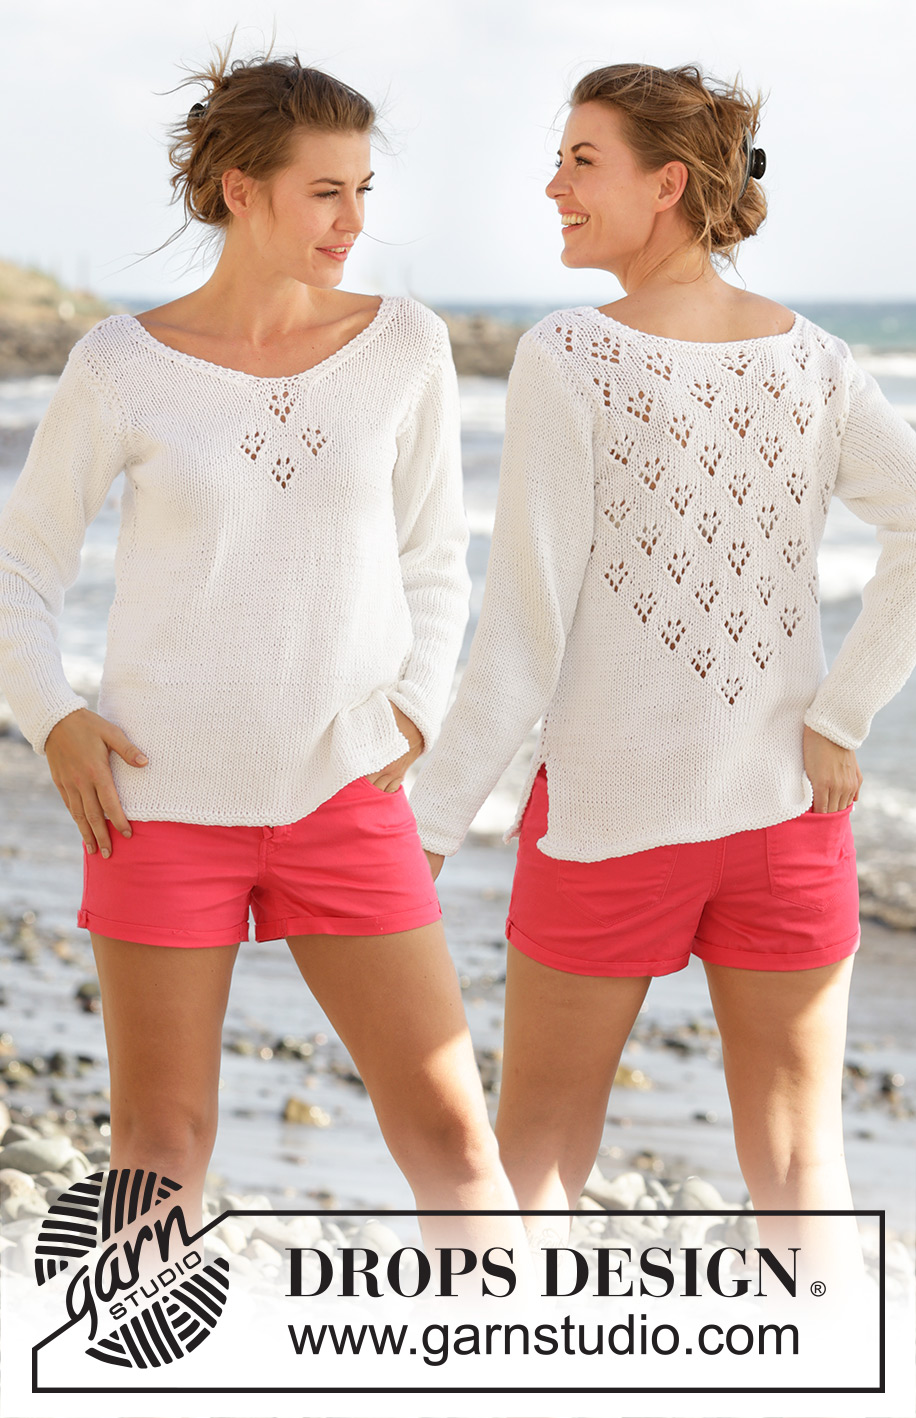
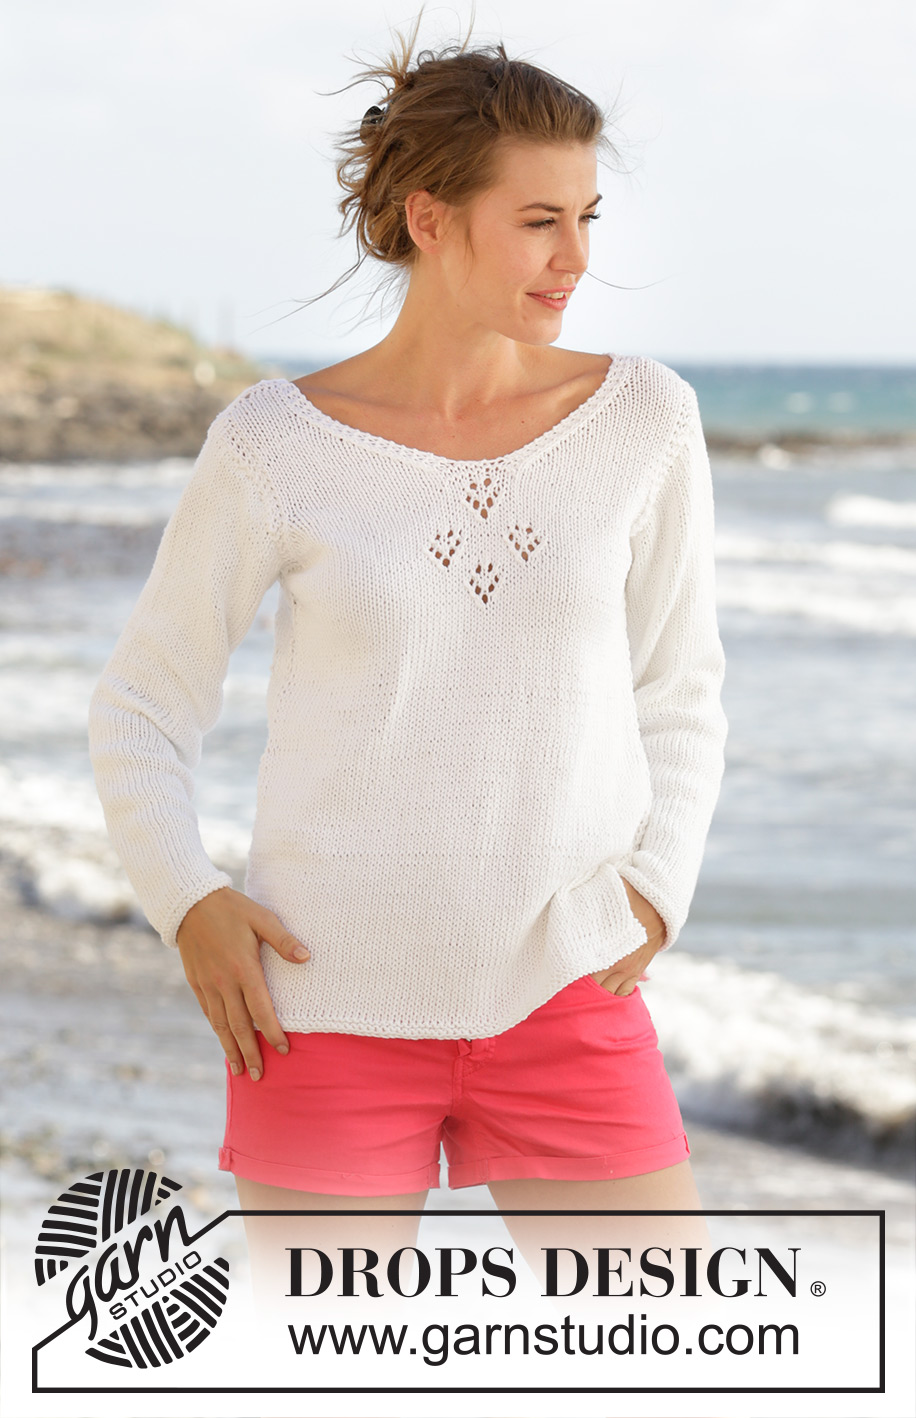
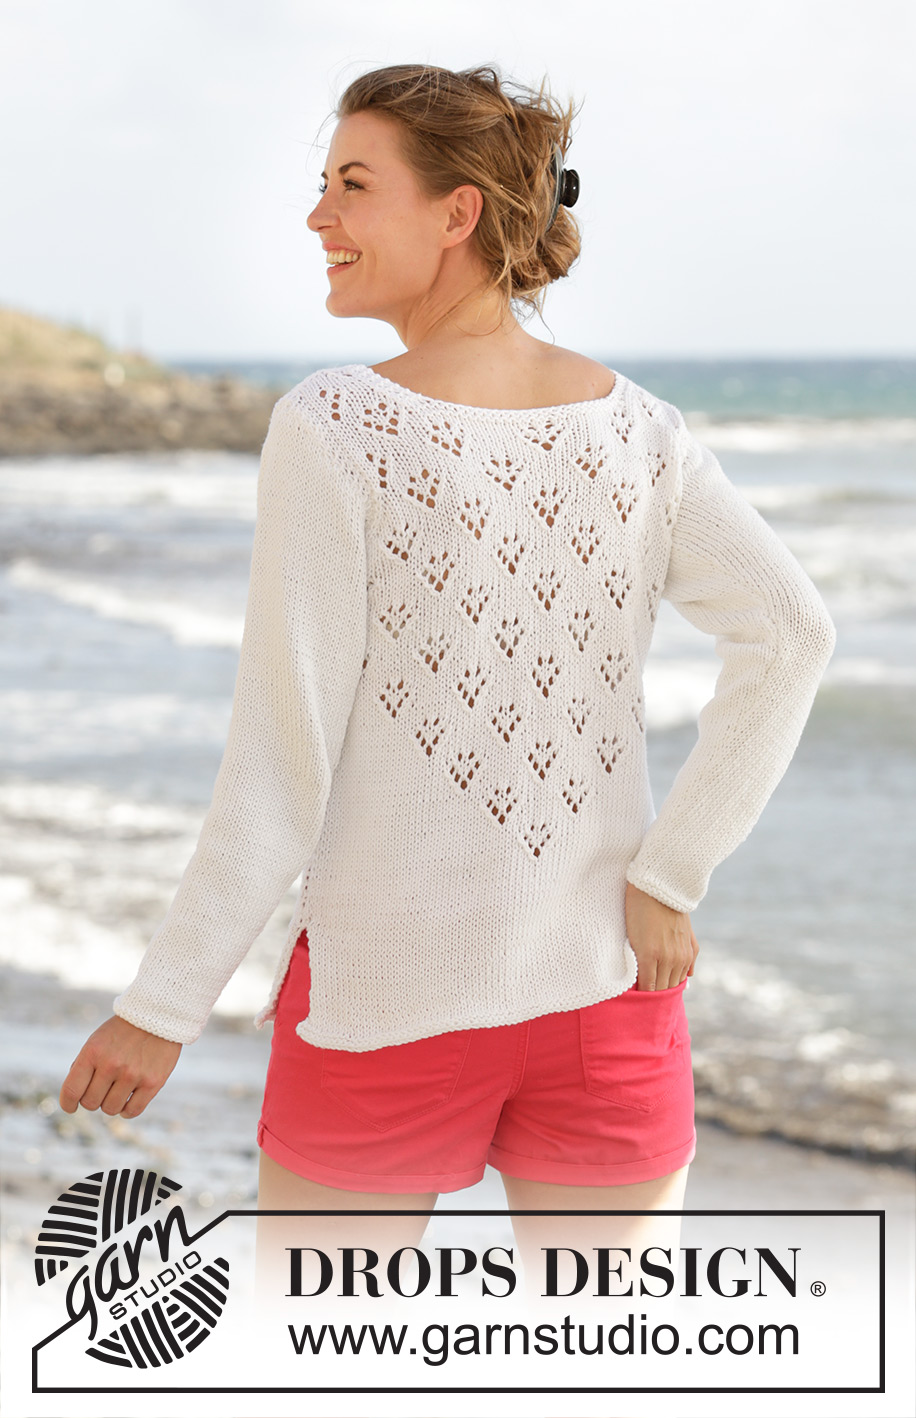
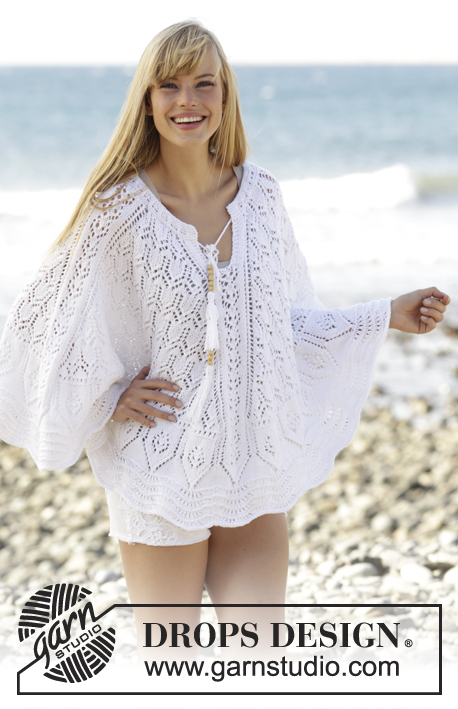
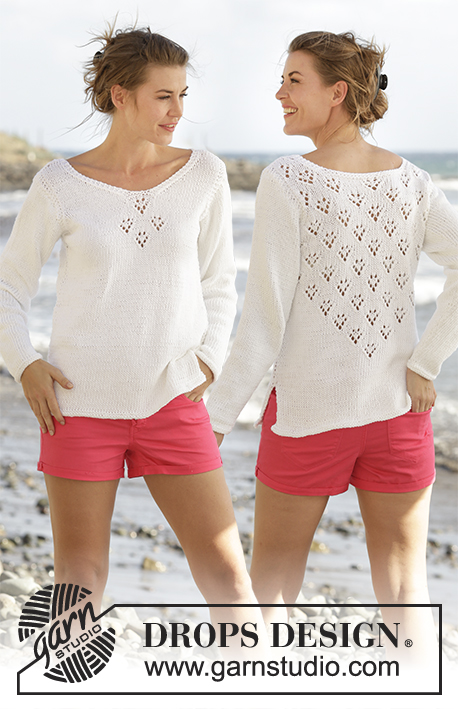
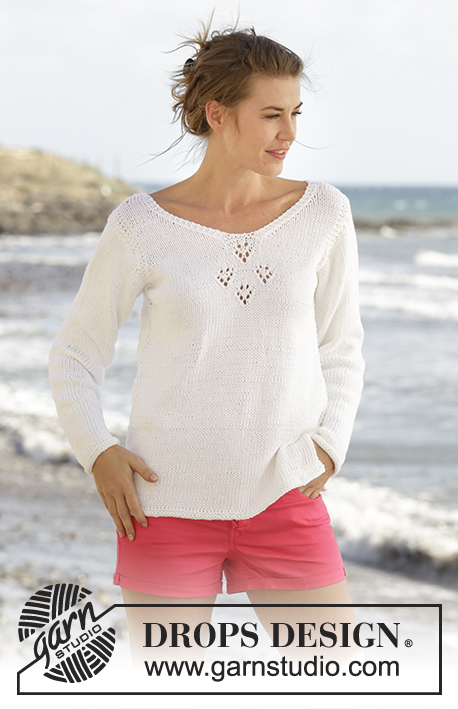
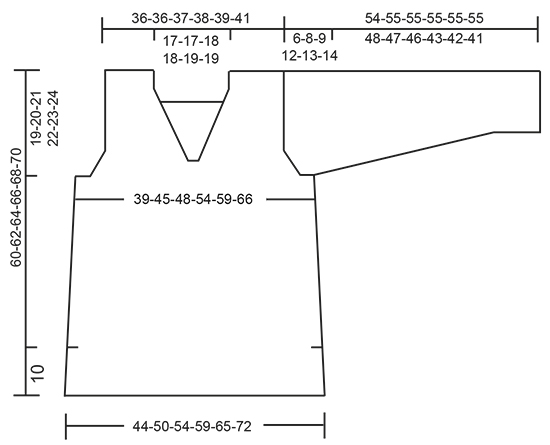
Knitted DROPS jumper with V-neck, lace pattern and vents in the sides in ”Paris”. Size: S - XXXL.
DROPS 170-8 |
||||||||||||||||
|
GARTER ST (back and forth): K all rows. 1 ridge = 2 rows K. GARTER ST (worked in the round): * K 1 round and P 1 round *, repeat from *-*. 1 ridge = 2 rounds. PATTERN: See diagrams A.1 and A.2. The diagrams show all rows in pattern seen from RS. DECREASE TIP (applies to sides on body, at armholes and neck): Dec inside 2 edge sts in garter st on front and back piece and inside 3 edge sts in garter st along armholes and neck. All dec are done from RS! Dec as follows after 2 or 3 edge sts: Slip 1 st as if to K, K 1, psso. Dec as follows before 2 or 3 edge sts: Beg 2 sts before edge sts and K 2 tog. INCREASE TIP (applies to mid under sleeve): Beg 1 st before marker, make 1 YO, K 2 (marker is between these 2 sts) and make 1 YO. On next round K YOs twisted to avoid holes. ---------------------------------------------------------- JUMPER: Body is worked bottom up in two parts. Sleeves are worked in the round. BACK PIECE: Cast on 75-85-91-101-111-123 sts on needle size 4 mm with Paris. Work 2 ridges in GARTER ST - see explanation above. Insert 1 marker after the first 37-42-45-50-55-61 sts on needle (seen from RS) = 38-43-46-51-56-62 sts on needle after marker, move the marker upwards when working. Switch to needle size 5 mm and work in stocking st with 2 edge sts in garter st in each side. REMEMBER THE KNITTING TENSION When piece measures 12 cm, dec 1 st in each side - READ DECREASE TIP! Repeat dec every 8-8-7-7-7-7 cm a total of 4-4-5-5-5-5 times in each side = 67-77-81-91-101-113 sts. AT THE SAME TIME when piece measures 15-16-17-14-15-16 cm, work pattern according to diagram A.1 over the middle sts – pattern beg from RS after marker in the middle of piece (see arrow in diagram) – work the other sts as before. When A.1 has been worked 1 time in height continue the pattern towards the edge st in each side as before - adjust to a whole or half heart - see A.1A and A.1B, (work A.1A in the right side of work and work A.1B in the left side of work), inside edge st in each side. Work the sts that do not fit a whole or half heart out towards the sides in stocking st. When piece measures 40-41-42-43-44-45 cm, work 2 ridges over the outermost 5-7-8-9-10-11 sts in each side (work the other sts as before). Then cast off the first 2-4-5-6-7-8 sts at beg of the next 2 rows for armholes. Continue pattern with 3 edge sts in garter st in each side (where there is not enough room for a whole or half heart out towards armholes work these sts in stocking st). AT THE SAME TIME dec for armholes inside edge st on every other row (i.e. every row from RS) as follows: Dec 1 st 1-4-4-7-10-14 times in total – READ DECREASE TIP = 61-61-63-65-67-69 sts remain on needle. Continue pattern with 3 edge sts in garter st in each side (where there is not enough room for a whole or half heart out towards armhole work these sts in stocking st). When piece measures 52-54-56-58-60-62 cm, work 2 ridges over the middle 29-29-31-31-33-33 sts on needle (work the other sts as before). On next row from RS, cast off the middle 23-23-25-25-27-27 sts for neck and finish each shoulder separately. Continue as before with 3 edge sts in garter st in each side. AT THE SAME TIME dec for neck on every other row as follows: Dec 1 st 3 times in total – READ DECREASE TIP = 16-16-16-17-17-18 sts remain on shoulder. Continue until piece measures 60-62-64-66-68-70 cm and cast off. Repeat on the other shoulder. FRONT PIECE: READ ALL OF THE FOLLOWING SECTION BEFORE CONTINUING! Cast on and work as on back piece until piece measures 35-37-38-39-40-42 cm - NOTE: Do not work A.1 on front piece. Now work pattern according to diagram A.2 over the middle sts – pattern beg from RS after marker in the middle of piece (see arrow in diagram) – work the other sts as before. ARMHOLE: AT THE SAME TIME when piece measures 40-41-42-43-44-45 cm, work 2 ridges over the outermost 5-7-8-9-10-11 sts in each side as on back piece (work the other sts as before). Then dec for armhole in the side as on back piece. V-NECK: AT THE SAME TIME when A.2 has been worked 1 time vertically work 2 ridges over the middle 9 sts mid front (work the other sts as before). On next row from RS after ridges, cast off the middle 3 sts for neck and finish each part separately. Continue in stocking st with dec for armhole as before and dec AT THE SAME TIME for V-neck on every other row (i.e. on every row from RS) as follows: Dec 1 st 13-13-14-14-15-15 times in total - READ DECREASE TIP. After all dec for armholes and V-neck, 16-16-16-17-17-18 sts remain on shoulder. Continue until piece measures 60-62-64-66-68-70 cm and cast off. Repeat on the other shoulder - NOTE: Work first row from mid front (= WS). Beg by picking up 1 st in first st from the other side and work this tog with first st on needle. This is done to avoid a nick at the bottom of vent. SLEEVE: Worked in the round on double pointed needles. Cast on 32-34-36-38-40-40 sts on double pointed needles size 4 mm with Paris. Work 2 ridges in GARTER ST in the round - see explanation above. Switch to double pointed needles size 5 mm and work in stocking st, insert 1 marker at beg of round (= mid under sleeve). When piece measures 7-6-10-6-6-12 cm, inc 2 sts mid under sleeve - READ INCREASE TIP. Repeat inc every 3½-3-2½-2½-2-1½ cm 12-14-14-15-17-19 times in total = 56-62-64-68-74-78 sts. When sleeve measures 48-47-46-43-42-41 cm (NOTE: Shorter measurements in the larger sizes because of longer sleeve cap and wider shoulders) cast off the middle 4-8-10-12-14-16 sts mid under sleeve. Finish sleeve cap back and forth on circular needle in stocking st AT THE SAME TIME cast off at beg of every row in each side follows: Cast off 2 sts 2-2-3-3-3-3 times and 1 st 1-1-2-4-7-8 times, then cast off 2 sts in each side until piece measures 53-54-54-54-54-54 cm, cast off 3 sts at beg of the next 2 rows and the cast off the remaining sts, piece measures approx. 54-55-55-55-55-55 cm. Knit another sleeve. ASSEMBLY: Sew shoulder seams inside cast-off edge. Sew side seams – sew edge to edge in outer loops of edge sts - beg at the top by armhole and sew until approx. 10 cm remain in each side (= vent). Sew in sleeves – place sleeve 1 st in under edge in garter st along armhole and fasten neatly so that edge in garter st shows. |
||||||||||||||||
Diagram explanations |
||||||||||||||||
|
||||||||||||||||
 |
||||||||||||||||
 |
||||||||||||||||
 |
||||||||||||||||
Have you finished this pattern?Tag your pictures with #dropspattern #sunnydaysweater or submit them to the #dropsfan gallery. Do you need help with this pattern?You'll find 22 tutorial videos, a Comments/Questions area and more by visiting the pattern on garnstudio.com. © 1982-2026 DROPS Design A/S. We reserve all rights. This document, including all its sub-sections, has copyrights. Read more about what you can do with our patterns at the bottom of each pattern on our site. |
||||||||||||||||


With over 40 years in knitting and crochet design, DROPS Design offers one of the most extensive collections of free patterns on the internet - translated to 17 languages. As of today we count 325 catalogues and 12291 patterns translated into English (UK/cm). 12291
We work hard to bring you the best knitting and crochet have to offer, inspiration and advice as well as great quality yarns at incredible prices! Would you like to use our patterns for other than personal use? You can read what you are allowed to do in the Copyright text at the bottom of all our patterns. Happy crafting!
Post a comment to pattern DROPS 170-8
We would love to hear what you have to say about this pattern!
If you want to leave a question, please make sure you select the correct category in the form below, to speed up the answering process. Required fields are marked *.